以前刚接触Vue的时候手撸了一个 轮播图 效果还是不错的
但是在学习过程中,越发发现组件的用处
所以在书上源码的加持下 添油加醋 写了一个轮播组件
注释很清晰 供有缘人查看
  1 <template>
  2   <div class="swiper-container">
  3     <!-- 用动态样式换图片 -->
  4     <!-- 通过div的方式展示图片可以减轻浏览器负担 -->
  5
  6     <!-- 进行过渡 -->
  7     <transition-group name="images" tag="div" class="swiper-images">
  8       <!-- 通过v-for来实现多个盒子的注入 -->
  9       <div
 10         v-for="(slide, index) in slides"
 11         :key="slides.indexOf(slide)"
 12         :style="{ backgroundImage: 'url(' + slide + ')' }"
 13         class="swiper-image"
 14         v-show="index === value"
 15         @mouseover="toggleIndex(index)"
 16         @mouseout="initTimer"
 17       ></div>
 18     </transition-group>
 19
 20     <!-- 切换按钮 -->
 21     <div class="swiper-paginator">
 22       <!-- slides 是父组件传入的参数 -->
 23
 24       <span
 25         v-for="(slide, index) in slides"
 26         :key="index"
 27         class="paginator-item"
 28         :class="{ 'paginator-current': index === value }"
 29         @mouseover="toggleIndex(index)"
 30         @mouseout="initTimer"
 31       ></span>
 32     </div>
 33
 34     <div
 35       class="arrow arrow_left"
 36       @click="onLeft"
 37       @mouseover="toggleIndex()"
 38       @mouseout="initTimer"
 39     >
 40       <div></div>
 41     </div>
 42     <div
 43       class="arrow arrow_right"
 44       @click="onRight"
 45       @mouseover="toggleIndex()"
 46       @mouseout="initTimer"
 47     >
 48       <div></div>
 49     </div>
 50   </div>
 51 </template>
 52
 53 <script>
 54 // 制造组件的第一部分 其实就是想清楚 变量
 55 // 要得到相应的 变量 ; 要从上级组件得到的 参数
 56 // 这里 因为是 轮播图 所以
 57 //  1 存放图片路径的图片数组 slides
 58 //  2 当前的图片标志 (页码) value
 59 //  3 自动轮播的时间间隔 interval
 60 // 这些我们都可以从上级的组件里面得到
 61
 62 export default {
 63   name: "Swiper",
 64   props: {
 65     slides: {
 66       type: Array,
 67       validator(value) {
 68         //  判断是否每一个元素 都是 满足String 的条件
 69         return value.every(
 70           (item) => Object.prototype.toString.call(item) === "[object String]"
 71         );
 72       },
 73     },
 74     value: {
 75       //  Value 标志当前的图片 默认是从 0 开始 ( props 里面的 value 属性默认接受父组件的v-model值 )
 76       type: Number,
 77       default: 0,
 78     },
 79     interval: {
 80       //  间隔也是一个 数字类型的变量 默认从 4 开始
 81       type: Number,
 82       default: 4,
 83     },
 84   },
 85   data() {
 86     return {
 87       //  在 data 里面设置一个 计时器 还未被初始化
 88       timer: null,
 89     };
 90   },
 91
 92   mounted() {
 93     // 每次挂载好了 就开启计时器
 94     this.initTimer();
 95   },
 96   methods: {
 97     //  初始化计时器
 98     initTimer() {
 99       this.timer = setInterval(() => {
100         //  父组件的 input 的参数
101         this.$emit("input", (this.value + 1) % this.slides.length);
102       }, this.interval * 1000);
103     },
104     //  每当 hover 和 点击到了 按钮 就开始 执行下面的操作
105     toggleIndex(index) {
106       // 父组件的index 为当前的的index 如果 没有参数 则就是原来的数值 注意0也是没得
107       this.$emit("input", index >= 0 ? index : this.value);
108       clearInterval(this.timer); // 清除计时器
109     },
110     // 箭头点击
111     // 左箭头
112     onLeft() {
113       // 自己做一下数学运算
114       this.$emit(
115         "input",
116         this.value - 1 >= 0
117           ? (this.value - 1) % this.slides.length
118           : (this.slides.length - Math.abs(this.value - 1)) % this.slides.length
119       );
120       clearInterval(this.timer); // 清除计时器
121     },
122     // 右箭头
123     onRight() {
124       this.$emit("input", (this.value + 1) % this.slides.length);
125       clearInterval(this.timer); // 清除计时器
126     },
127   },
128 };
129 </script>
130
131 <style scoped>
132 /* scoped 表明该 css 仅仅只适用于 本组件 */
133 .swiper-container {
134   /* 容纳的大盒子 子绝 父相 */
135   position: relative;
136   width: 100%;
137   height: 100%;
138 }
139 .swiper-images {
140   height: 100%;
141   width: 100%;
142 }
143 .swiper-image {
144   height: 100%;
145   width: 100%;
146   background-size: cover;
147   background-repeat: no-repeat;
148   /* 让几个 image 盒子重叠 */
149   position: absolute;
150 }
151 .swiper-paginator {
152   margin-top: -30px;
153   padding-right: 5px;
154   text-align: right;
155   list-style: none;
156 }
157 .paginator-item {
158   cursor: pointer;
159   display: inline-block;
160   width: 16px;
161   height: 16px;
162   margin-left: 5px;
163   border-radius: 50%;
164   background-color: #000;
165   opacity: 0.3;
166 }
167 .paginator-current {
168   background-color: #fff; /* 当前激活的幻灯片切换按钮样式 */
169   opacity: 0.6;
170 }
171
172 /* 箭头 */
173 .arrow {
174   display: block;
175   width: 45px;
176   height: 108px;
177   position: absolute;
178   top: 35%;
179   cursor: pointer;
180   right: -20%;
181   background: linear-gradient(
182     to left,
183     rgba(0, 0, 0, 0.3) 5%,
184     rgba(0, 0, 0, 0) 95%
185   );
186   transition: all 0.5s;
187 }
188 .arrow_left {
189   /*//左边距离父盒子边框*/
190   left: -45px;
191   background: linear-gradient(
192     to right,
193     rgba(0, 0, 0, 0.3) 5%,
194     rgba(0, 0, 0, 0) 95%
195   );
196 }
197 .arrow_right {
198   /*//右边距离父盒子边框*/
199   right: -45px;
200   background: linear-gradient(
201     to left,
202     rgba(0, 0, 0, 0.3) 5%,
203     rgba(0, 0, 0, 0) 95%
204   );
205 }
206 .arrow:hover {
207   background: linear-gradient(
208     to left,
209     rgba(171, 218, 244, 0.3) 5%,
210     rgba(171, 218, 244, 0) 95%
211   );
212 }
213
214 .arrow div {
215   display: block;
216   /* 箭头图片的路径 */
217   background-image: url(/static/images/arrow.png);
218   background-repeat: no-repeat;
219   height: 36px;
220   width: 23px;
221   margin: 36px auto;
222 }
223
224 .arrow_left div {
225   background-position: -23px 0px;
226 }
227 .arrow_right div {
228   background-position: 0px 0px;
229 }
230
231 /* 过渡效果 */
232 .images-enter,
233 .images-leave-to {
234   opacity: 0;
235   /* transform:translateX(30px) */
236 }
237 .images-enter-active,
238 .images-leave-active {
239   transition-property: all;
240   /* transition-delay: 100ms; */
241   transition-duration: 500ms;
242   transition-timing-function: linear;
243 }
244 .images-leave,
245 .images-enter-to {
246   /* transform:translateX(0px); */
247   opacity: 1;
248 }
249 </style>
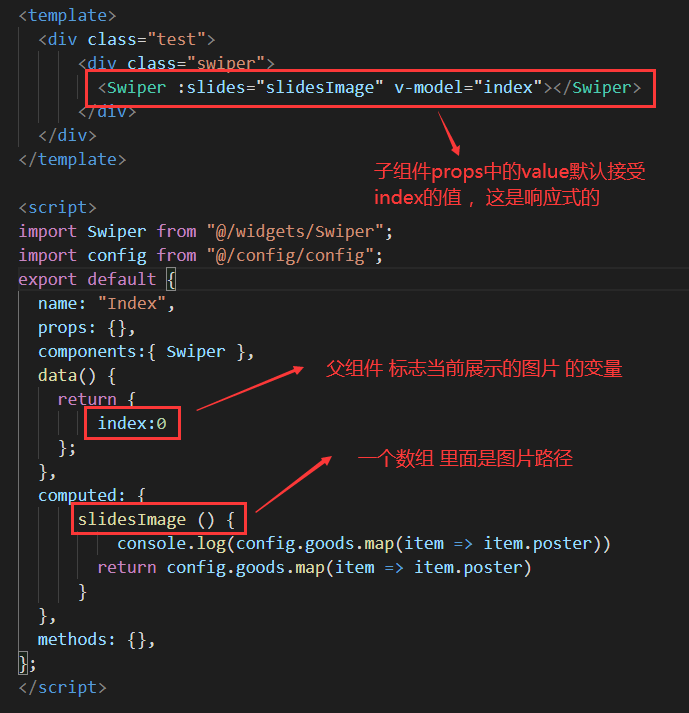
当然这个组件应该怎么用呢,
如下图
接着是我写这个组件的时候遇到的问题
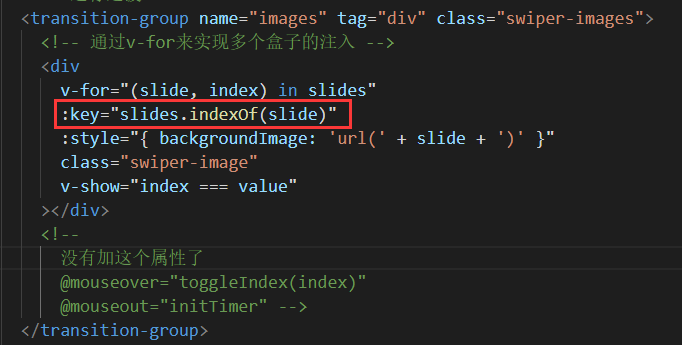
1.trasnsition-group 没有只套用在 v-for 的一个标签上
当时是这样的,v-for那个div 外层还有一个 大div , 我给套在大盒子上了,结果就出错了
2.js 表示假值的一般来说 就是没得的东西 0 也是假值
加了注释的地方就是我出错的地方

当时没有想到这个,原来的代码是 框起来的那个部分
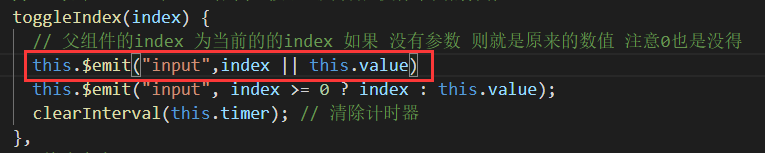
如果 传入 0 的时候,如果参数 index 为 0 的话,就会发生意想不到的事情
表现在这个组件里面就是没办法点击到第一个小圆点,因为传到的参数是 0
3.还有一个错误,就是
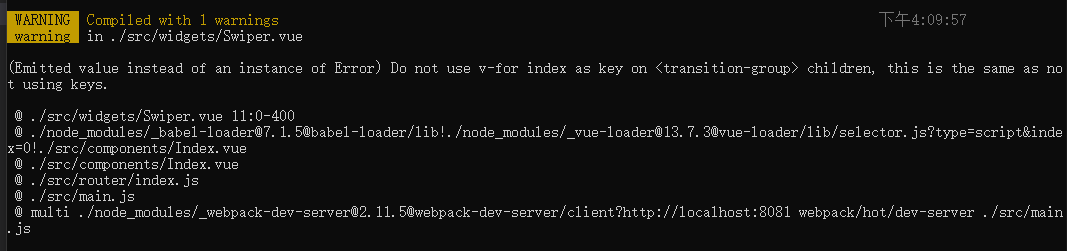
transition-group提示key值没有弄对,其实这里直接 这样就能解决 或者 :key ="slide"
最后呢
对比原来写的一个代码,我发现现在这个组件的代码更加美观,原来那个太小孩子了 感觉
原来写的 https://www.cnblogs.com/WaterMealone/articles/14332704.html
注:
可能有朋友在用的时候会发现,小圆点有点奇怪,这个我也不知道怎么去处理,因为 span 的规定范围太小了,导致了快速滑动的时候 判定老是更新
所以 会有一种反应不过来的 现象
然后这个是箭头的图片

这个是整个项目的图片
总结
每天进步一点点
今天再撸一下代码