说明
主要功能:
1) 分割文件, 生成下载任务;
2) 定时任务: 检索需要下载的任务, 利用多线程下载并限制下载速度;
3) 定时任务: 检索可合并的文件, 把n个文件合并为完整的文件.
GitHub: https://github.com/vergilyn/SpringBootDemo
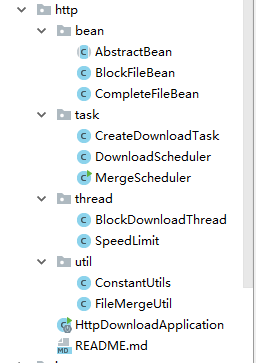
代码结构:
一、获取远程资源ContentLength、FileName
本来以为很容易, 但如果想较好的得到contentLength、fileName其实很麻烦,主要要看download-url是怎么样的. 大致有3种:
1) download-url: www.xxx.com/xxxx.exe,这种是最简单的.直接通过HttpURLConnection.getContentLength()就可以获取到, FileName则直接解析download-url(或从Content-Disposition中解析得到fileName).
2) download-url: www.xxx.com/download.html?fileId=xxx, 这个实际响应的和1)一样, 只是无法直接解析download-url得到fileName, 只能从Content-Disposition中解析得到fileName.
3) download-url跟2)类似, 但会"重定向"或"响应"一个真实下载地址, 那么就需要具体分析.
二、分割下载文件
原意: 把一个大文件分割成n个小文件, 分别下载这n个小文件. 尽可能减少需要重新下载的大小. 其实就是想要"断点下载"(或称"断点续传");
但是, 后面想了下这种"分块"感觉好蠢.更理想的实现思路可能是:
直接往完整文件file.exe.tmp写,每次启动下载的时候读取这个file.exe.tmp的size,请求下载的Range就是bytes={size}-{contentLength}.
代码说明: 生成n个下载任务, 保存每个下载任务的Range: bytes={beginOffse}-{endOffset}
 private void createSplitFile(CompleteFileBean fileBean){
        String key = ConstantUtils.keyBlock(fileBean.getId());
        String fileId = fileBean.getId();
        String fileName = fileBean.getFileName();
        String url = fileBean.getDownloadUrl();
        long contentLength = fileBean.getContentLength();

        BlockFileBean block;
        List<String> blocks = new ArrayList<>();

        if(contentLength <= ConstantUtils.UNIT_SIZE){
            block = new BlockFileBean(fileId, getBlockName(fileName, 1), url, 0, contentLength );
            blocks.add(JSON.toJSONString(block));
        }else{
            long begin = 0;
            int index = 1;
            while(begin < contentLength){
                long end = begin + ConstantUtils.UNIT_SIZE <= contentLength ? begin + ConstantUtils.UNIT_SIZE : contentLength;
                block = new BlockFileBean(fileId, getBlockName(fileName, index++), url, begin, end );
                blocks.add(JSON.toJSONString(block));
                begin += ConstantUtils.UNIT_SIZE;
            }
        }

        if(blocks.size() > 0){
            // 模拟保存数据库: 生成每个小块的下载任务, 待定时器读取任务下载
            redisTemplate.opsForList().rightPushAll(key, blocks);
            // 保存需要执行下载的任务, 实际应用中是通过sql得到.
            redisTemplate.opsForList().rightPushAll(ConstantUtils.keyDownloadTask(), key);
        }
    }
三、多线程下载
线程池、线程的知识请自行baidu/google;(我也不是很了解啊 >.<!)
实际中我只特别去了解了下:ArrayBlockingQueue、CallerRunsPolicy, 根据我的理解(不一定对): 只有CallerRunsPolicy比较适用, 但当ArrayBlockingQueue等待队列达到满值时并且有新任务A-TASK进来时,CallerRunsPolicy会强制中断当前主线程去执行这个新任务A-TASK, 见:https://www.cnblogs.com/lic309/p/4564507.html.
这是否意味着我可能有"某块"下到一半被强制中断了?虽然这下载任务并未被标记成已下载完, 但如果有大量这种中断操作, 意味着会重新去下载这部分数据.(这也反映出另外中"断点下载"思路可能更好)
所以, 实际中我把任务等待队列设置成一定比总任务数大. 因为实际中我每天只执行一次下载定时任务, 每次只下载700个小块(即700条下载任务), 所以ArrayBlockingQueue我设置的800. 并且我没有保留核心线程
        ThreadPoolExecutor executor = new ThreadPoolExecutor(
                2,
                6,
                30,
                TimeUnit.MINUTES,
                new ArrayBlockingQueue<Runnable>(100),
                new ThreadPoolExecutor.CallerRunsPolicy()
        );
        executor.allowCoreThreadTimeOut(true);
分块下载, 只需用到Http请求的Range: bytes={beginOffse}-{endOffset}.
至于哪种"下载"写法更好, 并未有太多的深究, 所以不知道具体那种"下载"的写法会更好, 但看到很多都是RandomAccessFile实现的:
  @Override
    public void run() {
        byte[] buffer = new byte[1024]; // 缓冲区大小
        long totalSize = block.getEndOffset() - block.getBeginOffset();
        long begin = System.currentTimeMillis();
        InputStream is = null;
        RandomAccessFile os = null;
        try {
            URLConnection conn = new URL(block.getDownloadUrl()).openConnection();
            // -1: 因为bytes=0-499, 表示contentLength=500.
            conn.setRequestProperty(HttpHeaders.RANGE, "bytes=" + block.getBeginOffset() + "-" + (block.getEndOffset() - 1));
            conn.setDoOutput(true);

            is = conn.getInputStream();

            File file = new File(tempPath + File.separator + block.getBlockFileName());
            os = new RandomAccessFile(file, "rw");

            int len;
            while((len = is.read(buffer)) != -1) {
                os.write(buffer, 0, len);
            }

            os.close();

        } catch (IOException e) {
            e.printStackTrace();
            System.out.println(block.getBlockFileName() + " download error: " + e.getMessage());
            return; // 注意要return
        } finally {
            IOUtils.closeQuietly(is);
            IOUtils.closeQuietly(os);
        }
        long end = System.currentTimeMillis() ;
        // 简单计算下载速度, 我把连接时间也算在内了
        double speed = totalSize / 1024D / (end - begin + 1) * 1000D; // +1: 避免0
        System.out.println(block.getBlockFileName() + " aver-speed: " + speed + " kb/s");

        // FIXME: 实际中需要更新表BlockFileBean的信息, 标记分块已下载完成, 记录平均下载速度、下载完成时间等需要的信息
        // (省略)更新表BlockFileBean
    }
四、限制下载速度
看了下网上说的如何现在下载速度, 思路:
假设下载速度上限是m(kb/s), 发送n个字节的理论耗时: n / 1024 / m (kb/s); 然而实际耗时 t(s), 那么则线程需要休眠 n / 1024 / m - t;
我也只是看到都是用这种方式来限速, 但我怎么觉得"很蠢", (个人理解)这种实现其实实际下载速度还是满速, 而且会频繁的存在线程的调度.
public class SpeedLimit {
    private final Long speed;
    // 已下载大小
    private Long writeSize = 0L;
    private long beginTime;
    private long endTime;


    public SpeedLimit(Long speed, long beginTime) {
        this.speed = speed;
        this.beginTime = beginTime;
        this.endTime = beginTime;
    }

    public void updateWrite(int size){
        this.writeSize += size;
    }

    public void updateEndTime(long endTime) {
        this.endTime = endTime;
    }

    public Long getTotalSize() {
        return totalSize;
    }

    public Long getSpeed() {
        return speed;
    }

    public Long getWriteSize() {
        return writeSize;
    }

    public long getBeginTime() {
        return beginTime;
    }

    public long getEndTime() {
        return endTime;
    }
}
    @Override
    public void run() {
        byte[] buffer = new byte[1024]; // 缓冲区大小
        long totalSize = block.getEndOffset() - block.getBeginOffset();
        long begin = System.currentTimeMillis();
        InputStream is = null;
        RandomAccessFile os = null;
        try {
            // FIXME: 对下载(对文件操作)并没有太多了解, 所以不知道具体那种"下载"的写法会更好, 但看到很多都是RandomAccessFile实现的.
            URLConnection conn = new URL(block.getDownloadUrl()).openConnection();
            // -1: 因为bytes=0-499, 表示contentLength=500.
            conn.setRequestProperty(HttpHeaders.RANGE, "bytes=" + block.getBeginOffset() + "-" + (block.getEndOffset() - 1));
            conn.setDoOutput(true);

            is = conn.getInputStream();

            File file = new File(tempPath + File.separator + block.getBlockFileName());
            os = new RandomAccessFile(file, "rw");

            int len;
            // 是否限制下载速度
            if(ConstantUtils.IS_LIMIT_SPEED){ // 限制下载速度

                /* 思路:
                 *  假设下载速度上限是m(kb/s), 发送n个字节的理论耗时: n / 1024 / m; 然而实际耗时 t(s), 那么则需要休眠 n / 1024 / m - t;
                 */
                // 需要注意: System.currentTimeMillis(), 可能多次得到的时间相同, 详见其API说明.
                SpeedLimit sl = new SpeedLimit(ConstantUtils.DOWNLOAD_SPEED, System.currentTimeMillis());

                while((len = is.read(buffer)) != -1) {
                    os.write(buffer, 0, len);

                    sl.updateWrite(len);
                    sl.updateEndTime(System.currentTimeMillis());

                    long timeConsuming = sl.getEndTime() - sl.getBeginTime() + 1; // +1: 避免0

                    // 当前平均下载速度: kb/s, 实际中可以直接把 b/ms 约等于 kb/ms (减少单位转换逻辑)
                    double currSpeed = sl.getWriteSize() / 1024D / timeConsuming * 1000D;
                    if(currSpeed > sl.getSpeed()){ // 当前下载速度超过限制速度
                        // 休眠时长 = 理论限速时常 - 实耗时常;
                        double sleep = sl.getWriteSize() / 1024D / sl.getSpeed() * 1000D - timeConsuming;
                        if(sleep > 0){
                            try {
                                Thread.sleep((long) sleep);
                            } catch (InterruptedException e) {
                                e.printStackTrace();
                            }
                        }
                    }

                }
            }else{
                while((len = is.read(buffer)) != -1) {
                    os.write(buffer, 0, len);
                }
            }

            os.close();

        } catch (IOException e) {
            e.printStackTrace();
            System.out.println(block.getBlockFileName() + " download error: " + e.getMessage());
            return; // 注意要return
        } finally {
            IOUtils.closeQuietly(is);
            IOUtils.closeQuietly(os);
        }
        long end = System.currentTimeMillis() ;
        // 简单计算下载速度, 我把连接时间也算在内了
        double speed = totalSize / 1024D / (end - begin + 1) * 1000D; // +1: 避免0
        System.out.println(block.getBlockFileName() + " aver-speed: " + speed + " kb/s");

        // FIXME: 实际中需要更新表BlockFileBean的信息, 标记分块已下载完成, 记录平均下载速度、下载完成时间等需要的信息
        // (省略)更新表BlockFileBean
    }
五、合并文件
需要注意:
1) 合并文件的顺序;
2) stream一定要关闭;
3) 不要把一个大文件读取到内存中.
我乱七八糟写了(或看到)以下4种写法,并没去深究哪种更理想.可能比较推荐的RandomAccessFile或者channelTransfer的形式.
(以下代码中的stream并不一定都关闭了, 可以检查一遍)
public class FileMergeUtil {

    /**
     * 利用FileChannel.write()合并文件
     *
     * @param dest 最终文件保存完整路径
     * @param files 注意排序
     * @param capacity {@link ByteBuffer#allocate(int)}
     * @see <a href="http://blog.csdn.net/skiof007/article/details/51072885">http://blog.csdn.net/skiof007/article/details/51072885<a/>
     * @see <a href="http://blog.csdn.net/seebetpro/article/details/49184305">ByteBuffer.allocate()与ByteBuffer.allocateDirect()方法的区别<a/>
     */
    public static void channelWrite(String dest, File[] files, int capacity) {
        capacity = capacity <= 0 ? 1024 : capacity;
        FileChannel outChannel = null;
        FileChannel inChannel = null;
        FileOutputStream os = null;
        FileInputStream is = null;
        try {
            os = new FileOutputStream(dest);
            outChannel = os.getChannel();
            for (File file : files) {
                is = new FileInputStream(file);
                inChannel = is.getChannel();
                ByteBuffer bb = ByteBuffer.allocate(capacity);
                while (inChannel.read(bb) != -1) {
                    bb.flip();
                    outChannel.write(bb);
                    bb.clear();
                }
                inChannel.close();
                is.close();
            }
        } catch (IOException ioe) {
            ioe.printStackTrace();
        } finally {
            try {
                if (outChannel != null) {
                    outChannel.close();
                }
                if (inChannel != null) {
                    inChannel.close();
                }
                if (os != null) {
                    os.close();
                }
                if (is != null) {
                    is.close();
                }
            } catch (IOException e) {
                e.printStackTrace();
            }
        }
    }

    /**
     * 利用FileChannel.transferFrom()合并文件
     * @param dest 最终文件保存完整路径
     * @param files 注意排序
     * @see <a href="http://blog.csdn.net/tobacco5648/article/details/52958046">http://blog.csdn.net/tobacco5648/article/details/52958046</a>
     */
    public static void channelTransfer(String dest, File[] files) {
        FileChannel outChannel = null;
        FileChannel inChannel = null;
        FileOutputStream os = null;
        FileInputStream is = null;
        try {
            os = new FileOutputStream(dest);
            outChannel = os.getChannel();
            for (File file : files) {
                is = new FileInputStream(file);
                inChannel = is.getChannel();
                outChannel.transferFrom(inChannel, outChannel.size(), inChannel.size());

                inChannel.close();
                is.close();
            }
        } catch (IOException ioe) {
            ioe.printStackTrace();
        } finally {
            try {
                if (outChannel != null) {
                    outChannel.close();
                }
                if (inChannel != null) {
                    inChannel.close();
                }
                if (os != null) {
                    os.close();
                }
                if (is != null) {
                    is.close();
                }
            } catch (IOException e) {
                e.printStackTrace();
            }

        }
    }

    /**
     * 利用apache common-IO, {@link IOUtils#copyLarge(Reader, Writer, char[])}.
     * <p>看实现代码, 不就是普通write()? 没发现又什么特别的优化, 所以感觉此方式性能/效率可能并不好.</p>
     * @param dest
     * @param files
     * @param buffer
     */
    public static void apache(String dest, File[] files, int buffer){
        OutputStream os = null;
        try {
            byte[] buf = new byte[buffer];
            os = new FileOutputStream(dest);
            for (File file : files) {
                InputStream is = new FileInputStream(file);
                IOUtils.copyLarge(is, os, buf);
                is.close();
            }
        } catch (IOException ioe) {
            ioe.printStackTrace();
        } finally {
            if (os != null) {
                try {
                    os.close();
                } catch (IOException e) {
                    e.printStackTrace();
                }
            }
        }
    }

    /**
     * 利用randomAccessFile合并文件.
     * <pre>虽然用了RandomAccessFile, 但还是普通的write(), 未了解其性能....<pre/>
     * @param dest
     * @param files
     * @param buffer
     */
    public static void randomAccessFile(String dest, List<File> files, int buffer){
        RandomAccessFile in = null;
        try {
            in = new RandomAccessFile(dest, "rw");
            in.setLength(0);
            in.seek(0);

            byte[] bytes = new byte[buffer];

            int len = -1;
            for (File file : files) {
                RandomAccessFile out = new RandomAccessFile(file, "r");
                while((len = out.read(bytes)) != -1) {
                    in.write(bytes, 0, len);
                }
                out.close();
            }
        } catch (IOException e) {
            e.printStackTrace();
        } finally {
            if(in != null){
                try {
                    in.close();
                } catch (IOException e) {
                    e.printStackTrace();
                }
            }
        }

    }
}