一.如何将一个field索引两次来解决字符串排序问题
如果对一个string field进行排序,结果往往不准确,因为分词后是多个单词,再排序就不是我们想要的结果了
通常解决方案是,将一个string field建立两次索引,一个分词,用来进行搜索;一个不分词,用来进行排序
PUT /website
{
"mappings": {
"article": {
"properties": {
"title": {
"type": "text",
"fields": {
"raw": {
"type": "string",
"index": "not_analyzed"
}
},
"fielddata": true
},
"content": {
"type": "text"
},
"post_date": {
"type": "date"
},
"author_id": {
"type": "long"
}}}}
}
PUT /website/article/1
{
"title": "first article",
"content": "this is my second article",
"post_date": "2017-01-01",
"author_id": 110
}
{
"took": 2,
"timed_out": false,
"_shards": {
"total": 5,
"successful": 5,
"failed": 0
},
"hits": {
"total": 3,
"max_score": 1,
"hits": [
{
"_index": "website",
"_type": "article",
"_id": "2",
"_score": 1,
"_source": {
"title": "first article",
"content": "this is my first article",
"post_date": "2017-02-01",
"author_id": 110
}
},
{
"_index": "website",
"_type": "article",
"_id": "1",
"_score": 1,
"_source": {
"title": "second article",
"content": "this is my second article",
"post_date": "2017-01-01",
"author_id": 110
}
},
{
"_index": "website",
"_type": "article",
"_id": "3",
"_score": 1,
"_source": {
"title": "third article",
"content": "this is my third article",
"post_date": "2017-03-01",
"author_id": 110
}
}
]
}
}
GET /website/article/_search
{
"query": {
"match_all": {}
},
"sort": [
{
"title.raw": {
"order": "desc"
}
}
]
}
二.相关度评分TF&IDF算法独家解密
1、算法介绍
relevance score算法,简单来说,就是计算出,一个索引中的文本,与搜索文本,他们之间的关联匹配程度
Elasticsearch使用的是 term frequency/inverse document frequency算法,简称为TF/IDF算法
Term frequency:搜索文本中的各个词条在field文本中出现了多少次,出现次数越多,就越相关
搜索请求:hello world
doc1:hello you, and world is very good
doc2:hello, how are you
Inverse document frequency:搜索文本中的各个词条在整个索引的所有文档中出现了多少次,出现的次数越多,就越不相关
搜索请求:hello world
doc1:hello, today is very good
doc2:hi world, how are you
比如说,在index中有1万条document,hello这个单词在所有的document中,一共出现了1000次;world这个单词在所有的document中,一共出现了100次
doc2更相关
Field-length norm:field长度,field越长,相关度越弱
搜索请求:hello world
doc1:{ "title": "hello article", "content": "babaaba 1万个单词" }
doc2:{ "title": "my article", "content": "blablabala 1万个单词,hi world" }
hello world在整个index中出现的次数是一样多的
doc1更相关,title field更短
2、_score是如何被计算出来的
GET /test_index/test_type/_search?explain
{
"query": {
"match": {
"test_field": "test hello"
}
}
}
3、分析一个document是如何被匹配上的
GET /test_index/test_type/6/_explain
{
"query": {
"match": {
"test_field": "test hello"
}
}
}
三.内核级知识点之doc value初步探秘
搜索的时候,要依靠倒排索引;排序的时候,需要依靠正排索引,看到每个document的每个field,然后进行排序,所谓的正排索引,其实就是doc values
在建立索引的时候,一方面会建立倒排索引,以供搜索用;一方面会建立正排索引,也就是doc values,以供排序,聚合,过滤等操作使用
doc values是被保存在磁盘上的,此时如果内存足够,os会自动将其缓存在内存中,性能还是会很高;如果内存不足够,os会将其写入磁盘上
doc1: hello world you and me
doc2: hi, world, how are you
word doc1 doc2
hello *
world * *
you * *
and *
me *
hi *
how *
are *
hello you --> hello, you
hello --> doc1
you --> doc1,doc2
doc1: hello world you and me
doc2: hi, world, how are you
sort by age
doc1: { "name": "jack", "age": 27 }
doc2: { "name": "tom", "age": 30 }
document name age
doc1 jack 27
doc2 tom 30
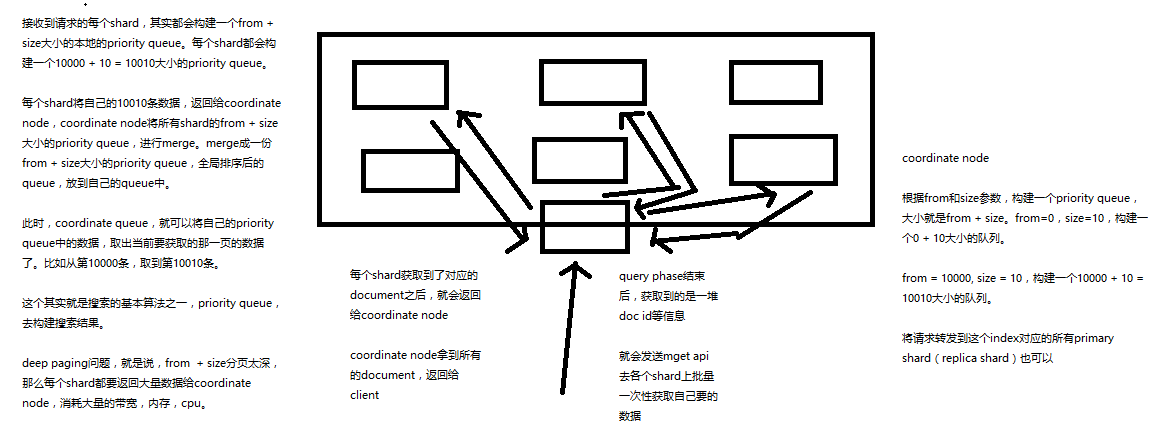
四.分布式搜索引擎内核解密之query phase
1、query phase
(1)搜索请求发送到某一个coordinate node,构构建一个priority queue,长度以paging操作from和size为准,默认为10
(2)coordinate node将请求转发到所有shard,每个shard本地搜索,并构建一个本地的priority queue
(3)各个shard将自己的priority queue返回给coordinate node,并构建一个全局的priority queue
2、replica shard如何提升搜索吞吐量
一次请求要打到所有shard的一个replica/primary上去,如果每个shard都有多个replica,那么同时并发过来的搜索请求可以同时打到其他的replica上去

五.分布式搜索引擎内核解密之fetch phase
1、fetch phbase工作流程
(1)coordinate node构建完priority queue之后,就发送mget请求去所有shard上获取对应的document
(2)各个shard将document返回给coordinate node
(3)coordinate node将合并后的document结果返回给client客户端
2、一般搜索,如果不加from和size,就默认搜索前10条,按照_score排序

六.搜索相关参数梳理以及bouncing results问题解决方案
1、preference
决定了哪些shard会被用来执行搜索操作
_primary, _primary_first, _local, _only_node:xyz, _prefer_node:xyz, _shards:2,3
bouncing results问题,两个document排序,field值相同;不同的shard上,可能排序不同;每次请求轮询打到不同的replica shard上;每次页面上看到的搜索结果的排序都不一样。这就是bouncing result,也就是跳跃的结果。
搜索的时候,是轮询将搜索请求发送到每一个replica shard(primary shard),但是在不同的shard上,可能document的排序不同
解决方案就是将preference设置为一个字符串,比如说user_id,让每个user每次搜索的时候,都使用同一个replica shard去执行,就不会看到bouncing results了
2、timeout,主要就是限定在一定时间内,将部分获取到的数据直接返回,避免查询耗时过长
3、routing,document文档路由,_id路由,routing=user_id,这样的话可以让同一个user对应的数据到一个shard上去
4、search_type
default:query_then_fetch
dfs_query_then_fetch,可以提升revelance sort精准度
七.基于scoll技术滚动搜索大量数据
如果一次性要查出来比如10万条数据,那么性能会很差,此时一般会采取用scoll滚动查询,一批一批的查,直到所有数据都查询完处理完
使用scoll滚动搜索,可以先搜索一批数据,然后下次再搜索一批数据,以此类推,直到搜索出全部的数据来
scoll搜索会在第一次搜索的时候,保存一个当时的视图快照,之后只会基于该旧的视图快照提供数据搜索,如果这个期间数据变更,是不会让用户看到的
采用基于_doc进行排序的方式,性能较高
每次发送scroll请求,我们还需要指定一个scoll参数,指定一个时间窗口,每次搜索请求只要在这个时间窗口内能完成就可以了
GET /test_index/test_type/_search?scroll=1m
{
"query": {
"match_all": {}
},
"sort": [ "_doc" ],
"size": 3
}
{
"_scroll_id": "DnF1ZXJ5VGhlbkZldGNoBQAAAAAAACxeFjRvbnNUWVZaVGpHdklqOV9zcFd6MncAAAAAAAAsYBY0b25zVFlWWlRqR3ZJajlfc3BXejJ3AAAAAAAALF8WNG9uc1RZVlpUakd2SWo5X3NwV3oydwAAAAAAACxhFjRvbnNUWVZaVGpHdklqOV9zcFd6MncAAAAAAAAsYhY0b25zVFlWWlRqR3ZJajlfc3BXejJ3",
"took": 5,
"timed_out": false,
"_shards": {
"total": 5,
"successful": 5,
"failed": 0
},
"hits": {
"total": 10,
"max_score": null,
"hits": [
{
"_index": "test_index",
"_type": "test_type",
"_id": "8",
"_score": null,
"_source": {
"test_field": "test client 2"
},
"sort": [
0
]
},
{
"_index": "test_index",
"_type": "test_type",
"_id": "6",
"_score": null,
"_source": {
"test_field": "tes test"
},
"sort": [
0
]
},
{
"_index": "test_index",
"_type": "test_type",
"_id": "AVp4RN0bhjxldOOnBxaE",
"_score": null,
"_source": {
"test_content": "my test"
},
"sort": [
0
]
}
]
}
}
获得的结果会有一个scoll_id,下一次再发送scoll请求的时候,必须带上这个scoll_id
GET /_search/scroll
{
"scroll": "1m",
"scroll_id" : "DnF1ZXJ5VGhlbkZldGNoBQAAAAAAACxeFjRvbnNUWVZaVGpHdklqOV9zcFd6MncAAAAAAAAsYBY0b25zVFlWWlRqR3ZJajlfc3BXejJ3AAAAAAAALF8WNG9uc1RZVlpUakd2SWo5X3NwV3oydwAAAAAAACxhFjRvbnNUWVZaVGpHdklqOV9zcFd6MncAAAAAAAAsYhY0b25zVFlWWlRqR3ZJajlfc3BXejJ3"
}
11,4,7
3,2,1
20
scoll,看起来挺像分页的,但是其实使用场景不一样。分页主要是用来一页一页搜索,给用户看的;scoll主要是用来一批一批检索数据,让系统进行处理的