一、 smarty的特点
速度:相对于其他模板引擎,速度较快
编译型:在下次访问模板时直接访问编译文件,不再进行模板重新编译
缓存技术:可以将用户最终看到的HTML文件缓存成一个静态HTML
插件技术:smarty可以自定义插件,插件其实是一些自定义函数
强大的表现逻辑:模板中可以使用if/else if/end if/foreach等
二、 smarty的基本使用
(1)index.php页面输入如下
<?php
//1.引入smarty类
include 'smarty/libs/Smarty.class.php';
//2.实例化smarty对象
$smarty = new Smarty();
//3.设置相关属性
$smarty->template_dir = "templates"; //模板目录
$smarty->compile_dir = "templates_c"; //编译目录
//修改定界符
$smarty->left_delimiter = '<{';
$smarty->right_delimiter = '}>';
//4.分配数据
$smarty->assign("title", "smarty模板引擎");
$smarty->assign("content", "smarty模板引擎的hello world");
//5.载入视图
$smarty->display('index.html');
(2)在视图页面index.html输入如下
<!DOCTYPE html>
<html lang="en">
<head>
<meta charset="UTF-8">
<title>{$title}</title>
</head>
<body>
<h2>{$title}</h2>
<p>{$content}</p>
</body>
</html>
二、 smarty的基本语法
(1)定界符
smarty中默认的定界符是{ }
① 任何在定界符之外的内容都是静态的,不会被解析(包括php代码)
② 定界符开始的”{”符号和变量$之前不能有空格,例如{ $title}不会被解析
③ 页面中的css或者js的{ }也会被认为是定界符,发生冲突,处理方式如下:
a ) 可以在{开头的地方加上空格
b ) css和js以外部引入的方式添加
c ) 使用内置函数{literal} {需要解析的css或js} {/literal}
④ 修改定界符,在smarty配置的php页面中输入如下代码:
$smarty->left_delimiter = '<{';
$smarty->right_delimiter = '}>';
(2)注释
在index.html视图页面中使用<*注释内容*>来书写smarty的注释
(3)变量
Smarty中的变量来源主要有以下三种:
① 通过PHP程序中的assign函数分配
② 保留变量
③ 配置变量
① assign变量
php中的8种数据类型:
422阵容
4:四种标量类型;整型、浮点型、字符串、布尔型
2:两种复合类型;数组、对象
2:两种特殊类型,资源和null
分配assign变量:
$user=array(“tom”,”jim”,”jack”);
$smarty->assign(‘user’,$user);
在视图页面中输入{$user[0]},或者点语法{$user.0}可得到相应的值此处为tom
② 保留变量
无需在php中分配,直接可以在模板页面中使用的变量。包括php中的超级全局变量,比如:$_GET,$_SERVER,以及smarty自带的一些变量
使用格式:{$smarty.保留变量名}
示例:{$smarty.server.SERVER_NAME}
③ 配置变量
无需在php程序中分配,但不同于保留变量,它是通过配置文件配置的
示例如下:创建配置文件config.conf,输入如下内容 ,配置文件必须创建在文件夹名configs的文件夹中
copyright="版权信息" //配置文件中的双引号可以去除
police=备案信息
[nationnality]
name=nationnality
[time]
name=time
php页面调用smarty引擎
<?php
//1.引入smarty类
include 'smarty/libs/Smarty.class.php';
//2.实例化smarty对象
$smarty = new Smarty();
//3.设置相关属性
$smarty->template_dir = "templates";
$smarty->compile_dir = "templates_c";
$smarty->display('config.html');
调用配置信息:
在视图页面中输入如下内容即可调用配置信息
{config_load file="test.conf" section="time"} //引用配置文件,并注明使用time这个部分
<h2>{#copyright#}</h2>
<h2>{$smarty.config.police}</h2>
<h2>{#name#}</h2>
//因为配置文件中有两个name,加载文件已指明为time部分,所以此处输出time
(4)函数(smarty中函数主要分为三类)
① 内置函数
1. {if} {elseif} {else}
每一个{if}必须有配对的关闭标签:{/if}
内置函数使用示例:在视图页面中输入如下
{if $iq >= 130}
Tom
{elseif $iq <130 && $iq>=110}
Jack
{elseif $iq<110 && $iq>=90}
Lucy
{else}
Jim
{/if} //配对的关闭标签
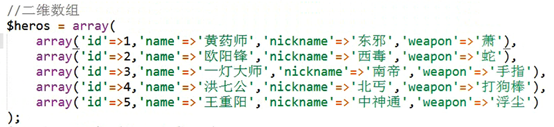
2. {foreach}
使用foreach循环输出二维数组示例如下:

{foreach}的属性,主要有下述6个:
a ) @index ,当前数组索引,从0开始计算
b ) @iteration,当前循环的次数,从1开始计算
c ) @first ,首次循环时,该值为true
d ) @last ,循环到最后一次时,该值为true
e ) @total ,总的循环次数,可在foreach内部使用,也可以在循环完成之后使用
f ) @show ,在foreach循环执行完之后,检测循环是否显示数据的判断
使用方法示例如下:以@first为例,给第一个tr添加类名

3. {section}
使用section循环时,注意,section不能用于关联数组,只能用于连续下标的数组(0,1,2,…),对关联数组使用循环,需要使用{foreach}
相关参数如下:

使用方式示例:在视图页面中输入如下
{section name=”item” start=0} 表示从第0项开始循环
<li>{$user[item]}</li> //此处的$user是一个索引数组
{/section}
使用index、first等属性:

使用section可以在一次循环中遍历多个数组:

② 变量修饰器
通常情况,在模板页面中,直接输出php程序中分配过来的变量即可,但也有一些特殊情况,需要对分配过来的变量/保留变量,进行再次处理,smarty提供了变量修饰器
使用示例如下:
{$smarty.now|date_format:"%Y-%m-%d %T"} //使用了smarty的时间修饰器
{$content|truncate:10} //使用限制字符长度的修饰器
{"hello"|str_repeat:10} //重复输出hello10次
……
③ 函数插件(自定义函数)
(1)html_radios
{html_radios name=”names” values=$value output=$outlabs selected=”2”}
视图页面中调用这段代码,相当于创建了对应的<input type=”radio”>提示信息
此处的output就是input的外部的提示信息
Selected=2表示第2个数值被选中
(2)html_checkbox //使用方法与html_radios基本相同
{html_checkbox name=”names” values=$value output=$outlabs selected=”Tom”}
如果要设置默认选中多个选项,以数组的形式设置selected的值即可
(3) html_options (下拉列表)
{html_options name=”names” options=$array selected=3}
不需要设置在select下,option赋值一个关联数组即可,value就是数组的key
(4) cycle (交替循环值)
视图页面示例: //输出隔行添加的class
<tr class=”{cycle values=’one,two,three’}”>
<td>{$v.id}</td>
<td>{$v.name}</td>
<td>{$v.age}</td>
</tr>
三、 smarty在项目中的引用
(1)引入smarty
放在framework中,意味着smarty是框架的一部分
放在application中,是以第三方的方式引入smarty,(third_party)
(2)配置smarty
此处以第三方引入方式为例:
在application>controllers>home>indexControler.class,php文件中
public function indexAction(){
//引入smarty类
Include APP_PATH.”third_party/smarty/smarty.class.php”
//实例化smarty对象
$smarty = new Smarty();
//设置相关属性
$smarty -> template_dir = CUR_VIEW_PATH . “templates”;
$smarty -> compile_dir = CUR_VIEW_PATH . “templates_c”;
//分配数据
$smarty -> assign(‘cats’,$cats);
$smarty -> assign(‘bestGoods’,$bestGoods);
//载入模板文件
$smarty -> display(‘index.html’);
}
(3)配置smarty优化(BaseController.class.php)
可以将上述(2)中的代码写到基础控制类中,再让其他控制器继承自基础控制价,这样可以实现重复利用
(4)模板包含
可以将头部html页面提取出来,再引用include内置函数方法将提出的head.html页面注入其他页面中,{include file = “head.html”}
四、 smarty的缓存
(1)缓存的基础使用
主要的缓存方法分为:数据缓存和文件缓存
smarty的缓存属于文件缓存:生成静态页面
smarty设置缓存:
//开启缓存
$smarty->caching=true;
//设置缓存目录 (需要创建响应的文件夹)
$smarty->cache_dir=CUR_VIEW_PATH.”cache”
//设置缓存有效期
$this->smarty->cache_lifetime=60; (默认有效期为3600,单位秒)
//开启smarty调用模式
$smarty->debugging=true; (可以开启调试页面)
//当前页面是首页
$smarty->assign(‘index’,true);
Smarty提供的判断方法,判断是否缓存:isCached
使用示例如下:
if(!$smarty->isCached(‘index.html’)){ //表明没有缓存
执行代码
}
(2)局部不缓存
①标签的缓存控制(nocache属性)
显示时间:{$smarty.now|date_format:’%Y-%m-%d %T’} 有缓存刷新时间不变
显示时间:{$smarty.now|date_format:’%Y-%m-%d %T’ nocache} 去除缓存
②变量的缓存控制(适用于单个变量,分配时第三个参数设为true)
声明变量:$time=date(“Y-m-d H:i:s”);
$smarty->assign(“time1”,$time);
$smarty->assign(“time1”,$time,true); //声明第三参数为true,该变量不缓存
③模板区域的缓存控制({nocache} {/nocache} 适用于一块区域)
在视图页面使用{nocache}内置函数,去除缓存,示例如下:
{nocache}
<h3>{$smarty.now|date_format:’%Y-%m-%d %T’}</h3> //该内容不会缓存
{/nocache}
(3)单模板多缓存(同一个页面生成多个缓存文件)
只需要在载入模板文件时,输入区分的参数即可(url中传递的参数)
$smarty->display(‘goods.html’,$goods_id);
同理判断缓存的时候也需要输入这个参数:
$smarty->isCached(‘goods.html’,$goods_id)
(4)缓存组

设置缓存组:
$smarty->display(“list.html”,”$size|$brand|$style|$material”)
(5)删除缓存
缓存失效情况:超过有效期、模板页面发生变化、删除缓存文件
//删除首页缓存
$smarty->clearCache(“index.html”);
//删除页面指定参数缓存
$smarty->clearCache(“goods.html”,2);
//删除所有缓存
$smarty->clearAllCache();
删除文件使用的底层方法是unlink()函数