盒模型拓展
1、清除默认样式
很多标签都有一些默认的盒子样式。
比如:ul,li,ol,dl,dt,dd,p,div,body,h1等,都有默认的内外边距,需要清除。
ul,ol都有一个list-style列表样式的默认样式,需要清除。
a标签有默认的字体样式,下划线,字体颜色。
在做网页之前,第一个准备工作就是清除默认样式!↓
        *{
            margin: 0;
            padding: 0;
        }
        ul,ol{
            list-style:none;
        }
        a{
            text-decoration: none;
            color: red;
        }
2、height
一般情况下不给盒子设置高度,而是用内部的内容去撑高元素。
代码↓


<!DOCTYPE html PUBLIC "-//W3C//DTD XHTML 1.0 Transitional//EN" "http://www.w3.org/TR/xhtml1/DTD/xhtml1-transitional.dtd">
<html xmlns="http://www.w3.org/1999/xhtml" xml:lang="en">
<head>
    <meta http-equiv="Content-Type" content="text/html;charset=UTF-8">
    <title>Document</title>
    <style type="text/css">
        div{
            width: 440px;
            height: 140px;
            padding: 12px 22px;
            margin: 100px auto;
            border: 1px dashed #333;
            font-size: 14px;
            font-family: "SimSun";
            color: #DC2C2C;
            line-height: 28px;
            text-indent: 2em;
        }
    </style>
</head>
<body>
    <div>
    <p>哈哈啊哈哈哈哈哈哈哈哈哈哈哈哈哈哈哈哈或或或或或或或或或或或或或或或或或或或或或或或或或或或或或或或或或或或或或或或或或或或或或或或或或或或或或或哈哈哈哈哈哈哈哈哈哈或或或或或或或或或或或或或或或或或或或或或或或或或或或或或或或或或或或或或或或或或或或或或或或或或或或或或或</p>
    </div>
</body>
</html>
这里正常写了盒子高度,效果图↓
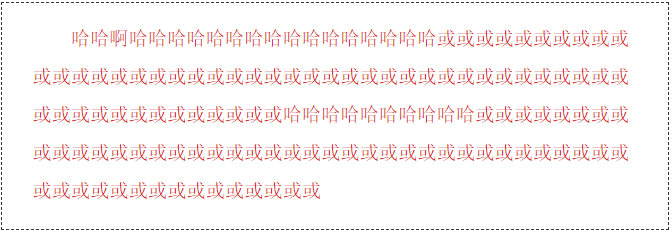
如果把div里height属性去掉,这个效果还是会正常显示,不写height的话,他会根据你的内容来定义你的盒子高度。
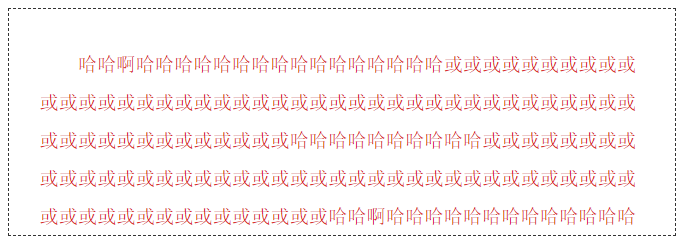
但是你写了盒子高度,内容也很多,就会导致文字溢出盒子↓

隐藏溢出属性:overflow: hidden;
添加overflow: hidden后代码↓
        div{
             440px;
            height: 140px;
            padding: 12px 22px;
            margin: 100px auto;
            border: 1px dashed #333;
            /*隐藏溢出*/
            overflow: hidden;
            font-size: 14px;
            font-family: "SimSun";
            color: #DC2C2C;
            line-height: 28px;
            text-indent: 2em;
        }
效果图↓
3、宽度剩余
制作网页的小技巧:一般右边距根据内容不同,边距大小不同,没办法去精准确定paadin-right,所以我们只需要设置左边距,右侧都给width,内容自动填充,剩余部分自动留白就可以。
设置放法↓
padding: 12px 22px;
padding-right: 0;
高度剩余与宽度剩余类似。
4、margin
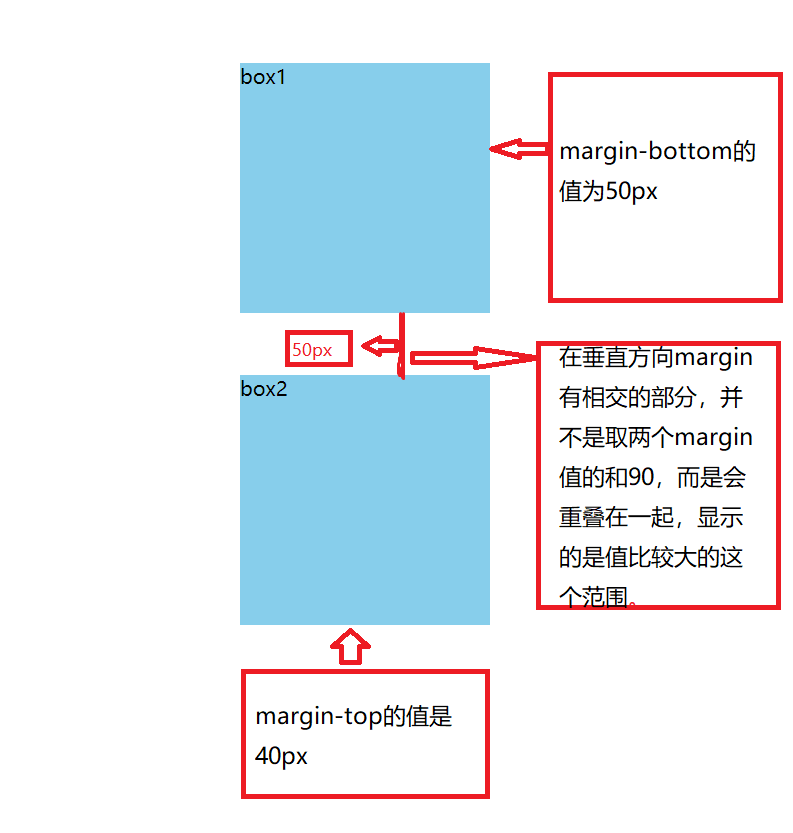
垂直方向相邻的两个元素如果都有外边距,而且外边距有相交部分,相交的部分出现边距重合的现象,我们把它叫做——外边距塌陷。代码↓
<!DOCTYPE html PUBLIC "-//W3C//DTD XHTML 1.0 Transitional//EN" "http://www.w3.org/TR/xhtml1/DTD/xhtml1-transitional.dtd">
<html xmlns="http://www.w3.org/1999/xhtml" xml:lang="en">
<head>
    <meta http-equiv="Content-Type" content="text/html;charset=UTF-8">
    <title>Document</title>
    <style type="text/css">
        *{
            margin: 0;
            padding: 0;
        }
        div{
            width: 200px;
            height: 200px;
            background-color: skyblue;
        }
        .box1{
            margin: 50px auto;

        }
        .box2{
            margin: 40px auto;
        }
    </style>
</head>
<body>
    <div class="box1">box1</div>
    <div class="box2">box2</div>
</body>
</html>
图解↓
嵌套的盒子也会出现margin合并的现象,代码↓
<!DOCTYPE html PUBLIC "-//W3C//DTD XHTML 1.0 Transitional//EN" "http://www.w3.org/TR/xhtml1/DTD/xhtml1-transitional.dtd">
<html xmlns="http://www.w3.org/1999/xhtml" xml:lang="en">
<head>
    <meta http-equiv="Content-Type" content="text/html;charset=UTF-8">
    <title>Document</title>
    <style type="text/css">
        *{
            margin: 0;
            padding: 0;
        }
        .box1{
            width: 200px;
            height: 200px;
            background-color: skyblue;
            margin: 50px 0;
        }
        .box2{
            width: 100px;
            height: 100px;
            background-color: yellowgreen;
            margin: 40px 0;
        }
    </style>
</head>
<body>
    <div class="box1">
        <div class="box2"></div>
    </div>
</body>
</html>
图解↓

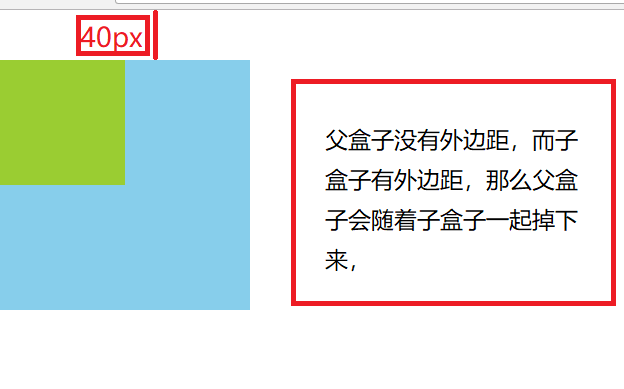
子盒子设置外边距的情况:如果不设置父亲的margin,只设置儿子的margin会出现什么情况?
代码↓
<!DOCTYPE html PUBLIC "-//W3C//DTD XHTML 1.0 Transitional//EN" "http://www.w3.org/TR/xhtml1/DTD/xhtml1-transitional.dtd">
<html xmlns="http://www.w3.org/1999/xhtml" xml:lang="en">
<head>
    <meta http-equiv="Content-Type" content="text/html;charset=UTF-8">
    <title>Document</title>
    <style type="text/css">
        *{
            margin: 0;
            padding: 0;
        }
        .box1{
            width: 200px;
            height: 200px;
            background-color: skyblue;
        }
        .box2{
            width: 100px;
            height: 100px;
            background-color: yellowgreen;
            margin: 40px 0;
        }
    </style>
</head>
<body>
    <div class="box1">
        <div class="box2"></div>
    </div>
</body>
</html>
图解↓
实际中两个同级盒子之间,要么给上面盒子设置下边距,要么给下面盒子设置上边距,不要同时设置。
子盒子与父盒子之间的垂直距离:
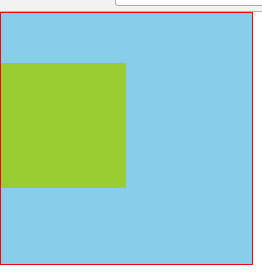
①强行给父盒子加一个边框,强制限定父盒子的位置。代码↓
<!DOCTYPE html PUBLIC "-//W3C//DTD XHTML 1.0 Transitional//EN" "http://www.w3.org/TR/xhtml1/DTD/xhtml1-transitional.dtd">
<html xmlns="http://www.w3.org/1999/xhtml" xml:lang="en">
<head>
    <meta http-equiv="Content-Type" content="text/html;charset=UTF-8">
    <title>Document</title>
    <style type="text/css">
        *{
            margin: 0;
            padding: 0;
        }
        .box1{
            width: 200px;
            height: 200px;
            border: 1px solid red;
            background-color: skyblue;
        }
        .box2{
            width: 100px;
            height: 100px;
            background-color: yellowgreen;
            margin: 40px 0;
        }
    </style>
</head>
<body>
    <div class="box1">
        <div class="box2"></div>
    </div>
</body>
</html>
效果图↓
②不用子盒子去踢父盒子,用父盒子padding来撑开。代码↓
<!DOCTYPE html PUBLIC "-//W3C//DTD XHTML 1.0 Transitional//EN" "http://www.w3.org/TR/xhtml1/DTD/xhtml1-transitional.dtd">
<html xmlns="http://www.w3.org/1999/xhtml" xml:lang="en">
<head>
    <meta http-equiv="Content-Type" content="text/html;charset=UTF-8">
    <title>Document</title>
    <style type="text/css">
        *{
            margin: 0;
            padding: 0;
        }
        .box1{
            width: 200px;
            height: 160px;
            background-color: skyblue;
            padding-top: 40px;
        }
        .box2{
            width: 100px;
            height: 100px;
            background-color: yellowgreen;
        }
    </style>
</head>
<body>
    <div class="box1">
        <div class="box2"></div>
    </div>
</body>
</html>
效果图↓
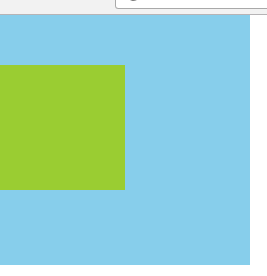
第二种方法注意一点,你的padding-top设置多少,要记得用盒子原先的height减去你的内边距padding-top设置的数字,然后的到的数字才是你实际的盒子高度,比如我之前的是height是200px,设置了一个padding-top内边距40后,200-40=160,所以我代码里的height改为了160,内减方法~