If you missed the beginning of the series, you should check out Part 1 and Part 2 before beginning this part if you want to follow along.
Today’s tutorial will create the service contracts for our WCF service and actually implement the methods (read: write some code that does something).
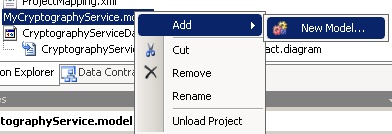
First, in your Solution Explorer, right click on MyCryptographyService.model and Add–>New Model.
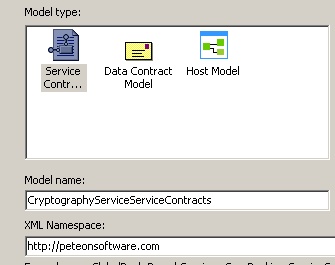
You will need to fill out the form like you see below.
If you don’t already have your property window handy, right click in the white designer surface and click properties. Just like with our Data Contracts, select our Project Mapping Table and choose WCF Extension from the “Implementation Technology” dropdown. Set the “Serializer Type” to DataContractSerializer.

Since you should be familiar with how the designer surface works (from part 2 of the tutorial), I’m going to move through this part a little more quickly. The toolbox is context sensitive and now displays tools relevant to Service Contracts.
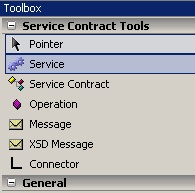
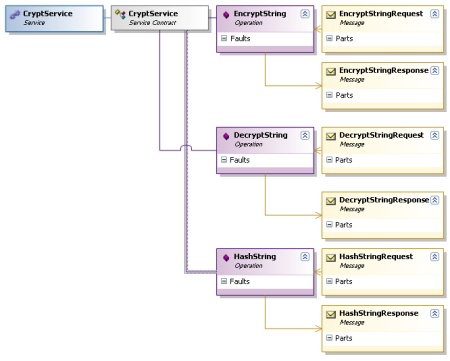
Drag a Service (name: CryptService), a Service Contract (name: CryptService), an Operation (name: EncryptString), and two messages (EncryptStringRequest and EncryptStringResponse) out onto the designer surface. Arrange and them as shown below.

Use the connector tool to connect the objects. Drag a connection between the Service Contract and the Service. Drag another connection between the Operation and the Service Contract. This part is a little bit tricky. You need to associate the “Request” and “Reponse” messages to the operation. However, up to this point, which direction you connected the object did not matter. For the messages, it does. Start on the “Request” message and drag to the Operation. Then for the other connection, start on the Operation and drag it to the “Response” message. You have now finished modeling this Operation.

You should drag 2 more Operations onto the surface and call them DecryptString and HashString. Drag 4 more Messages onto the surface and call them DecryptStringRequest, DecryptStringResponse, HashStringRequest, and HashStringResponse. Connect them up like you did for the EncryptString (attaching the Operations to the Service Contract).
Now you are almost done. You need need to load up the messages with their payloads. Right click on EncryptStringRequest and Add–>Data Contract Message Part. Name it EncryptionObject. While it is highlighted, examine the Properties Panel. Next to Type, click the Elipses (…) to bring up this dialog box. Choose EncryptionObject from the box and click OK.
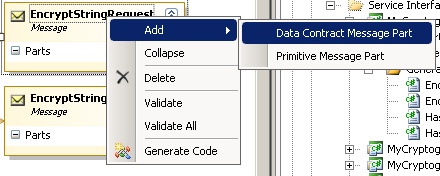
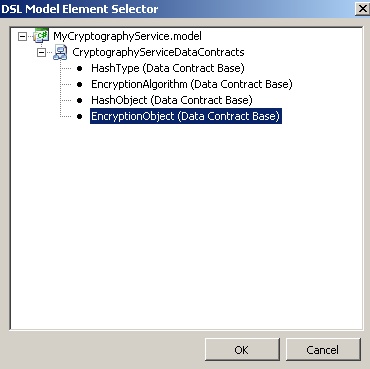
You should also add an EncryptionObject to DecryptStringRequest and a HashObject to HashStringRequest. Add Primitive Message Parts to each of the three responses and call each one “ReturnValue”. (I realize I haven’t come with the most “enterprisey” names during this tutorial… I’m sorry).
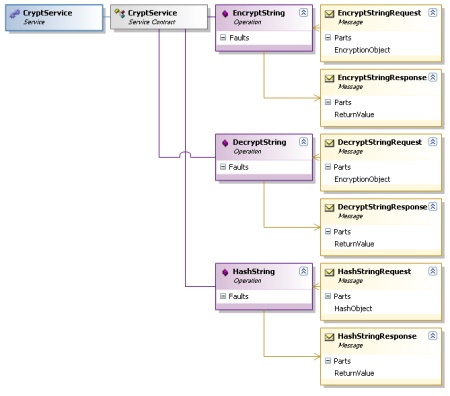
Now, right click somewhere in the white of the Visual Designer and choose Validate All. If that comes back with errors, recheck your work. If it comes back clean, right click again and choose Generate Code. You will then have additional generated code appear in MyCryptographyService.ServiceImplementation and MyCryptographyService.ServiceContracts.
Next, right click on the MyCryptographyService.BusinessLogic project and choose to add a new class. Call it CryptographyServiceBusinessLogic. To save some time (and since this code isn’t the point of the tutorial), I’ve included the code here for you.
using System;

using System.IO;

using System.Security.Cryptography;

using System.Text;

using MyCryptographyService.BusinessEntities;


namespace MyCryptographyService.DataAccess

{

    /// <SUMMARY>

    /// This is the class where all the action happens, and all gathering of external

    /// resources (DB, XML files, registry, etc) should be done from here.  Ideally, in this

    /// scenerio, you would store your keys external to the application and the

    /// transformations would be done here with those keys after they were received.

    ///

    /// NOTE: These implementations are derivations (or outright copying) from samples

    /// posted on the internet.  Included are:

    ///

    /// http://blog.stevex.net/index.php/c-code-snippet-creating-an-md5-hash-string/

    /// http://www.codeproject.com/KB/cs/NET_Encrypt_Decrypt.aspx

    /// http://www.obviex.com/samples/hash.aspx

    /// </SUMMARY>

    public class CryptManager

    {

        // Note:  This is not a tutorial on encryption.  Key management

        // is paramount in good encryption and of course storing your

        // key in plain text in the code is not a good idea.  This is

        // merely sample code and should not be considered good

        // cryptography practice.


        private const string KEY = "$0ftw@r3";

        private const string IV = "@p3t30n&";


        private DESCryptoServiceProvider des = new DESCryptoServiceProvider();


        public CryptManager()

        {

            des.Key = ASCIIEncoding.ASCII.GetBytes(KEY);

            des.IV = ASCIIEncoding.ASCII.GetBytes(IV);

        }


        public string HashString(HashObject hashObject)

        {

            switch (hashObject.HashType)

            {

                case HashType.MD5:

                    return getMd5Sum(hashObject.StringToHash);

                case HashType.SHA256:

                    return getSha256Hash(hashObject.StringToHash);

                default:

                    throw new NotImplementedException("That Hashing Algorithm is not supported");

            }

        }


        public string EncryptString(EncryptionObject encryptionObject)

        {

            string cryptText = string.Empty;


            switch (encryptionObject.EncryptionAlgorithm)

            {

                case EncryptionAlgorithm.DES:

                    cryptText = encryptDes(encryptionObject.Text);

                    break;

                case EncryptionAlgorithm.Rijndael:

                    cryptText = encryptRijndael(encryptionObject.Text);

                    break;

                default:

                    throw new NotImplementedException("You provided an algorithm that is not implemented.");

            }


            return cryptText;

        }


        public string DecryptString(EncryptionObject encryptionObject)

        {

            string plainText = string.Empty;


            switch (encryptionObject.EncryptionAlgorithm)

            {

                case EncryptionAlgorithm.DES:

                    plainText = decryptDes(encryptionObject.Text);

                    break;

                case EncryptionAlgorithm.Rijndael:

                    plainText = decryptRijndael(encryptionObject.Text);

                    break;

                default:

                    throw new NotImplementedException("You provided an algorithm that is not implemented.");

            }


            return plainText;

        }


        private string encryptDes(string plainText)

        {

            MemoryStream memoryStream = new MemoryStream();

            CryptoStream cryptoStream = new CryptoStream(memoryStream, des.CreateEncryptor(), CryptoStreamMode.Write);

            StreamWriter writer = new StreamWriter(cryptoStream);

            writer.Write(plainText);

            writer.Flush();

            cryptoStream.FlushFinalBlock();

            writer.Flush();

            return Convert.ToBase64String(memoryStream.GetBuffer(), 0, (int)memoryStream.Length);


        }


        private string decryptDes(string cryptText)

        {

            MemoryStream memoryStream = new MemoryStream(Convert.FromBase64String(cryptText));

            CryptoStream cryptoStream = new CryptoStream(memoryStream, des.CreateDecryptor(), CryptoStreamMode.Read);

            StreamReader reader = new StreamReader(cryptoStream);

            return reader.ReadToEnd();

        }


        private string encryptRijndael(string plainText)

        {

            RijndaelManaged rijndaelCipher = new RijndaelManaged();


            byte[] plainBytes = Encoding.Unicode.GetBytes(plainText);

            byte[] salt = Encoding.ASCII.GetBytes(KEY.Length.ToString());


            //This class uses an extension of the PBKDF1 algorithm defined in the PKCS#5 v2.0

            //standard to derive bytes suitable for use as key material from a password.

            //The standard is documented in IETF RRC 2898.


            PasswordDeriveBytes secretKey = new PasswordDeriveBytes(KEY, salt);

            //Creates a symmetric encryptor object.

            ICryptoTransform encryptor = rijndaelCipher.CreateEncryptor(secretKey.GetBytes(32), secretKey.GetBytes(16));

            MemoryStream memoryStream = new MemoryStream();

            //Defines a stream that links data streams to cryptographic transformations

            CryptoStream cryptoStream = new CryptoStream(memoryStream, encryptor, CryptoStreamMode.Write);

            cryptoStream.Write(plainBytes, 0, plainBytes.Length);

            //Writes the final state and clears the buffer

            cryptoStream.FlushFinalBlock();

            byte[] cipherBytes = memoryStream.ToArray();

            memoryStream.Close();

            cryptoStream.Close();

            string encryptedData = Convert.ToBase64String(cipherBytes);

            return encryptedData;

        }


        private string decryptRijndael(string cipherText)

        {

            RijndaelManaged rijndaelCipher = new RijndaelManaged();

            byte[] encryptedData = Convert.FromBase64String(cipherText);

            byte[] salt = Encoding.ASCII.GetBytes(KEY.Length.ToString());

            //Making of the key for decryption

            PasswordDeriveBytes secretKey = new PasswordDeriveBytes(KEY, salt);

            //Creates a symmetric Rijndael decryptor object.

            ICryptoTransform decryptor = rijndaelCipher.CreateDecryptor(secretKey.GetBytes(32), secretKey.GetBytes(16));

            MemoryStream memoryStream = new MemoryStream(encryptedData);

            //Defines the cryptographics stream for decryption.THe stream contains decrpted data

            CryptoStream cryptoStream = new CryptoStream(memoryStream, decryptor, CryptoStreamMode.Read);

            byte[] plainText = new byte[encryptedData.Length];

            int decryptedCount = cryptoStream.Read(plainText, 0, plainText.Length);

            memoryStream.Close();

            cryptoStream.Close();

            //Converting to string

            string decryptedData = Encoding.Unicode.GetString(plainText, 0, decryptedCount);

            return decryptedData;

        }


        private string getMd5Sum(string inputText)

        {

            // First we need to convert the string into bytes, which

            // means using a text encoder.

            Encoder encoder = System.Text.Encoding.Unicode.GetEncoder();


            // Create a buffer large enough to hold the string

            byte[] unicodeText = new byte[inputText.Length * 2];

            encoder.GetBytes(inputText.ToCharArray(), 0, inputText.Length, unicodeText, 0, true);


            // Now that we have a byte array we can ask the CSP to hash it

            MD5 md5 = new MD5CryptoServiceProvider();

            byte[] result = md5.ComputeHash(unicodeText);


            // Build the final string by converting each byte

            // into hex and appending it to a StringBuilder

            StringBuilder sb = new StringBuilder();

            for (int i = 0; i < result.Length; i++)

            {

                sb.Append(result[i].ToString("X2"));

            }


            // And return it

            return sb.ToString();

        }


        private string getSha256Hash(string plainText)

        {

            byte[] plainTextBytes = Encoding.UTF8.GetBytes(plainText);

            byte[] saltBytes = Encoding.UTF8.GetBytes(IV);


            byte[] plainTextWithSaltBytes =

                    new byte[plainTextBytes.Length + saltBytes.Length];


            for (int i = 0; i < plainTextBytes.Length; i++)

                plainTextWithSaltBytes[i] = plainTextBytes[i];


            for (int i = 0; i < saltBytes.Length; i++)

                plainTextWithSaltBytes[plainTextBytes.Length + i] = saltBytes[i];


            HashAlgorithm hash = new SHA256Managed();


            byte[] hashBytes = hash.ComputeHash(plainTextWithSaltBytes);


            byte[] hashWithSaltBytes = new byte[hashBytes.Length +

                                                saltBytes.Length];

            for (int i = 0; i < hashBytes.Length; i++)

                hashWithSaltBytes[i] = hashBytes[i];


            for (int i = 0; i < saltBytes.Length; i++)

                hashWithSaltBytes[hashBytes.Length + i] = saltBytes[i];


            string hashValue = Convert.ToBase64String(hashWithSaltBytes);


            return hashValue;


        }

    }

}
Lastly, we only need to do one more thing before this step of the tutorial is complete. We need to implement the methods that tie into what will be our endpoints. When we defined our service contracts, we defined some methods. We need to write the implementation of those methods that tie them to our business layer (and ultimately to our data access layer).
However, since the generated code can and will change every time we make any changes to the service contract designer, we have to create another code file and create a partial class with the same name as the generated one. Inside, we will override the methods, write our own implementation, assign values to the response, and return it. Create a class in the MyCryptographyService.ServiceImplementation project called CryptImplementation.cs. Then you should have the following code inside.
Notice that this is the class that also uses the translators that you wrote. They allow the class that is the DataContract to be mapped to the class that is the BusinessEntity. The code here should be pretty straightforward, but if you have any questions, please leave them in the comments and I will respond as quickly as possible.
Part 4 should be coming shortly. Until then
reprint [Pete on Software]


