vue参考---vue组件基本开发
一、总结
一句话总结:
vue就是组件化开发,整体还是比较简单,前端用框架的话的确可以有点化腐朽为神奇,弄清楚目录结构、组件引入方式、路由(是根据不同情况路由显示不同组件)
1、vue组件中引入其它组件的方式?
1、引入组件:FryTest:import FryTest from './components/FryTest'
2、映射组件标签:FryTest:components: {FryTest}
3、编写组件标签:FryTest:<FryTest></FryTest>
 1 <template>
 2   <div id="app">
 3     <img src="./assets/logo.png">
 4     <router-view/>
 5     <!--3、编写组件标签:FryTest-->
 6     <FryTest></FryTest>
 7   </div>
 8 </template>
 9
10 <script>
11   //1、引入组件:FryTest
12   import FryTest from './components/FryTest'
13 export default {
14   name: 'App',
15   //2、映射组件标签:FryTest
16   components: {FryTest}
17 }
18 </script>
19
20 <style>
21 #app {
22   text-align: center;
23   color: #2c3e50;
24   margin-top: 60px;
25 }
26 </style>
2、引入路由中指定组件的方法?
比如在App主组件中使用路由标签指定路由中的组件:<router-view/>
 1 <template>
 2   <div id="app">
 3     <img src="./assets/logo.png">
 4     <router-view/>
 5     <!--3、编写组件标签:FryTest-->
 6     <FryTest></FryTest>
 7   </div>
 8 </template>
 9
10 <script>
11   //1、引入组件:FryTest
12   import FryTest from './components/FryTest'
13 export default {
14   name: 'App',
15   //2、映射组件标签:FryTest
16   components: {FryTest}
17 }
18 </script>
19
20 <style>
21 #app {
22   text-align: center;
23   color: #2c3e50;
24   margin-top: 60px;
25 }
26 </style>
3、vue中如下路由代码的作用是什么?
|||-begin
import Vue from 'vue'
import Router from 'vue-router'
import HelloWorld from '@/components/HelloWorld'
import FryTest from '@/components/FryTest'

Vue.use(Router)

export default new Router({
  routes: [
    {
      path: '/',
      name: 'HelloWorld',
      component: HelloWorld
    },
    {
      path: '/test',
      name: 'FryTest',
      component: FryTest
    }
  ]
})
|||-end
表示HelloWorld组件在根页面显示,表示FryTest组件会在/test页面显示,当然得在主组件页面引入<router-view/>标签 根据情况 使用 路由中的 这些组件
4、vue入口文件main.js中代码是什么意思?
|||-begin
 1 // The Vue build version to load with the `import` command
 2 // (runtime-only or standalone) has been set in webpack.base.conf with an alias.
 3 import Vue from 'vue'
 4 import App from './App'
 5 import router from './router'
 6
 7 Vue.config.productionTip = false
 8
 9 /* eslint-disable no-new */
10 new Vue({
11   el: '#app',
12   router,
13   //也就是引入src中的App.vue组件,也是三步,import引入、映射组件标签、编写组件标签
14   components: { App },
15   template: '<App/>'
16 })
|||-end
第4、5行:入口文件main.js中也就是引入了主组件App.vue和路由
第4、14、15行:也就是引入src中的App.vue组件,也是三步,import引入、映射组件标签、编写组件标签
二、vue组件基本开发
博客对应课程的视频位置:
1、基本结构
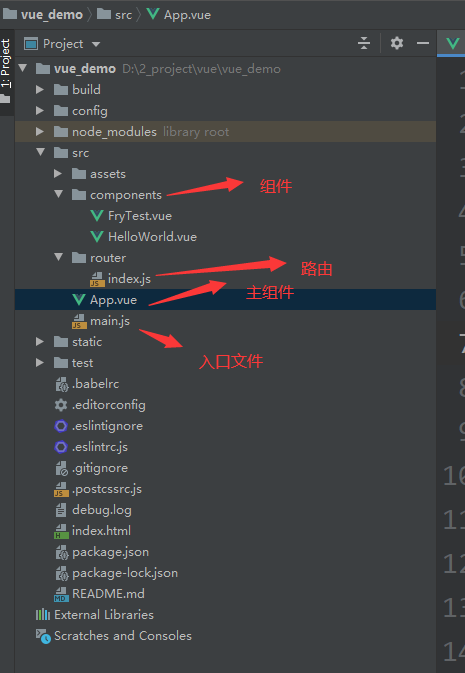
2、各个文件介绍
子组件:FryTest.vue
<template>
    <div class="class_1">
      <h2>{{msg}}</h2>
    </div>
</template>

<script>
  export default {
    name: 'FryTest',
    data () {
      return {
        msg: '这是FryTest模块'
      }
    }
  }
</script>

<style scoped>
  .class_1{
    color: red;
  }
</style>
子组件:HelloWorld.vue
<template>
  <div class="hello">
    <h1>{{ msg }}</h1>
  </div>
</template>

<script>

export default {
  name: 'HelloWorld',
  data () {
    return {
      msg: '这是HelloWorld模块'
    }
  }
}
</script>

<!-- Add "scoped" attribute to limit CSS to this component only -->
<style scoped>
h1, h2 {
  font-weight: normal;
}
</style>
路由文件:index.js
 1 import Vue from 'vue'
 2 import Router from 'vue-router'
 3 import HelloWorld from '@/components/HelloWorld'
 4 import FryTest from '@/components/FryTest'
 5
 6 Vue.use(Router)
 7
 8 export default new Router({
 9   routes: [
10     {
11       path: '/',
12       name: 'HelloWorld',
13       component: HelloWorld
14     },
15     {
16       path: '/test',
17       name: 'FryTest',
18       component: FryTest
19     }
20   ]
21 })
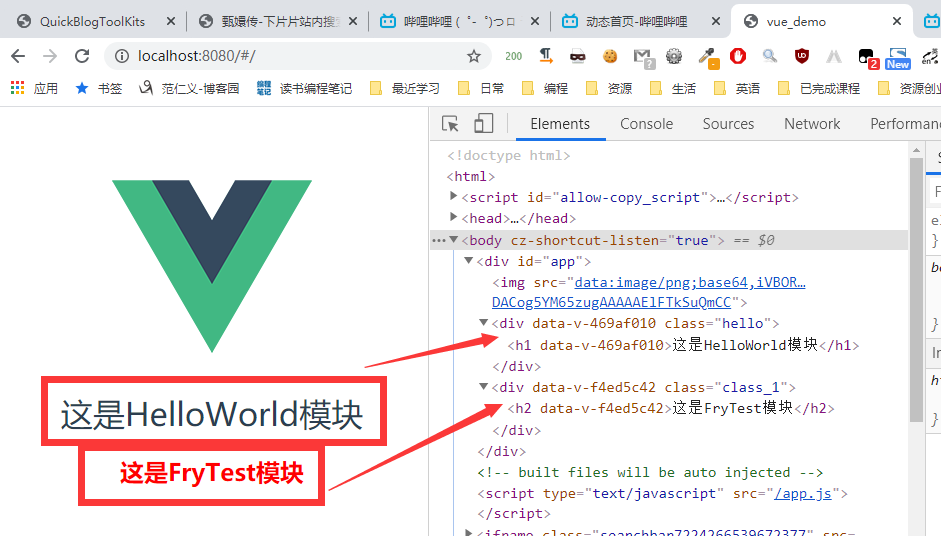
表示HelloWorld模块在根页面显示
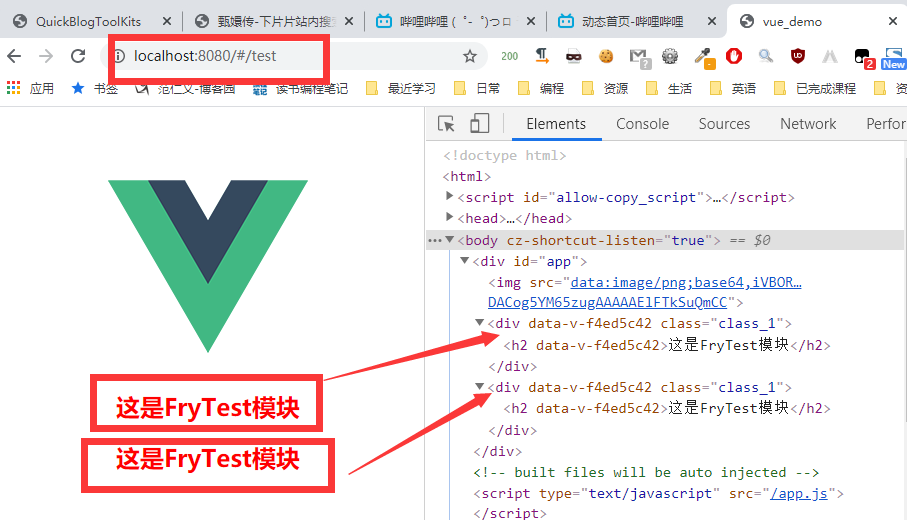
表示FryTest模块会在/test页面显示
当然得在主组件页面引入<router-view/>标签 根据情况 使用 路由中的 这些组件
主组件:App.vue
 1 <template>
 2   <div id="app">
 3     <img src="./assets/logo.png">
 4     <router-view/>
 5     <!--3、编写组件标签:FryTest-->
 6     <FryTest></FryTest>
 7   </div>
 8 </template>
 9
10 <script>
11   //1、引入组件:FryTest
12   import FryTest from './components/FryTest'
13 export default {
14   name: 'App',
15   //2、映射组件标签:FryTest
16   components: {FryTest}
17 }
18 </script>
19
20 <style>
21 #app {
22   text-align: center;
23   color: #2c3e50;
24   margin-top: 60px;
25 }
26 </style>
第4行:说明引入了路由中的组件,当然是根据路由的情况:<router-view/>
表示HelloWorld模块在根页面显示
表示FryTest模块会在/test页面显示
第6行:说明引入了FryTest模块
以上:说明如果在根页面会有HelloWorld组件(路由中指定)和FryTest组件(本组件引入)
以上结合路由,也说明test页面会有两个组件:FryTest组件(路由中指定)和FryTest组件(主组件App.vue引入)
入口文件:main.js
 1 // The Vue build version to load with the `import` command
 2 // (runtime-only or standalone) has been set in webpack.base.conf with an alias.
 3 import Vue from 'vue'
 4 import App from './App'
 5 import router from './router'
 6
 7 Vue.config.productionTip = false
 8
 9 /* eslint-disable no-new */
10 new Vue({
11   el: '#app',
12   router,
13   //也就是引入src中的App.vue组件,也是三步,import引入、映射组件标签、编写组件标签
14   components: { App },
15   template: '<App/>'
16 })
第4、5行:入口文件main.js中也就是引入了主组件App.vue和路由
第4、14、15行:也就是引入src中的App.vue组件,也是三步,import引入、映射组件标签、编写组件标签
三、组件中引入其它组件的方式
 1 <template>
 2   <div id="app">
 3     <img src="./assets/logo.png">
 4     <router-view/>
 5     <!--3、编写组件标签:FryTest-->
 6     <FryTest></FryTest>
 7   </div>
 8 </template>
 9
10 <script>
11   //1、引入组件:FryTest
12   import FryTest from './components/FryTest'
13 export default {
14   name: 'App',
15   //2、映射组件标签:FryTest
16   components: {FryTest}
17 }
18 </script>
19
20 <style>
21 #app {
22   text-align: center;
23   color: #2c3e50;
24   margin-top: 60px;
25 }
26 </style>
这里是在App.vue主组件中引入了FryTest组件
三步:
1、引入组件:FryTest:import FryTest from './components/FryTest'
2、映射组件标签:FryTest:components: {FryTest}
3、编写组件标签:FryTest:<FryTest></FryTest>