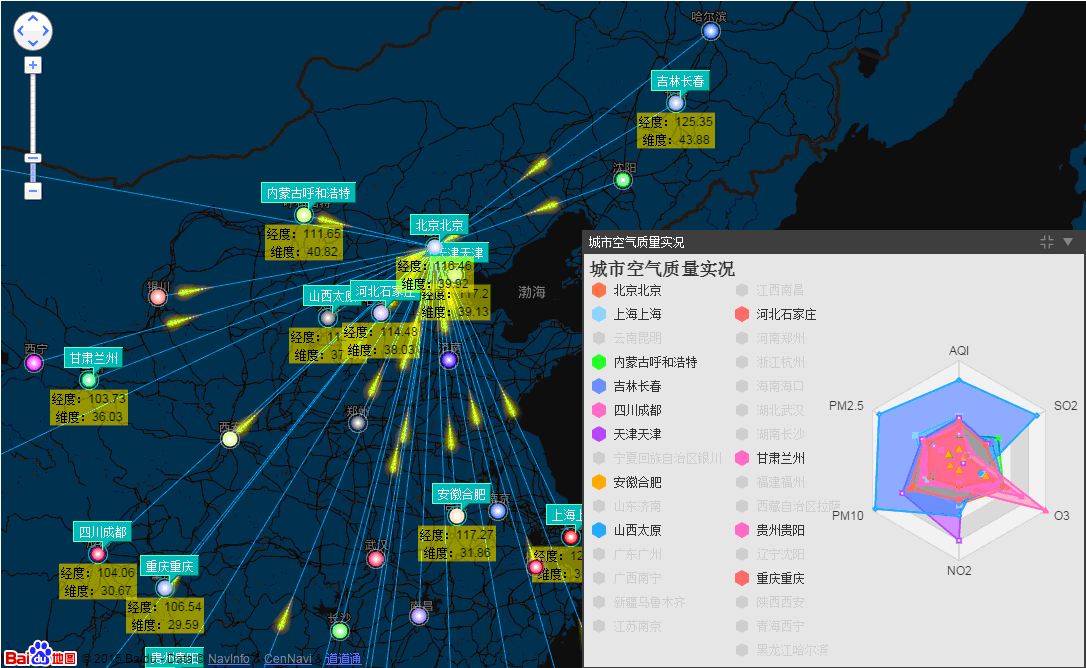
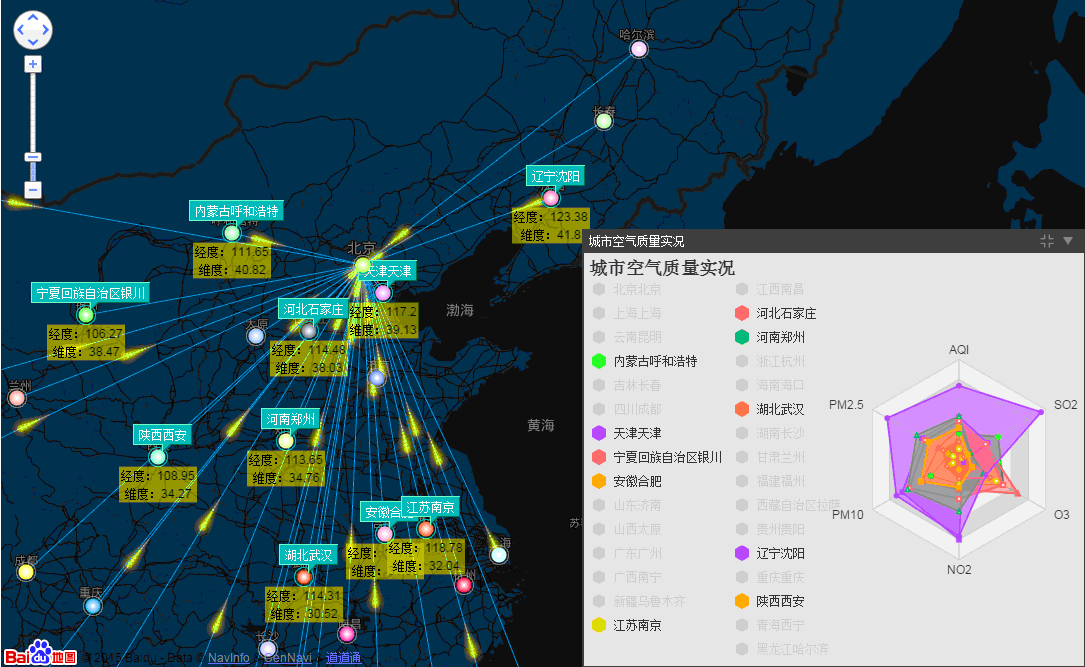
摘要 前一篇谈及到了ECharts整合HT for Web的网络拓扑图应用,后来在ECharts的Demo中看到了有关空气质量的相关报表应用,就想将百度地图、ECharts和HT for Web三者结合起来也做一个类似空气质量报告的报表+拓扑图应用。前一篇谈及到了ECharts整合HT for Web的网络拓扑图应用,后来在ECharts的Demo中看到了有关空气质量的相关报表应用,就想将百度地图、ECharts和HT for Web三者结合起来也做一个类似空气质量报告的报表+拓扑图应用,于是有了下面的Demo:
在这个Demo中,将GraphView拓扑图组件添加到百度地图组件中,覆盖在百度地图组件之上,并且在百度地图组件上和GraphView拓扑图组件上分别添加事件监听,相互同步经纬度和屏幕位置信息,从而来控制拓扑图上的组件位置固定在地图上,并在节点和节点之间的连线上加上了流动属性。右下角的图标框是采用HT for Web的Panel面板组件结合ECharts图表组件完成的。
接下来我们来看看具体的代码实现:
1. 百度地图是如何与HT for Web组件结合的;
map =newBMap.Map("map");varview = graphView.getView();view.className ='graphView';varmapDiv = document.getElementById('map');mapDiv.firstChild.firstChild.appendChild(view);
首先需要在body中存在id为map的div,再通过百度地图的api来创建一个map地图对象,然后创建GraphView拓扑图组件,并获取GraphView组件中的view,最后将view添加到id为map的div的第二代孩子节点中。这时候问题就来了,为什么要将view添加到map的第二代孩子节点中呢,当你审查元素时你会发现这个div是百度地图的遮罩层,将view添加到上面,会使view会是在地图的顶层可见,不会被地图所遮挡。
2. 百度地图和GraphView的事件监听;
map.addEventListener('moveend',function(e){resetPosition();});map.addEventListener('dragend',function(e){resetPosition();});map.addEventListener('zoomend',function(e){resetPosition();});graphView.handleScroll =function(){};graphView.handlePinch =function(){};functionresetPosition(e){graphView.tx(0);graphView.ty(0);dataModel.each(function(data){varlonLat, position;if(datainstanceofht.HtmlNode){if(data.getId() !='chartTotal') {position = data.getHost().getPosition();position = {x: position.x + 168, y: position.y + 158};data.setPosition(position.x, position.y);}}elseif(datainstanceofht.Node){lonLat = data.lonLat;position = map.pointToPixel(lonLat);data.setPosition(position.x,position.y);}});}
首先监听map的三个事件:moveend、 dragend、 zoomend,这三个事件做了同一件事--修改DataModel中所有data的position属性,让其在屏幕上的坐标与地图同步,然后将GraphView的Scroll和Pinch两个事件的执行函数设置为空函数,就是当监听到Scroll或者Pinch事件时不做任何的处理,将这两个事件交给map来处理。
在resetPosition函数中,做的事情很简单:遍历DataModel中的data,根据它们各自在地图上的经纬度来换算成屏幕坐标,并将坐标设置到相应的data中,从而达到GraphView中的节点能够固定在地图上的效果。
3. 创建右下角的图表组件:
ht.Chart =function(option){varself =this,view = self._view = document.createElement('div');view.style.position ='absolute';view.style.setProperty('box-sizing','border-box',null);self._option = option;self._chart = echarts.init(self.getView());if(option)self._chart.setOption(option);self._FIRST =true;};ht.Default.def('ht.Chart', Object, {ms_v: 1,ms_fire: 1,ms_ac: ['chart','option','isFirst','view'],validateImpl:function(){varself =this,chart = self._chart;chart.resize();if(self._FIRST){self._FIRST =false;chart.restore();}},setSize:function(w, h){varview =this._view;view.style.width = w +'px';view.style.height = h +'px';}});functioncreatePanel(title, width, height){chart =newht.Chart(option);varc = chart.getChart();c.on(echarts.config.EVENT.LEGEND_SELECTED, legendSelectedFun);varchartPanel =newht.widget.Panel({title: title,restoreToolTip:"Overview",width,contentHeight: height,narrowWhenCollapse:true,content: chart,expanded:true});chartPanel.setPositionRelativeTo("rightBottom");chartPanel.setPosition(0, 0);chartPanel.getView().style.margin ='10px';document.body.appendChild(chartPanel.getView());}
首先定义了ht.Chart类,并实现了validateImpl方法,方法中处理的逻辑也很简单:在每次方法执行的时候调用图表的reset方法重新设定图标的展示大小,如果该方法是第一次执行的话,就调用图表的restore方法将图表还原为最原始的状态。会有这样的设计是因为ht.Chart类中的view是动态创建的,在没有添加到dom之前将一直存在于内存中,在内存中因为并没有浏览器宽高信息,所以div的实际宽高均为0,因此chart将option内容绘制在宽高为0的div中,即使你resize了chart,如果没用重置图表状态的话,图表状态将无法在图表上正常显示。
接下来就是创建panel图表组件了,这是HT for Web的Panel组件的基本用法,其中content属性的值可以是HT for Web的任何组件或div元素,如果是HT fro Web组件的话,该组件必须实现了validateImpl方法,因为在panel的属性变化后将会调用content对应组件的validateImpl方法来重新布局组件内容。
4. ECharts和GraphView拓扑图组件的交互:
legendSelectedFun =function(param) {if(chart._legendSelect){deletechart._legendSelect;return;}console.info(param);varid = nodeMap[param.target],dm = graphView.dm(),data = dm.getDataById(id),sm = dm.sm(),selection = sm.getSelection();if(param.selected[param.target]) {sm.appendSelection([data]);if(selectionData.indexOf(param.target) < 0){selectionData.push(param.target);}}else{sm.removeSelection([data]);varindex = selectionData.indexOf(param.target);if(index >= 0){selectionData.splice(index, 1);}}sm.setSelection(selection.toArray());};graphView.mi(function(e){console.info(e.kind, e.data);varc = chart.getChart(),legend = c.component.legend,selectedMap = legend.getSelectedMap();if(e.kind ==='endRectSelect'){chart._legendSelect =true;for(varnameinnotes){legend.setSelected(name,false);}notes = {};graphView.dm().sm().each(function(data){varnote = data.s('note');if(note)notes[note] = 1;});for(varnameinnotes){legend.setSelected(name,true);}}elseif(e.kind ==='clickData'){chart._legendSelect =true;vardata = e.data;if(datainstanceofht.Node){varnote = data.s('note');if(note){varselected = legend.isSelected(note);if(selected){graphView.dm().sm().removeSelection([data]);}legend.setSelected(note, !selected);}}}});
legendSelectedFun函数是EChart图表的legend插件选中事件监听,其中处理的逻辑是:当legend插件中的某个节点被选中了,也选中在GraphView拓扑图中对应的节点,当取消选中是,也取消选中GraphView拓扑图中对应的节点。
在GraphView中添加交互监听,如果在GraphView中做了框选操作,在框选结束后,将原本legend插件上被选中的节点取消选中,然后再获取被选中节点,并在legend插件上选中对应节点;当GraphView上的节点被选中,则根据legend插件中对应节点选中情况来决定legend插件中的节点和graphView上的节点是否选中。
在GraphView交互中,我往chart实例中添加了_legendSelect变量,该变量的设定是为了阻止在GraphView交互中修改legend插件的节点属性后回调legendSelectedFun回调函数做修改GraphView中节点属性操作。
今天就写到这吧,希望这篇文章能够帮到那些有地图、拓扑图、图表相结合需求的朋友,在设计上可能想法还不够成熟,希望大家不吝赐教。