elastic-job-spring-boot
qq交流群:812321371
1 简介
Elastic-Job是一个分布式调度解决方案,由两个相互独立的子项目Elastic-Job-Lite和Elastic-Job-Cloud组成。Elastic-Job-Lite定位为轻量级无中心化解决方案,使用jar包的形式提供分布式任务的协调服务。
基于quartz定时任务框架为基础的,因此具备quartz的大部分功能
使用zookeeper做协调,调度中心,更加轻量级
支持任务的分片
支持弹性扩容,可以水平扩展, 当任务再次运行时,会检查当前的服务器数量,重新分片,分片结束之后才会继续执行任务
失效转移,容错处理,当一台调度服务器宕机或者跟zookeeper断开连接之后,会立即停止作业,然后再去寻找其他空闲的调度服务器,来运行剩余的任务
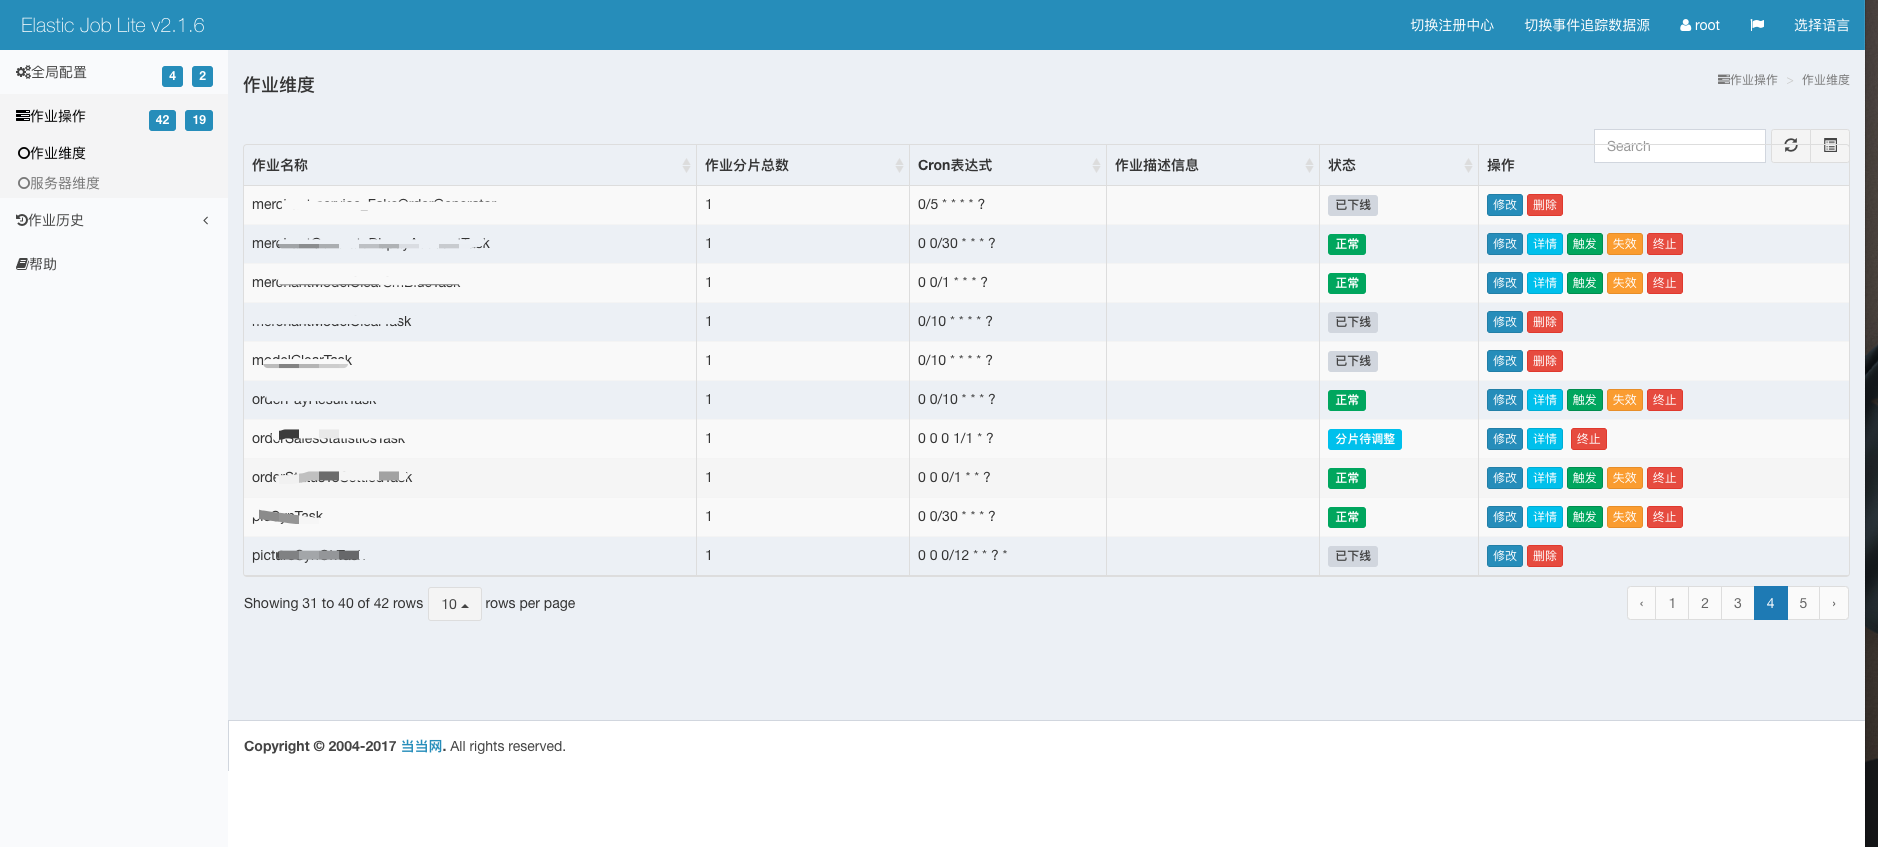
提供运维界面,可以管理作业和注册中心。
1.1 使用场景
由于项目为微服务,单模块可能在两个实例以上的数量,定时器就会出现多实例同时执行的情况。
一般定时器缺少管理界面,无法监控定时器是否执行成功。
市面上常见的解决方案为定时器加锁的操作,或者采用第3方分布式定时器。
分布式定时器有多种方案,比如阿里内部的ScheduledX,当当网的Elastic job,个人开源的xxl-job等。
1.2 功能列表
- 分布式调度协调
- 弹性扩容缩容
- 失效转移
- 错过执行作业重触发
- 作业分片一致性,保证同一分片在分布式环境中仅一个执行实例
- 自诊断并修复分布式不稳定造成的问题
- 支持并行调度
- 支持作业生命周期操作
- 丰富的作业类型
- Spring整合以及命名空间提供
- 运维平台
1.3 概念
分片:任务的分布式执行,需要将一个任务拆分为多个独立的任务项,然后由分布式的服务器分别执行某一个或几个分片项。
例如:有一个遍历数据库某张表的作业,现有2台服务器。为了快速的执行作业,那么每台服务器应执行作业的50%。 为满足此需求,可将作业分成2片,每台服务器执行1片。作业遍历数据的逻辑应为:服务器A遍历ID以奇数结尾的数据;服务器B遍历ID以偶数结尾的数据。 如果分成10片,则作业遍历数据的逻辑应为:每片分到的分片项应为ID%10,而服务器A被分配到分片项0,1,2,3,4;服务器B被分配到分片项5,6,7,8,9,直接的结果就是服务器A遍历ID以0-4结尾的数据;服务器B遍历ID以5-9结尾的数据。
历史轨迹:Elastic-Job提供了事件追踪功能,可通过事件订阅的方式处理调度过程的重要事件,用于查询、统计和监控。
1.4 封装elasticjob
由于当当网Elastic job处于1年间未更新阶段,相关jar处于可以使用阶段功能不全。考虑到使用场景为多项目使用,将elastic-job-lite-spring简单封装便于使用。
2.使用说明:
2.1 添加依赖
ps:实际version版本请使用最新版
<dependency>
  <groupId>com.purgeteam</groupId>
  <artifactId>elasticjob-spring-boot-starter</artifactId>
  <version>0.1.1.RELEASE</version>
</dependency>
2.2 配置
ps: 需要mysql,zookeeper支持,请提前搭建好。
配置bootstrap.yml或者application.yml。
加入以下配置:
spring:
  elasticjob:
    datasource: # job需要的记录数据源
      url: jdbc:mysql://127.0.0.1:3306/batch_log?useUnicode=true&characterEncoding=utf-8&verifyServerCertificate=false&useSSL=false&requireSSL=false
      driver-class-name: com.mysql.cj.jdbc.Driver
      username: root
      password: Rtqw123OpnmER
    regCenter: # 注册中心
      serverList: 127.0.0.1:2181
      namespace: elasticJobDemo
2.3 定时器实现方法编写
创建定时器类(唯一不同的地方在于将@Scheduled改为实现SimpleJob接口即可)
定时器实现方法编写在execute方法里。
@Slf4j
@Component
public class MySimpleJob implements SimpleJob {

    //  @Scheduled(cron = "0 0/1 * * * ?")
    @Override
    public void execute(ShardingContext shardingContext) {
        log.info(String.format("Thread ID: %s, 作业分片总数: %s, " +
                        "当前分片项: %s.当前参数: %s," +
                        "作业名称: %s.作业自定义参数: %s",
                Thread.currentThread().getId(),
                shardingContext.getShardingTotalCount(),
                shardingContext.getShardingItem(),
                shardingContext.getShardingParameter(),
                shardingContext.getJobName(),
                shardingContext.getJobParameter()
        ));
        // 分片大致如下:根据配置的分片参数执行相应的逻辑
        switch (context.getShardingItem()) {
            case 0:
                // do something by sharding item 0
                break;
            case 1:
                // do something by sharding item 1
                break;
            case 2:
                // do something by sharding item 2
                break;
            // case n: ...
        }
    }
}
log:Thread ID: 66, 作业分片总数: 1, 当前分片项: 0.当前参数: Beijing,作业名称: PropertiesSimpleJob.作业自定义参数: test
2.4 配置定时器
2.4.1 创建Configuration类
将ZookeeperRegistryCenter和JobEventConfiguration注入。
创建JobScheduler @Bean(initMethod = "init")。
在mySimpleJobScheduler方法里先通过ElasticJobUtils#getLiteJobConfiguration获取LiteJobConfiguration对象。
创建SpringJobScheduler对象返回即可。
@Configuration
public class MyJobConfig {

    // job 名称
    private static final String JOB_NAME = "MySimpleJob";

    // 定时器cron参数
    private static final String CRON = "0 0/1 * * * ?";

    // 定时器分片
    private static final int SHARDING_TOTAL_COUNT = 1;

    // 分片参数
    private static final String SHARDING_ITEM_PARAMETERS = "0=Beijing,1=Shanghai,2=Guangzhou";

    // 自定义参数
    private static final String JOB_PARAMETERS = "parameter";

    @Resource
    private ZookeeperRegistryCenter regCenter;

    @Resource
    private JobEventConfiguration jobEventConfiguration;


    @Bean(initMethod = "init")
    public JobScheduler mySimpleJobScheduler(final MySimpleJob mySimpleJob) {

        LiteJobConfiguration liteJobConfiguration = ElasticJobUtils
                .getLiteJobConfiguration(mySimpleJob.getClass(), JOB_NAME, CRON,
                        SHARDING_TOTAL_COUNT, SHARDING_ITEM_PARAMETERS, JOB_PARAMETERS);
        // 参数:1.定时器实例,2.注册中心类,3.LiteJobConfiguration,
        //     3.历史轨迹(不需要可以省略)
        return new SpringJobScheduler(mySimpleJob, regCenter, liteJobConfiguration, jobEventConfiguration);
    }

}
ElasticJobUtils#getLiteJobConfiguration参数简介:
/**
     * 获取 {@link LiteJobConfiguration} 对象
     *
     * @param jobClass               定时器实现类
     * @param jobName                定时器名称
     * @param cron                   定时参数
     * @param shardingTotalCount     作业分片总数
     * @param shardingItemParameters 当前参数 可以为null
     * @param jobParameters          作业自定义参数 可以为null
     * @return {@link LiteJobConfiguration}
     */
  public static LiteJobConfiguration getLiteJobConfiguration(
      final Class<? extends SimpleJob> jobClass,
      final String jobName,
      final String cron,
      final int shardingTotalCount,
      final String shardingItemParameters,
      final String jobParameters) {
  ...
    return ...;
  }
2.4.2 简化Configuration类
当然也可以用下面的@Configuration实现简化,配置bootstrap.yml或者application.yml。
spring:
  elasticjob:
    scheduled:
      jobConfigMap: // 为map集合
        PropertiesSimpleJob: // 定时器key名称
          jobName: PropertiesSimpleJob // job名称
          cron: 0 0/1 * * * ? // cron表达式
          shardingTotalCount: 2 // 分片数量
          shardingItemParameters: 0=123,1=332 // 分片参数
          jobParameters: test // 自定义参数
注入SpringJobSchedulerFactory,在propertiesSimpleJobScheduler方法里调用gerSpringJobScheduler方法即可。
@Configuration
public class PropertiesSimpleJobConfig {

    @Resource
    private SpringJobSchedulerFactory springJobSchedulerFactory;

    @Bean(initMethod = "init")
    public JobScheduler propertiesSimpleJobScheduler(final PropertiesSimpleJob job) {
        // 参数:1.定时器实例,2.配置名称,3.是否开启历史轨迹
        return springJobSchedulerFactory.getSpringJobScheduler(job,"PropertiesSimpleJob", true);
    }

}
2.4.3 注解方式配置(推荐方式)
ps:这个注解包含了上述方式,简化定时器注入。
继承SimpleJob实现方法execute。
在AnnotationSimpleJob类上加入注解@ElasticJobScheduler即可。
下面为完整注解。
@Slf4j
@ElasticJobScheduler(
        name = "AnnotationSimpleJob", // 定时器名称
        cron = "0/8 * * * * ?", // 定时器表达式
    	shardingTotalCount = 1, // 作业分片总数 默认为1
        shardingItemParameters = "0=Beijing,1=Shanghai,2=Guangzhou",  // 分片序列号和参数用等号分隔 不需要参数可以不加
        jobParameters = "123", // 作业自定义参数 不需要参数可以不加
    	isEvent = true // 是否开启数据记录 默认为true
)
public class AnnotationSimpleJob implements SimpleJob {

    @Override
    public void execute(ShardingContext shardingContext) {
        log.info(String.format("Thread ID: %s, 作业分片总数: %s, " +
                        "当前分片项: %s.当前参数: %s," +
                        "作业名称: %s.作业自定义参数: %s",
                Thread.currentThread().getId(),
                shardingContext.getShardingTotalCount(),
                shardingContext.getShardingItem(),
                shardingContext.getShardingParameter(),
                shardingContext.getJobName(),
                shardingContext.getJobParameter()
        ));
    }
}
总结
分布式job可以解决多个项目同一个定时器都执行的问题,配合elastic-job控制台可以直观监控定时器执行情况等。
示例代码地址:elastic-job-spring-boot