总的来说,其核心思维其实不是用神经网络的方法,
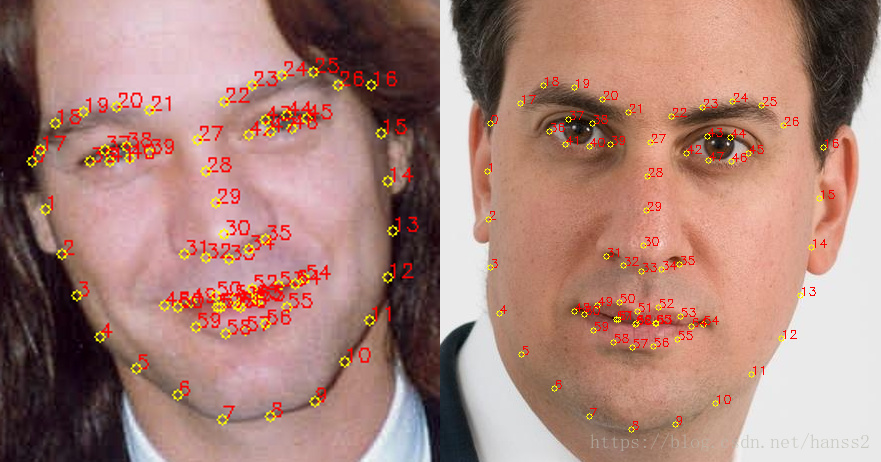
使用Dlib进行人脸检测和68个关键点定位:
这里使用的是ERT方法,源自论文<< One Millisecond Face Alignment with an Ensemble of RegressionTrees>>,算是一种比较老的方法了。但是效果很好。
进行旋转,缩放,平移等变换,即aligement操作,使得第二个图和原始图相互吻合:
这里使用的是普式变换(Ordinary Procrustes Analysis),最终结果是要使得变换过程满足下面式子最小化,简单的说,就是第一个图的68个点经过仿射变换(warp_affine)后,和第二个图的68个点的距离最小,优化目标是:
$sum_{i=1}^{68}||s R p_i^T + T - q_i^T||^{2}$
解释一下这个优化目标:RR是一个正交的2∗22∗2矩阵,SS是标量,tt是2矢量,pipi和qiqi是上面计算的人脸定位矩阵的68个点坐标。
使用奇异值SVD分解( Singular Value Decomposition),从而求出R:
U, S, Vt = numpy.linalg.svd(points1.T * points2)
R = (U * Vt).T
通过如下步骤实现(https://github.com/matthewearl/faceswap):
将输入矩阵转换为浮点数。这对于后续操作是必需的。
减去每个点集的质心。一旦找到点集的最佳的缩放和旋转方式,质心C1C1和C2C2可以用来求解最终结果。
同样,将每个点按其标准偏差进行划分。这消除了问题的缩放变换的麻烦。
利用奇异值分解计算旋转部分。请参阅维基百科关于正交普鲁克斯特问题的文章。
返回完整的变换作为仿射变换矩阵。
程序所需的库包括dlib(需要上Github下载源码来安装):
$ python setup.py install
会编译比较久。。。
然后就是使用:
$ ./faceswap.py head_image.jpg face_image.jpg
import cv2
import dlib
import numpy

import sys

PREDICTOR_PATH = "/home/matt/dlib-18.16/shape_predictor_68_face_landmarks.dat"
SCALE_FACTOR = 1
FEATHER_AMOUNT = 11

FACE_POINTS = list(range(17, 68))
MOUTH_POINTS = list(range(48, 61))
RIGHT_BROW_POINTS = list(range(17, 22))
LEFT_BROW_POINTS = list(range(22, 27))
RIGHT_EYE_POINTS = list(range(36, 42))
LEFT_EYE_POINTS = list(range(42, 48))
NOSE_POINTS = list(range(27, 35))
JAW_POINTS = list(range(0, 17))

# Points used to line up the images.
ALIGN_POINTS = (LEFT_BROW_POINTS + RIGHT_EYE_POINTS + LEFT_EYE_POINTS +
                               RIGHT_BROW_POINTS + NOSE_POINTS + MOUTH_POINTS)

# Points from the second image to overlay on the first. The convex hull of each
# element will be overlaid.
OVERLAY_POINTS = [
    LEFT_EYE_POINTS + RIGHT_EYE_POINTS + LEFT_BROW_POINTS + RIGHT_BROW_POINTS,
    NOSE_POINTS + MOUTH_POINTS,
]

# Amount of blur to use during colour correction, as a fraction of the
# pupillary distance.
COLOUR_CORRECT_BLUR_FRAC = 0.6

detector = dlib.get_frontal_face_detector()
predictor = dlib.shape_predictor(PREDICTOR_PATH)

class TooManyFaces(Exception):
    pass

class NoFaces(Exception):
    pass

def get_landmarks(im):
    rects = detector(im, 1)

    if len(rects) > 1:
        raise TooManyFaces
    if len(rects) == 0:
        raise NoFaces

    return numpy.matrix([[p.x, p.y] for p in predictor(im, rects[0]).parts()])

def annotate_landmarks(im, landmarks):
    im = im.copy()
    for idx, point in enumerate(landmarks):
        pos = (point[0, 0], point[0, 1])
        cv2.putText(im, str(idx), pos,
                    fontFace=cv2.FONT_HERSHEY_SCRIPT_SIMPLEX,
                    fontScale=0.4,
                    color=(0, 0, 255))
        cv2.circle(im, pos, 3, color=(0, 255, 255))
    return im

def draw_convex_hull(im, points, color):
    points = cv2.convexHull(points)
    cv2.fillConvexPoly(im, points, color=color)

def get_face_mask(im, landmarks):
    im = numpy.zeros(im.shape[:2], dtype=numpy.float64)

    for group in OVERLAY_POINTS:
        draw_convex_hull(im,
                         landmarks[group],
                         color=1)

    im = numpy.array([im, im, im]).transpose((1, 2, 0))

    im = (cv2.GaussianBlur(im, (FEATHER_AMOUNT, FEATHER_AMOUNT), 0) > 0) * 1.0
    im = cv2.GaussianBlur(im, (FEATHER_AMOUNT, FEATHER_AMOUNT), 0)

    return im

def transformation_from_points(points1, points2):
    """
    Return an affine transformation [s * R | T] such that:
        sum ||s*R*p1,i + T - p2,i||^2
    is minimized.
    """
    # Solve the procrustes problem by subtracting centroids, scaling by the
    # standard deviation, and then using the SVD to calculate the rotation. See
    # the following for more details:
    #   https://en.wikipedia.org/wiki/Orthogonal_Procrustes_problem

    points1 = points1.astype(numpy.float64)
    points2 = points2.astype(numpy.float64)

    c1 = numpy.mean(points1, axis=0)
    c2 = numpy.mean(points2, axis=0)
    points1 -= c1
    points2 -= c2

    s1 = numpy.std(points1)
    s2 = numpy.std(points2)
    points1 /= s1
    points2 /= s2

    U, S, Vt = numpy.linalg.svd(points1.T * points2)

    # The R we seek is in fact the transpose of the one given by U * Vt. This
    # is because the above formulation assumes the matrix goes on the right
    # (with row vectors) where as our solution requires the matrix to be on the
    # left (with column vectors).
    R = (U * Vt).T

    return numpy.vstack([numpy.hstack(((s2 / s1) * R,
                                       c2.T - (s2 / s1) * R * c1.T)),
                         numpy.matrix([0., 0., 1.])])

def read_im_and_landmarks(fname):
    im = cv2.imread(fname, cv2.IMREAD_COLOR)
    im = cv2.resize(im, (im.shape[1] * SCALE_FACTOR,
                         im.shape[0] * SCALE_FACTOR))
    s = get_landmarks(im)

    return im, s

def warp_im(im, M, dshape):
    output_im = numpy.zeros(dshape, dtype=im.dtype)
    cv2.warpAffine(im,
                   M[:2],
                   (dshape[1], dshape[0]),
                   dst=output_im,
                   borderMode=cv2.BORDER_TRANSPARENT,
                   flags=cv2.WARP_INVERSE_MAP)
    return output_im

def correct_colours(im1, im2, landmarks1):
    blur_amount = COLOUR_CORRECT_BLUR_FRAC * numpy.linalg.norm(
                              numpy.mean(landmarks1[LEFT_EYE_POINTS], axis=0) -
                              numpy.mean(landmarks1[RIGHT_EYE_POINTS], axis=0))
    blur_amount = int(blur_amount)
    if blur_amount % 2 == 0:
        blur_amount += 1
    im1_blur = cv2.GaussianBlur(im1, (blur_amount, blur_amount), 0)
    im2_blur = cv2.GaussianBlur(im2, (blur_amount, blur_amount), 0)

    # Avoid divide-by-zero errors.
    im2_blur += (128 * (im2_blur <= 1.0)).astype(im2_blur.dtype)

    return (im2.astype(numpy.float64) * im1_blur.astype(numpy.float64) /
                                                im2_blur.astype(numpy.float64))

im1, landmarks1 = read_im_and_landmarks(sys.argv[1])
im2, landmarks2 = read_im_and_landmarks(sys.argv[2])

M = transformation_from_points(landmarks1[ALIGN_POINTS],
                               landmarks2[ALIGN_POINTS])

mask = get_face_mask(im2, landmarks2)
warped_mask = warp_im(mask, M, im1.shape)
combined_mask = numpy.max([get_face_mask(im1, landmarks1), warped_mask],
                          axis=0)

warped_im2 = warp_im(im2, M, im1.shape)
warped_corrected_im2 = correct_colours(im1, warped_im2, landmarks1)

output_im = im1 * (1.0 - combined_mask) + warped_corrected_im2 * combined_mask

cv2.imwrite('output.jpg', output_im)
-
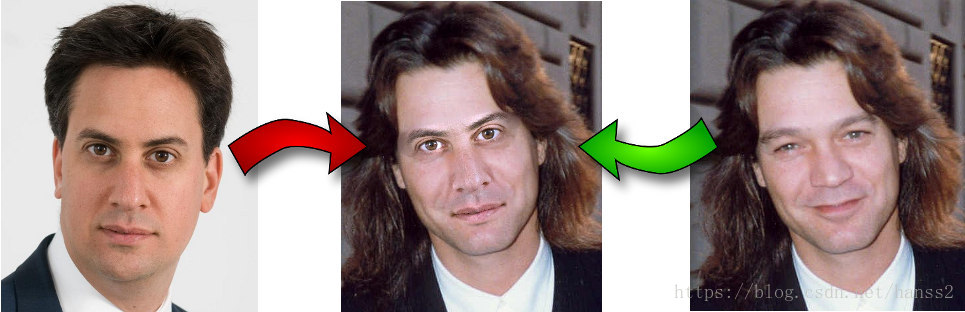
效果: