1)访问mysql官方网站
#访问网站
https://dev.mysql.com/downloads/file/?id=470281
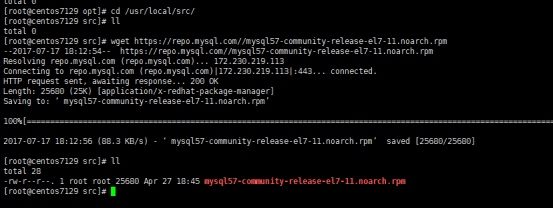
2)下载安装包到linux
#进入文件存放路径
cd /usr/local/src
wget https://repo.mysql.com//mysql57-community-release-el7-11.noarch.rpm
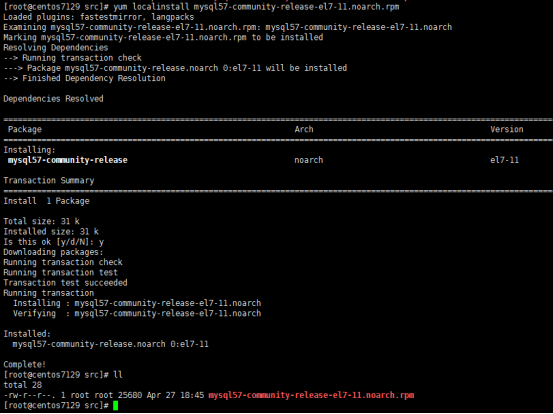
3)下载以rpm方式安装mysql的yum源
yum localinstall mysql57-community-release-el7-11.noarch.rpm
4)检查mysql的yum源
#检查mysql的yum repo源是否可用
yum repolist enabled |grep "mysql.*-community.*"

5)以yum方式安装mysql
#安装mysql
yum -y install mysql-commuinty-server
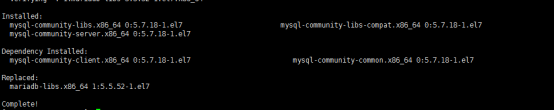
#如上提示表示安装成功
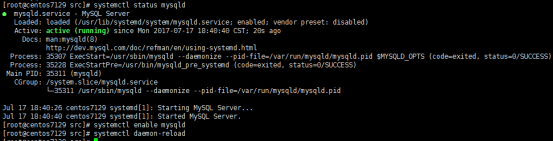
6)启动mysql服务
#启动mysql服务
systemctl start mysqld
7)设置开机启动
#设置开机自动启动
systemctl enable mysqld
systemctl daemon-reload
8)设置mysql的root密码
#获取登录MySQL的root用户临时密码
grep 'temporary password' /var/log/mysqld.log

利用临时密码,访问mysql
alter user 'root'@'localhost' identified by 'chineseA@123/#';
[root@centos7129 opt]# mysql -uroot -p
Enter password: 临时密码
mysql> alter user 'root'@'localhost' identified by 'chineseA@123/#';
#更改密码策略
mysql> show variables like '%password';
set global validate_password_policy=0;
set global validate_password_length=4;
#再次重置密码
mysql> alter user 'root'@'localhost' identified by '123456';
#新增1个test用户,可远程访问mysql
mysql> grant all privileges on *.* to 'test'@'%' identified by '123456' with grant option;

9)配置mysql支持的字符集
#在[mysqld]配置项中,添加支持utf-8编码
vim /etc/my.cnf
character-set-server=utf8mb4
collation-server=utf8mb4_unicode_ci
init_connect='SET NAMES utf8mb4'
#重启mysql
systemctl restart mysqld
10)重新设置mysql的root密码(在第8步骤不成功时)
#登录后出现如下错误:
ERROR 1045 (28000): Access denied for user 'root'@'localhost' (using password: YES)

#则在/etc/my.cnf的[msyqld]项中新增 skip-grant-tables
#重启mysql
systemctl restart mysqld
#mysql -uroot -p
Enter password:原密码
mysql>use mysql;
mysql>update user set authentication_string=password("123456") where user="root";
mysql>flush privileges;
mysql>exit;
#然后再将/etc/my.cnf的[msyqld]项中的skip-grant-tables注释
#再重启mysql
systemctl restart mysqld
#如果出现该问题
failed: Access denied for user 'root'@'192.168.0.129' (using password: YES) at ./mysqlreport line 249
可先在配置文件 /etc/my.cnf中,新增如下内容
[client]
host=localhost
user=xxx
password=xxx
重启数据库后
在执行该语句
mysql>INSERT INTO `user` VALUES ('%','root','Y','Y','Y','Y','Y','Y','Y','Y','Y','Y','Y','Y','Y','Y','Y','Y','Y','Y','Y','Y','Y','Y','Y','Y','Y','Y','Y','Y','Y','','','','',0,0,0,0,'mysql_native_password','*6BB4837EB74329105EE4568DDA7DC67ED2CA2AD9','N',LOCALTIME(),NULL,'N');
mysql>flush privileges;
之后再注释以下配置项
/etc/my.cnf中
[client]
host=localhost
user=xxx
password=xxx
11)列出mysql常见路径配置项
#配置文件路径 /etc/my.cnf
#日志文件路径 /var/log/mysqld.log
#mysql启动脚本 /usr/lib/systemd/system/mysqld.service
#socket文件路径 /var/lib/mysql/mysql.sock
#pid文件 /var/run/mysqld/mysqld.pid