1 Angular路由的工作流程
用户在浏览器输入一个URL -> Angular将获取到这个URL并将其解析成一个UrlTree实例 -> Angular会到路由配置中去寻找并激活与UrlTree实例匹配的配置项 -> 为配置项指定的组件创建实例 -> 将创建的实例组件渲染到<router-outlet>所在位置
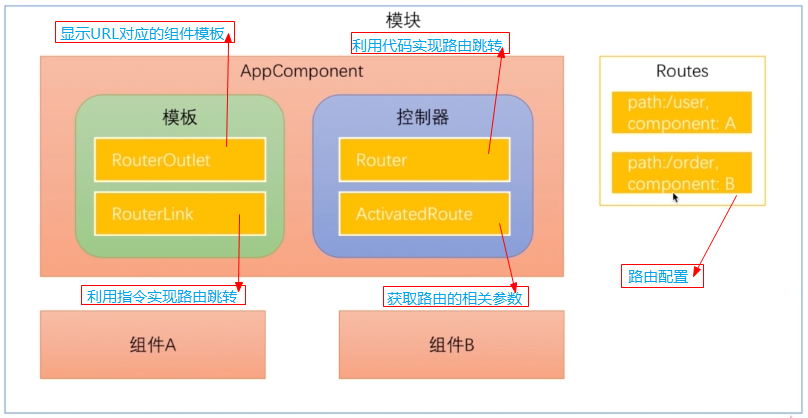
2 Angular路由的几个核心概念
2.1 路由配置
就是一个Routes类型的数组
// 路由配置
const routeConfig: Routes = [ // 创建路由根模块需要用到的路由配置
  {path: '', component: HomeComponent},
  {path: 'stock', component: StockComponent}
];
路由想要正常工作还需要创建一个路由根模块,并将其添加到相应的模块中去
import {BrowserModule} from '@angular/platform-browser';
import {NgModule} from '@angular/core';

import {AppComponent} from './app.component';
import {FormsModule} from '@angular/forms';
import {HttpModule} from '@angular/http';
import { TestComponentComponent } from './test-component/test-component.component';
import {MyModuleModule} from './module/my-module/my-module.module';
import { HomeComponent } from './home/home.component';
import { StockComponent } from './stock/stock.component';
import {RouterModule, Routes} from '@angular/router';

// 路由配置
const routeConfig: Routes = [ // 创建路由根模块需要用到的路由配置
  {path: '', component: HomeComponent},
  {path: 'stock', component: StockComponent}
];

@NgModule({
  declarations: [ // 声明在该模块中有哪些东西(组件、指令、管道)
    AppComponent, TestComponentComponent, HomeComponent, StockComponent
  ],
  imports: [ // 声明该模块需要正常运转时需要用到哪些模块(即:该模块依赖哪些其它模块)
    BrowserModule,
    FormsModule,
    HttpModule,
    MyModuleModule,
    RouterModule.forRoot(routeConfig) // 创建路由根模块,并导入到主模块中
  ],
  providers: [], // 声明模块中的服务
  bootstrap: [AppComponent] // 声明该模块的主组件
})
export class AppModule {
}
注意:详细写法请参见《揭秘angular2》P302
2.2 RouterOutlet指令
在组件的模板中开辟一块位置来显示URL对应的组件
2.3 通过代码实现路由跳转
在控制器类中调用Router对象的相关方法来实现路由跳转
import {Component} from '@angular/core';
import {Router} from '@angular/router'; // 导入需要的东西

@Component({
  selector: 'app-root',  // 使用组件时的标签
  templateUrl: './app.component.html', // 使用组件时的模板
  styleUrls: ['./app.component.css']  // css
})
export class AppComponent { // 控制器
  constructor(private router: Router) {
  }

  toStock() { // 该事件触发时就跳转到指定的组件
    this.router.navigate(['/stock']);
  }

}
2.4 使用指令实现路由跳转
<div>
  Hello Boy
</div>
<hr />

<!--利用指令进行路由跳转-->
<a [routerLink]="['/']">主页面</a>
<!--<a [routerLink]="['/stock']">股票信息页面</a>-->

<!--触发单击事件后,在控制类中相应方法中利用代码实现路由跳转-->
<input type="button" value="股票信息页面" (click)="toStock()" />

<!--添加RouterOuter指令-->
<router-outlet></router-outlet>
2.5 利用ActivatedRoute服务获取路由的相关参数【请参见《揭秘angular2》P316】
2.5.1 获取Path参数
传入Path参数的方式1

传入Path参数的方式2

获取Path参数的方式
import {Component, OnInit, OnDestroy} from '@angular/core';
import {ActivatedRoute, Params} from '@angular/router';

@Component({
  selector: 'app-stock',
  templateUrl: './stock.component.html',
  styleUrls: ['./stock.component.css']
})
export class StockComponent implements OnInit {
  public stockId: number;
  public limit: number;
  private sub: any;
  private sub2: any;

  constructor(private data: ActivatedRoute) {
  }

  ngOnInit() {
    // 利用快照的方式读取路由参数(有bug,不推荐使用)
    // this.stockId = this.data.snapshot.params['id'];

    // 利用订阅的方式读取参数(推荐使用)
    this.sub = this.data.params.subscribe((params: Params) => {
      this.stockId = params['id'];
    });

    this.sub2 = this.data.queryParams.subscribe((params: Params) => {
      this.limit = parseInt(params['limit']);
      if (this.limit >= 100) {
        console.log('已达到上线值');
      }
      console.log(this.limit);
    });
  }

  ngOnDestroy() {
    this.sub.unsubscribe();
  }

}
2.5.2 获取Query参数
传入Query参数的方式1

传入Query参宿的方式2

获取Query参数的方式
import {Component, OnInit, OnDestroy} from '@angular/core';
import {ActivatedRoute, Params} from '@angular/router';

@Component({
  selector: 'app-stock',
  templateUrl: './stock.component.html',
  styleUrls: ['./stock.component.css']
})
export class StockComponent implements OnInit {
  public stockId: number;
  public limit: number;
  private sub: any;
  private sub2: any;

  constructor(private data: ActivatedRoute) {
  }

  ngOnInit() {
    // 利用快照的方式读取Path路由参数(有bug,不推荐使用)
    // this.stockId = this.data.snapshot.params['id'];

    // 利用订阅的方式读取Path参数(推荐使用)
    this.sub = this.data.params.subscribe((params: Params) => {
      this.stockId = params['id'];
    });

    // 获取Query参数
    this.sub2 = this.data.queryParams.subscribe((params: Params) => {
      this.limit = parseInt(params['limit']);
      if (this.limit >= 100) {
        console.log('已达到上线值');
      }
      console.log(this.limit);
    });
  }

  ngOnDestroy() {
    this.sub.unsubscribe();
  }

}
注意:Query参数都是字符串类型的
3 子路由
3.1 子路由配置
import {BrowserModule} from '@angular/platform-browser';
import {NgModule} from '@angular/core';

import {AppComponent} from './app.component';
import {FormsModule} from '@angular/forms';
import {HttpModule} from '@angular/http';
import { TestComponentComponent } from './test-component/test-component.component';
import {MyModuleModule} from './module/my-module/my-module.module';
import { HomeComponent } from './home/home.component';
import { StockComponent } from './stock/stock.component';
import {RouterModule, Routes} from '@angular/router';
import {UserInfoComponent} from "./user/user-info/user-info.component";
import { Error404Component } from './error404/error404.component';
import { BuyerComponent } from './buyer/buyer.component';
import { SellerComponent } from './seller/seller.component';

// 路由配置
const routeConfig: Routes = [ // 创建路由根模块需要用到的路由配置
  {path: '', component: HomeComponent},
  {path: 'stock', component: StockComponent,
    children: [ // 配置子路由
      {path: 'buyer', component: BuyerComponent},
      {path: 'seller', component: SellerComponent}
    ]
  },
  {path: '**', component: Error404Component}
];

@NgModule({
  declarations: [ // 声明在该模块中有哪些东西(组件、指令、管道)
    AppComponent, TestComponentComponent, HomeComponent, StockComponent, Error404Component, BuyerComponent, SellerComponent
  ],
  imports: [ // 声明该模块需要正常运转时需要用到哪些模块(即:该模块依赖哪些其它模块)
    BrowserModule,
    FormsModule,
    HttpModule,
    MyModuleModule,
    RouterModule.forRoot(routeConfig) // 创建路由根模块,并导入到主模块中
  ],
  providers: [], // 声明模块中的服务
  bootstrap: [AppComponent] // 声明该模块的主组件
})
export class AppModule {
}
3.2 子路由组件的路由跳转
<p>
  这是股票信息页面,注意:自路由的路径前面需要加一个点
</p>
<a [routerLink]="['./seller']">卖家信息列表</a>
<a [routerLink]="['./buyer']">买家信息列表</a>

<router-outlet></router-outlet>
4 附属路由
一个组件可以同时有多个路由,但是只能有一个主路由,其他的都是辅助路由
4.1 自路由配置
import {BrowserModule} from '@angular/platform-browser';
import {NgModule} from '@angular/core';

import {AppComponent} from './app.component';
import {FormsModule} from '@angular/forms';
import {HttpModule} from '@angular/http';
import {TestComponentComponent} from './test-component/test-component.component';
import {MyModuleModule} from './module/my-module/my-module.module';
import {HomeComponent} from './home/home.component';
import {StockComponent} from './stock/stock.component';
import {RouterModule, Routes} from '@angular/router';
import {UserInfoComponent} from "./user/user-info/user-info.component";
import {Error404Component} from './error404/error404.component';
import {BuyerComponent} from './buyer/buyer.component';
import {SellerComponent} from './seller/seller.component';
import {ConsultComponent} from './consult/consult.component';

// 路由配置
const routeConfig: Routes = [ // 创建路由根模块需要用到的路由配置
  {path: 'home', component: HomeComponent},
  {
    path: 'stock', component: StockComponent,
    children: [ // 配置子路由
      {path: 'buyer', component: BuyerComponent},
      {path: 'seller', component: SellerComponent}
    ]
  },
  {path: 'consult', component: ConsultComponent, outlet: 'aux'}, // 子路由配置
  {path: '**', component: Error404Component}
];

@NgModule({
  declarations: [ // 声明在该模块中有哪些东西(组件、指令、管道)
    AppComponent,
    TestComponentComponent,
    HomeComponent,
    StockComponent,
    Error404Component,
    BuyerComponent,
    SellerComponent,
    ConsultComponent
  ],
  imports: [ // 声明该模块需要正常运转时需要用到哪些模块(即:该模块依赖哪些其它模块)
    BrowserModule,
    FormsModule,
    HttpModule,
    MyModuleModule,
    RouterModule.forRoot(routeConfig) // 创建路由根模块,并导入到主模块中
  ],
  providers: [], // 声明模块中的服务
  bootstrap: [AppComponent] // 声明该模块的主组件
})
export class AppModule {
}
4.2 子路由的跳转与关闭
<div>
  Hello Boy
</div>
<hr />

<div>
  <a [routerLink]="['/home']">主页面</a>
  <input type="button" value="股票页面" (click)="toStock()" />

  <!--子路由跳转的时候同时设置主路由的跳转-->
  <a [routerLink]="[{outlets:{primary: ['home'], aux:['consult']}}]">咨询页面</a>

  <!--关闭子路由-->
  <a [routerLink]="[{outlets:{aux:null}}]">结束咨询</a>
</div>


<!--主路由-->
<router-outlet></router-outlet>

<!--辅助路由-->
<router-outlet name="aux"></router-outlet>
5 路由加载模块
5.1 需求
在实际开发中常常是每个模块中每个路由前面部分都必须保持一致,例如:客户模块中所有的路由必须都是以 /client 开头
5.2 实现方法
为每个模块都设置一个模块级别的主组件,其余组件都是该组件的子组件;在子模块中为子模块的主组件设定子路由实现
5.3 代码实现
5.3.1 创建多个模块
模块创建后为每个模块都创建一个模块路由文件


import { NgModule } from '@angular/core';
import { CommonModule } from '@angular/common';
import { Test01Component } from './test01/test01.component';
import { CoreModule } from '../core/core.module';
import { TestHomeComponent } from './test-home/test-home.component';
import { SharedModule } from '../shared/shared.module';
import { TestRoutingModule } from './test-routing.module';
import { Test02Component } from './test02/test02.component';
import { Test03Component } from './test03/test03.component';
import { TestDemoComponent } from './test-demo/test-demo.component';
import { HttpModule } from '@angular/http';

@NgModule({
  imports: [
    SharedModule,
    TestRoutingModule
  ],
  declarations: [
    TestHomeComponent,
    Test01Component,
    Test02Component,
    Test03Component,
    TestDemoComponent
  ],
  exports: [
    Test01Component
  ]
})
export class TestModule { }

import { NgModule } from '@angular/core';
import { RouterModule, Routes } from '@angular/router';
import { CommonModule } from '@angular/common';
import { TestHomeComponent } from './test-home/test-home.component';
import { Test01Component } from './test01/test01.component';
import { Test02Component } from './test02/test02.component';
import { Test03Component } from './test03/test03.component';
import { TestDemoComponent } from './test-demo/test-demo.component';

const routes: Routes = [
    {
        path: 'test',
        component: TestHomeComponent,
        children: [
            { path: 'testDemo', component: TestDemoComponent},
            { path: 'test01', component: Test01Component },
            { path: 'test02', component: Test02Component },
            { path: 'test03', component: Test03Component }
        ]
     }
];

@NgModule({
    imports: [CommonModule, RouterModule.forChild(routes)],
    exports: [RouterModule]
})
export class TestRoutingModule {}
坑01:子模块的路由文件中加载路由信息是用的forChild,主模块中加载路由文件才用forRoot
5.3.2 在主模块中导入测试子模块
由于我这种写法不是利用路由进行模块懒加载的,所以必须在主模块中将子模块进行引入
import { BrowserModule } from '@angular/platform-browser';
import { NgModule } from '@angular/core';


import { AppComponent } from './app.component';
import { TestModule } from './test/test.module';
import { CoreModule } from './core/core.module';
import { SharedModule } from './shared/shared.module';
import { AppRoutingModule } from './app-routing.module';
import { ClientModule } from './client/client.module';
import { EmployeeModule } from './employee/employee.module';
import { SceneModule } from './scene/scene.module';

@NgModule({
  declarations: [
    AppComponent
  ],
  imports: [
    BrowserModule,
    CoreModule,
    SharedModule,
    AppRoutingModule,
    ClientModule,
    EmployeeModule,
    SceneModule,
    TestModule
  ],
  bootstrap: [AppComponent]
})
export class AppModule { }
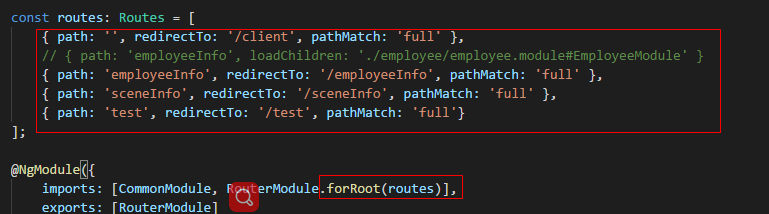
5.3.3 创建主路由
在主模块的路由文件中利用重定向来实现各个子模块的重定向
import { NgModule } from '@angular/core';
import { RouterModule, Routes } from '@angular/router';
import { CommonModule } from '@angular/common';

const routes: Routes = [
    { path: '', redirectTo: '/client', pathMatch: 'full' },
    // { path: 'employeeInfo', loadChildren: './employee/employee.module#EmployeeModule' }
    { path: 'employeeInfo', redirectTo: '/employeeInfo', pathMatch: 'full' },
    { path: 'sceneInfo', redirectTo: '/sceneInfo', pathMatch: 'full' },
    { path: 'test', redirectTo: '/test', pathMatch: 'full'}
];

@NgModule({
    imports: [CommonModule, RouterModule.forRoot(routes)],
    exports: [RouterModule]
})
export class AppRoutingModule {}
技巧01:路由文件必须导入到模块中去
6 模块懒加载???
待更新......
2018-3-12 09:14:21