学习android开发已经四五个月,由于项目中职责的原因一直没有接触过Service的实际项目,今天重新学一遍Service用法。
问题:
作为四大组件,为什么需要Service?
它与Thread又有何区别?
具体怎么用?
如何实现与Activity之间的通信?
一、Service 介绍
从官网中,我们可以看到这么一句:
Most confusion about the Service class actually revolves around what it is not:
- A Service is not a separate process. The Service object itself does not imply it is running in its own process; unless otherwise specified, it runs in the same process as the application it is part of.
- A Service is not a thread. It is not a means itself to do work off of the main thread (to avoid Application Not Responding errors).
Thus a Service itself is actually very simple, providing two main features:
- A facility for the application to tell the system about something it wants to be doing in the background (even when the user is not directly interacting with the application). This corresponds to calls to Context.startService(), which ask the system to schedule work for the service, to be run until the service or someone else explicitly stop it.
- A facility for an application to expose some of its functionality to other applications. This corresponds to calls to Context.bindService(), which allows a long-standing connection to be made to the service in order to interact with it.
简单来说,Service不是一个独立的进程,除非它被特殊指定,否则它也是我们应用程序的一部分,它需要依赖于创建服务时所在的应用程序。同时Service也不是一个线程,它其实是在主线程工作的,所以不能在Service中处理耗时的操作,不然就会出现ARN现象,如果要处理耗时的操作,可以新开一个子线程,单独处理。
更进一步讲,Service是 Android中实现程序后台运行的解决方案,它非常适合用于去执行那 些不需要和用户交互而且还要求长期运行的任务。服务的运行不依赖于任何用户界面,即使 当程序被切换到后台,或者用户打开了另外一个应用程序,服务仍然能够保持正常运行。
Service有两种启动方式,一种是通过startService()方式,一种是通过bindService()方式,那这两种具体有什么区别呢,我们可以看下它们的生命周期来看出端倪。
1.1 Service 生命周期 及两种状态

Service 分为两种工作状态: 一种是 启动状态用于执行后台计算,另一种是 绑定状态用于和其他组件和Service进行交互。需要注意的是这两种状态的Service是可以共存的,即Service既可以处于绑定状态和启动状态。
startService()启动的生命周期:
当我们第一次使用startService启动一个服务时,系统实例化一个Service实例,然后依次调用onCreate()和onStartCommand()方法,然后运行,需要注意的是,再次使用startService方法时,不会在创建一个新的服务对象了,但还是会再次执行onStartCommand()方法,如果我们想要停掉一个服务,可以用stopService方法,此时,onDestroy()方法就会被调用,不管前面使用了多少次的startService,stopService方法调用一次,就可停掉服务。
自定义一个 MyService继承自Service


public class MyService extends Service {

    public static final String TAG = "MyService";

    @Override
    public void onCreate() {
        super.onCreate();
        Log.d(TAG, "onCreate() executed");
    }

    @Override
    public int onStartCommand(Intent intent, int flags, int startId) {
        Log.d(TAG, "onStartCommand() executed");
        return super.onStartCommand(intent, flags, startId);
    }

    @Override
    public void onDestroy() {
        super.onDestroy();
        Log.d(TAG, "onDestroy() executed");
    }

    @Override
    public IBinder onBind(Intent intent) {
        return null;
    }

}
当通国startService()启动一个Service时
Intent startIntent = new Intent(this, MyService.class);
startService(startIntent);
log信息如下:

再次启动Service时:

调用stopService()时,Service就会被停止。
Intent stopIntent = new Intent(this, MyService.class);
stopService(stopIntent);
这种方法Service和Activity的关系并不大,只是Activity通知了Service一下:“你可以启动了。”然后Service就去忙自己的事情了
bindService()启动的生命周期:
当调用者首次使用bindService绑定一个服务时,系统会实例化一个Service实例,并一次调用其onCreate()方法和onBind()方法,然后调用者就可以和服务进行交互了,此后,如果再次使用bindService绑定服务,系统不会创建新的Service实例,也不会再调用onBind方法;如果我们需要解除与这个服务的绑定,可使用unbindService方法,此时onUnbind方法和onDestroy方法会被调用。
自定义Service;
public class MyService extends Service {

    public static final String TAG = "MyService";

    private MyBinder mBinder = new MyBinder();

    @Override
    public void onCreate() {
        super.onCreate();
        Log.d(TAG, "onCreate() executed");
    }

    @Override
    public int onStartCommand(Intent intent, int flags, int startId) {
        Log.d(TAG, "onStartCommand() executed");
        return super.onStartCommand(intent, flags, startId);
    }

    @Override
    public void onDestroy() {
        super.onDestroy();
        Log.d(TAG, "onDestroy() executed");
    }

    @Override
    public IBinder onBind(Intent intent) {
        return mBinder;
    }

    class MyBinder extends Binder {

        public void startDownload() {
            Log.d("TAG", "startDownload() executed");
            // 执行具体的下载任务
        }

    }

}
这里我们新增了一个MyBinder类继承自Binder类,然后在MyBinder中添加了一个startDownload()方法用于在后台执行下载任务,当然这里并不是真正地去下载某个东西,只是做个测试,所以startDownload()方法只是打印了一行日志。
在MainActivity中开启和关闭Service:
public class MainActivity extends Activity implements OnClickListener {

    private Button startService;

    private Button stopService;

    private Button bindService;

    private Button unbindService;

    private MyService.MyBinder myBinder;

    private ServiceConnection connection = new ServiceConnection() {

        @Override
        public void onServiceDisconnected(ComponentName name) {
        }

        @Override
        public void onServiceConnected(ComponentName name, IBinder service) {
            myBinder = (MyService.MyBinder) service;
            myBinder.startDownload();
        }
    };

    @Override
    protected void onCreate(Bundle savedInstanceState) {
        super.onCreate(savedInstanceState);
        setContentView(R.layout.activity_main);
        startService = (Button) findViewById(R.id.start_service);
        stopService = (Button) findViewById(R.id.stop_service);
        bindService = (Button) findViewById(R.id.bind_service);
        unbindService = (Button) findViewById(R.id.unbind_service);
        startService.setOnClickListener(this);
        stopService.setOnClickListener(this);
        bindService.setOnClickListener(this);
        unbindService.setOnClickListener(this);
    }

    @Override
    public void onClick(View v) {
        switch (v.getId()) {
        case R.id.start_service:
            Intent startIntent = new Intent(this, MyService.class);
            startService(startIntent);
            break;
        case R.id.stop_service:
            Intent stopIntent = new Intent(this, MyService.class);
            stopService(stopIntent);
            break;
        case R.id.bind_service:
            Intent bindIntent = new Intent(this, MyService.class);
            bindService(bindIntent, connection, BIND_AUTO_CREATE);
            break;
        case R.id.unbind_service:
            unbindService(connection);
            break;
        default:
            break;
        }
    }

}
可以看到,这里我们首先创建了一个ServiceConnection的匿名类,在里面重写了onServiceConnected()方法和onServiceDisconnected()方法,这两个方法分别会在Activity与Service建立关联和解除关联的时候调用。在onServiceConnected()方法中,我们又通过向下转型得到了MyBinder的实例,有了这个实例,Activity和Service之间的关系就变得非常紧密了。现在我们可以在Activity中根据具体的场景来调用MyBinder中的任何public方法,即实现了Activity指挥Service干什么Service就去干什么的功能。
1.2 同时startService和binderService
如果我们既点击了StartService按钮,又点击了Bind Service按钮会怎么样呢?这个时候你会发现,不管你是单独点击Stop Service按钮还是Unbind Service按钮,Service都不会被销毁,必要将两个按钮都点击一下,Service才会被销毁。也就是说,点击Stop Service按钮只会让Service停止,点击Unbind Service按钮只会让Service和Activity解除关联,一个Service必须要在既没有和任何Activity关联又处理停止状态的时候才会被销毁。
先点击一下Start Service按钮,再点击一下Bind Service按钮,这样就将Service启动起来,并和Activity建立了关联。然后点击Stop Service按钮后Service并不会销毁,再点击一下Unbind Service按钮,Service就会销毁了,打印日志如下所示:

总结:
这两个启动方式的不同,导致生命周期也不同。startService与调用者没有必然的联系,即调用者结束了自己的生命周期,只要没有使用stopService方法停止这个服务,服务仍会运行。而bindService需要有个寄宿的对象,就相当于bind到某个宿主中去,谁绑定了,谁就要负责,负责它的生命周期,从开始到结束,如果宿主自己的生命周期结束了,bindService模式就要先把服务给销毁掉。
值得注意的一点是,如果调用者首先是先用startService方式启动服务,然后再用bindService方式绑定某个服务的话,一定要先用unbindService方式解绑,然后才用stopService方式销毁服务对象,不然的话,仅仅只是stopService是不够的,没解绑的对象还是在的,就容易造成内存泄露了。
我们应该始终记得在Service的onDestroy()方法里去清理掉那些不再使用的资源,防止在Service被销毁后还会有一些不再使用的对象仍占用着内存。
二、Service 与 Thread 之间的关系
Service与Thread这两个是没有什么关系的。因为我们知道Service是运行在UI线程中,那么当需要耗时操作的时候,就需要Thread帮助,不是说Service因为是在后台运行,就跟Thread等同了。Thread是用于开启一个子线程,在这里去执行一些耗时操作就不会阻塞主线程的运行。而Service我们最初理解的时候,总会觉得它是用来处理一些后台任务的,一些比较耗时的操作也可以放在这里运行,这就会让人产生混淆了。
Android的后台就是指,它的运行是完全不依赖UI的。即使Activity被销毁,或者程序被关闭,只要进程还在,Service就可以继续运行。比如说一些应用程序,始终需要与服务器之间始终保持着心跳连接,就可以使用Service来实现。
我们可以在Service中再创建一个子线程,然后在这里去处理耗时逻辑就没问题。既然在Service里要创建一个子线程,那为什么不直接在Activity里创建呢?这是因为Activity很难对Thread进行控制,当Activity被销毁之后,就没有任何其它的办法可以再重新获取到之前创建的子线程的实例。而且在一个Activity中创建的子线程,另一个Activity无法对其进行操作。但是Service就不同了,所有的Activity都可以与Service进行关联,然后可以很方便地操作其中的方法,即使Activity被销毁了,之后只要重新与Service建立关联,就又能够获取到原有的Service中Binder的实例。因此,使用Service来处理后台任务,Activity就可以放心地finish,完全不需要担心无法对后台任务进行控制的情况。
当需要在一个Service中创建一个子线程时,可以通过如下实现:
@Override
public int onStartCommand(Intent intent, int flags, int startId) {
    new Thread(new Runnable() {
        @Override
        public void run() {
            // 开始执行后台任务
        }
    }).start();
    return super.onStartCommand(intent, flags, startId);
}

class MyBinder extends Binder {

    public void startDownload() {
        new Thread(new Runnable() {
            @Override
            public void run() {
                // 执行具体的下载任务
            }
        }).start();
    }

}
三、 创建前台Service
Service几乎都是在后台运行的,一直以来它都是默默地做着辛苦的工作。但是Service的系统优先级还是比较低的,当系统出现内存不足情况时,就有可能会回收掉正在后台运行的Service。如果你希望Service可以一直保持运行状态,而不会由于系统内存不足的原因导致被回收,就可以考虑使用前台Service。前台Service和普通Service最大的区别就在于,它会一直有一个正在运行的图标在系统的状态栏显示,下拉状态栏后可以看到更加详细的信息,非常类似于通知的效果。当然有时候你也可能不仅仅是为了防止Service被回收才使用前台Service,有些项目由于特殊的需求会要求必须使用前台Service,比如说墨迹天气,它的Service在后台更新天气数据的同时,还会在系统状态栏一直显示当前天气的信息。
那么我们就来看一下如何才能创建一个前台Service吧,其实并不复杂,修改MyService中的代码,如下所示:
public class MyService extends Service {

    public static final String TAG = "MyService";

    private MyBinder mBinder = new MyBinder();

    @Override
    public void onCreate() {
        super.onCreate();
        Notification notification = new Notification(R.drawable.ic_launcher,
                "有通知到来", System.currentTimeMillis());
        Intent notificationIntent = new Intent(this, MainActivity.class);
        PendingIntent pendingIntent = PendingIntent.getActivity(this, 0,
                notificationIntent, 0);
        notification.setLatestEventInfo(this, "这是通知的标题", "这是通知的内容",
                pendingIntent);
        startForeground(1, notification);
        Log.d(TAG, "onCreate() executed");
    }

    .........

}
这里只是修改了MyService中onCreate()方法的代码。可以看到,我们首先创建了一个Notification对象,然后调用了它的setLatestEventInfo()方法来为通知初始化布局和数据,并在这里设置了点击通知后就打开MainActivity。然后调用startForeground()方法就可以让MyService变成一个前台Service,并会将通知的图片显示出来。
四、远程Service(开辟一个新进程)
将一个Service放到单独的进程中去执行:
  <service
        android:name="com.example.servicetest.MyService"
        android:process=":remote" >
    </service>
此时,可以通过startService去开启这个Service(可以在这个Service中处理耗时的操作,而不影响主线程的执行,因为它在另一个单独的进程中)。但是当我们在MainAcitivity中去bindService时,程序会崩溃(因为MainActivity在主进程中而Service运行在远程的进程中,让MainActivity和MyService建立关联会让程序崩溃)。
那么如何关联一个Activity与Service,这时候需要用AIDL来进程间通信(IPC)
AIDL(Android Interface Definition Language)是Android接口定义语言的意思,它可以用于让某个Service与多个应用程序组件之间进行跨进程通信,从而可以实现多个应用程序共享同一个Service的功能。
4.1 开启service的Server端程序
下面我们就来一步步地看一下AIDL的用法到底是怎样的。首先需要新建一个AIDL文件,在这个文件中定义好Activity需要与Service进行通信的方法。新建MyAIDLService.aidl文件,代码如下所示:(点击sync后,会生成MyAIDLService.java文件)
package com.example.servicetest;
interface MyAIDLService {
    int plus(int a, int b);
    String toUpperCase(String str);
}
然后修改MyService中的代码,在里面实现我们刚刚定义好的MyAIDLService接口,如下所示:
public class MyService extends Service {

    ......

    @Override
    public IBinder onBind(Intent intent) {
        return mBinder;
    }

    MyAIDLService.Stub mBinder = new Stub() {

        @Override
        public String toUpperCase(String str) throws RemoteException {
            if (str != null) {
                return str.toUpperCase();
            }
            return null;
        }

        @Override
        public int plus(int a, int b) throws RemoteException {
            return a + b;
        }
    };

}
这里先是对MyAIDLService.Stub进行了实现,重写里了toUpperCase()和plus()这两个方法。这两个方法的作用分别是将一个字符串全部转换成大写格式,以及将两个传入的整数进行相加。然后在onBind()方法中将MyAIDLService.Stub的实现返回。这里为什么可以这样写呢?因为Stub其实就是Binder的子类,所以在onBind()方法中可以直接返回Stub的实现。
public class MainActivity extends Activity implements OnClickListener {

    private Button startService;

    private Button stopService;

    private Button bindService;

    private Button unbindService;

    private MyAIDLService myAIDLService;

    private ServiceConnection connection = new ServiceConnection() {

        @Override
        public void onServiceDisconnected(ComponentName name) {
        }

        @Override
        public void onServiceConnected(ComponentName name, IBinder service) {
            myAIDLService = MyAIDLService.Stub.asInterface(service);
            try {
                int result = myAIDLService.plus(3, 5);
                String upperStr = myAIDLService.toUpperCase("hello world");
                Log.d("TAG", "result is " + result);
                Log.d("TAG", "upperStr is " + upperStr);
            } catch (RemoteException e) {
                e.printStackTrace();
            }
        }
    };

    ......

}
可以看到,这里首先使用了MyAIDLService.Stub.asInterface()方法将传入的IBinder对象传换成了MyAIDLService对象,接下来就可以调用在MyAIDLService.aidl文件中定义的所有接口了。这里我们先是调用了plus()方法,并传入了3和5作为参数,然后又调用了toUpperCase()方法,并传入hello world字符串作为参数,最后将调用方法的返回结果打印出来。
由此可见,我们确实已经成功实现跨进程通信了,在一个进程中访问到了另外一个进程中的方法。
不过你也可以看出,目前的跨进程通信其实并没有什么实质上的作用,因为这只是在一个Activity里调用了同一个应用程序的Service里的方法。而跨进程通信的真正意义是为了让一个应用程序去访问另一个应用程序中的Service,以实现共享Service的功能。那么下面我们自然要学习一下,如何才能在其它的应用程序中调用到MyService里的方法。
如果想要让Activity与Service之间建立关联,需要调用bindService()方法,并将Intent作为参数传递进去,在Intent里指定好要绑定的Service,示例代码如下:
Intent bindIntent = new Intent(this, MyService.class);
bindService(bindIntent, connection, BIND_AUTO_CREATE);
注册Service(让其它程序可以通过隐式方法访问该Service)
<service
        android:name="com.example.servicetest.MyService"
        android:process=":remote" >
        <intent-filter>
            <action android:name="com.example.servicetest.MyAIDLService"/>
        </intent-filter>
    </service>
注:android 5.0 之后隐式方法访问Service需要:
Intent intent = new Intent("com.example.servicetest.MyAIDLService").setPackage(com.example.servicetest);
到此,Server端的 service就定义好了,他可以在该server端的程序中运行,其它程序也可以访问该Service
4.2 访问Service的Client端程序
然后创建一个新的Android项目,起名为ClientTest,我们就尝试在这个程序中远程调用MyService中的方法。
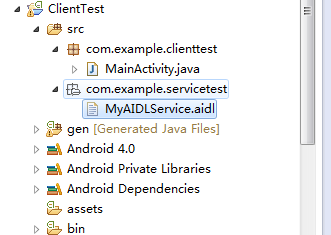
ClientTest中的Activity如果想要和MyService建立关联其实也不难,首先需要将MyAIDLService.aidl文件从ServiceTest项目中拷贝过来,注意要将原有的包路径一起拷贝过来,完成后项目的结构如下图所示:
接下来打开或新建MainActivity,在其中加入和MyService建立关联的代码,如下所示:
public class MainActivity extends Activity {

    private MyAIDLService myAIDLService;

    private ServiceConnection connection = new ServiceConnection() {

        @Override
        public void onServiceDisconnected(ComponentName name) {
        }

        @Override
        public void onServiceConnected(ComponentName name, IBinder service) {
            myAIDLService = MyAIDLService.Stub.asInterface(service);
            try {
                int result = myAIDLService.plus(50, 50);
                String upperStr = myAIDLService.toUpperCase("comes from ClientTest");
                Log.d("TAG", "result is " + result);
                Log.d("TAG", "upperStr is " + upperStr);
            } catch (RemoteException e) {
                e.printStackTrace();
            }
        }
    };

    @Override
    protected void onCreate(Bundle savedInstanceState) {
        super.onCreate(savedInstanceState);
        setContentView(R.layout.activity_main);
        Button bindService = (Button) findViewById(R.id.bind_service);
        bindService.setOnClickListener(new OnClickListener() {
            @Override
            public void onClick(View v) {
                Intent intent = new Intent("com.example.servicetest.MyAIDLService");
                bindService(intent, connection, BIND_AUTO_CREATE);
            }
        });
    }

}
这部分代码大家一定会非常眼熟吧?没错,这和在ServiceTest的MainActivity中的代码几乎是完全相同的,只是在让Activity和Service建立关联的时候我们使用了隐式Intent,将Intent的action指定成了com.example.servicetest.MyAIDLService。
这样我们跨进程跨app的通信就完成了。
参考博客:
http://www.cnblogs.com/cr330326/p/5741464.html
http://blog.csdn.net/guolin_blog/article/details/11952435/
http://blog.csdn.net/guolin_blog/article/details/9797169