React Component-React组件
允许用户自由封装组件是React非常突出的特性,用户可将自己创建的组件像普通的HTML标签一样插入页面,React.CreateClass方法就是用来创建一个组件类的。在创建和调用react组件时有几点需要注意,我们在实际的demo中进行总结。
从一个简单的例子开始,我们尝试创建一个包含文本框和提交按钮的组件:
    <div id="container"></div>
    <script type="text/babel">
      let InputWithButton = React.createClass({
        render:function(){
          return(
            <div>
              <input type="text" value="password"/>
              <button>Submit</button>
            </div>
          )
        }
      });
      ReactDOM.render(
        <InputWithButton/>,
        document.getElementById("container")
      )
    </script>
运行上述代码,显示结果如下:

在上述代码中,需要注意以下几点:
- 我们创建了一个名为
InputWithButton的组件类,注意此处命名首字母必须大写,自动生成InputWithButton实例。 - 所有的组件都必须要有自己的render方法,用以输出组件。
- 在创建组件类时,return的最终结果内只能包含一个顶级标签,如果我们在上例中去掉div标签直接返回
<input>和<button>,代码会报错。 - 组件的用法与原生HTML的用法一致,直接在ReactDOM.render中插入
<InputWithButton/>,注意"/"不能丢,在jsx解析时会根据"/"判断标签的闭合。
另外,像原生的HTML标签一样,可以给组件添加属性,参考如下代码:
    <div id="container"></div>
    <script type="text/babel">
      let InputWithButton = React.createClass({
        render:function(){
          return(
            <div>
              <input type="text" value={this.props.value} className="input"/>
              <button>{this.props.name}</button>
            </div>
          )
        }
      });
      ReactDOM.render(
        <InputWithButton name="confirm" value="password"/>,
        document.getElementById("container")
      )
    </script>

- 如上例中调用
<InputWithButton/>标签时,添加的name和value属性,在创建组件类时,可以通过this.props对象是获取组件的属性,在input通过this.props.value给value赋值,在button中通过this.props.name赋值,注意都要包裹在{}内。 - 添加属性时需要注意添加class属性时要用className,for属性用htmlFor,这是因为class和for是JavaScript的保留字。
在使用this.props对象获取属性时,需要注意比较特殊的this.props.children,他表示组件的所有子节点。
    <div id="container"></div>
    <script type="text/babel">
      let FormList = React.createClass({
        render:function(){
          return(
            <form>
              {
                React.Children.map(this.props.children,function(child){
                  return <button>{child}</button>;
                })
              }
            </form>
          )
        }
      });

      ReactDOM.render(
        <FormList>
            <span>Submit</span>
            <span>Clear</span>
            <span>Cancel</span>
        </FormList>,
        document.getElementById("container")
      )
    </script>
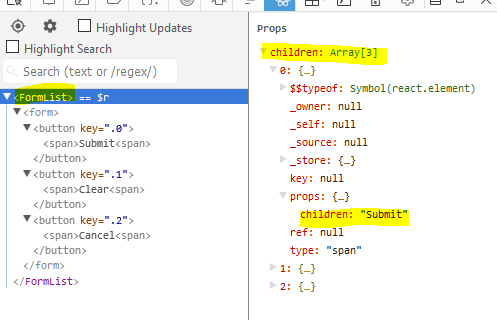
如上代码,我们尝试创建一个包含三个按钮的form表单,在创建FormList组件类时,通过this.props.children获取FormList下的子元素,通过React.Children.map遍历节点。通过React专用的调试工具,我们可以查看FormList组件类的具体组成如下:

对于React的入门还是比较容易的,但想深入掌握还有些路要走,要尽快熟悉JSX的语法规则,主要参考阮一峰大神的react入门实例教程和官方文档。