1.1、活动是什么
活动(Activity)是最容易吸引用户的地方,他是一种可以包含用户界面的组件
主要用于和用户进行交互
一个用户可以包含零个或多个活动,不包含活动的程序少见
1.2、活动的基本用法
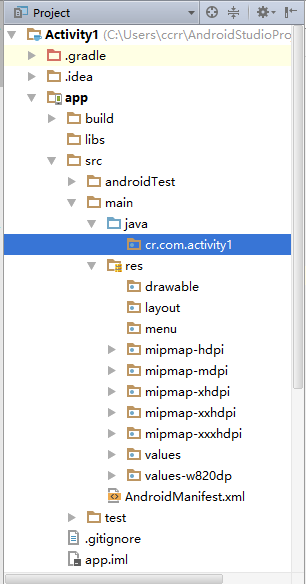
首先创建好一个工程,目录如下图:
1.2.1、手动创建活动
在cr.com.activity1上右键--New--Activity--Empty Activity
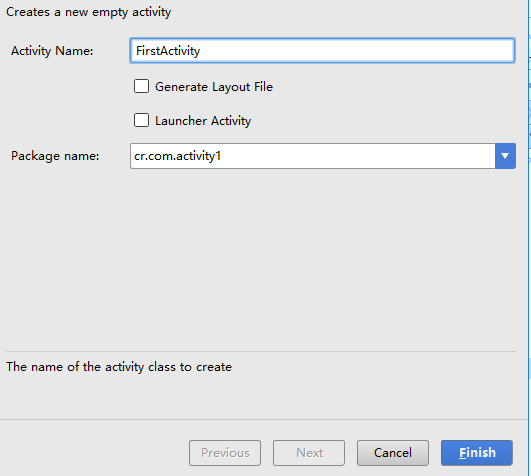
进行创建一个活动
关于选项:
Generate Layout File:自动为新创建的活动创建一个对用的布局文件
Launcher Activity:将创建的活动设置为当前项目的主活动
此时创建好的类:
public class FirstActivity extends AppCompatActivity {

    @Override
    protected void onCreate(Bundle savedInstanceState) {
        super.onCreate(savedInstanceState);
    }
}
创建好的活动都继承了AppCompatActivity,并且都有应该实现实现其中方法
这里简单的调用父类的onCreate()方法
后续需要加入更多的处理事务的逻辑。
1.2.2、创建豪加载布局
在layout文件上右键--Layout resource file进行创建布局文件
这里默认先选择LinearLayout布局
first_layout
<?xml version="1.0" encoding="utf-8"?>
<LinearLayout xmlns:android="http://schemas.android.com/apk/res/android"
    android:orientation="vertical" android:layout_width="match_parent"
    android:layout_height="match_parent">

    <Button
        android:id="@+id/button_1"
        android:text="Button 1"
        android:layout_width="match_parent"
        android:layout_height="wrap_content" />

</LinearLayout>
布局文件中添加Button元素
android:id:给当前元素添加唯一的标识符(类似前端中的id)
android:layout_width:指定当前元素的宽度
------match_parent:之当前元素和父元素一样宽
android:layout_height:指定当前元素的高度
------wrap_content:当前元素的高度可以刚好包含内容
android:textL:指定当前元素的显示内容
使用观察视图:
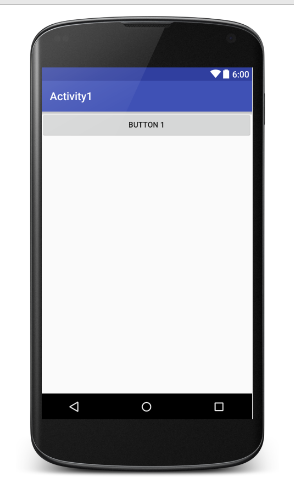
此时是可以对当前的按钮元素进行显示
在FirstActivity的oncreate()方法中:
public class FirstActivity extends AppCompatActivity {
    @Override
    protected void onCreate(Bundle savedInstanceState) {
        super.onCreate(savedInstanceState);
        setContentView(R.layout.first_layout);
    }
}
这里的setContentView()是给当前的活动加载一个布局
在方法中一般是传入布局文件的id
1.2.3、在AndroidManifest.xml文件中进行注册
<?xml version="1.0" encoding="utf-8"?>
<manifest xmlns:android="http://schemas.android.com/apk/res/android"
    package="cr.com.activity1">

    <application
        android:allowBackup="true"
        android:icon="@mipmap/ic_launcher"
        android:label="@string/app_name"
        android:supportsRtl="true"
        android:theme="@style/AppTheme">
        <activity android:name=".FirstActivity"></activity>
    </application>

</manifest>
通过<activity>标签来对活动进行注册,注册的声明需要放在<application>标签中
android:name指定哪一个具体的活动
.FirstActivity是之前创建的类,其余的包在manifest已经进行填写。
若要程序运行还需要在配置中设置主活动
<?xml version="1.0" encoding="utf-8"?>
<manifest xmlns:android="http://schemas.android.com/apk/res/android"
package="cr.com.activity1">

<application
    android:allowBackup="true"
    android:icon="@mipmap/ic_launcher"
    android:label="@string/app_name"
    android:supportsRtl="true"
    android:theme="@style/AppTheme">
    <activity android:name=".FirstActivity" android:label="first">
        <intent-filter>
            <action android:name="android.intent.action.MAIN"></action>
            <category android:name="android.intent.category.LAUNCHER"></category>
        </intent-filter>
    </activity>
</application>

</manifest>
只需要在标签中添加上述的两个声明
同时也可以使用android:label:进行指定当前活动中标题栏的内容
标题栏是显示在活动的最顶部,同时也会成为启动器中应用程序显示的名称

此时运行显示界面
1.2.4、在活动中使用Toast
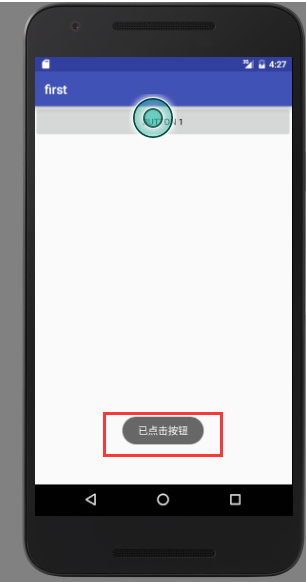
Toast是Android系统提供一种非常好的提醒方式
在程序中可以使用其提供一些短小的信息
这些信息会在一段时间自动消失,不会占用任何的屏幕的空间
代码:
public class FirstActivity extends AppCompatActivity {

    @Override
    protected void onCreate(Bundle savedInstanceState) {
        super.onCreate(savedInstanceState);
        setContentView(R.layout.first_layout);

        Button button1 = (Button) findViewById(R.id.button_1);
        button1.setOnClickListener(new View.OnClickListener() {
            @Override
            public void onClick(View v) {
                Toast.makeText(FirstActivity.this,"已点击按钮",Toast.LENGTH_SHORT).show();
            }
        });
    }
}
使用findViewById()方法获取在布局文件中的定义的元素
得到的是是一个View对象,需要进行墙砖为Button属性
setOnClickListener():为按钮注册一个监听器,点击事件就会触发监听器的onClick()方法
所以弹出Toast功能需要在onclick()方法中进行编写
通过静态方法makeText()创建一个Toast对象
在进行调用show()方法将Toast显示出来
makeText传入的三个参数:
第一个:Toast要求的上下文,由于活动本身就是一个Context对象,所以此时直接传入
第二个:Toast显示的文本内容
第三个:显示的时长,此时是两个选择:LENGTH_SHORT和LENGTH_LONG
1.2.5、在活动中使用Menu
手机屏幕非常有限,充分利用手机界面的空间是很重要的。
若没有文件夹进行创建menu文件夹
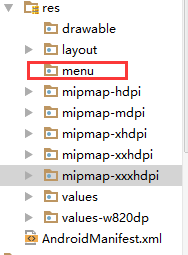
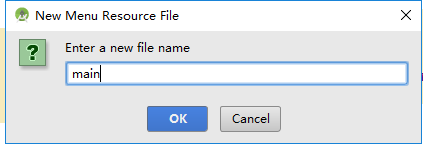
右键--Menu resource file进行创建一个mein文件
<?xml version="1.0" encoding="utf-8"?>
<menu xmlns:android="http://schemas.android.com/apk/res/android">
    <item android:id="@+id/add_item"
        android:title="add">
    </item>
    <item android:id="@+id/remove_item"
        android:title="remove">
    </item>
</menu>
<item>标签就是用来创建具体的菜单项
android:id指定唯一的标识
android:title:指定名称
在firstActivity中实现如下两个方法:
    @Override
    public boolean onCreateOptionsMenu(Menu menu) {
        getMenuInflater().inflate(R.menu.main,menu);
        return true;
    }

    @Override
    public boolean onOptionsItemSelected(MenuItem item) {
        switch (item.getItemId()){
            case R.id.add_item:
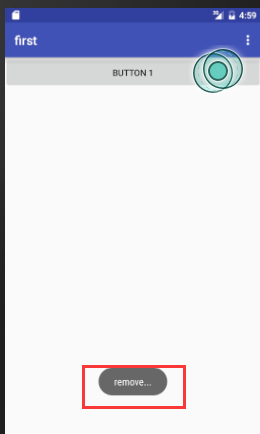
                Toast.makeText(FirstActivity.this, "add...", Toast.LENGTH_SHORT).show();
                break;
            case R.id.remove_item:
                Toast.makeText(FirstActivity.this, "remove...", Toast.LENGTH_SHORT).show();
                break;
            default:
        }
        return true;
    }
onCreateOptionsMenu()方法,用于显示菜单
getMenuInflater()方法能得到MenuInflater对象,在调用inflate()方法就可以给当前活动创建菜单了
inflate()方法接受两个参数:
第一个参数:用于指定通过哪一个配置资源来创建菜单
第二个参数:指定菜单项将添加到哪一个menu对象中
返回值为true:表示允许创建的菜单显示出来
返回值为false:创建的菜单无法显示
onOptionsItemSelected()方法:用于响应自定义菜单的响应事件
item.getItemId()来判断点击的是哪一个带单项
1.2.6、销毁一个活动
销毁活动的两种方式:
1、按一下back键
2、使用finish()方法
修改之前对button1的监听代码:
        Button button1 = (Button) findViewById(R.id.button_1);
        button1.setOnClickListener(new View.OnClickListener() {
            @Override
            public void onClick(View v) {
               finish();
            }
        });
点击一下就会销毁活动
1.3、使用Intent
1.3.1、显示Intent
新建一个活动:
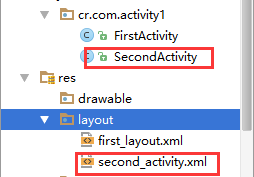
second_activity.xml
<?xml version="1.0" encoding="utf-8"?>
<RelativeLayout xmlns:android="http://schemas.android.com/apk/res/android"
    xmlns:tools="http://schemas.android.com/tools"
    android:layout_width="match_parent"
    android:layout_height="match_parent"
    android:paddingBottom="@dimen/activity_vertical_margin"
    android:paddingLeft="@dimen/activity_horizontal_margin"
    android:paddingRight="@dimen/activity_horizontal_margin"
    android:paddingTop="@dimen/activity_vertical_margin"
    tools:context="cr.com.activity1.SecondActivity">

    <Button
        android:id="@+id/button_2"
        android:text="Button 2"
        android:layout_width="match_parent"
        android:layout_height="wrap_content" />

</RelativeLayout>
SecondActivity.java
public class SecondActivity extends AppCompatActivity {

    @Override
    protected void onCreate(Bundle savedInstanceState) {
        super.onCreate(savedInstanceState);
        setContentView(R.layout.second_activity);
    }
}
此时还需要在 文件中进行注册
    <application
        android:allowBackup="true"
        android:icon="@mipmap/ic_launcher"
        android:label="@string/app_name"
        android:supportsRtl="true"
        android:theme="@style/AppTheme">
        <activity
            android:name=".FirstActivity"
            android:label="first">
            <intent-filter>
                <action android:name="android.intent.action.MAIN" />

                <category android:name="android.intent.category.LAUNCHER" />
            </intent-filter>
        </activity>
        <activity android:name=".SecondActivity"></activity>
    </application>
关于Intent:
Intent是Android程序中各组件之间进行交互数据的一种重要方式
可以指明当前组件想要执行的操作,还可以在不同组件之间进行传递数据
Intent一般可以用于启动服务,启动服务以及发送广播等场景
大致分为两种:
1、显示
2、隐式
Intent有多个构造函数的重载,其中一个是Intent(Context packageContext,Class<?>cls)
这个构造函数接受两个参数
1、要求提供一个启动活动的上下文
2、要启动的上下文
继续对button1进行修改:
public class FirstActivity extends AppCompatActivity {

    @Override
    protected void onCreate(Bundle savedInstanceState) {
        super.onCreate(savedInstanceState);
        setContentView(R.layout.first_layout);

        Button button1 = (Button) findViewById(R.id.button_1);
        button1.setOnClickListener(new View.OnClickListener() {
            @Override
            public void onClick(View v) {
                Intent intent = new Intent(FirstActivity.this,SecondActivity.class);
                startActivity(intent);
            }
        });
    }
}
这里首先构造出一个Intent,传入FirstActivity作为上下文
传入SecondActivity作为目标活动
通过startActivity()方法来执行Intent
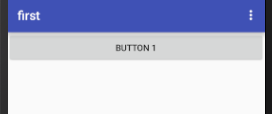
点击:

若要返回到上一个活动,back键就可以销毁当前活动,返回到上衣活动!!
1.3.2、隐式Intent
隐式不明确指定想要启动哪一个活动
而是指定了一系列更为抽象的action个category等信息
然后交给系统去分析这个Intent
著熬出合适的活动去启动
AndroidManifest.xml
指定当前活动能够响应的action和category
        <activity android:name=".SecondActivity">
            <intent-filter>
                <action android:name="android.intent.action.ACTION_START"></action>
                <category android:name="android.intent.category.DEFAULT"></category>
            </intent-filter>
        </activity>
action指定可以响应的活动:android.intent.action.ACTION_START
category是一些附加信息,更精确指明了活动的能狗响应的Intent还带category
当前只有两个标签都能匹配才会进行响应
修改button1
    @Override
    protected void onCreate(Bundle savedInstanceState) {
        super.onCreate(savedInstanceState);
        setContentView(R.layout.first_layout);

        Button button1 = (Button) findViewById(R.id.button_1);
        button1.setOnClickListener(new View.OnClickListener() {
            @Override
            public void onClick(View v) {
                Intent intent = new Intent("android.intent.action.ACTION_START");
                intent.addCategory("android.intent.category.DEFAULT");
                startActivity(intent);
            }
        });
    }
<category android:name="android.intent.category.DEFAULT"></category>是默认的
写不写均可以,在调用startActivity()方法时会自动添加到Intent
可以对其进行添加不同的属性
        <activity android:name=".SecondActivity">
            <intent-filter>
                <action android:name="android.intent.action.ACTION_START"></action>
                <category android:name="android.intent.category.DEFAULT"></category>
                <category android:name="android.intent.category.SECOND"></category>
            </intent-filter>
        </activity>
category可以同时指定多个,但是action自能指定一个
测试和之前的显式调用结果一样!!!
1.3.3、更多隐式Intent的使用
调用系统的浏览器:
 Button button1 = (Button) findViewById(R.id.button_1);
        button1.setOnClickListener(new View.OnClickListener() {
            @Override
            public void onClick(View v) {
                Intent intent = new Intent(Intent.ACTION_VIEW);
                intent.setData(Uri.parse("http://www.baidu.con"));
                startActivity(intent);
            }
        });
Intent.ACTION_VIEW:Android系统的内置动作,常量值为android.intent.action.VIEW
Uri.parse()方法,将一个网易解析成一个Uri对象,在调用setData()方法将这个uri传递过去
还可以在<intent-filter>标签中在配置一个date标签,更精确的指定当前活动能够响应的什么类型数据
data标签中可以配置一下的内容:

新建活动:
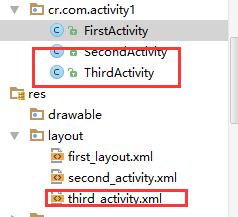
AndroidMainifest.xml
        <activity android:name=".ThirdActivity">
            <intent-filter>
                <action android:name="android.intent.action.VIEW"></action>
                <category android:name="android.intent.category.DEFAULT"></category>
                <data android:scheme="http"></data>
            </intent-filter>
        </activity>
指定了能够响应的action是Intent
category是默认的值
在data标签中指定数据的协议必须是http协议
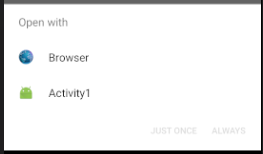
系统弹出一个列表,显示能够响应这个Intent的所有程序
选择第一个和之前一样会在浏览器中进行打开
JUST ONCE表四只是这次使用选择的程序打开
ALWAYS表示一致使用这次的选择打开
虽然声明了ThoedActivity是可以响应打开网页
但实际这个活动并没有加载并显示网页的功能
在项目中进行不要出现这种可能会五代用户的行为
geo表示显示地理位置
tel表示拨号
进行修改测试的代码:
Button button1 = (Button) findViewById(R.id.button_1);
button1.setOnClickListener(new View.OnClickListener() {
    @Override
    public void onClick(View v) {
        Intent intent = new Intent(Intent.ACTION_DIAL);
        intent.setData(Uri.parse("tel:10000"));
        startActivity(intent);
    }
});
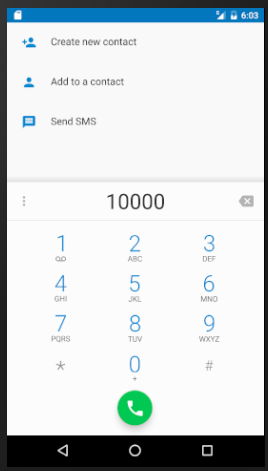
首先指定Intent的action
是Intent.ACTION_DIAL这也是安卓系统的内置活动
然后再data部分制定了协议是tel号码是10000
1.2.4、向下一个活动传递数据
不同活动活动之前进行数据的传毒
Intent提供了一系列putExtra()方法的重载
可以把将要传递的数据暂存再Intent中,启动另一个活动后,再从中取出数据
FirstActivity.java
        Button button1 = (Button) findViewById(R.id.button_1);
        button1.setOnClickListener(new View.OnClickListener() {
            @Override
            public void onClick(View v) {
                Intent intent = new Intent(FirstActivity.this,SecondActivity.class);
                intent.putExtra("data","date......");

                startActivity(intent);
            }
        });
使用显式的Intent的方式来启动SecondActivity
通过putExtra()方法传递了一个字符,有两个参数
1、键,用于后面的Intent中取值
2、传递的数据
SecondActivity.java
public class SecondActivity extends AppCompatActivity {
    @Override
    protected void onCreate(Bundle savedInstanceState) {
        super.onCreate(savedInstanceState);
        setContentView(R.layout.second_activity);
        Intent intent = getIntent();
        String data = intent.getStringExtra("data");
        Log.d("date--------",data);
    }
}
首先是通过getIntent()方法获启动SecondActivity的Intent
然后掉哦那个getStringExtra()方法传入响应的键值,就可以获取到数据
字符型数据:getStringExtra()
整型数据:getIntExtra()
布尔型数据:getBooleanExtra()
等
再运行之后点击按钮:
控制台会进行相关的打印

1.3.5、返回数据给上一个活动
数据可以正向的传递给下一个活动
同时也可以进行传递给上一个活动
返回键back可以返回带上一个活动但是没有进行相关的数据传递
Activity中有一个方法:startActivityForResult()方法也是用来启动活动的
但是这方法期望再销毁活动时能够给返回一个结果给上一个活动
两个参数:
1、Intent
2、参数的请求码,用于再之后的回调判断数据的来源
首先是FirstActivity.java
    @Override
    protected void onCreate(Bundle savedInstanceState) {
        super.onCreate(savedInstanceState);
        setContentView(R.layout.first_layout);

        Button button1 = (Button) findViewById(R.id.button_1);
        button1.setOnClickListener(new View.OnClickListener() {
            @Override
            public void onClick(View v) {
                Intent intent = new Intent(FirstActivity.this,SecondActivity.class);
               startActivityForResult(intent,1);
            }
        });
    }
这里使用startActivityForResult方法来启动SecondActivity
请求码只要是一个唯一值就可以了
其次是SecondActivity.java
 @Override
    protected void onCreate(Bundle savedInstanceState) {
        super.onCreate(savedInstanceState);
        setContentView(R.layout.second_activity);

        Button button2 = (Button) findViewById(R.id.button_2);
        button2.setOnClickListener(new View.OnClickListener() {
            @Override
            public void onClick(View v) {
                Intent intent = new Intent();
                intent.putExtra("date","date....");
                setResult(RESULT_OK,intent);
                finish();
            }
        });
    }
这里构建了一个Intent
这个Intent只是用于传递数据
将要传递的数据存放在Intent中
再调用setResutl()方法接受两个参数
1、用于向上一个活动返回处理结果,一般用RESULT_OK或者RESULT_CANCELED
2、把带有数据的Intent传递回去
调用finish()方法使用了销毁当前的活动
最后回到FirstActivity.java
 @Override
    protected void onActivityResult(int requestCode, int resultCode, Intent data) {
        switch (requestCode){
            case 1:
                if (requestCode == RESULT_OK){
                    String date = data.getStringExtra("date");
                    Log.d("date---",date);
                }
                break;
            default:
        }
    }
带有三个参数onActivityResult()
1、requestCode:启动活动时传入的请求码
2、resultCode返回数据传入时的处理结果
3、data携带返回数据的Intent
由于再一个活动可能调用startActivityForResult()方法启动很多不同的活动
每一个活动都会回到onActivityResult() 这个方法中
因此需要检验requestCode的值来判断数据来源
确定是其返回的周,再通过resultCode值来判断处理结果是否成功
最后从data中取值并打印出来
此时完成了向上一个活动返回数据的工作

如果通过Back键返回到上衣活动只需要在SecondActivity中重写onBackPresses()方法来解决这个问题
    @Override
    public void onBackPressed() {
        Intent intent = new Intent();
        intent.putExtra("date","date....");
        setResult(RESULT_OK,intent);
        finish();
    }