1、properties(这个标签基本上不太使用,了解)
1、mybatis可以使用properties来引入外部properties配置文件的内容
resource是引入类路径下的资源
url:引入网络网络路径或磁盘路径下的资源
新建一个file文件命名为dbconfig.properties,内容填充如下
jdbc.driver = com.mysql.jdbc.Driver
jdbc.url=jdbc:mysql://localhost:3306/mybatis
jdbc.username=root
jdbc.password=root
mybatis-config.xml文件内容修改如下,添加了properties标签,将数据库信息动态传入。(11、16-19行进行了修改)
(在后面mybatis与spring整合时,这一块都交给了spring做)
 1 <?xml version="1.0" encoding="UTF-8" ?>
 2 <!DOCTYPE configuration
 3  PUBLIC "-//mybatis.org//DTD Config 3.0//EN"
 4  "http://mybatis.org/dtd/mybatis-3-config.dtd">
 5 <configuration>
 6 <!--
 7  1、mybatis可以使用properties来引入外部properties配置文件的内容
 8  resource是引入类路径下的资源
 9  url:引入网络网络路径或磁盘路径下的资源
10  -->
11 <properties resource="dbconfig.properties"></properties>
12     <environments default="development">
13         <environment id="development">
14             <transactionManager type="JDBC" />
15             <dataSource type="POOLED">
16                 <property name="driver" value="${jdbc.driver}" />
17                 <property name="url" value="${jdbc.url}" />
18                 <property name="username" value="${jdbc.username}" />
19                 <property name="password" value="${jdbc.password}" />
20             </dataSource>
21         </environment>
22     </environments>
23     <!-- 将我们写好的sql映射文件(EmployeeMapper.xml)一定要注册到全局配置文件(mybatis-config.xml)中 -->
24
25     <mappers>
26         <mapper resource="EmployeeMapper.xml" />
27     </mappers>
28 </configuration>
2、settings
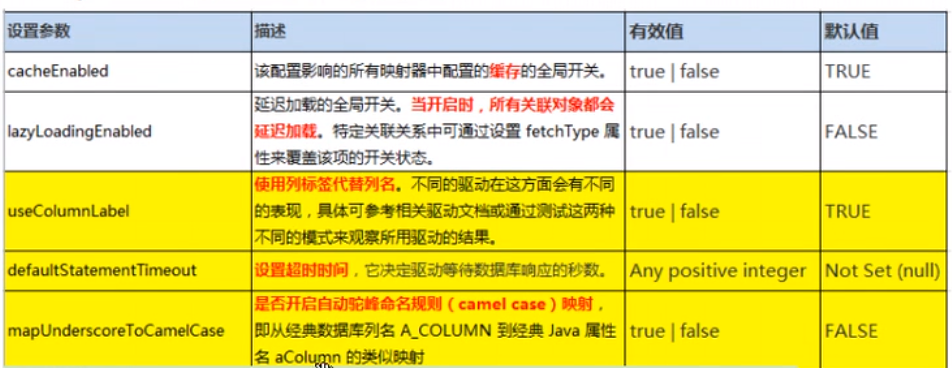
2.1、mapUnderscoreToCamelCase的使用
之前由于字段名没有和数据库中的对应上,lastName获取到的是null(如下图),使用mapUnderscoreToCamelCase可以使用驼峰命名法,需要将默认值FALSE改为TRUE即可使用了。

将以下代表加入到全局配置mybatis-config.xml文件中
1  <settings>
2  <setting name="mapUnderscoreToCamelCase" value="TRUE"/>
3  </settings>
再次进行测试,可以取到值了

数据库的字段是last_name,而javabean是lastName,这种情况下使用nice~规范~
(数据库不区分大小写,故命名规则是单词间要加下划线;java区分大小写,命名规范是驼峰命名法)
3、typeAliases
别名处理器
在xml文件中应用全类名的地方,可以使用别名了,减少工作量
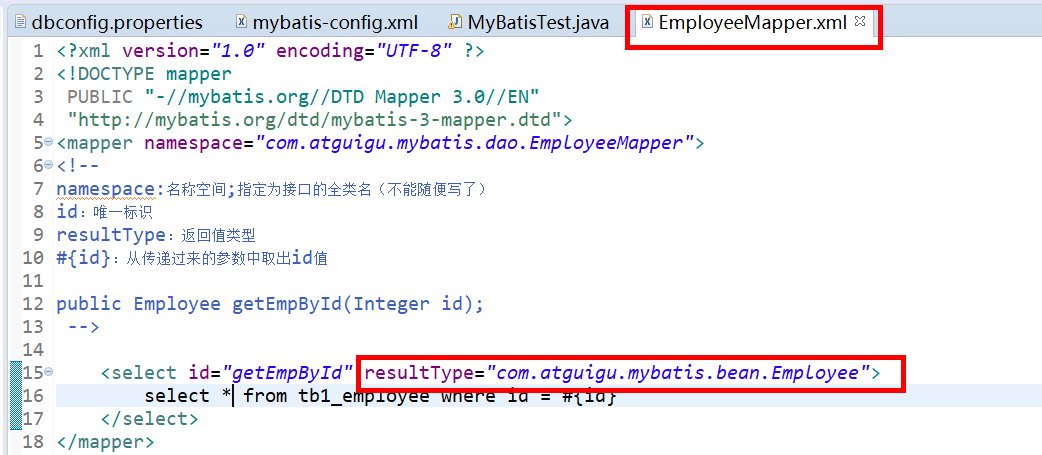
在EmployeeMapper.xml文件中,查询结果的返回值为com.atguigu.mybatis.bean.Employee,太长了
别名不区分带小写
处理方法如下:
(1)从Javabean中的Employee复制全类名放到全局配置文件mybatis-config.xml
1 <typeAliases>
2  <!--typeAlias:为某个java类型起类名
3      type:指定要起别名的类型全类名;默认别名就是类型小写:employee
4      alias:指定新的别名
5
6   -->
7      <typeAlias type="com.atguigu.mybatis.bean.Employee"/>
8  </typeAliases>
(2)在EmployeeMapper.xml文件中,将返回值改为默认别名即employee,再次测试,成功

或者使用alias指定别名
mybatis-config.xml,修改如下
1  <typeAliases>
2  <!--typeAlias:为某个java类型起类名
3      type:指定要起别名的类型全类名;默认别名就是类型小写:employee
4      alias:指定新的别名
5
6      -->
7      <typeAlias type="com.atguigu.mybatis.bean.Employee" alias="emp"/>
8  </typeAliases>
EmployeeMapper.xml修改如下
1 <select id="getEmpById" resultType="emp">
2         select * from tb1_employee where id = #{id}
3 </select>
运行成功!
如果每次取别名,都用typeAliases就每次只能为一个类型取别名,太麻烦了。使用批量取别名来解决这一问题
package:为某个包内下的所有类批量取别名
name:指定包名(为当前包及下面所有的的后代包的每一一个类都起一个默认别名(类名小写)
将全局文件中代码修改如下:
1 <typeAliases>
2      <package name="com.atguigu.mybatis.bean"/>
3  </typeAliases>
将EmpolyeeMapper.xml更改如下
1  <!-- resultType可以写成Employee或employee,别名不区分大小写 -->
2     <select id="getEmpById" resultType="Employee">
3         select * from tb1_employee where id = #{id}
4     </select>
如果使用package,容易产生别名冲突,从而报错
解决方法:Javabean中使用一个注解,为这个类名指定一个新的别名
@Alias("emp")
并修改EmployeeMapper.xml中的返回值,当然别名不区分大小写
1 <select id="getEmpById" resultType="emp">
2         select * from tb1_employee where id = #{id}
3 </select>
运行成功!
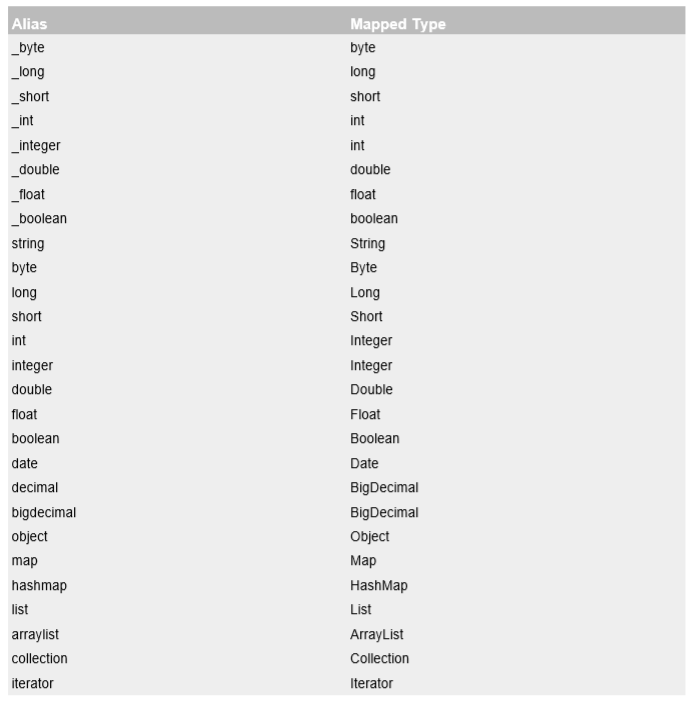
根据文档查看,我们可以看到很多已经取好的别名
我们自己设置的别名一定不能和下面的别名重复
写全类名比较适合查看按住crtl+鼠标点击,即可查看javabean,这样可能会比较方便一些。
4、typeHandlers(粗略介绍,后面再仔细看)
类型处理器,在数据类型和java映射时使用
日期处理:
NOTE If you use classes provided by JSR-310(Date and Time API), you can use the mybatistypehandlers-jsr310.(官方文档中的一句话)
官方下载地址:https://github.com/mybatis/typehandlers-jsr310
想要更丰富的类型这样来注册
<typeHandlers>
  <typeHandler handler="org.apache.ibatis.type.InstantTypeHandler" />
  <typeHandler handler="org.apache.ibatis.type.LocalDateTimeTypeHandler" />
  <typeHandler handler="org.apache.ibatis.type.LocalDateTypeHandler" />
  <typeHandler handler="org.apache.ibatis.type.LocalTimeTypeHandler" />
  <typeHandler handler="org.apache.ibatis.type.OffsetDateTimeTypeHandler" />
  <typeHandler handler="org.apache.ibatis.type.OffsetTimeTypeHandler" />
  <typeHandler handler="org.apache.ibatis.type.ZonedDateTimeTypeHandler" />
  <typeHandler handler="org.apache.ibatis.type.YearTypeHandler" />
  <typeHandler handler="org.apache.ibatis.type.MonthTypeHandler" />
  <typeHandler handler="org.apache.ibatis.type.YearMonthTypeHandler" />
  <typeHandler handler="org.apache.ibatis.type.JapaneseDateTypeHandler" />
</typeHandlers>
但是在mybatis3.4以前的版本需要我们手动注册这些处理器,以后的版本都是自动注册的。
5、plugins
插件
现在先简单了解,到mybatis运行原理以后,对mybatis运行机制了解后详细讲解。
先将四大对象混个眼熟。

Executor 执行器
ParameHandler 参数处理器
ResultSetHandler 结果集处理器
StatementHandler sql语句处理器
6、environments
environments:环境们,mybatis可以配置多种环境,default指定使用某种环境,可以达到快速切换
environment:配置一个具体的环境信息,必须有transactionManager和dataSource才完整,id代表当前环境的唯一表示
transactionManager:事务管理器;
type:事务管理器的类型,有JDBC(JdbcTransactionFactory)|MANAGED(ManagedTransactionFactory);
自定义事务管理器:实现TransactionFactory接口,type指定为全类名
dataSource:数据源;
type:数据源类型;UNPOOLED(UnpooledDataSourceFactory)|POOLED(PooledDataSourceFactory)|JNDI(JndiDataSourceFactory)
自定义数据源:实现DataSourceFactory接口,type指定为全类名
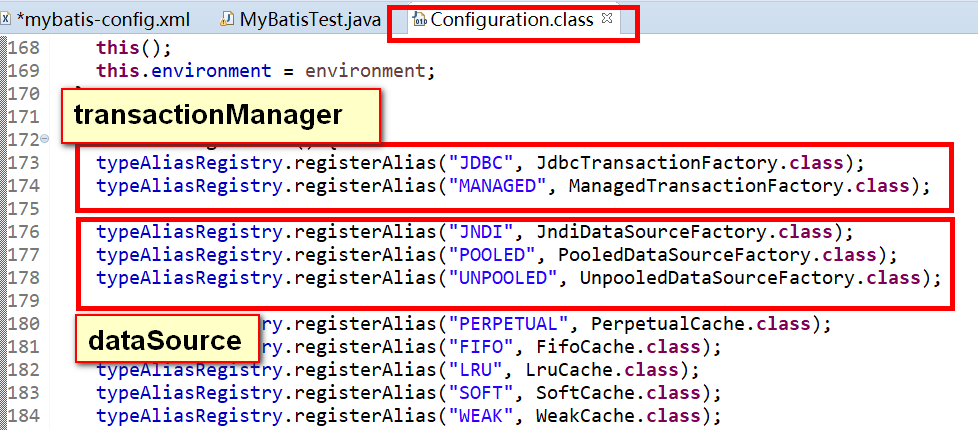
Ctrl + Shift + T:快捷键打开openType,搜索configuration
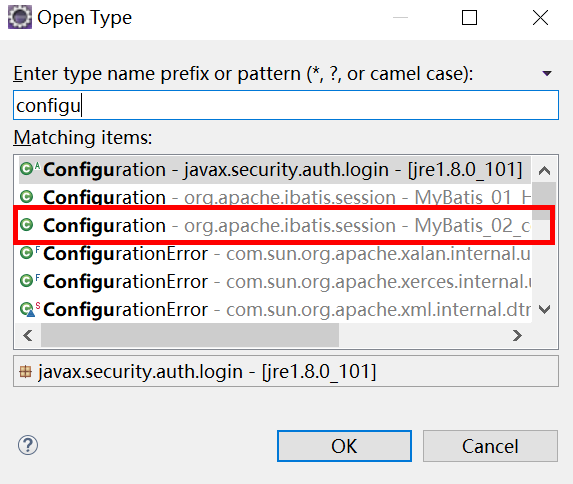
这里边注册了很多别名
7、databaseIdProvider
支持多个数据库厂商
这个功能支持需要全局配置文件中添加
<databaseIdProvider type="DB_VENDOR" />
此标签于本人可能用不到先不写。。
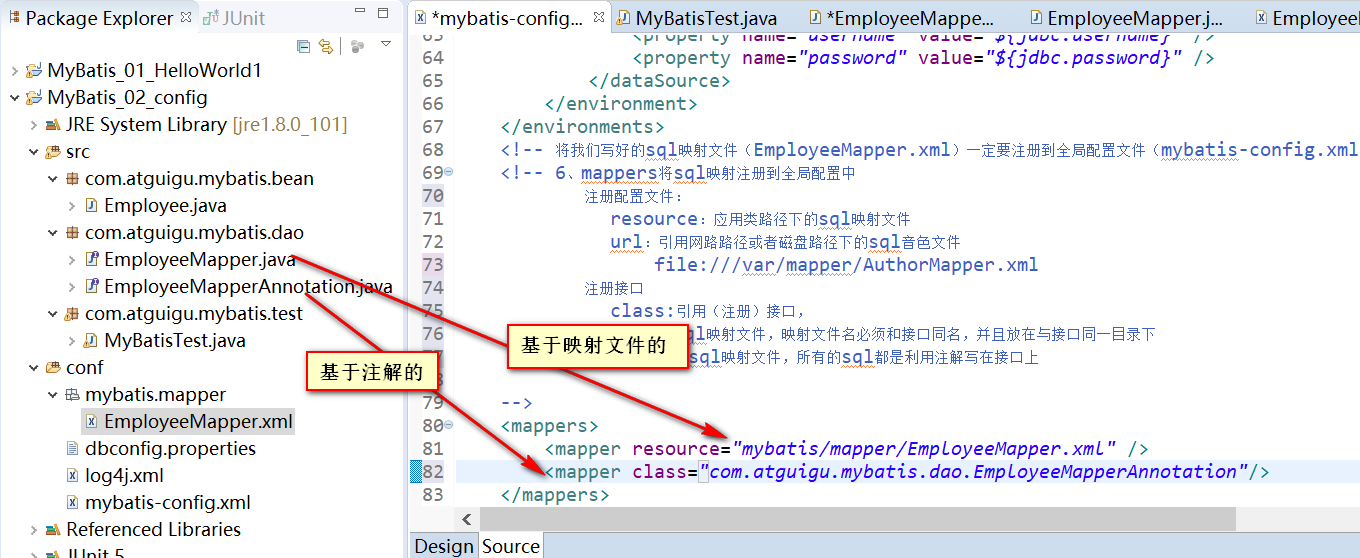
8、mappers
mappers将sql映射注册到全局配置中
注册配置文件:
resource:应用类路径下的sql映射文件
url:引用网路路径或者磁盘路径下的sql音色文件
file:///var/mapper/AuthorMapper.xml
注册接口
class:引用(注册)接口,
1、有sql映射文件,映射文件名必须和接口同名,并且放在与接口同一目录下
2、没有sql映射文件,所有的sql都是利用注解写在接口上;
resource属性:
新建一个包,将EmployeeMapper.xml放进去,然后修改配置文件内容resource改为全类名
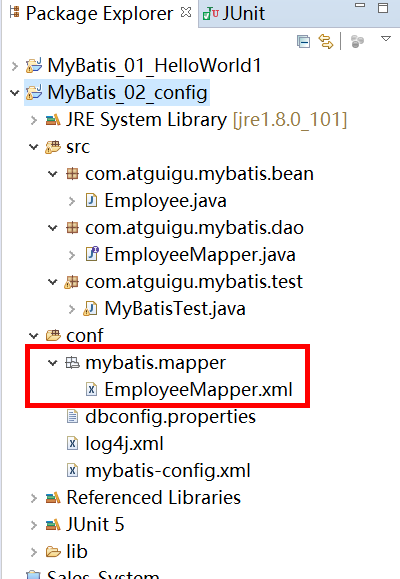
1 <mappers>
2         <mapper resource="mybatis/mapper/EmployeeMapper.xml" />
3 </mappers>
class属性:
EmployeeMapperAnnotation接口代码:
 1 package com.atguigu.mybatis.dao;
 2
 3 import org.apache.ibatis.annotations.Select;
 4
 5 import com.atguigu.mybatis.bean.Employee;
 6
 7 public interface EmployeeMapperAnnotation {
 8
 9     @Select("select * from tb1_employee where id = #{id}")
10     public Employee getEmpById(Integer id);
11 }
在测试文件中再写一个测试方法
 1 public void test02() throws IOException {
 2         SqlSessionFactory sqlSessionFactory = getSqlSessionFactory();
 3         SqlSession openSession = sqlSessionFactory.openSession();
 4
 5         try {
 6             EmployeeMapperAnnotation mapper = openSession.getMapper(EmployeeMapperAnnotation.class);
 7             Employee empById = mapper.getEmpById(1);
 8             System.out.println(empById);
 9         }finally {
10             openSession.close();
11         }
12
13     }
运行成功!
不过还是写在xml文件上便于维护,推荐必要重要的Dao接口写sql映射文件,不重要的简单的Dao接口为了开发快速可以使用注解。
由于mapper都是一个一个注册的,比较麻烦,故而还有批量注册的方法。
使用package,name属性中要写包名,基于注解版没有问题,但是,写了映射文件的可能找不到,故而将映射文件放入同一个包下,文件名和接口名是一样的,这样才可以批量注册。
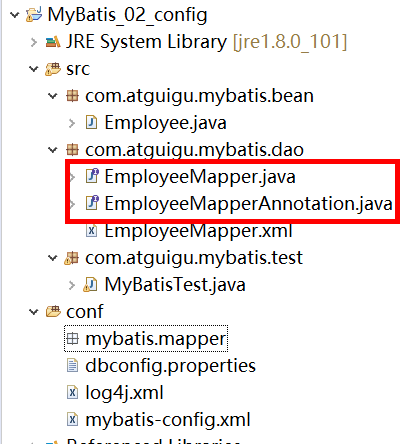
以后都将接口和xml放在一起,但是为了规整,在conf下建一个与接口文件一样路径的包

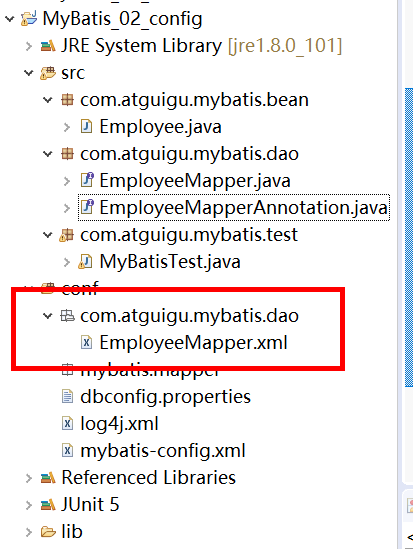
虽然看起来不是在一个路径下,实际打开源码包都都会放在bin的路径下,bin路径被我们叫做类文件的开始。