【建模步骤】
- Open the Modeling module [PEmag], either from within PExprt or directly from the Windows Start Menu.第一步通过开始菜单打开PEmag软件。
- Define the core shape and size. 定义磁芯的形状和尺寸
- Define the winding setup. 定义绕组设置
- Assign the winding setup to the core legs. 将绕组设置分配给磁芯引脚
- Create connections. 创建连接
- Define the PCB technology. 设置PCB相关的参数
- Assign the conductors and insulators. 分配导体和绝缘体
- Define the number of turns and insulator width. 定义匝数和绝缘体宽度
- Assign the core material. 为磁芯分配材料
- Define the model properties. 定义模型属性
- Generate the model. 生成模型
- Explore the results. 导出结果
【建模示例】
Step01 Create the PEmag Design.建立PEmag设计的文档
- Open PEmag using the Windows Start Menu and create an empty design using File/New.
从Windows 的启动菜单打开PEmag,并且使用File/New建立一个新的设计
- Save the PEmag design using File/Save Assign a name to the file, e.g. Planar_Transformer.pmg.
- 使用File / Save保存PEmag设计为文件分配一个名称,例如 Planar_Transformer.pmg。
使用File / Save保存PEmag设计为文件分配一个名称,例如 Planar_Transformer.pmg。

Step02: Define Core Shape and Size. 定义磁芯的形状和尺寸
To define the core:
- Expand the Ferroxcube library. 展开Ferroxcube库
- Expand the EI core shape. 展开EI磁芯形状库,并找到E32/6/20磁芯

- Drag the E32/6/20 core, and drop it on the Cross Section Area (black area at the right bottom) of the working window. The core cross section appears.
拖动E32/6/20磁芯,并将其放在工作窗口的"横截面区域"(右下角黑色区域)上,该磁芯形状的横截面将出现在视图中。

- Double-click the E32/6/20 core element in the Component Library.双击Component Library中的E32/6/20磁芯,设计其参数。

- Select Double 2D (XY Plane). 选择Double 2D(XY Plane)
- Click the Dimensions Tab. 单击选中Dimensions 标签
- Enter 0.254 mm (10 mils) in the Central Leg Gap field. 设置中间气隙间距为10mils
设置完成的界面如下图所示。

Step03: Define Winding Setup:定义绕组设置
- Select the Windings Tab at the Library Tree Area.在库的列表中选中Windings 标签
- Expand the Ferroxcube library. 展开Ferroxcube库
- Drag the 9 Layer Planar element, and drop it on the Cross Section Area (black area at the right bottom) of the working window. The winding setup appears in the Winding Setup Area of the working window 拖动9层平面元素,并将其拖放到工作窗口的"横截面区域"(右底部的黑色区域)上。 绕组设置出现在工作窗口的"绕组设置"区域中
- Double-click the 9 Layer Planar element in the Component Library.双击组件库中的9 Layer Planar元素。
- Enter the following values in the listed fields:根据如下界面配置参数。
- Winding Setup Name: Outer_Legs
- Number of pins: 6
- Number of layers: 15
- Top Margin Tape: 0.35 mm
- Central Margin Tape: 0.2 mm
- Winding Strategy: Top-Down
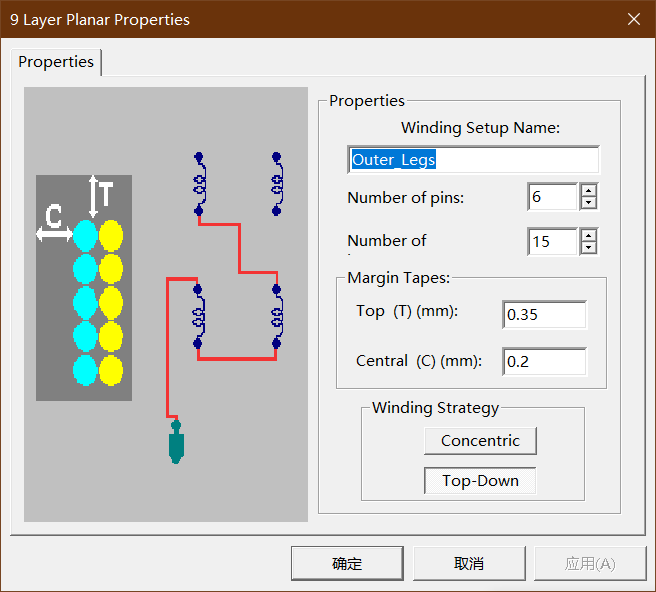
- Click OK to continue
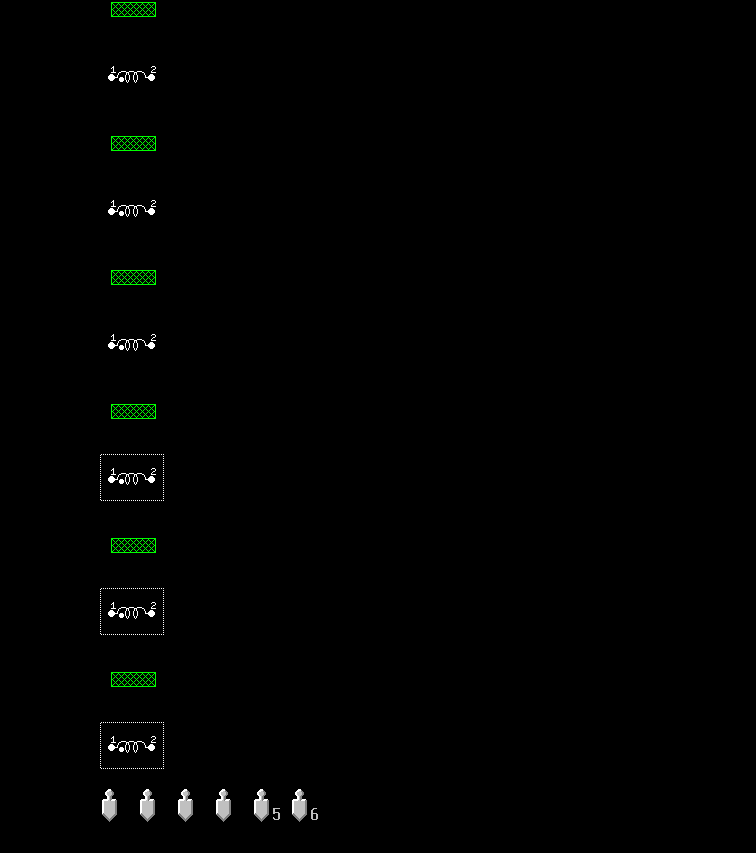
接下来,需要根据实际情况将这些层定义为导体或者绝缘体。
Define the layers:通过以下步骤进行层的定义

摁住Ctrl键依次选中需要进行修改的层,然后点击图上红色箭头所示,将层修改为走线。修改后的效果如图所示。
Step04: Assign the winding setup to the core legs. 将绕组设置分配给磁芯引脚
- Select the Current Design Tab in the Winding Setup Area of the working window.
在工作窗口的"绕组设置"区域中选择"当前设计"选项卡。
- Click the Winding Setup [Center Leg] element in the list. The available winding setups (the ones included in the Component Library folder) appear at the bottom.
单击列表中的"绕组设置[Center Leg]"元素。 可用的绕组设置("组件库"文件夹中包含的绕组设置)显示在底部。
- Click the No Winding Setup element in the available elements list.
在可用元素列表中单击"无绕组设置"元素。
- Click the Winding Setup [Left Leg] element in the list. The available winding setups (the ones included in the Component Library folder) appear at the bottom.
单击列表中的"绕组设置" [Left Leg]元素。 可用的绕组设置("组件库"文件夹中包含的绕组设置)显示在底部。
- Click the Outer_Legs element in the available elements list.
单击可用元素列表中的Outer_Legs元素。

- Click the Winding Setup [Right Leg] element in the list. The available winding setups (the ones included in the Component Library folder) appear at the bottom.
单击列表中的绕组设置[Right Leg]元素。 可用的绕组设置("组件库"文件夹中包含的绕组设置)显示在底部。
- Click the Outer_Legs element in the available elements list.
单击可用元素列表中的Outer_Legs元素。
Step05:Create Connections 建立连线,根据实际需要连接绕组
The primary A winding layers (3 and 11) are connected in series, the primary B winding layers (5 and 13) are connected in series, and the secondary C layers (1, 7, 9, and 15) are connected in parallel
初级A绕组层(3和11)串联连接,初级B绕组层(5和13)串联连接,次级C层(1、7、9和15)并联
To connect the series layers of winding A:连接绕组A
- Choose the Connections/Add menu item 选中Connections/Add 菜单
- Click on pin 1 (left) on the bottom of the Winding Setup Area. A green circle indicates that the pin is selected.
单击"绕组设置"区域底部的引脚1(左)。 绿色圆圈表示该引脚已选中。

- Click on the "dotted" terminal (number 1) of layer 3. A yellow connection is made.
单击第3层的"虚线"端子(编号1)。进行黄色连接。

- Click on the "non-dotted" terminal (number 2) of layer 3. Notice the green selection mark.
单击第3层的"非虚线"端子(编号2)。注意绿色选择标记。

- Click on the "dotted " terminal of layer 11.
单击第11层的"虚线"终端。
- Click on the "non-dotted" terminal of layer 11
单击第11层的"非虚线"终端
- Click on pin 2 on the bottom of the Winding Setup Area. Note this will change pin names to 'A.' (Naming is explained in Terminal Names of PEmag Models.)
单击绕组设置区域底部的引脚2。 请注意,这会将引脚名称更改为" A"。 (在PEmag模型的终端名称中解释了命名。)
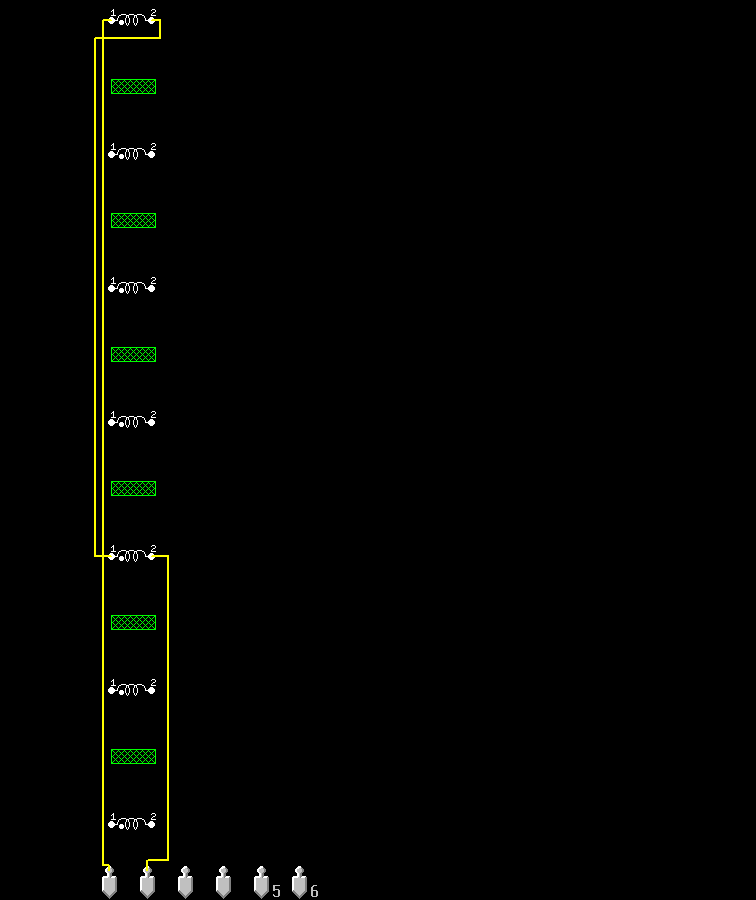
按照相同的方式进行绕组B和绕组C的连接。
绕组B是5和13层串联连接,绕组C是1、7、9、15并联连接。


Step06:Define PCB Technology 设置PCB相关的参数
- Select the Wires/Ins Tab in the Library Tree Area.在"库树"区域中选择"导线/插入"选项卡。
- Expand the Ferroxcube library. 扩展Ferroxcube库
- Expand the Planar library. 扩展Planar 库
- Drag the Copper_100um element, and drop it on the Component Library folder in the Library Tree.拖动Copper_100um元素,并将其拖放到"库树"中的"组件库"文件夹中。
- Double-click the Copper_100um element in the Component Library.
双击组件库中的Copper_100um元素。
- Enter the following values in the listed fields: 在列出的字段中输入以下值
- Name: Copper_150um_9mm
- Wire height: 0.15 mm
- Wire width: 8.6 mm
- Insulator thickness: 0 mm
- Turns spacing: 0.1 mm
- Resistivity: 2.21·10-8 ohm·m
- Wire Thermal Conductivity: 400 W/ºC/m
- Wire Thermal Emissivity: 0.04
- Insulator Thermal Conductivity: 0.3 W/ºC/m
- Insulator Thermal Emissivity: 0.8

- Click OK to continue. 单击ok继续下一步操作
- Drag the previously created Copper_150um_9mm element, and drop it on the Component Library folder in the Library Tree in order to copy it. A new element named Copper_150um_9mm(1) appears.拖动先前创建的Copper_150um_9mm元素,并将其拖放到"库树"中的"组件库"文件夹中以进行复制。 出现一个名为Copper_150um_9mm(1)的新元素。
- Double-click the Copper_150um_9mm(1) element in the Component Library.在组件库中双击Copper_150um_9mm(1)元素。
- Enter the following values in the listed fields:在列出的字段中输入以下值:
- Name: Copper_150um_2mm
- Wire height: 0.15 mm
- Wire width: 2 mm
- Insulator thickness: 0 mm
- Turns spacing: 0.2 mm
- Resistivity: 2.21·10-8 ohm·m
- Wire Thermal Conductivity: 400 W/ºC/m
- Wire Thermal Emissivity: 0.04
- Insulator Thermal Conductivity: 0.3 W/ºC/m
- Insulator Thermal Emissivity: 0.8

- Click OK to continue. 单击ok继续下一步操作
- Expand the Ferroxcube library.展开 Ferroxcube 库
- Expand the Insulator library. 展开 Insulator库
- Drag the FR4_200um element, and drop it on the Component Library folder in the Library 将FR4_200um拖到器件库

Step07:Assign Conductors and Insulators 分配导体和绝缘体
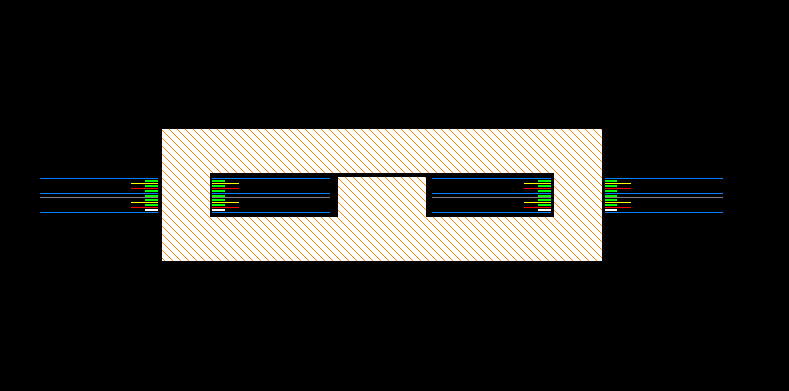
Drag the elements from the Component Library folder, and drop them on the appropriate layer at the Winding Setup Area.
将元素从"组件库"文件夹中拖放到"绕组设置"区域的相应层上。
Layer 1 | Copper_150um_9mm |
Layer 2 | FR4_200um |
Layer 3 | Copper_150um_2mm |
Layer 4 | FR4_200um |
Layer 5 | Copper_150um_2mm |
Layer 6 | FR4_200um |
Layer 7 | Copper_150um_9mm |
Layer 8 | FR4_200um |
Layer 9 | Copper_150um_9mm |
Layer 10 | FR4_200um |
Layer 11 | Copper_150um_2mm |
Layer 12 | FR4_200um |
Layer 13 | Copper_150um_2mm |
Layer 14 | FR4_200um |
Layer 15 | Copper_150um_9mm |
Step08:Define Turns and Insulator Width 定义匝数和绝缘体
- Right-click the appropriate layer in the Winding Setup Area of the working window. The following window appears
在工作窗口的"绕组设置"区域中,右键单击相应的层。 出现以下窗口
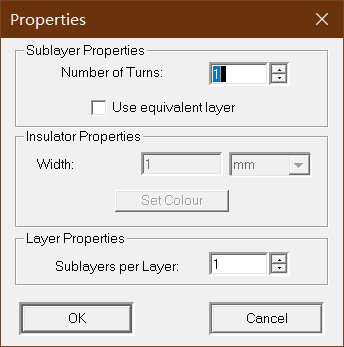
- Assign the following number of turns to the following layers: 将以下匝数分配给以下层
- Layers 1, 7, 9, and 15: 1 turn
- Layers 3, 5, 11, and 13: 4 turns
- To define the width of each insulator layer
- If you right-click an insulator layer, the following window appears:

Assign 8.6 mm for all the width of all insulator layers (layers 2, 4, 6, 8, 10, 12, and 14).
绝缘体层宽度为8.6mm

Step09:Assign the Core Material 为磁芯分配材料
- Select the Core Material Tab in the Library Tree Area. 在"库树"区域中选择"核心材料"选项卡。
- Expand the Ferroxcube library. 展开Ferroxcube库
- Drag the 3F3 core material and drop it on the Cross-Section Area (black area at the right bottom) of the working window. A warning message appears
将3F3核心材料拖放到工作窗口的"横截面"区域(右下黑色区域)上。 出现警告信息
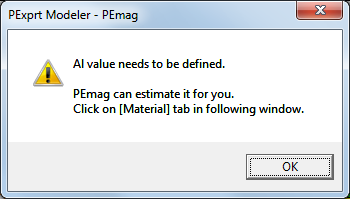
- Click OK to dismiss the window. The E32/6/20 core properties window appears.
- 单击确定以关闭该窗口。 出现E32 / 6/20核心属性窗口。
- Select the Material Tab 选择Material标签。
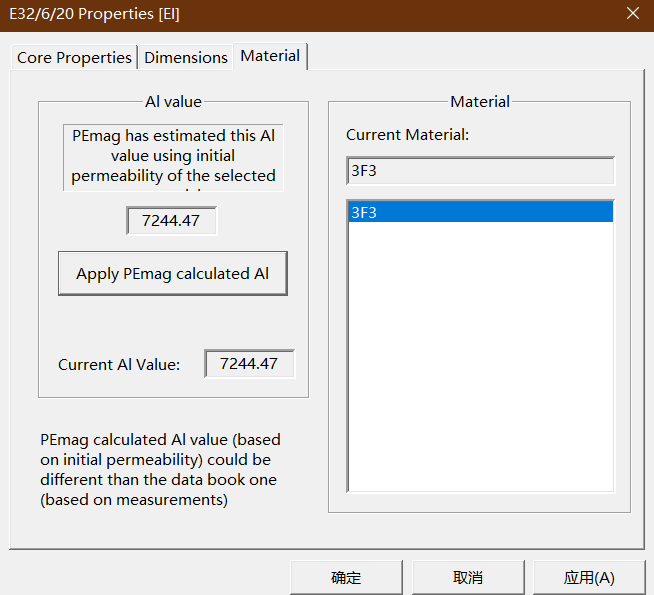
- Click the Apply PEmag calculated Al button to assign the Al value for this core shape/size/material combination.
- 单击"应用PEmag计算出的Al"按钮,为该铁心形状/尺寸/材料组合指定Al值。
- Click OK to continue 单击ok进行下一步
Step10:Define Model Properties 配置模型参数
- Select Modeler/Model Properties menu item The Model Properties window appears. 选择Modeler / Model Properties菜单项。将显示Model Properties窗口。
- Change the number of FEA Frequency steps to 5. 将" FEA频率"步数更改为5。
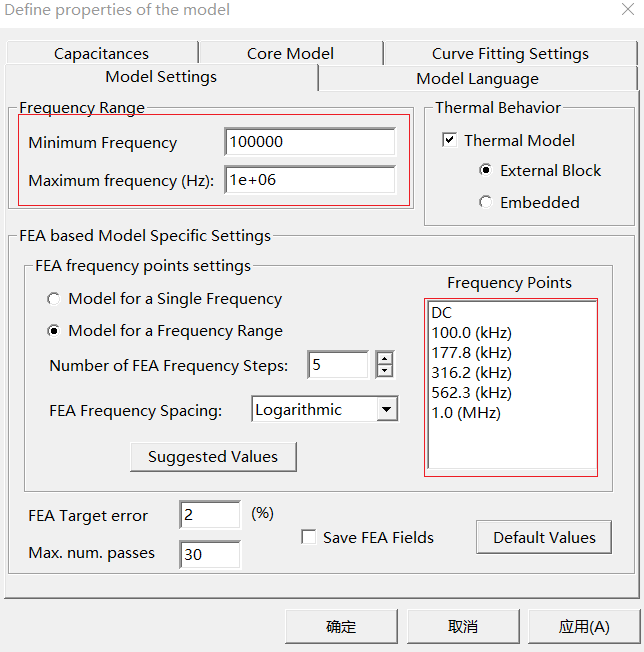
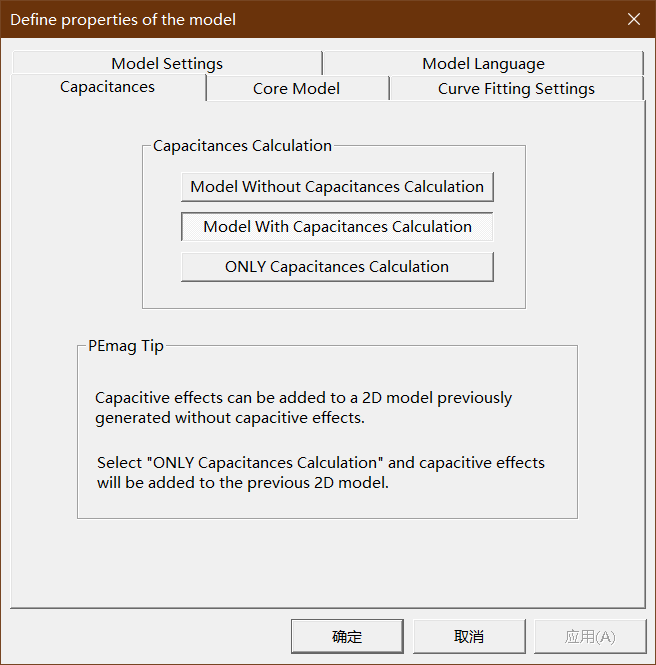
- Select the Capacitances Tab.
选择"电容"选项卡。
- Click the Model With Capacitances Calculation button to include capacitive effects in the model.
单击"带电容模型计算"按钮以在模型中包括电容效应。
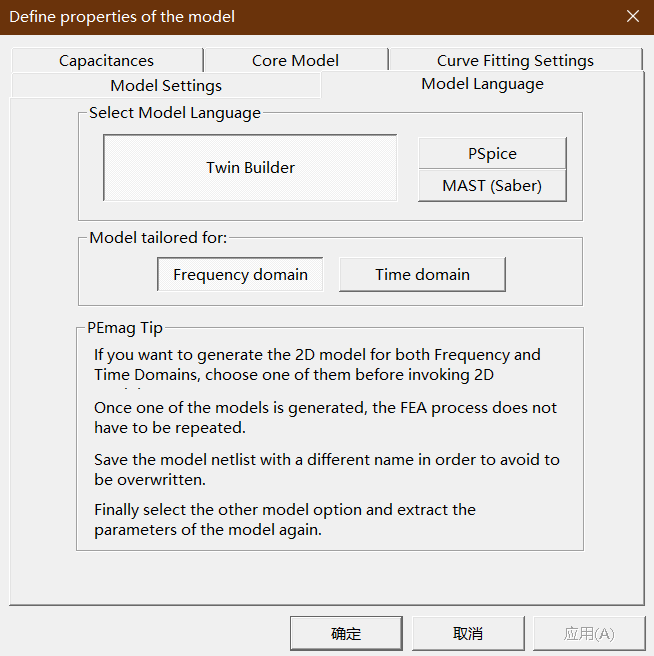
- Select the Model Language Tab. 选择"模型语言"选项卡。
- Click the Twin Builder button to select Twin Builder as the model netlist language. 单击" Twin Builder"按钮以选择" Twin Builder"作为模型网表语言。
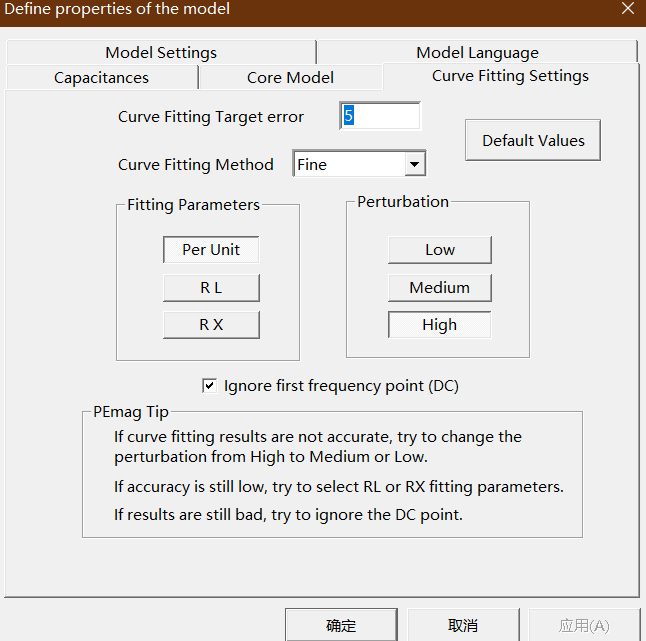
- Select the Curve Fitting Setting Tab. 选择"曲线拟合设置"选项卡。
- Assign the following parameters:
- Curve Fitting Target Error: 5%
- Curve Fitting Method: Fine
- Fitting Parameters: Per Unit
- Perturbation: High
- Ignore first frequency point: Selected
- Click OK to continue. 单击ok进行下一步
到此,模型已经建立完成,接下来就是如何对其进行输出并导入到Maxwell中进行仿真分析。