一、使用Petalinux定制Linux系统
1.1 建立petalinux和Vivado工作环境
source /tools/Xilinx/petalinux/settings.sh  //sptl
source /tools/Xilinx/Vivado/2019.2/settings64.sh //svvd
echo $PETALINUX  //验证petalinux工作环境已经设置
1.2 建立新的petalinux工程
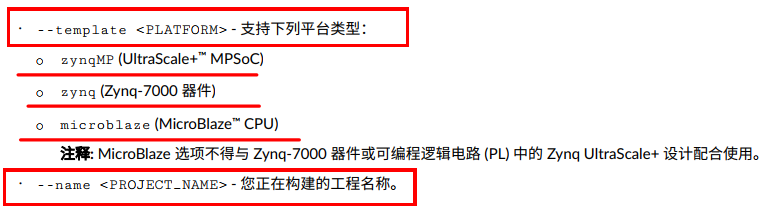
petalinux-create --type project --template zynq --name ax_peta
1.3 导入硬件配置
cd ax_peta
petalinux-config --get-hw-description ../xsa //硬件发生变化时,第一次需要重新导入
或者
petalinux-config  //硬件没有发生变化,重新配置petalinux
在选项 Linux Components Selection 中可以配置 uboot 和 Linux 内核的来源,默认是 github上下载的,需要 Linux 主机连接互联网才能下载。
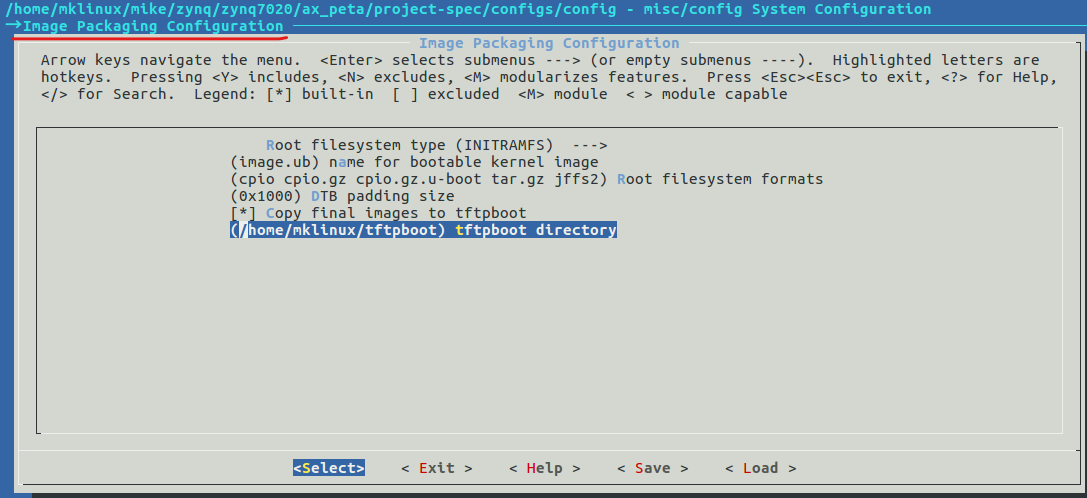
在选项 Image Packaging Configuration --> Root filesystem type 选项中选择 EXT,把根文件系统放在SD卡中
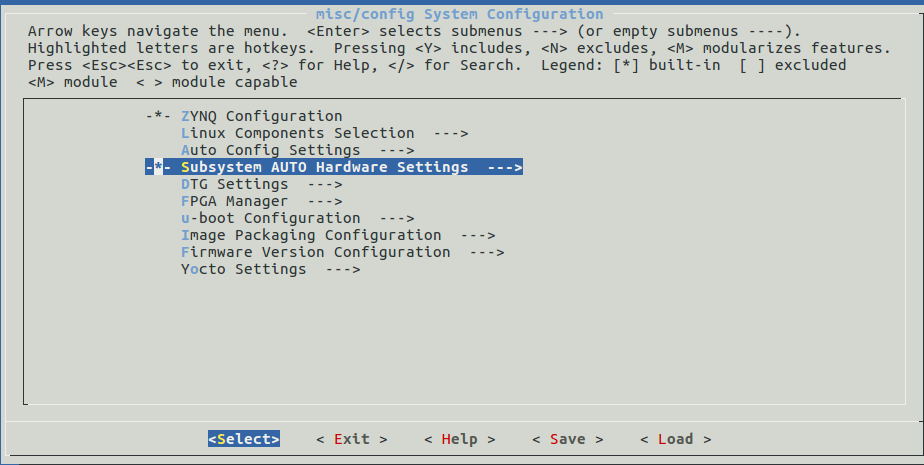
在选项 Subsystem AUTO Hardware Settings 可以配置外设和启动方式,默认SD卡启动
以上建立petalinux和导入硬件配置信息可以使用附录3脚本文件完成。
1.4 配置u-boot
petalinux-config -c u-boot //配置u-boot
产生zynqmp.dtsi,system-top.dts,system-conf.dtsi文件。
1.5 配置内核
petalinux-build -c linux-xlnx -x reset  //如果之前配置过内核,可以根据需要清除之前的配置
petalinux-config -c kernel
petalinux-build -c kernel -x finish -f  //保存内核配置
在选项Device Drivers --> Graphics support中选择Digilent VGA/HDMI DRM Encode Driver以支持HDMI驱动
在Networking Support --> Wireless 选择网络驱动
1.6 配置根文件系统
petalinux-config -c rootfs
1.7 修改设备树
设备树1-设备树文件.DTS文件格式
设备树2-创建小型模板设备树
设备树3-设备树常用OF函数
1.8 编译(构建系统镜像)
petalinux-build //编译fsbl、uboot、设备树、Linux内核和根文件系统
petalinux-build -c u-boot    //编译u-boot  在./images/linux生成system.bit文件
petalinux-build -c kernel    //编译内核    在./images/linux生成image.ub, uImage, zImage, u-boot.bin, u-boot.elf, zynq_fsbl.elf, system.dtb, rootfs.tar.gz文件
petalinux-build -c rootfs //编译根文件系统
如果再次编译卡死,可以使用下面命令清理编译结果
petalinux-build -x mrproper -f //清理编译结果
1.9 生成BOOT文件
petalinux-package --boot --fsbl ./images/linux/zynq_fsbl.elf --fpga --u-boot --force //生成Zynq-7000器件的镜像
petalinux-package --boot --fsbl ./images/linux/zynqmp_fsbl.elf --fpga --u-boot --force //生成ZU 器件的镜像
1.10 制作根文件系统
sudo rm -rfd /media/mklinux/rootfs/  //清除SD卡rootfs分区的数据
sudo tar -zxvpf debian_rootfs.tar.gz  //解压缩文件系统
sudo rsync -av ./debian_rootfs/ /media/mklinux/rootfs  //将解压后的文件系统数据同步到SD卡的rootfs分区
sync                //防止有些数据没复制过去
sudo umount sdb*          //卸载SD卡各个分区
二、启动Linux系统
Ubuntu驱动程序开发2-Uboot使用(bootcmd、bootargs、uboot命令)
2.1 在Uboot下手动启动
通过nfs下载zImage、设备树文件
nfs 00000000 192.168.2.120:/home/mklinux/nfs/zImage  //下载zImage到开发板DRAM的0x00000000
nfs 05000000 192.168.2.120:/home/mklinux/nfs/system.dtb  //下载system.dtb到开发板DRAM的0x05000000
通过tftp下载zImage、设备树文件
tftpboot 00000000 zImage  //下载zImage到开发板DRAM的0x00000000
tftpboot 05000000 system.dtb  //下载system.dtb到开发板DRAM的0x05000000
启动
bootz 00000000 - 05000000
2.2 通过网络启动
把zImage和system.dtb文件放到ubuntu主机的/home/mklinux/tftpboot目录下
把文件系统放在ubuntu主机的/home/mklinux/nfs/zynq_rootfs目录下
setenv bootcmd 'tftpboot 8000 zImage; tftpboot 103cdda8 system.dtb; bootz 8000 - 103cdda8'  //将zImage文件和设备树文件system.dtb分别加载到内存中,并使用bootz命令启动
或者
setenv bootcmd 'tftpboot 10000000 image.ub;bootm' //image.ub包含了kernel和设备树,将image.ub文件加载到内存,并使用bootm命令启动

setenv bootargs 'console=ttyPS0,115200 root=/dev/nfs rw nfsroot=192.168.2.125:/home/mklinux/nfs/zynq_rootfs ip=192.168.2.116: 192.168.2.125:192.168.2.100:255.255.255.0::eth0:off'  //通过网络挂载文件系统
2.3 通过SD卡
mmc list     //列出当前有几个MMC设备,以及MMC设备编号dev
mmc dev [dev]  //切换到要查看的MMC设备
mmc info    //查看当前MMC设备信息
mmc part    //列出当前所有分区
setenv bootcmd 'mmcinfo && fatload mmc 0:1 0x10000000 image.ub; bootm 0x10000000;'     //将image.ub文件从设备号为0的MMC设备的1号分区读取到DRAM的0x1000000
setenv bootargs 'console=ttyPS0,115200 root=/dev/mmcblk0p2 rootwait rw rootfstype=ext4'  //通过SD卡挂载文件系统
三、petalinux源码位置
3.1 uboot源码
- uboot源码
在执行了petalinux-config -c u-boot命令后。
cd build/tmp/work/
find . -type d -name "git" 2> /dev/null | grep "u-boot-xlnx"| grep "git"
得到
./build/tmp/work/plnx_zynqmp-xilinx-linux/u-boot-xlnx/v2019.01-xilinx-v2019.2+git999-r0/u-boot-xlnx-v2019.01-xilinx-v2019.2+git999/source  //u-boot源码位置
链接到以下位置
./components/plnx_workspace/sources/u-boot-xlnx  //u-boot源码最终位置
-
uboot配置信息
cd build/tmp/work/
find . -type d -name "build" 2> /dev/null | grep "u-boot-xlnx"| grep "build"
得到
./build/tmp/work/plnx_zynqmp-xilinx-linux/u-boot-xlnx/v2019.01-xilinx-v2019.2+git999-r0/u-boot-xlnx-v2019.01-xilinx-v2019.2+git999/.config //u-boot配置文件位置
注意事项:
从PetaLinux工程里得到的UBoot源代码中自动生成的文件include/configs/platform-auto.h里的宏定义里的连接符后有空格,可能导致编译时编译器会产生大量警告。
使用以下命令去除:
sed 's/ $//' include/configs/platform-auto.h -i
3.2 kernel源码
- 内核源代码位置
当执行了petalinux-config -c kernel,
find ./ -type d -name "kernel-source"  //查找kernel源码位置
./build/tmp/work-shared/plnx-zynq7/kernel-source  //kernel源码位置
或者
./build/tmp/work/plnx_zynqmp-xilinx-linux/linux-xlnx/4.19-xilinx-v2019.2+git999-r0/linux-xlnx-4.19-xilinx-v2019.2+git999/source
以上连个路径中的kernel-source文件都会链接到以下路径
/components/plnx_workspace/sources/linux-xlnx //kernel-source最终位置
- 内核配置文件
当执行了petalinux-config -c kernel,会在以下路径生成一个.config文件,每次修改内核配置并点击了save后,会将配置信息保存到.config文件。
./build/tmp/work/plnx_zynqmp-xilinx-linux/linux-xlnx/4.19-xilinx-v2019.2+git999-r0/linux-xlnx-4.19-xilinx-v2019.2+git999/.config
执行了petalinux-build,会复制一份.config文件到以下路径。
find ./ -type d -name "kernel-build-artifacts"  //查找内核配置文件
得到
build/tmp/work-shared/plnx-zynq7/kernel-build-artifacts/.config
为了方便,可以把该目录下的.config文件复制到linux源码的子目录arch/arm/config/目录下,重命名为xilinux_peta_defconfig.config文件,使用make xilinx_peta_defconfig进行配置。
./build/tmp/work/plnx_zynqmp-xilinx-linux/linux-xlnx/4.19-xilinx-v2019.2+git999-r0/linux-xlnx-4.19-xilinx-v2019.2+git999/ //内核编译后的位置
3.3 rootfs源码
./image/linux
sudo tar -zxvpf ./image/linux/rootfs.tar.gz -C ~/nfs/zynq_rootfs/  //解压到nfs目录下
3.4 设备树源码
./project-spec/meta-user/recipes-bsp/device-tree/files/system-user.dtsi
./project-spec/meta-user/recipes-bsp/device-tree/files/pl-custom.dtsi

./components/plnx_workspace/device-tree/device-tree/system-conf.dtsi
./components/plnx_workspace/device-tree/device-tree/system-top.dts
./components/plnx_workspace/device-tree/device-tree/pl.dtsi      //是我们在vivado当中添加的pl端外设对应的配置信息
./components/plnx_workspace/device-tree/device-tree/pcw.dtsi    //是我们在vivado当中已经使能的PS外设

3.5 petalinux配置文件
./project-spec/configs/config
扩展资料:
1.image.ub文件
image.ub = kernel + dtb + rootfs.img
kernel:一般就是linux生成的elf文件。dtb:设备树,与驱动有关。rootfs.img:编译完成的文件系统。
2.BOOT.bin文件
BOOT.bin = u-boot.elf + zynq_fsbl.elf + bootgen.bif + system.bit
u-boot.elf:就是uboot编译生成的bootgen.bif:可以自己手写。zynq_fsbl.elf:Vivado创建PS以后,在SDK中创建File-New-Application Project-Zynq FSBL以后Build Project生成的。system.bit:FPGA工程师生成的二进制流,用于PL端烧写的(可以没有)
3.脚本文件
petalinux工程创建
#!/bin/sh
help () {
    echo "Error : need $projectname $hw_bsp"
    echo "  eg :"
    echo "      $0 ax_project ~/hw-vivado-bsp-for-petalinux/some_packakge"
    exit 1
}

if [ -z "$1" ]; then
    help
fi
if [ -z "$2" ]; then
    help
fi

## 删除源目录
rm $1 -rf

## 创建项目
petalinux-create --type project --template zynq --name $1

## 导入硬件信息
cd $1
petalinux-config --get-hw-description $2

## 使PetaLinux不删除源码
echo 'RM_WORK_EXCLUDE += "linux-xlnx"'>> project-spec/meta-user/conf/petalinuxbsp.conf
echo 'RM_WORK_EXCLUDE += "u-boot-xlnx"'>> project-spec/meta-user/conf/petalinuxbsp.conf
echo ''>> project-spec/meta-user/conf/petalinuxbsp.conf
内核编译脚本文件
#!/bin/sh
make ARCH=arm CROSS_COMPILE=arm-linux-gnueabihf- distclean
make ARCH=arm CROSS_COMPILE=arm-linux-gnueabihf- mike_zynq_defconfig
make ARCH=arm CROSS_COMPILE=arm-linux-gnueabihf- menuconfig
make ARCH=arm CROSS_COMPILE=arm-linux-gnueabihf- all -j16
4.petalinux kernel rootfs u-boot常见配置
4.1 petalinux-config
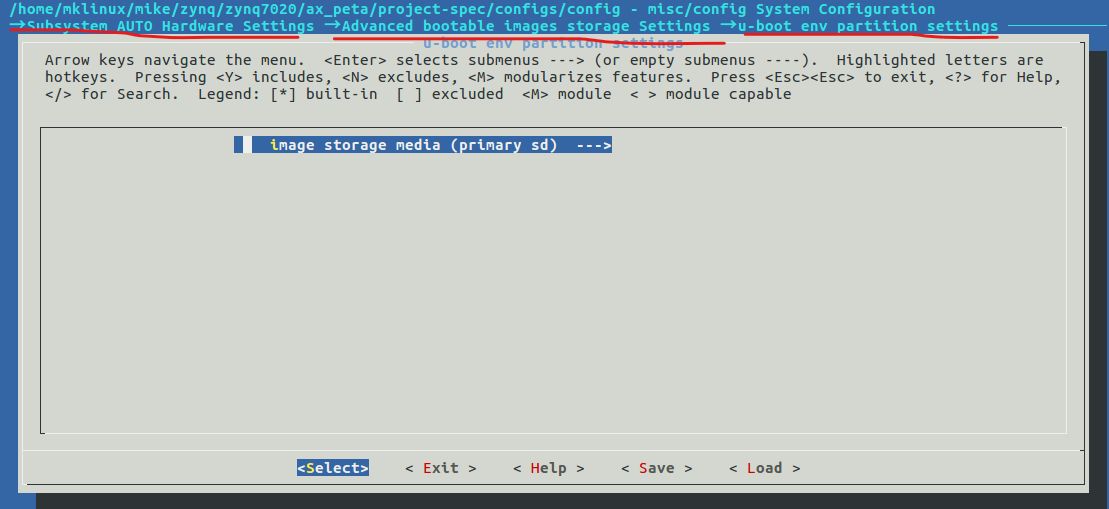
设置uboot环境变量保存在sd卡
设置将编译结果存至tftpboot文件夹
4.2 petalinux-config -c kernel
4.3 petalinux-config -c rootfs
配置用root账户自动登录
