configparser模块
https://www.cnblogs.com/plf-Jack/p/11170284.html
https://blog.csdn.net/miner_k/article/details/77857292
在Python2下,需要大写:import ConfigParser
在PYthon3下,需要小写:import configparser
config = configparser.ConfigParser()
config.read(cls.user_dir, encoding='utf-8') # encoding解决写入李四读出不是李四的问题
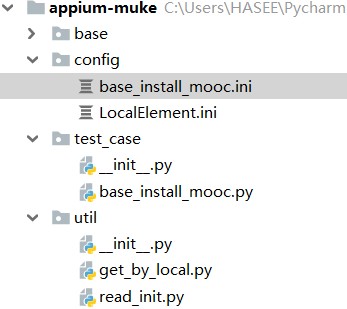
当前项目文件的目录结构

base_install_mooc.ini
[install_mooc]
swipe_left_times=4

[install_element]
test_right_now=className>android.widget.ImageView
update_now=uiautomator>new UiSelector().text("现在升级")
ok_button=id>com.android.packageinstaller:id/ok_button
2-2 读取配置文件代码封装实战
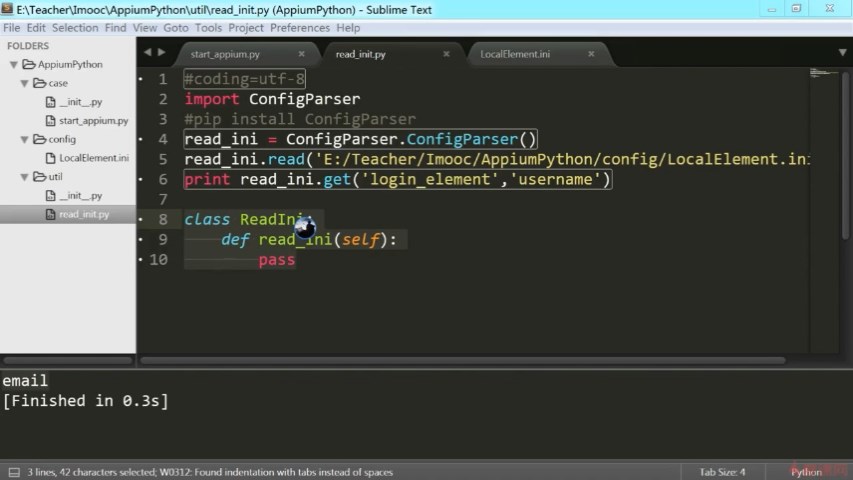
util.read_init
#coding=utf-8
#读取.ini格式文件的工具类

import configparser


class ReadIni:
    def __init__(self,file_path=None):
        #判断是否用默认参数变量
        if file_path == None:
            self.file_path = '../config/base_install_mooc.ini'
        else:
            self.file_path = file_path
        self.data = self.read_ini()

    def read_ini(self):
        read_ini = configparser.ConfigParser()
        read_ini.read(self.file_path,encoding='utf-8')
        return read_ini

    #通过key获取对应的value
    def get_value(self,section,key):
        if section == None:
            section = 'login_element'
        else:
            section == section
        #捕获处理异常处理
        try:
            value = self.data.get(section,key)
        except:
            value = None
        return value


if __name__ == '__main__':
    read_ini = ReadIni()  #python获得一个class的实例化对象,类名后面必须要有()
    print(read_ini.get_value("login_element","username"))
    print(read_ini.get_value("install_mooc","swipe_left_times"))
base_install_mooc.py
# coding=utf-8
# 模拟手机首次安装app后,进入后的手指滑动操作


import time
from appium import webdriver

import sys
sys.path.append('C:/Users/HASEE/PycharmProjects/appium-muke/util')
from util import read_init
from util.get_by_local import GetByLocal

def get_driver():
    capabilities = {
        "platformName": "Android",
        "platformVersion": "6.0.1",
        "deviceName": "127.0.0.1:7555",
        "app": "D:\Android\open_mooc_701_.apk",
        # "appPackage":新版Appium1.19.1无需手动配置
        # "appActivity":新版Appium1.19.1无需手动配置
        # "appPackage":"cn.com.open.mooc",
        #"appWaitActivity": "com.imooc.component.imoocmain.splash.GuideActivity"
    }
    driver = webdriver.Remote("http://127.0.0.1:4723/wd/hub", capabilities)
    return driver


# driver.swipe(x,y,x1,y1)
# driver.swipe(500,400,50,400) #水平从右向左滑动
# 如何获取屏幕像素的宽和高
# size = driver.get_window_size()
# width = size['width']
# height = size['height']


# 获取屏幕像素宽和高,用方法封装起来
def get_size():
    # driver = get_driver()
    size = driver.get_window_size()
    width = size['width']
    height = size['height']
    return width, height


# 手指向左滑动,方法封装
def swipe_left():
    x = get_size()[0] / 10 * 9
    y1 = get_size()[1] / 2
    x1 = get_size()[0] / 10
    # driver = get_driver()
    driver.swipe(x, y1, x1, y1)

# 手指向右滑动,方法封装
def swipe_right():
    x = get_size()[0] / 10
    y1 = get_size()[1] / 2
    x1 = get_size()[0] / 10 * 9
    # driver = get_driver()
    driver.swipe(x, y1, x1, y1)

# 手指向上滑动,方法封装
def swipe_up():
    x = get_size()[0] / 2
    y = get_size()[1] / 10 * 9
    y1 = get_size()[1] / 10
    x1 = get_size()[0] / 2
    # driver = get_driver()
    driver.swipe(x, y, x1, y1)

# 手指向下滑动,方法封装
def swipe_down():
    x = get_size()[0] / 2
    y = get_size()[1] / 10
    y1 = get_size()[1] / 10 * 9
    x1 = get_size()[0] / 2
    # driver = get_driver()
    driver.swipe(x, y, x1, y1)


# 进一步封装,滑动的方法
def swipe_on(direction):
    if direction == 'up':
        swipe_up()
    elif direction == 'down':
        swipe_down()
    elif direction == 'left':
        swipe_left()
    else:
        swipe_right()


# 进一步封装,向左滑动的方法
def swipe_left_test():
    swipe_on('left')
    time.sleep(2)
    return print("模拟手指向左滑")


def get_driver_update():
    capabilities = {
        "platformName": "Android",
        "platformVersion": "6.0.1",
        "deviceName": "127.0.0.1:7555",
        #"app": "D:\Android\open_mooc_701_.apk",
        "noReset": 'true',
        "appPackage":"com.android.packageinstaller",
        "appActivity":"com.android.packageinstaller.PackageInstallerActivity",
        #"appWaitActivity": "com.imooc.component.imoocmain.splash.GuideActivity"
    }
    driver = webdriver.Remote("http://127.0.0.1:4723/wd/hub", capabilities)
    return driver


if __name__ == '__main__':
    # 获取一个全局变量driver
    driver = get_driver()
    # 读取ini文件
    read_ini = read_init.ReadIni()
    swipe_left_times = read_ini.get_value("install_mooc", "swipe_left_times")
    # str显式转换成int数据类型
    swipe_left_times = int(swipe_left_times)
    # 限定首次全新安装app左滑的次数
    # 用for循环次数限定
    for i in range(swipe_left_times):
        swipe_left_test()


#点击图片进入“立即体验”
    #driver.find_element_by_class_name('android.widget.ImageView').click()
    GetByLocal(driver).get_element('install_element','test_right_now').click()

#调用升级按钮
    time.sleep(6)
    # driver.find_element_by_android_uiautomator('new UiSelector().text("现在升级")').click()
    GetByLocal(driver).get_element('install_element','update_now').click()
#点击未知源的安装按钮
    #需要切换视图否则Message: An element could not be located on the page using the given search parameters.
    #mCurrentFocus = {"com.android.packageinstaller" , "com.android.packageinstaller.PackageInstallerActivity"}
    time.sleep(2)
    driver_update = get_driver_update()
    # driver_update.find_element_by_id('com.android.packageinstaller:id/ok_button').click()
    GetByLocal(driver_update).get_element('install_element','ok_button')
util/get_by_local.py
#coding=utf-8
#把定位方法封装到ini文件里


from util.read_init import ReadIni


class GetByLocal:
    def __init__(self,driver):
        self.driver = driver
    def get_element(self,section,key):
        read_ini = ReadIni()
        # "id > cn.com.open.mooc: id / login_lable"
        local = read_ini.get_value(section,key)
        if local != None:
            by = local.split('>')[0]
            local_by = local.split('>')[1]
            try:
                if by == 'id':
                    return self.driver.find_element_by_id(local_by)
                elif by == 'className':
                    return self.driver.find_element_by_class_name(local_by)
                elif by == 'uiautomator':
                    return self.driver.find_element_by_android_uiautomator(local_by)
                else:
                    return self.driver.find_element_by_xpath(local_by)
            except:
                #self.driver.save_screenshot("../jpg/test02.png")
                return None
        else:
            return None
