大概很久很久以前,2017年,参加了第二届中国前端开发者大会(FDCon2017),除了看了一眼尤雨溪,印象最深刻的就是手淘渚薰分享的关于H5交互的内容了。时光荏苒,最近再次接触,简单回顾一下。
示例项目地址: https://github.com/skillnull/lottie-web-caption-animation
首先是安装AE,具体怎么安装就不赘述了,随便一搜就有很多教程。

安装完AE以后,装一个AE的插件bodymovin, github地址为: https://github.com/airbnb/lottie-web 在 'lottie-web/build/extension/'目录下面有一个bodymovin.zxp的文件,
这就是我们要的插件了。
安装插件,可以使用官方推荐的几种方法:https://github.com/airbnb/lottie-web#option-1-recommended
本文尝试了两种方法:1. 使用 ZXP installer安装,试了很多次,都已失败告终。2. 将bodymovin.zxp文件后缀改成.zip然后解压,放到ae的安装目录下'AdobeCEPextensions'成功:
WINDOWS:
C:Program Files (x86)Common FilesAdobeCEPextensions or
C:<username>AppDataRoamingAdobeCEPextensions
MAC:
/Library/Application Support/Adobe/CEP/extensions/bodymovin
(you can open the terminal and type:
$ cp -R YOURUNZIPEDFOLDERPATH/extension /Library/Application Support/Adobe/CEP/extensions/bodymovin
then type:
$ ls /Library/Application Support/Adobe/CEP/extensions/bodymovin
to make sure it was copied correctly type)

Edit the registry key:
WINDOWS:
open the registry key HKEY_CURRENT_USER/Software/Adobe/CSXS.6 and add a key named PlayerDebugMode, of type String, and value 1.
MAC:
open the file ~/Library/Preferences/com.adobe.CSXS.6.plist and add a row with key PlayerDebugMode, of type String, and value 1.
接着就是打开AE,新建一个动画或者导入一个AE模板,然后在 ‘编辑 > 首选项 > 常规’ 中将允许脚本写入和访问网络勾上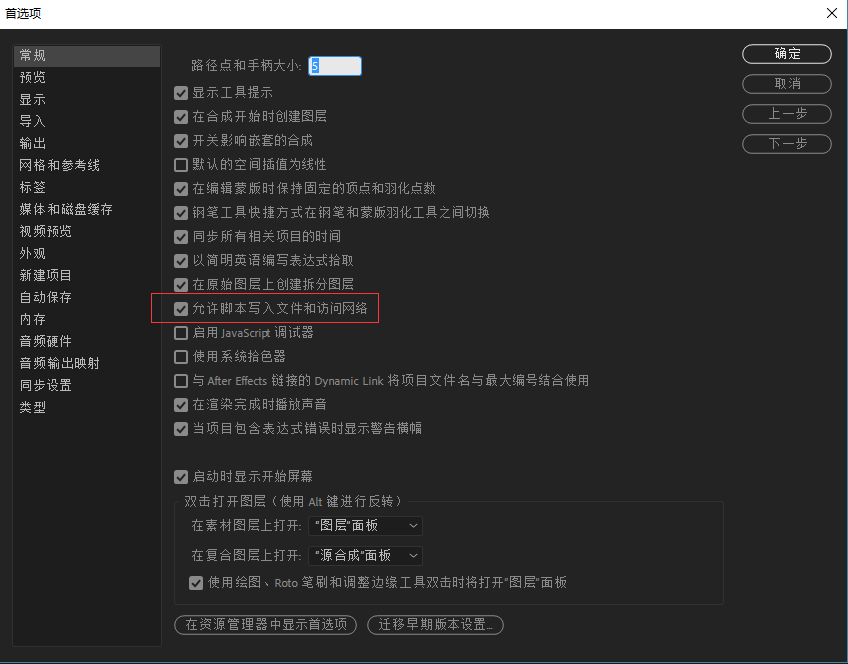
然后在‘窗口 > 扩展 > Bodymovin’将Bodymovin选中,会弹出一个插件框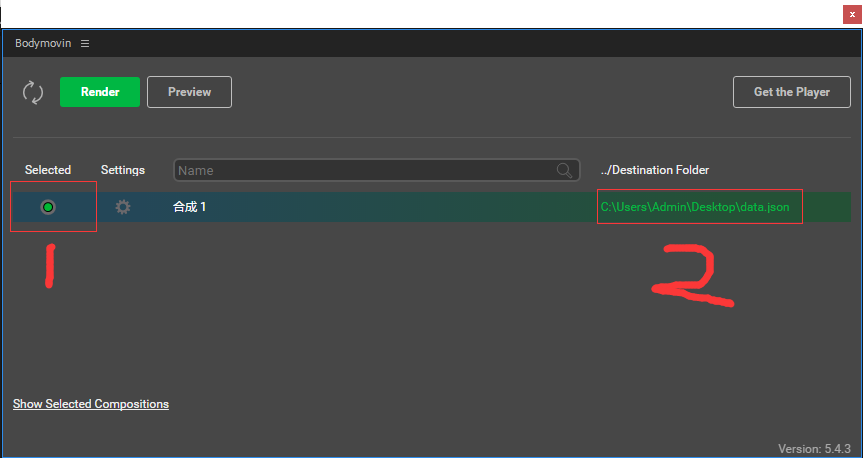
将上图中1的位置选中,在2的位置选择一个位置确定,然后render,导出data.json和其他文件,这时候可以点击preview进行预览,只需要选择刚才导出的data.json文件即可。
下面就是和lottie进行结合使用了:
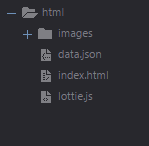
首先下载lottie.js文件,在项目:https://github.com/airbnb/lottie-web下的'lottie-web/build/player/'目录下有个lottie.js文件,就是我们要的。然后将lottie放到根目录下,新建一个index.html文件,同时将导出的data.json和images文件夹放到根目录
index.html的内容为:
<!DOCTYPE html>
<html lang="en">
<head>
    <meta charset="UTF-8">
    <title>Bodymovin Demo</title>
    <script src="lottie.js"></script>
</head>
<body>
    <div id="animation"></div>
    <script>
        lottie.loadAnimation({
            path:'data.json',   //json文件路径
            loop:true,
            autoplay:true,
            renderer:'canvas',  //渲染方式,有"html"、"canvas"和"svg"三种
            container:document.getElementById('animation')
        });
    </script>
</body>
</html>
这时候如果直接双击index.html进行预览是不行的,因为使用的是file:///形式打开的,ajax会报跨域的错误:
lottie.js:4340 Access to XMLHttpRequest at 'file:///C:/nginx-1.15.8/html/data.json' from origin 'null' has been blocked by CORS policy: Cross origin requests are only supported for protocol schemes: http, data, chrome, chrome-extension, https.
你可以本地安装一个nginx启动一个代理,然后配置端口为2323,server_name 为localhost:
#user  nobody;
worker_processes  1;

#error_log  logs/error.log;
#error_log  logs/error.log  notice;
#error_log  logs/error.log  info;

#pid        logs/nginx.pid;


events {
    worker_connections  1024;
}


http {
    include       mime.types;
    default_type  application/octet-stream;

    #log_format  main  '$remote_addr - $remote_user [$time_local] "$request" '
    #                  '$status $body_bytes_sent "$http_referer" '
    #                  '"$http_user_agent" "$http_x_forwarded_for"';

    #access_log  logs/access.log  main;

    sendfile        on;
    #tcp_nopush     on;

    #keepalive_timeout  0;
    keepalive_timeout  65;

    #gzip  on;

    server {
        listen       2323;
        server_name  localhost;

        #charset koi8-r;

        #access_log  logs/host.access.log  main;

        location / {
            root   html;
            index  index.html index.htm;
        }

        #error_page  404              /404.html;

        # redirect server error pages to the static page /50x.html
        #
        error_page   500 502 503 504  /50x.html;
        location = /50x.html {
            root   html;
        }

        # proxy the PHP scripts to Apache listening on 127.0.0.1:80
        #
        #location ~ .php$ {
        #    proxy_pass   http://127.0.0.1;
        #}

        # pass the PHP scripts to FastCGI server listening on 127.0.0.1:9000
        #
        #location ~ .php$ {
        #    root           html;
        #    fastcgi_pass   127.0.0.1:9000;
        #    fastcgi_index  index.php;
        #    fastcgi_param  SCRIPT_FILENAME  /scripts$fastcgi_script_name;
        #    include        fastcgi_params;
        #}

        # deny access to .htaccess files, if Apache's document root
        # concurs with nginx's one
        #
        #location ~ /.ht {
        #    deny  all;
        #}
    }


    # another virtual host using mix of IP-, name-, and port-based configuration
    #
    #server {
    #    listen       8000;
    #    listen       somename:8080;
    #    server_name  somename  alias  another.alias;

    #    location / {
    #        root   html;
    #        index  index.html index.htm;
    #    }
    #}


    # HTTPS server
    #
    #server {
    #    listen       443 ssl;
    #    server_name  localhost;

    #    ssl_certificate      cert.pem;
    #    ssl_certificate_key  cert.key;

    #    ssl_session_cache    shared:SSL:1m;
    #    ssl_session_timeout  5m;

    #    ssl_ciphers  HIGH:!aNULL:!MD5;
    #    ssl_prefer_server_ciphers  on;

    #    location / {
    #        root   html;
    #        index  index.html index.htm;
    #    }
    #}

}
到命令行下去运行nginx.exe启动nginx然后访问localhost:2323就能预览了。至于nginx的使用命令就不罗列了。
lottie的具体使用文档见: https://github.com/airbnb/lottie-web
另:如果渲染的时候提示无法获取字体轮廓,将你的AE换成英文就好了。下面是一种将语言设置成英文的方法,以windows环境为例:
首先找到安装路径下的配置文件painter.ini,一般默认安装的话在这个路径下:C:Program FilesAdobeAdobe After Effects CC 2018Support Filespainter.ini
然后修改这个文件,在@AdobeID下面加上下面两行:
ForceLanguage=1
Language=en_US
修改后的painter.ini内容为:
[Config]
; Use INI or use default options
UseCfg=1
Name=Adobe After Effects CC 2017
LEID=V7{}AfterEffects-140-Win-GM
Version=14.0.0
Serial=102310015133850186390073
; AdobeID (stub)
AdobeID=painter@adobe.com
PersonGUID=7189F1490B80A4FEC6B81B51@AdobeID
ForceLanguage=1
Language=en_US
[AMT]
; AMT Library version
Version=10
; Enables the genuine AMTRetrieveLibraryPath algorithm
; 0 = disable
; 1 = enable
AMTRetrieveLibraryPath=0
修改完后重新启动AE即可。如果没有权限修改,在painter.ini 文件上右击选择属性,在安全里更改权限即可。