matplotlib教程学习笔记
如何干劲利落地使用constrained_layout参数来画图
constrained_layout参数会自动地调整subplots和修饰的位置
import matplotlib.pyplot as plt
constrained_layout和tight_latout比较相似,不过是利用一个约束器?来完成。
在任意axex被添加到fig中,constrained_layout需要被激活,有俩种方式能够完成这个目的:
plt.subplots(constrained_layout=True)
plt.rcParams['figure.constrained_layout.use'] = True
简单的例子
在matplotlib中,axes的位置是通过标准化的图像坐标轴定制的所以,有可能发生axes超出图片的边界而被剪切掉的情况:
# sphinx_gallery_thumbnail_number = 18

#import matplotlib
#matplotlib.use('Qt5Agg')

import warnings

import matplotlib.pyplot as plt
import numpy as np
import matplotlib.colors as mcolors
import matplotlib.gridspec as gridspec

import matplotlib._layoutbox as layoutbox

plt.rcParams['savefig.facecolor'] = "0.8"
plt.rcParams['figure.figsize'] = 4.5, 4.
def example_plot(ax, fontsize=12, nodec=False):
    ax.plot([1, 2])

    ax.locator_params(nbins=3)
    if not nodec:
        ax.set_xlabel('x-label', fontsize=fontsize)
        ax.set_ylabel('y-label', fontsize=fontsize)
        ax.set_title('Title', fontsize=fontsize)
    else:
        ax.set_xticklabels('')
        ax.set_yticklabels('')


fig, ax = plt.subplots(constrained_layout=False)
example_plot(ax, fontsize=24)

notebook会自动调整的?
fig, ax = plt.subplots(constrained_layout=True)
example_plot(ax, fontsize=24)

当你有多个子图的时候,你会发现,它们很可能是重叠在一起的
fig, axs = plt.subplots(2, 2, constrained_layout=False)
for ax in axs.flatten():
    example_plot(ax)

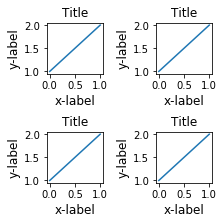
将constrained_layout设置为True可以避免这一尴尬
fig, axs = plt.subplots(2, 2, constrained_layout=True)
for ax in axs.flatten():
    example_plot(ax)

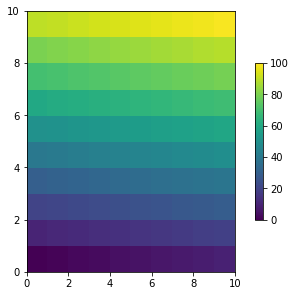
Colorbars
当你使用colorbar()创建colorbar的时候,需要为其预留一点空间,将constrained_layout为True,matplotlib会自动帮你完成这一项工作。
arr = np.arange(100).reshape((10, 10))
norm = mcolors.Normalize(vmin=0., vmax=100.)
# see note above: this makes all pcolormesh calls consistent:
pc_kwargs = {'rasterized': True, 'cmap': 'viridis', 'norm': norm}
fig, ax = plt.subplots(figsize=(4, 4), constrained_layout=True)
im = ax.pcolormesh(arr, **pc_kwargs)
fig.colorbar(im, ax=ax, shrink=0.6);
fig, axs = plt.subplots(2, 2, figsize=(4, 4), constrained_layout=True)
for ax in axs.flatten():
    im = ax.pcolormesh(arr, **pc_kwargs)
fig.colorbar(im, ax=axs, shrink=0.6);

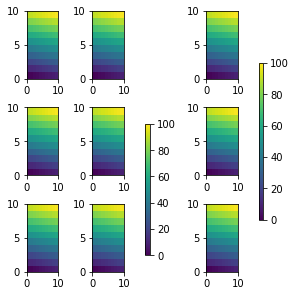
我们可以利用ax=...来设定colorbar的位置,也就是colorbar所属的axes,这个时候
constrained_layout会给其留一个空,并且其他的图形大小依旧是一致的。
fig, axs = plt.subplots(3, 3, figsize=(4, 4), constrained_layout=True)
for ax in axs.flatten():
    im = ax.pcolormesh(arr, **pc_kwargs)
fig.colorbar(im, ax=axs[1:, ][:, 1], shrink=0.8) #等价于ax=axs[1:, :-1]
fig.colorbar(im, ax=axs[:, -1], shrink=0.6);
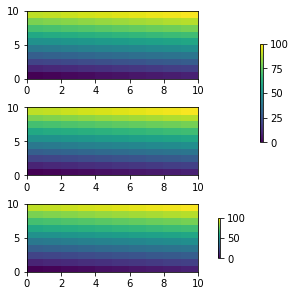
通过shrink参数,我们可以调整colorbar的长度。
fig, axs = plt.subplots(3, 1, figsize=(4, 4), constrained_layout=True)
for ax in axs[:2]:
    im = ax.pcolormesh(arr, **pc_kwargs)
fig.colorbar(im, ax=axs[:2], shrink=0.6)
im = axs[2].pcolormesh(arr, **pc_kwargs)
fig.colorbar(im, ax=axs[2], shrink=0.6);
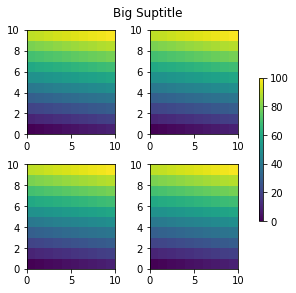
Suptitle
Suptitle用以设置整个图片的标题,
t:str,
x: default 0.5
y: default 0.98
constrained_layout 也会贴心地给大标题留出空间。
fig, axs = plt.subplots(2, 2, figsize=(4, 4), constrained_layout=True)
for ax in axs.flatten():
    im = ax.pcolormesh(arr, **pc_kwargs)
fig.colorbar(im, ax=axs, shrink=0.6)
fig.suptitle('Big Suptitle');
Legends
同样constrained_layout能够合适地处理legends
fig, ax = plt.subplots(constrained_layout=True)
ax.plot(np.arange(10), label='This is a plot')
ax.legend(loc='center left', bbox_to_anchor=(0.8, 0.5));

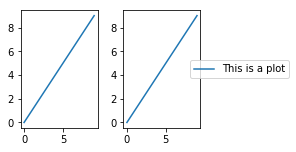
但是,legend可能会偷取原本应该属于subplots的空间
fig, axs = plt.subplots(1, 2, figsize=(4, 2), constrained_layout=True)
axs[0].plot(np.arange(10))
axs[1].plot(np.arange(10), label='This is a plot')
axs[1].legend(loc='center left', bbox_to_anchor=(0.8, 0.5));#这也不能怪legend啊,自己非要设置bbox_to_anchor作死
后面的没看懂啥意思
Padding and Spacing
对于constrained_layout,我们为其设置内边距。Padding设置了边缘与画板的距离,以及plots的最小边距。
通过set_constrained_layout_pads设置:
w_pad
h_pad
fig, axs = plt.subplots(2, 2, constrained_layout=True)
for ax in axs.flatten():
    example_plot(ax, nodec=True)
    ax.set_xticklabels('')
    ax.set_yticklabels('')
fig.set_constrained_layout_pads(w_pad=8./72., h_pad=8./72.,
        hspace=0., wspace=0.)

fig, axs = plt.subplots(2, 2, constrained_layout=True)
for ax in axs.flatten():
    example_plot(ax, nodec=True)
    ax.set_xticklabels('')
    ax.set_yticklabels('')
fig.set_constrained_layout_pads(w_pad=2./72., h_pad=2./72.,
        hspace=0., wspace=0.)


subplots之间的空间,可以通过wspace和hspace来设置,传入一个比例,然后随着图片大小的变化,宽度也会按照比例进行变化
fig, axs = plt.subplots(2, 2, constrained_layout=True)
for ax in axs.flatten():
    example_plot(ax, nodec=True)
    ax.set_xticklabels('')
    ax.set_yticklabels('')
fig.set_constrained_layout_pads(w_pad=2./72., h_pad=2./72.,
        hspace=0.2, wspace=0.2)

spacing with colobars
fig, axs = plt.subplots(2, 2, constrained_layout=True)
for ax in axs.flatten():
    pc = ax.pcolormesh(arr, **pc_kwargs)
    fig.colorbar(pc, ax=ax, shrink=0.6, pad=0)#这里的pad默认为0.02
    ax.set_xticklabels('')
    ax.set_yticklabels('')
fig.set_constrained_layout_pads(w_pad=2./72., h_pad=2./72.,
        hspace=0.2, wspace=0.2)

如何我们希望colorbar再稍微远离一点,可以调整pad属性
fig, axs = plt.subplots(2, 2, constrained_layout=True)
for ax in axs.flatten():
    pc = ax.pcolormesh(arr, **pc_kwargs)
    fig.colorbar(im, ax=ax, shrink=0.6, pad=0.05)
    ax.set_xticklabels('')
    ax.set_yticklabels('')
fig.set_constrained_layout_pads(w_pad=2./72., h_pad=2./72.,
        hspace=0.2, wspace=0.2)

rcParams
关于constrained_layout,有5个rcParams参数可以调整
use: 是否使用constrained_layout, 默认为False
w_pad, h_pad: 内边距,默认为3./72. inches 3pts
wspace, hspace: subplots之间的空间,默认为0.02
plt.rcParams['figure.constrained_layout.use'] = True
fig, axs = plt.subplots(2, 2, figsize=(3, 3))
for ax in axs.flatten():
    example_plot(ax)
Use with GridSpec
明白了,就是说使用GridSpec的同时也设置constrained_layout=True是有意义的
plt.rcParams['figure.constrained_layout.use'] = False
fig = plt.figure()

gs1 = gridspec.GridSpec(2, 1, figure=fig)
ax1 = fig.add_subplot(gs1[0])
ax2 = fig.add_subplot(gs1[1])
example_plot(ax1)
example_plot(ax2)

plt.rcParams['figure.constrained_layout.use'] = True
fig = plt.figure()

gs1 = gridspec.GridSpec(2, 1, figure=fig)
ax1 = fig.add_subplot(gs1[0])
ax2 = fig.add_subplot(gs1[1])
example_plot(ax1)
example_plot(ax2)

fig = plt.figure()

gs0 = fig.add_gridspec(1, 2)

gs1 = gs0[0].subgridspec(2, 1)
ax1 = fig.add_subplot(gs1[0])
ax2 = fig.add_subplot(gs1[1])

example_plot(ax1)
example_plot(ax2)

gs2 = gs0[1].subgridspec(3, 1)

for ss in gs2:
    ax = fig.add_subplot(ss)
    example_plot(ax)
    ax.set_title("")
    ax.set_xlabel("")

ax.set_xlabel("x-label", fontsize=12);

plt.rcParams['figure.constrained_layout.use'] = False
fig = plt.figure()

gs0 = fig.add_gridspec(1, 2)

gs1 = gs0[0].subgridspec(2, 1)
ax1 = fig.add_subplot(gs1[0])
ax2 = fig.add_subplot(gs1[1])

example_plot(ax1)
example_plot(ax2)

gs2 = gs0[1].subgridspec(3, 1)

for ss in gs2:
    ax = fig.add_subplot(ss)
    example_plot(ax)
    ax.set_title("")
    ax.set_xlabel("")

ax.set_xlabel("x-label", fontsize=12);

fig = plt.figure()

gs0 = fig.add_gridspec(6, 2)

ax1 = fig.add_subplot(gs0[:3, 0])
ax2 = fig.add_subplot(gs0[3:, 0])

example_plot(ax1)
example_plot(ax2)

ax = fig.add_subplot(gs0[0:2, 1])
example_plot(ax)
ax = fig.add_subplot(gs0[2:4, 1])
example_plot(ax)
ax = fig.add_subplot(gs0[4:, 1])
example_plot(ax)

plt.rcParams['figure.constrained_layout.use']=True
fig = plt.figure()

gs0 = fig.add_gridspec(6, 2)

ax1 = fig.add_subplot(gs0[:3, 0])
ax2 = fig.add_subplot(gs0[3:, 0])

example_plot(ax1)
example_plot(ax2)

ax = fig.add_subplot(gs0[0:2, 1])
example_plot(ax)
ax = fig.add_subplot(gs0[2:4, 1])
example_plot(ax)
ax = fig.add_subplot(gs0[4:, 1])
example_plot(ax)

def docomplicated(suptitle=None):
    fig = plt.figure()
    gs0 = fig.add_gridspec(1, 2, figure=fig, width_ratios=[1., 2.])
    gsl = gs0[0].subgridspec(2, 1)
    gsr = gs0[1].subgridspec(2, 2)

    for gs in gsl:
        ax = fig.add_subplot(gs)
        example_plot(ax)
    axs = []
    for gs in gsr:
        ax = fig.add_subplot(gs)
        pcm = ax.pcolormesh(arr, **pc_kwargs)
        ax.set_xlabel('x-label')
        ax.set_ylabel('y-label')
        ax.set_title('title')

        axs += [ax]
    fig.colorbar(pcm, ax=axs)
    if suptitle is not None:
        fig.suptitle(suptitle)

docomplicated()

plt.rcParams['figure.constrained_layout.use']=False
def docomplicated(suptitle=None):
    fig = plt.figure()
    gs0 = fig.add_gridspec(1, 2, figure=fig, width_ratios=[1., 2.])
    gsl = gs0[0].subgridspec(2, 1)
    gsr = gs0[1].subgridspec(2, 2)

    for gs in gsl:
        ax = fig.add_subplot(gs)
        example_plot(ax)
    axs = []
    for gs in gsr:
        ax = fig.add_subplot(gs)
        pcm = ax.pcolormesh(arr, **pc_kwargs)
        ax.set_xlabel('x-label')
        ax.set_ylabel('y-label')
        ax.set_title('title')

        axs += [ax]
    fig.colorbar(pcm, ax=axs)
    if suptitle is not None:
        fig.suptitle(suptitle)

docomplicated()

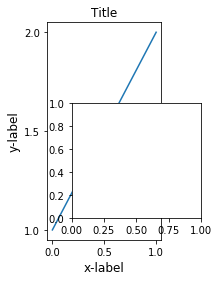
Manually setting axes positions
我们可以通过set_position来手动设置axes的位置
fig, axs = plt.subplots(1, 2)
example_plot(axs[0], fontsize=12)
axs[1].set_position([0.2, 0.2, 0.4, 0.4])
通过使用fig.execute_constrained_layout()函数,使得数据内的坐标能够被合理放置?
from matplotlib.transforms import Bbox

fig, axs = plt.subplots(1, 2)
example_plot(axs[0], fontsize=12)
fig.execute_constrained_layout()
# put into data-space:
bb_data_ax2 = Bbox.from_bounds(0.5, 1., 0.2, 0.4)
disp_coords = axs[0].transData.transform(bb_data_ax2)
fig_coords_ax2 = fig.transFigure.inverted().transform(disp_coords)
bb_ax2 = Bbox(fig_coords_ax2)
ax2 = fig.add_axes(bb_ax2)

Manually turning off constrained_layout
通过fig.set_constrained_layout(False)来手动关闭constrained_layout
Limitaions
Incompatible functions
subplot函数和constrained_layout是不兼容的,因为constrained_layout是通过gridspecs来布局,而subplot会产生一个独立的gridspec?
plt.rcParams['figure.constrained_layout.use']=True
fig = plt.figure()

ax1 = plt.subplot(221)
ax2 = plt.subplot(223)
ax3 = plt.subplot(122)

example_plot(ax1)
example_plot(ax2)
example_plot(ax3)

#当然我们可以通过gridspec来改善布局, 注意constrained_layout==True
fig = plt.figure()
gs = fig.add_gridspec(2, 2)

ax1 = fig.add_subplot(gs[0, 0])
ax2 = fig.add_subplot(gs[1, 0])
ax3 = fig.add_subplot(gs[:, 1])

example_plot(ax1)
example_plot(ax2)
example_plot(ax3)

同样的,subplot2grid函数也是不行的
fig = plt.figure()

ax1 = plt.subplot2grid((3, 3), (0, 0))
ax2 = plt.subplot2grid((3, 3), (0, 1), colspan=2)
ax3 = plt.subplot2grid((3, 3), (1, 0), colspan=2, rowspan=2)
ax4 = plt.subplot2grid((3, 3), (1, 2), rowspan=2)

example_plot(ax1)
example_plot(ax2)
example_plot(ax3)
example_plot(ax4)

也是通过gridspec来改善
fig = plt.figure()
gs = fig.add_gridspec(3, 3)

ax1 = fig.add_subplot(gs[0, 0])
ax2 = fig.add_subplot(gs[0, 1:])
ax3 = fig.add_subplot(gs[1:, 0:2])
ax4 = fig.add_subplot(gs[1:, -1])

example_plot(ax1)
example_plot(ax2)
example_plot(ax3)
example_plot(ax4)

管辖范围
注意constrained_layout只能管ticklabels, axis labels, titles,和legends,其他的Artist没法管。
函数链接
matplotlib.rcParams-基本参数设置
suptitle-整个图片的标题
set_constrained_layout_pads-设置paddings
set_position-设置axes的位置