技术在于交流、沟通,转载请注明出处并保持作品的完整性。
本节主要介绍一下类与类之间的关系,也就是面向对象编程先介绍两个术语
Object Oriented Programming OOP面向对象编程
Object Oriented Design OOD面向对象设计
对于类与类之间的关系有很多种,但是我认为理解3种足够
1.Inheritance (继承)
2.Composition (组合)
3.Delegation (委託) 该种关系也可以理解成聚合
一.组合
1.定义: has-a的关系,一个类中有包含另外一个类 (类中的成员变量之一是类),是包含一个对象,而不是包含一个指针,如果你组合了这个类,那么你就将拥有你包含的类的全部功能
下面我介绍一个组合的实际应用
#include<deque>
#include <queue>
template <class T>
class queue {
    ...
protected:
    std::deque<T> c; // 底層容器       has-a的关系
public:
    // 以下完全利用 c 的操作函數完成
    bool empty() const { return c.empty(); }//利用deque的功能来实现queue新定义的功能
    size_t size() const { return c.size(); }
    reference front() { return c.front(); }
    reference back() { return c.back(); }

    void push(const value_type& x) { c.push_back(x); }
    void pop() { c.pop_front(); }
};
queue是一种队列操作,单方向操作先进先出
deque是两端都可进出,所以说deque的功能较强大与quque,但是如果我queue组合deque(包含 has-a)那么我们就可以利用deque的功能来实现queue新定义的功能
这就是组合关系的一种实际应用,同时它也是adapter设计模式
2.类图
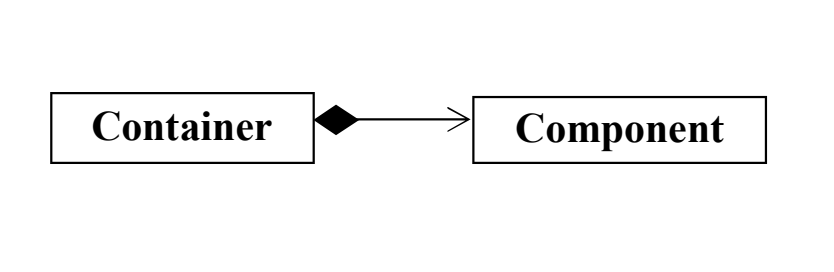
那么上面的queue与deque的类图为
![]()
queue包含deque
3.内存管理
template <class T>
class queue {
protected:
    deque<T> c;
    ...
};


template <class T>
class deque {
protected:
    Itr<T> start; Itr<T> start;//16 bit
    Itr<T> finish; Itr<T> finish; //16 bit
    T** map; T** map; //4bit
    unsigned int map_size;  //4bit
};


template <class T>
struct Itr { struct Itr {
    T* cur; T* cur;  //4bit
    T* first; T* first;
    T* last; T* last;
    T** node;
    ...
};
图示
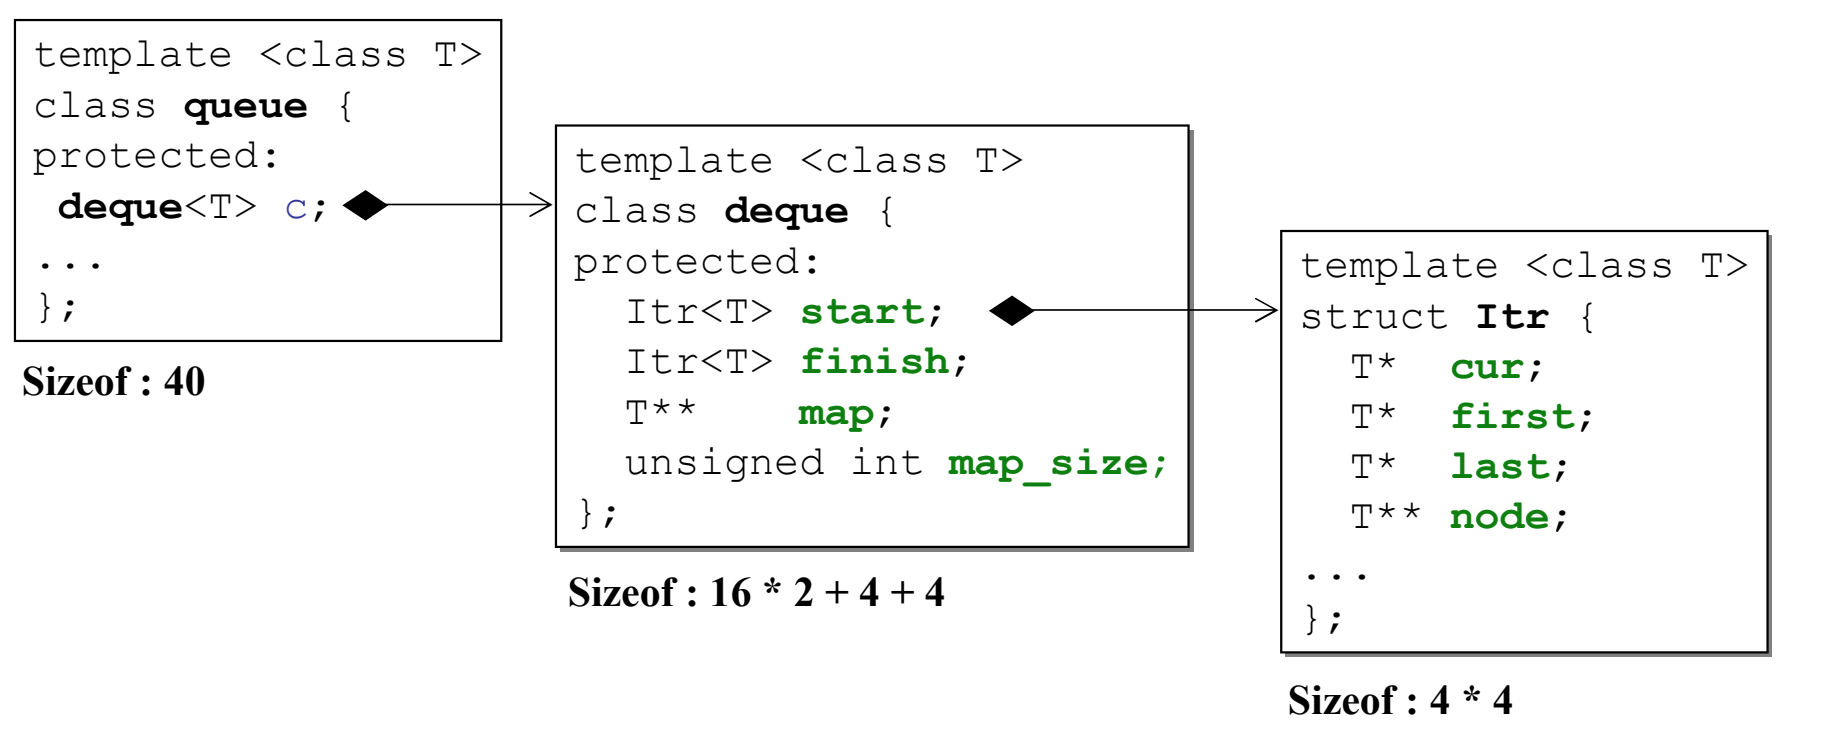
所以是queue的内存为40bit
4.构造与析构
未了方便我们的理解,我们可以将组合关系联想成下图
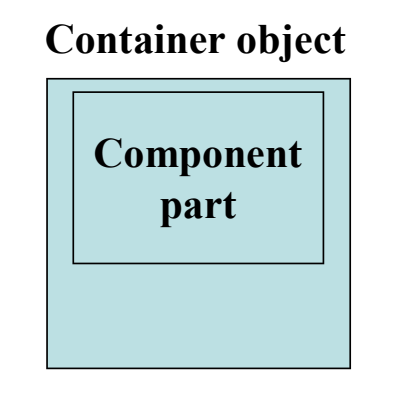
a.构造由内而外
Container 的构造函数首先调用 Component 的 default 构造函数,然後才执行自己 的构造函数,可以理解成这样
Container::Container(...): Component() { ... };
b.析构由外而内
Container 的析构函数首先执行自己的,然后调用 Component 的 析构函数,可以理解成这样
Container::~Container(...){ ... ~Component() };
5.生命周期
Container于Component具有相同的生命周期
二.聚合 也就是委托关系
1.定义has-a pointer,一个类中包含另一个类的指针,你也同样拥有被包含类的全部功能,他有一个重要的使用方法handle/body(pImpl)(我在格式工厂(六)shared_ptr中有介绍)
class StringRep;

class String {//handle
public:
    String();
    String(const char* s);
    String &operator=(const String& s); ~String();
    ....
private:
    StringRep* rep; // pimpl
};


class StringRep { //body
    friend class String;
    StringRep(const char* s);
    ~StringRep();
    int count;
    char* rep;
};
功能其实与组合非常相似
2.类图
![]()
3.内存管理
包含一个指针 4bit
4.构造与析构
不发生影响
5.生命周期
生命周期可以不相同
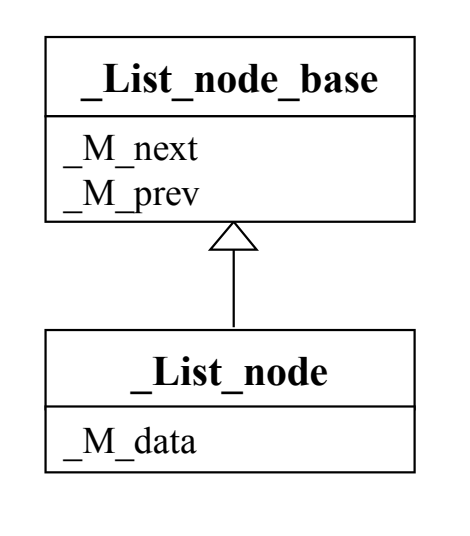
三.继承
1.定义is-a的关系,分为父类(Base)和子类(Drived),可以理解成孩子继承父亲的财产,就是父类有的子类都可以有,也可以理解成子类有父类的成分
class _List_node_base
{
    ...
    _List_node_base* _M_next;
    _List_node_base* _M_prev;
    ...
};

template<typename _Tp>
class _List_node: public _List_node_base
{
    _Tp _M_data;
};
2.类图
3.内存管理
无太大关联,抛去成员变量,子类比父类多一个虚函数表 4bit
4.构造与析构
子类含有父类的成分,可以理解成

构造由内而外
Derived 的构造函数首先调用Base 的 default 构造函数, 然后执行自己的
Derived::Derived(...): Base() { ... };
析构由外而内
Derived 的析构函数首先执行自己的,然后调用用 Base 的析构函数。
Derived::~Derived(...){ ... ~Base() };
5.继承真正的使用是与虚函数的搭配
虚函数:用virtual声明的函数,它有三种形式
non-virtual 即普通函数,你不希望子类重新定义它(重新定义override)
virtual 函数(虚函数):你希望 derived class 重新定义 它,且你对这个函数有默认定义
pure virtual 函数(纯虚函数):你希望 derived class 一定要重新定义它,你对它没有默认定义
void func_1();//non-virtual
virtual void func_2();//virtual
virtual void func_3() = 0;//pure virtual
下面我们来验证一下上面的继承规则
class A
{
public:
    A()
    {
        cout<< "A ctor" << endl;
    }
    virtual ~A()
    {
        cout<< "A dctor" << endl;
    }

    void func()
    {
        cout<< "A::func()"<<endl;
    }

    virtual void func_virtual()
    {
        cout<< "A::func_virtual()"<<endl;
    }
};

class B : public A
{
public:
    B()
    {
        cout<< "B ctor"<<endl;
    }
    ~B()
    {
        cout<< "B dctor"<<endl;
    }

    void func_virtual()
    {
        cout<< "B::func_virtual()"<<endl;
    }
};
我们先创建一个B对象看看都能输出什么
int main(int argc, const char * argv[])
{
    B b;
    return 0;
}
输出结果
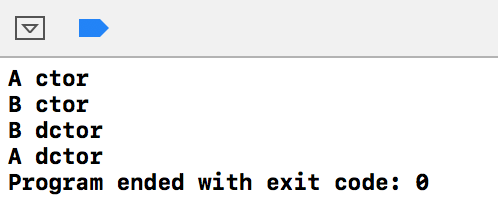
说明继承由内而外的构造,和由外而内的析构
继续看
1 int main(int argc, const char * argv[]) {
2     A* a = new B(); //父类指针可以指向子类对象(一般情况下子类的内存占用会大于父类,所以父类指针指向子类是可以的,那么反过来 子类指针指向父类就不行了)
3     a->func();
4     a->func_virtual();
5     delete a;//谁申请谁释放
6     a = nullptr;
7     return 0;
8 }
输出结果

你会返现为什么我用a调用func_virtual() 会调用到B的该函数,这个就是继承的好处之一了,他能动态识别是谁调用
用虚函数表来解释动态识别想必大家都会知道,现在我来介绍一下我的理解---this指针
在C++类中除了静态变量都有this指针,在上面第2行 A* a = new B(); 其实 a是一个b对象
在第3行 a->func(),编译器会编译成a->func(&a),(我在之前的文章中介绍过谁调用谁就是this,那么治理的&a 就相当于this),然后会在B中找func(),发现没有就去父类的A中去找
在第4行 a->func_virtual() => a->func_virtual(&a) 在B中找到了所以调用.
四 组合+继承
组合和继承共同使用它们的它们的创建顺序会是什么样子
第一种

Component构造 > Base构造 > 子类构造 析构相反
第二种

组合和继承的构造顺序都是由内而外,析构顺序都是由外而内,那上面的构造析构顺序呢
class A
{
public:
    A(){cout<< "A ctor" << endl;}
    virtual ~A(){cout<< "A dctor" << endl;}
    void func(){cout<< "A::func()"<<endl;}
    virtual void func_virtual(){cout<< "A::func_virtual()"<<endl;}
};

class C
{
public:
    C(){cout<< "C ctor"<<endl;}
    ~C(){cout<< "C dctor"<<endl;}
};

class B : public A
{
public:
    B(){cout<< "B ctor"<<endl;}
    ~B(){cout<< "B dctor"<<endl;}
    void func_virtual(){cout<< "B::func_virtual()"<<endl;}
private:
    C c;
};
输出结果

Base构造 > Component构造 > 子类构造 析构相反
Derived 的构造函数首先调用 Base 的 default 构造函数, 然后调用 Component 的 default 构造函数, 然后执行自己
Derived::Derived(...): Base(),Component() { ... };
Derived 的析构函数首先执行自己, 然后调用 Component 的 析构函数,然后調用 Base 的析构函数
Derived::~Derived(...){ ... ~Component(), ~Base() };
五 聚合 + 继承
这个我用一种设计模式来做实例
观察者模式(主要介绍聚合+继承的实现,详细的观察者模式我会在设计模式中介绍)
假设有一个txt文件,我用三个不同的阅读软件同时读取这一个txt文件,那么当txt内容发生改变时,这三个阅读器的内容都应做出相应的变化,其实现代码大致如下
用类图描述一下

大致实现如下
class Subject {
    String m_value;
    vector<Observer*> m_views;//包含指针
public:
    void attach(Observer* obs) {
        m_views.push_back(obs);//捕获Observe子类
    }
    void set_val(int value) {//当前内容发生改变
        m_value = value;
        notify();
    }
    void notify() {//通知所有子类发生改变,通过其继承关系调用相应的方法
        for (int i = 0; i < m_views.size(); ++i) m_views[i]->update(this, m_value);
    }
};


class Observer {
public:
    virtual void update(Subject* sub, int value) = 0;
};

class Observer_Sub : public  Observer //不同的阅读工具 同时观察Subject中的m_value
{
  void update(){...;}
};
五 聚合 + 继承
下面这个例子有点难理解且非常抽象,
现在我以原型模式来实现一个自动创建创建子类的方法
1.类图

2.实现如下
 1 #include <iostream>
 2 using namespace std;
 3
 4 enum imageType
 5 {
 6     LSAT, SPOT
 7 };
 8
 9 class Image
10 {
11 public:
12     virtual void draw() = 0;
13     static Image *findAndClone(imageType);
14 protected:
15     virtual imageType returnType() = 0;
16     virtual Image *clone() = 0;
17     // As each subclass of Image is declared, it registers its prototype
18     static void addPrototype(Image *image)
19     {
20         _prototypes[_nextSlot++] = image; }
21 private:
22     // addPrototype() saves each registered prototype here
23     static Image *_prototypes[10];
24     static int _nextSlot;
25 };
26
27 Image *Image::_prototypes[];
28 int Image::_nextSlot;
29
30 // Client calls this public static member function when it needs an instance // of an Image subclass
31 Image *Image::findAndClone(imageType type)
32 {
33     for (int i = 0; i < _nextSlot; i++)
34     {
35         if (_prototypes[i]->returnType() == type)
36         {
37             return _prototypes[i]->clone();
38         }
39     }
40     return nullptr;
41 }
子类SpotImage
 1 class SpotImage: public Image
 2 {
 3 public:
 4     imageType returnType()    {
 5         return SPOT;
 6     }
 7     void draw()
 8     {
 9         cout << "SpotImage::draw " << _id << endl;
10     }
11     Image *clone()    {
12         return new SpotImage(1);
13     }
14 protected:
15     SpotImage(int dummy)
16     {
17         _id = _count++;
18     }
19
20
21 private:
22     SpotImage()
23     {
24         addPrototype(this);
25         cout<< "static init SpotImage" << endl;
26     }
27     static SpotImage _spotImage;
28     int _id;
29     static int _count;
30 };
31 SpotImage SpotImage::_spotImage;
32 int SpotImage::_count = 1;
子类LandSatImage
 1 class LandSatImage: public Image
 2 {
 3 public:
 4     imageType returnType()
 5     {
 6         return LSAT;
 7     }
 8     void draw()
 9     {
10         cout << "LandSatImage::draw " << _id << endl;
11     }
12     // When clone() is called, call the one-argument ctor with a dummy arg
13     Image *clone()
14     {
15         return new LandSatImage(1);
16     }
17
18 protected:
19 // This is only called from clone()
20     LandSatImage(int dummy)
21     {
22         _id = _count++;
23     }
24 private:
25 // Mechanism for initializing an Image subclass - this causes the
26 // default ctor to be called, which registers the subclass's prototype
27     static LandSatImage _landSatImage;
28 // This is only called when the private static data member is inited
29     LandSatImage()
30     {
31         addPrototype(this);
32         cout<< "static init LandSatImage" << endl;
33     }
34 // Nominal "state" per instance mechanism
35     int _id;
36     static int _count;
37 };
38 // Register the subclass's prototype
39 LandSatImage LandSatImage::_landSatImage;
40 // Initialize the "state" per instance mechanism
41 int LandSatImage::_count = 1;
调用
 1 // Simulated stream of creation requests
 2 const int NUM_IMAGES = 8;
 3 imageType input[NUM_IMAGES] =
 4 {
 5     LSAT, LSAT, LSAT, SPOT, LSAT, SPOT, SPOT, LSAT
 6 };
 7
 8
 9 int main() {
10
11     Image *images[NUM_IMAGES];
12     // Given an image type, find the right prototype, and return a clone
13
14
15     for (int i = 0; i < NUM_IMAGES; i++)
16
17
18     images[i] = Image::findAndClone(input[i]);
19
20
21     // Demonstrate that correct image objects have been cloned
22     for (int i = 0; i < NUM_IMAGES; i++)
23
24
25     images[i]->draw();
26
27
28     // Free the dynamic memory
29     for (int i = 0; i < NUM_IMAGES; i++)
30         delete images[i];
31
32     return 0;
33 }
其实主要难理解的地方有两个
a.静态变量率先初始化 a.SpotImage初始化其默认构造函数调用 Image::addPrototype()
b.LandSatImage 初始化其默认构造函数调用 Image::addPrototype()
这两步使Image::_nextSlot == 2 并使这两个子类注册在Image::_prototypes[]中
b.SpotImage和LandSatImage其clone()函数调用带参数的构造函数,默认构造函数留给静态变量初始化使用
如有不正确的地方请指正
参照<<侯捷 C++面向对象高级编程>>