Lombok的简介
Lombok是一款Java开发插件,使得Java开发者可以通过其定义的一些注解来消除业务工程中冗长和繁琐的代码,尤其对于简单的Java模型对象(POJO)。在开发环境中使用Lombok插件后,Java开发人员可以节省出重复构建,诸如hashCode和equals这样的方法以及各种业务对象模型的accessor和ToString等方法的大量时间。对于这些方法,它能够在编译源代码期间自动帮我们生成这些方法,并没有如反射那样降低程序的性能。
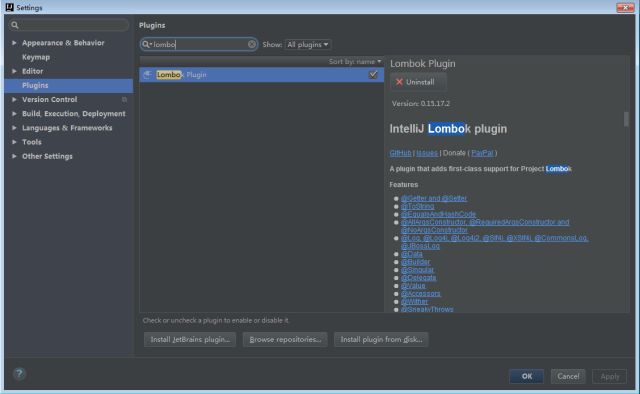
在Intellij中安装Lombok的插件
想要体验一把Lombok的话,得先在自己的开发环境中安装上对应的插件。下面先为大家展示下如何在Intellij中安装上Lombok插件。
通过IntelliJ的插件中心寻找Lombok
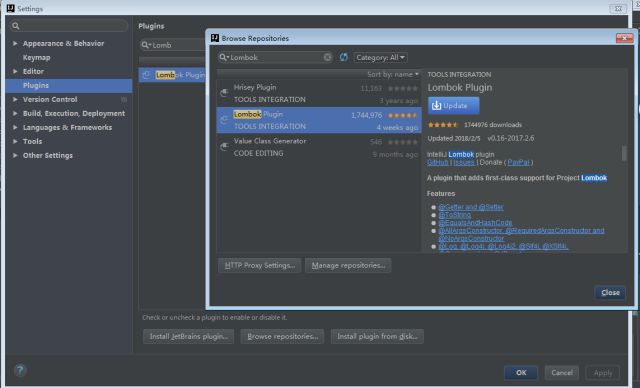
从Intellij插件中心安装Lombok
另外需要注意的是,在使用lombok注解的时候记得要导入lombok.jar包到工程,如果使用的是Maven的工程项目的话,要在其pom.xml中添加依赖如下:
<dependency>
    <groupId>org.projectlombok</groupId>
    <artifactId>lombok</artifactId>
    <version>1.16.8</version>
</dependency>
Lombok注解使用方法好了,就这么几步后就可以在Java工程中开始用Lombok这款开发神器了。下文将会给大家介绍Lombok中一些注解的使用方法,让大家对如何用这些注解有一个大致的了解。
Lombok常用注解介绍
下面先来看下Lombok中主要几个常用注解介绍:

Lombok的基本使用示例
(1)Val可以将变量申明是final类型。
public   static void main(String[] args) {

    val setVar = new HashSet<String>();
    val listsVar = new   ArrayList<String>();
    val mapVar = new HashMap<String,   String>();

    //=>上面代码相当于如下:
    final Set<String> setVar2 = new   HashSet<>();
    final List<String> listsVar2 = new   ArrayList<>();
    final Map<String, String> maps2 =   new HashMap<>();

}
(2)@NonNull注解能够为方法或构造函数的参数提供非空检查。
public void notNullExample(@NonNull String string) {
    //方法内的代码
}

//=>上面代码相当于如下:

public void notNullExample(String string) {
    if (string != null) {
        //方法内的代码相当于如下:
    } else {
        throw new NullPointerException("null");
    }
}
(3)@Cleanup注解能够自动释放资源。
public   void jedisExample(String[] args) {
    try {
        @Cleanup Jedis jedis =   redisService.getJedis();
    } catch (Exception ex) {
        logger.error(“Jedis异常:”,ex)
    }

    //=>上面代码相当于如下:
    Jedis jedis= null;
    try {
        jedis = redisService.getJedis();
    } catch (Exception e) {
        logger.error(“Jedis异常:”,ex)
    } finally {
        if (jedis != null) {
            try {
                jedis.close();
            } catch (Exception e) {
                e.printStackTrace();
            }
        }
    }
}
(4)@Getter/@Setter注解可以针对类的属性字段自动生成Get/Set方法。
public class OrderCreateDemoReq{

    @Getter
    @Setter
    private String customerId;

    @Setter
    @Getter
    private String poolId;

    //其他代码……
}

//上面请求Req类的代码相当于如下:

public class OrderCreateDemoReq{
    private String customerId;
    private String poolId;

    public String getCustomerId(){
         return customerId;
    }

    public String getPoolId(){
         return poolId;
    }

    public void setCustomerId(String customerId){
         this.customerId = customerId;
    }

    public void setPoolId(String poolId){
         this.pool = pool;
    }

}
(5)@ToString注解,为使用该注解的类生成一个toString方法,默认的toString格式为:ClassName(fieldName= fieleValue ,fieldName1=fieleValue)。
@ToString(callSuper=true,exclude="someExcludedField")
public   class Demo extends Bar {

    private boolean someBoolean = true;
    private String someStringField;
    private float someExcludedField;

}

//上面代码相当于如下:

public   class Demo extends Bar {

    private boolean someBoolean = true;
    private String someStringField;
    private float someExcludedField;

    @ Override
    public String toString() {
        return "Foo(super=" +   super.toString() +
            ", someBoolean=" +   someBoolean +
            ", someStringField=" +   someStringField + ")";
    }
}
(6)@EqualsAndHashCode注解,为使用该注解的类自动生成equals和hashCode方法。
@EqualsAndHashCode(exclude = {"id"}, callSuper =true)
public class LombokDemo extends Demo{
    private int id;
    private String name;
    private String gender;
}

//上面代码相当于如下:

public class LombokDemo extends Demo{

    private int id;
    private String name;
    private String gender;

    @Override
    public boolean equals(final Object o) {
        if (o == this) return true;
        if (o == null) return false;
        if (o.getClass() != this.getClass()) return false;
        if (!super.equals(o)) return false;
        final LombokDemo other = (LombokDemo)o;
        if (this.name == null ? other.name != null : !this.name.equals(other.name)) return false;
        if (this.gender == null ? other.gender != null : !this.gender.equals(other.gender)) return false;
        return true;
    }

    @Override
    public int hashCode() {
        final int PRIME = 31;
        int result = 1;
        result = result * PRIME + super.hashCode();
        result = result * PRIME + (this.name == null ? 0 : this.name.hashCode());
        result = result * PRIME + (this.gender == null ? 0 : this.gender.hashCode());
        return result;
    }

}
(7) @NoArgsConstructor, @RequiredArgsConstructor, @AllArgsConstructor,这几个注解分别为类自动生成了无参构造器、指定参数的构造器和包含所有参数的构造器。
@RequiredArgsConstructor(staticName = "of")
@AllArgsConstructor(access = AccessLevel.PROTECTED)
public class ConstructorExample<T> {

  private int x, y;
  @NonNull private T description;

  @NoArgsConstructor
  public static class NoArgsExample {
    @NonNull private String field;
  }

}

//上面代码相当于如下:
@RequiredArgsConstructor(staticName = "of")
@AllArgsConstructor(access = AccessLevel.PROTECTED)
public class ConstructorExample<T> {

  private int x, y;
  @NonNull private T description;

  @NoArgsConstructor
  public static class NoArgsExample {
    @NonNull private String field;
  }

}

public class ConstructorExample<T> {
  private int x, y;
  @NonNull private T description;

  private ConstructorExample(T description) {
    if (description == null) throw new NullPointerException("description");
    this.description = description;
  }

  public static <T> ConstructorExample<T> of(T description) {
    return new ConstructorExample<T>(description);
  }

  @java.beans.ConstructorProperties({"x", "y", "description"})
  protected ConstructorExample(int x, int y, T description) {
    if (description == null) throw new NullPointerException("description");
    this.x = x;
    this.y = y;
    this.description = description;
  }

  public static class NoArgsExample {
    @NonNull private String field;

    public NoArgsExample() {
    }
  }
}
(9)@Builder注解提供了一种比较推崇的构建值对象的方式。(8)@Data注解作用比较全,其包含注解的集合@ToString,@EqualsAndHashCode,所有字段的@Getter和所有非final字段的@Setter, @RequiredArgsConstructor。其示例代码可以参考上面几个注解的组合。
@Builder
public class BuilderExample {

  private String name;
  private int age;

  @Singular private Set<String> occupations;

}

//上面代码相当于如下:

public class BuilderExample {

  private String name;
  private int age;
  private Set<String> occupations;

  BuilderExample(String name, int age, Set<String> occupations) {
    this.name = name;
    this.age = age;
    this.occupations = occupations;
  }

  public static BuilderExampleBuilder builder() {
    return new BuilderExampleBuilder();
  }

  public static class BuilderExampleBuilder {

    private String name;
    private int age;
    private java.util.ArrayList<String> occupations;

    BuilderExampleBuilder() {
    }

    public BuilderExampleBuilder name(String name) {
      this.name = name;
      return this;
    }

    public BuilderExampleBuilder age(int age) {
      this.age = age;
      return this;
    }

    public BuilderExampleBuilder occupation(String occupation) {
      if (this.occupations == null) {
        this.occupations = new java.util.ArrayList<String>();
      }
      this.occupations.add(occupation);
      return this;
    }

    public BuilderExampleBuilder occupations(Collection<? extends String> occupations) {
      if (this.occupations == null) {
        this.occupations = new java.util.ArrayList<String>();
      }
      this.occupations.addAll(occupations);
      return this;
    }

    public BuilderExampleBuilder clearOccupations() {
      if (this.occupations != null) {
        this.occupations.clear();
      }
      return this;
    }

    public BuilderExample build() {
      Set<String> occupations = new HashSet<>();
      return new BuilderExample(name, age, occupations);
    }

    @verride
    public String toString() {
      return "BuilderExample.BuilderExampleBuilder(name = " + this.name + ", age = " + this.age + ", occupations = " + this.occupations + ")";
    }
  }
}
(10)@Synchronized注解类似Java中的Synchronized 关键字,但是可以隐藏同步锁。
public class SynchronizedExample {

 private final Object readLock = new   Object();

 @Synchronized
 public static void hello() {
     System.out.println("world");
 }

 @Synchronized("readLock")
 public void foo() {
   System.out.println("bar");
 }

//上面代码相当于如下:

 public class SynchronizedExample {

  private static final Object $LOCK = new   Object[0];
  private final Object readLock = new   Object();

  public static void hello() {
    synchronized($LOCK) {
      System.out.println("world");
    }
  }

  public void foo() {
    synchronized(readLock) {
        System.out.println("bar");
    }
  }

}
Lombok背后的自定义注解原理
本文在前三章节主要介绍了Lombok这款Java开发利器中各种定义注解的使用方法,但作为一个Java开发者来说光了解插件或者技术框架的用法只是做到了“知其然而不知其所以然”,如果真正掌握其背后的技术原理,看明白源码设计理念才能真正做到“知其然知其所以然”。好了,话不多说下面进入本章节的正题,看下Lombok背后注解的深入原理。
可能熟悉Java自定义注解的同学已经猜到,Lombok这款插件正是依靠可插件化的Java自定义注解处理API(JSR 269: Pluggable Annotation Processing API)来实现在Javac编译阶段利用“Annotation Processor”对自定义的注解进行预处理后生成真正在JVM上面执行的“Class文件”。有兴趣的同学反编译带有Lombok注解的类文件也就一目了然了。其大致执行原理图如下:

从上面的这个原理图上可以看出Annotation Processing是编译器在解析Java源代码和生成Class文件之间的一个步骤。其中Lombok插件具体的执行流程如下:
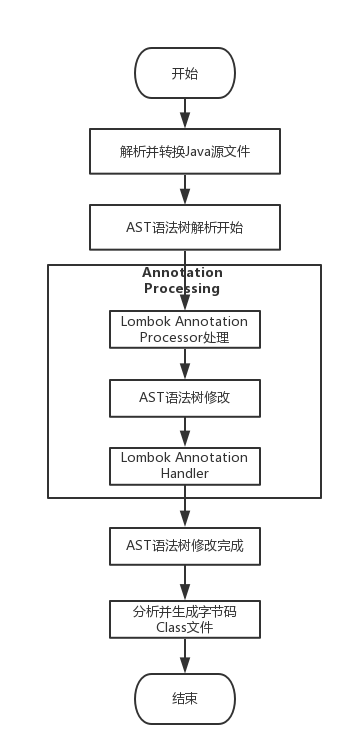
从上面的Lombok执行的流程图中可以看出,在Javac 解析成AST抽象语法树之后, Lombok 根据自己编写的注解处理器,动态地修改 AST,增加新的节点(即Lombok自定义注解所需要生成的代码),最终通过分析生成JVM可执行的字节码Class文件。使用Annotation Processing自定义注解是在编译阶段进行修改,而JDK的反射技术是在运行时动态修改,两者相比,反射虽然更加灵活一些但是带来的性能损耗更加大。
需要更加深入理解Lombok插件的细节,自己查阅其源代码是必比可少的。对开源框架代码比较有执着追求的童鞋可以将Lombok的源代码工程从github上download到本地进行阅读和自己调试。下图为Lombok工程源代码的截图:
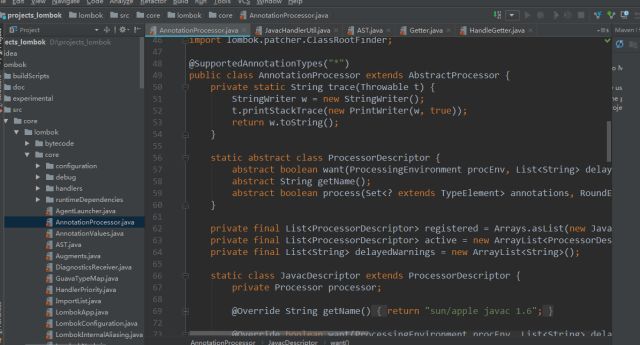
从熟悉JSR 269: Pluggable Annotation Processing API的同学可以从工程类结构图中发现AnnotationProcessor这个类是Lombok自定义注解处理的入口。该类有两个比较重要的方法一个是init方法,另外一个是process方法。在init方法中,先用来做参数的初始化,将AnnotationProcessor类中定义的内部类(JavacDescriptor、EcjDescriptor)先注册到ProcessorDescriptor类型定义的列表中。其中,内部静态类—JavacDescriptor在其加载的时候就将lombok.javac.apt.LombokProcessor这个类进行对象实例化并注册。
在LombokProcessor处理器中,其中的process方法会根据优先级来分别运行相应的handler处理类。Lombok中的多个自定义注解都分别有对应的handler处理类,如下图所示:
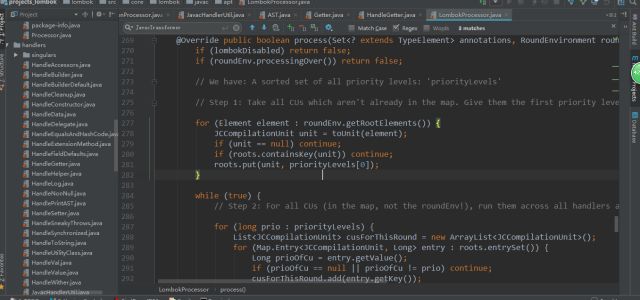
可以看出,在Lombok中对于其自定义注解进行实际的替换、修改和处理的正是这些handler类。对于其实现的细节可以具体参考其中的代码。