1、模拟登陆oschina(新浪)
一般登录后,用户就可以一段时间内可以使用该用户身份操作,不需要频繁登录。这背后往往使用了Cookie技术
登录后,用户获得一个cookie 值,这个值在浏览器当前会话中保存,只要不过期甚至可以保存很久
用户每次想服务器提交请求时,将这些cookie提交到服务器,服务器经过分析cookie中的信息,以确认用户身份,确认是信任的用户身份,就可以继续使用网站功能。
Cookie:网景公司发明,cookie 一般是一个键值对name=value ,但还可以包括 expire 过期,path路径,domain域, secure安全等信息。
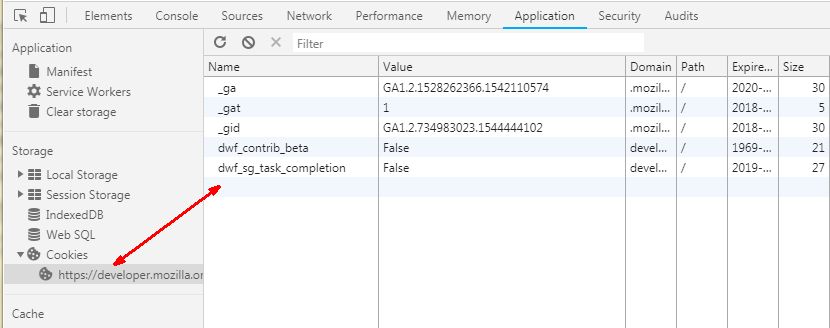
清空 oschina.net 的 所有cookie 重新登录,勾选“记住密码”
登录后的请求头如下:
GET /?nocache=1544444524642 HTTP/1.1
Host: www.oschina.net
Connection: keep-alive
Cache-Control: max-age=0
Upgrade-Insecure-Requests: 1
User-Agent: Mozilla/5.0 (Windows NT 6.1; Win64; x64) AppleWebKit/537.36 (KHTML, like Gecko) Chrome/69.0.3486.0 Safari/537.36
Accept: text/html,application/xhtml+xml,application/xml;q=0.9,image/webp,image/apng,*/*;q=0.8
Referer: https://www.oschina.net/home/login?goto_page=https%3A%2F%2Fwww.oschina.net%2F
Accept-Encoding: gzip, deflate, br
Accept-Language: zh-CN,zh;q=0.9,en;q=0.8
Cookie: _user_behavior_=d2104a4f-2484-4f85-8a31-4fe2a86accb8; aliyungf_tc=AQAAAAR/MWXo0QAAV8CVPSF2shLDVU11; Hm_lvt_a411c4d1664dd70048ee98afe7b28f0b=1544444408; _reg_key_=foI49279hton2EYg1ZJz; socialauth_id=n6SsxSVbY6yycMzklFO7; oscid=ZV2oveUqo28xv80qumQtfRqukWzpKq2brNqjn0Y0a5kFTeUQUUbcPj2dwLIiVt%2FuqEFRQShwYl7DjeTX5ZGViddJVodYy0RwW38eexYn%2FPq9afSRNy7SJarEKkqVYfw%2BdNYj1bbHQEhDiqhDeFBZbsf7ouMp1Msoa4cH6mU1ZtM%3D; Hm_lpvt_a411c4d1664dd70048ee98afe7b28f0b=1544444525
对比登录前后的cookie 值,发现登录后又oscid
那就 把这个登录后的HTTP 请求头放在代码中:
技巧: 使用postman 工具:
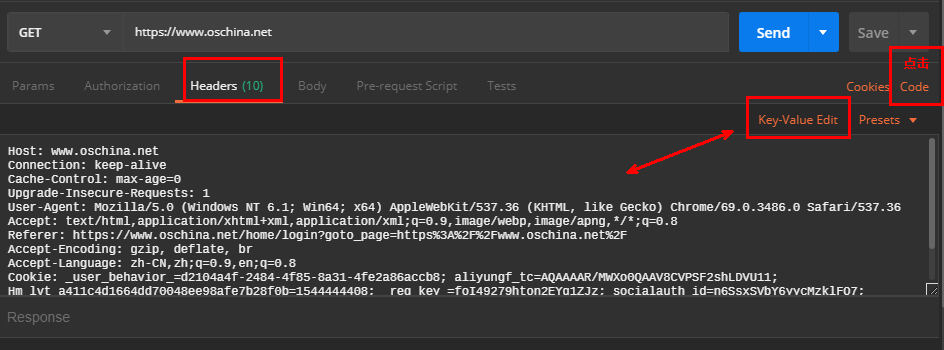

代码如下:(修改后)
 1 import requests
 2
 3 url = "https://www.oschina.net"
 4
 5
 6 headers = {
 7     'Host': "www.oschina.net",
 8     'Connection': "keep-alive",
 9     'Cache-Control': "max-age=0",
10     'Upgrade-Insecure-Requests': "1",
11     'User-Agent': "Mozilla/5.0 (Windows NT 6.1; Win64; x64) AppleWebKit/537.36 (KHTML, like Gecko) Chrome/69.0.3486.0 Safari/537.36",
12     'Accept': "text/html,application/xhtml+xml,application/xml;q=0.9,image/webp,image/apng,*/*;q=0.8",
13     'Referer': "https://www.oschina.net/home/login?goto_page=https%3A%2F%2Fwww.oschina.net%2F",
14     'Accept-Encoding': "gzip, deflate, br",
15     'Accept-Language': "zh-CN,zh;q=0.9,en;q=0.8",
16     'Cookie': "_user_behavior_=d2104a4f-2484-4f85-8a31-4fe2a86accb8; aliyungf_tc=AQAAAAR/MWXo0QAAV8CVPSF2shLDVU11; Hm_lvt_a411c4d1664dd70048ee98afe7b28f0b=1544444408; _reg_key_=foI49279hton2EYg1ZJz; socialauth_id=n6SsxSVbY6yycMzklFO7; oscid=ZV2oveUqo28xv80qumQtfRqukWzpKq2brNqjn0Y0a5kFTeUQUUbcPj2dwLIiVt%2FuqEFRQShwYl7DjeTX5ZGViddJVodYy0RwW38eexYn%2FPq9afSRNy7SJarEKkqVYfw%2BdNYj1bbHQEhDiqhDeFBZbsf7ouMp1Msoa4cH6mU1ZtM%3D; Hm_lpvt_a411c4d1664dd70048ee98afe7b28f0b=1544444525",
17     'cache-control': "no-cache",
18     'Postman-Token': "7d3714a6-c3d7-45ef-9b14-815ffb022535"
19     }
20
21 response = requests.request("GET", url, headers=headers)
22
23 with response:
24     with open('f://text.html','w',encoding='utf-8') as f:
25         text = response.text
26         f.write(text)
27         print(text)
28         print(response.status_code,'==========')
输出文件:

2、多线程爬取博客园
博客园的新闻分页地址:https://news.cnblogs.com/n/page/10/, 多线程成批 爬取新闻标题和连接
https://news.cnblogs.com/n/page/2/ 这个url 中变化的是最后的数字一直在变,它是页码
 1 import requests
 2 from  concurrent.futures import  ThreadPoolExecutor
 3 from queue import Queue
 4 from  bs4 import BeautifulSoup
 5 import threading
 6 import time
 7 import logging
 8
 9 FORMAT = "%(asctime)s %(threadName)s %(thread)s %(message)s"
10 logging.basicConfig(format=FORMAT, level=logging.INFO)
11
12 BASE_URL = "https://news.cnblogs.com"
13 NEW_PAGE = '/n/page/'
14
15 headers = {
16     'User-agent':'Mozilla/5.0 (Windows NT 6.1; WOW64) AppleWebKit/537.36 (KHTML, like Gecko) Chrome/61.0.3163.79 Safari/537.36 Maxthon/5.2.4.3000'
17 }
18
19 # 使用池,以后可以使用第三方消息队列完成
20 urls = Queue()  # url 的队列
21 htmls = Queue() # 响应数据队列
22 outputs = Queue() # 结果输出队列
23
24 # 创建博客园的新闻urls,每页30条新闻
25 def create_url(start, end, step=1):
26     for i in range(start, end + 1, step):
27         url = '{}{}{}/'.format(BASE_URL,NEW_PAGE, i)
28         print(url)
29         urls.put(url)
30     print('urls创建完毕')
31
32 event = threading.Event()
33
34 # 爬取页面线程函数
35 def crawler():
36     while not event.is_set():
37         try:
38             url = urls.get(True, 1)
39             with requests.request('GET', url , headers=headers) as response:
40                 html = response.text
41                 htmls.put(html)
42         except:
43             pass
44 # 解析线程函数
45 def parse():
46     while not event.is_set():
47         try:
48             html = htmls.get(True, 1)
49             soup =BeautifulSoup(html, 'lxml')
50             titles = soup.select('h2.news_entry a')
51             for title in titles:
52                 # <a href='/n/60287/' target='_blank'> 特斯拉</a>
53                 val = (BASE_URL + title.attrs['href'], title.text)
54                 outputs.put(val)
55                 print(val)
56         except:
57             pass
58 # 持久化线程函数
59 def persist(path):
60     with open(path, 'a+', encoding='utf-8') as f:
61         while not event.is_set():
62             try:
63                 url, text = outputs.get(True, 1)
64                 print(url, text)
65                 f.write('{}x01{}'.format(url, text))
66                 f.flush()
67             except:
68                 pass
69
70 # 线程池
71 executor = ThreadPoolExecutor(10)
72
73 executor.submit(create_url, 1, 10) # 模拟url收集,结束后,线程权让出
74 executor.submit(persist, 'f;/new.txt')
75
76 # 爬取页面并分析
77 for i in range(5):
78     executor.submit(crawler)
79 for i in range(4):
80     executor.submit(parse)
81
82
83 while True:
84     cmd = input('>>>>>>')
85     if cmd.strip() == 'quit':
86         event.set()
87         time.sleep(4)
88         break
89     print(threading.enumerate())
解析内容是一个比较耗时的过程,不适合放在crawler中同步处理,同样适用队列解耦
html 分析函数,parse ,分析完成后,需要将结果持久化, 不要在parse中直接持久化,放入队列中,统一持久化
这样一个实用的并行的爬虫就基本完成了
可以很方便的扩展成多进程版本
3、进阶(使用消息队列)
将队列换成第三方服务,本次采用较为常用的RabbitMQ
搭建RabbitMQ服务
队列工作模式选择:
以爬虫程序的htmls 队列为例,这个队列有很多个生产者(爬取函数 )写入,有多个消费者(解析函数)读取每一个消息只需要一个消费者使用,所以采用 RabbitMQ 的工作队列模式。
队列中如何分发呢:
其实说到底是路由,RabbitMQ的队列和工作队列,其实都是路由模式,只不过使用了缺省交换机
队列是否断开删除:
每一数据都要处理,不能因为某一端断开,然后队列就删除了,造成数据丢失。
测试代码:
send.py
 1 import pika
 2 import time
 3
 4 exchange = 'news'
 5 queue = 'urls'
 6
 7 params = pika.URLParameters('amqp://rab:123456@192.168.112.111:5672/test')
 8
 9 connection = pika.BlockingConnection(params)
10 channel = connection.channel()
11
12 # 生成一个交换机
13 channel.exchange_declare(
14     exchange=exchange,
15     exchange_type='direct'
16 )
17
18 channel.queue_declare(queue, exclusive=False)  # 生成队列
19 # 绑定队列到交换机, 没有指定routing_key ,将使用队列名
20 channel.queue_bind(queue, exchange)
21
22 with connection:
23     for i in range(10):
24         msg = 'data{:02}'.format(i)  # 让消息带上routing_key 便于观察
25         pub = channel.basic_publish(
26             exchange=exchange,
27             routing_key=queue,  # 指定routing_key ,没有指定,就使用队列名称匹配
28             body=msg  # 消息
29         )
30         print(msg, '==================')
31
32     print('===== send ok ===========')
receive.py
 1 import pika
 2 import time
 3
 4 exchange = 'news'
 5 queue = 'urls'
 6
 7 params = pika.URLParameters('amqp://rab:123456@192.168.112.111:5672/test')
 8
 9 connection = pika.BlockingConnection(params)
10 channel = connection.channel()
11
12 # 生成一个交换机
13 channel.exchange_declare(
14     exchange=exchange,
15     exchange_type='direct'
16 )
17
18 channel.queue_declare(queue, exclusive=False)  # 生成队列
19 # 绑定队列到交换机, 没有指定routing_key ,将使用队列名
20 channel.queue_bind(queue, exchange)
21
22 time.sleep(2)
23 with  connection:
24     msg = channel.basic_get(queue, True) # 从指定的队列获取一个消息
25     method , props, body = msg
26     if body:
27         print(body)
28     else:
29         print('empty')
重复获取消息:
 1 import pika
 2 import time
 3
 4 exchange = 'news'
 5 queue = 'urls'
 6
 7 params = pika.URLParameters('amqp://rab:123456@192.168.112.111:5672/test')
 8
 9 connection = pika.BlockingConnection(params)
10 channel = connection.channel()
11
12 # 生成一个交换机
13 channel.exchange_declare(
14     exchange=exchange,
15     exchange_type='direct'
16 )
17
18 channel.queue_declare(queue, exclusive=False)  # 生成队列
19 # 绑定队列到交换机, 没有指定routing_key ,将使用队列名
20 channel.queue_bind(queue, exchange)
21
22
23 def callback(channel, method, properties, body):
24     print(body)
25
26
27 tag = None
28 def cancel(tag):
29     print(tag)
30     channel.basic_cancel(tag) # 取消basic_consume
31
32 import threading
33
34 time.sleep(10)
35
36 def start():
37     with  connection:
38         tag = channel.basic_consume(
39             callback,
40             queue,
41             True
42         ) # 从指定队列获取一个消息回调,tag获取不到,阻塞,获取到,表示结束了
43         threading.Timer(10, cancel, args=(tag,)).start()
44         channel.start_consuming() # 等待所有的basic_consume消费者消费完, 就结束
45
46 threading.Thread(target=start).start() # 由于channel.start_consuming() 会阻塞,再开启一个线程
47 print('======== end ===========')
注:上面的多线程代码,写的不好,大量使用了全局变量,只是为了说明问题
重构消息队列:
 1 import pika
 2 import time
 3 import threading
 4
 5 class MessageQueue:
 6     def __init__(self, host,port,user,password, vhost, exchange,queue):
 7         url = 'amqp://{}:{}@{}:{}/{}'.format(
 8             user,password,host, port,vhost
 9         )
10         params = pika.URLParameters(url)
11         self.connection = pika.BlockingConnection(params)
12         self.channel = self.connection.channel()
13         self.exchange = self.channel.exchange_declare(exchange, 'direct')
14         self.exchange_name = exchange
15         self.channel.queue_declare(queue, exclusive=False) # 生成队列
16         self.queue = queue # 队列名,当routing_key
17         self.channel.queue_bind(queue, exchange)
18
19     def __enter__(self):
20         return self.channel
21
22     def __exit__(self, exc_type, exc_val, exc_tb):
23         self.connection.close()# 关闭连接s
24
25 # 生产者
26 class Producter(MessageQueue):
27     def sendmsg(self, msg):
28         self.channel.basic_publish(
29             exchange=self.exchange_name,
30             routing_key=self.queue,
31             body = msg
32         )
33
34 # 消费者
35 class Consumer(MessageQueue):
36     def recvmsg(self):
37         return  self.channel.basic_get(self.queue, True)[2] # body
重构爬虫代码:
  1 import requests
  2 from  concurrent.futures import  ThreadPoolExecutor
  3 from queue import Queue
  4 from  bs4 import BeautifulSoup
  5 import threading
  6 import time
  7 import logging
  8 import pika
  9 import simplejson
 10 from messagequeue import Producter, Consumer
 11
 12 FORMAT = "%(asctime)s %(threadName)s %(thread)s %(message)s"
 13 logging.basicConfig(format=FORMAT, level=logging.INFO)
 14
 15 BASE_URL = "https://news.cnblogs.com"
 16 NEW_PAGE = '/n/page/'
 17
 18 headers = {
 19     'User-agent':'Mozilla/5.0 (Windows NT 6.1; WOW64) AppleWebKit/537.36 (KHTML, like Gecko) Chrome/61.0.3163.79 Safari/537.36 Maxthon/5.2.4.3000'
 20 }
 21
 22 # 创建博客园的新闻urls,每页30条新闻
 23 def create_url(start, end, step=1):
 24     try:
 25         p = Producter('192.168.112.111',5672,'rab','123456','test','news','urls')
 26         for i in range(start, end + 1, step):
 27             url = '{}{}{}/'.format(BASE_URL,NEW_PAGE, i)
 28             print(url)
 29             p.sendmsg(url)
 30         print('urls创建完毕')
 31     except Exception as e:
 32         print(e)
 33
 34 event = threading.Event()
 35
 36 # 爬取页面线程函数
 37 def crawler():
 38     try:
 39         p = Producter('192.168.112.111', 5672, 'rab', '123456', 'test', 'news', 'htmls')
 40         c = Consumer('192.168.112.111', 5672, 'rab', '123456', 'test', 'news', 'urls')
 41         while not event.wait(1):
 42             try:
 43                 # url = urls.get(True, 1)
 44                 url = c.recvmsg()
 45                 with requests.request('GET', url , headers=headers) as response:
 46                     html = response.text
 47                     p.sendmsg(html)
 48             except:
 49                 raise
 50     except Exception as e:
 51         print(e)
 52 # 解析线程函数
 53 def parse():
 54     try:
 55         p = Producter('192.168.112.111', 5672, 'rab', '123456', 'test', 'news', 'outputs')
 56         c = Consumer('192.168.112.111', 5672, 'rab', '123456', 'test', 'news', 'htmls')
 57         while not event.wait(1):
 58             try:
 59                 # html = htmls.get(True, 1)
 60                 html = c.recvmsg()
 61                 if html:
 62                     soup =BeautifulSoup(html, 'lxml')
 63                     titles = soup.select('h2.news_entry a')
 64                     for title in titles:
 65                         # <a href='/n/60287/' target='_blank'> 特斯拉</a>
 66                         # val = (BASE_URL + title.attrs['href'], title.text)
 67                         # outputs.put(val)
 68                         val = simplejson.dumps({
 69                             'title':title.text,
 70                             'url':BASE_URL + title.attrs['href']
 71                         })
 72                         p.sendmsg(val)
 73                         print(val)
 74             except:
 75                 raise
 76     except Exception as e:
 77         print(e)
 78 # 持久化线程函数
 79 def persist(path):
 80     try:
 81         c = Consumer('192.168.112.111', 5672, 'rab', '123456', 'test', 'news', 'outputs')
 82         with open(path, 'a+', encoding='utf-8') as f:
 83             while not event.is_set():
 84                 try:
 85                     # url, text = outputs.get(True, 1)
 86                     data = c.recvmsg()
 87                     print(data,'==========================================')
 88                     print(type(data))
 89                     if data :
 90                         d = simplejson.loads(data)
 91                         print(d,'------------------------------------------')
 92                         print(type(d))
 93                         # print(url, text)
 94                         f.write('{}x01{}'.format(d['url'],d['title']))
 95                         f.flush()
 96                 except:
 97                     pass
 98     except Exception as e:
 99         print( e)
100 # 线程池
101 executor = ThreadPoolExecutor(10)
102
103 executor.submit(create_url, 1, 10) # 模拟url收集,结束后,线程权让出
104 executor.submit(persist, 'f;/new.txt')
105
106 # 爬取页面并分析
107 for i in range(5):
108     executor.submit(crawler)
109 for i in range(4):
110     executor.submit(parse)
111
112
113 while True:
114     cmd = input('>>>>>>')
115     if cmd.strip() == 'quit':
116         event.set()
117         time.sleep(4)
118         break
119     print(threading.enumerate())