【转】 SpringBoot war包部署到Tomcat服务器
(1)pom.xml文件修改<packaging>war</packaging>,默认是jar包,<build>节点中增加<finalName>springboot</finalName>,即生成war包的名字,完整pom.xml文件内容如下:
<?xml version="1.0" encoding="UTF-8"?>
<project xmlns="http://maven.apache.org/POM/4.0.0" xmlns:xsi="http://www.w3.org/2001/XMLSchema-instance"
    xsi:schemaLocation="http://maven.apache.org/POM/4.0.0 http://maven.apache.org/xsd/maven-4.0.0.xsd">
    <modelVersion>4.0.0</modelVersion>

    <groupId>springboot</groupId>
    <artifactId>springboot</artifactId>
    <version>0.0.1-SNAPSHOT</version>
    <packaging>war</packaging>

    <name>springboot</name>
    <description>Demo project for Spring Boot</description>

    <parent>
        <groupId>org.springframework.boot</groupId>
        <artifactId>spring-boot-starter-parent</artifactId>
        <version>1.5.4.RELEASE</version>
        <relativePath/> <!-- lookup parent from repository -->
    </parent>

    <properties>
        <project.build.sourceEncoding>UTF-8</project.build.sourceEncoding>
        <project.reporting.outputEncoding>UTF-8</project.reporting.outputEncoding>
        <java.version>1.7</java.version>
    </properties>

    <dependencies>
        <dependency>
            <groupId>org.springframework.boot</groupId>
            <artifactId>spring-boot-starter</artifactId>
            <exclusions>
                <exclusion>
                    <groupId>org.springframework.boot</groupId>
                    <artifactId>spring-boot-starter-logging</artifactId>
                </exclusion>
            </exclusions>
        </dependency>
        <dependency>
            <groupId>org.springframework.boot</groupId>
            <artifactId>spring-boot-starter-web</artifactId>
        </dependency>
        <dependency>
            <groupId>org.springframework.boot</groupId>
            <artifactId>spring-boot-starter-test</artifactId>
            <scope>test</scope>
        </dependency>
        <dependency>
            <groupId>org.springframework.boot</groupId>
            <artifactId>spring-boot-starter-thymeleaf</artifactId>
        </dependency>
        <dependency>
            <groupId>org.springframework.boot</groupId>
            <artifactId>spring-boot-starter-log4j</artifactId>
            <version>1.3.8.RELEASE</version>
        </dependency>
        <dependency>
            <groupId>org.springframework.boot</groupId>
            <artifactId>spring-boot-starter-data-redis</artifactId>
        </dependency>
        <dependency>
            <groupId>mysql</groupId>
            <artifactId>mysql-connector-java</artifactId>
        </dependency>
        <dependency>
            <groupId>org.mybatis.spring.boot</groupId>
            <artifactId>mybatis-spring-boot-starter</artifactId>
            <version>1.1.1</version>
        </dependency>
    </dependencies>

    <build>
        <finalName>springboot</finalName>
        <plugins>
            <plugin>
                <groupId>org.springframework.boot</groupId>
                <artifactId>spring-boot-maven-plugin</artifactId>
            </plugin>
        </plugins>
    </build>
</project>
(2)修改项目启动类,继承SpringBootServletInitializer,如下:
package springboot;

import org.springframework.boot.SpringApplication;
import org.springframework.boot.autoconfigure.SpringBootApplication;
import org.springframework.boot.builder.SpringApplicationBuilder;
import org.springframework.boot.web.support.SpringBootServletInitializer;
import org.springframework.cache.annotation.EnableCaching;
import org.springframework.scheduling.annotation.EnableScheduling;

@SpringBootApplication
@EnableScheduling
@EnableCaching
public class SpringbootApplication extends SpringBootServletInitializer{

    public static void main(String[] args) {
        SpringApplication.run(SpringbootApplication.class, args);
    }
    @Override
    protected SpringApplicationBuilder configure(SpringApplicationBuilder application) {
        return application.sources(SpringbootApplication.class);
    }
}
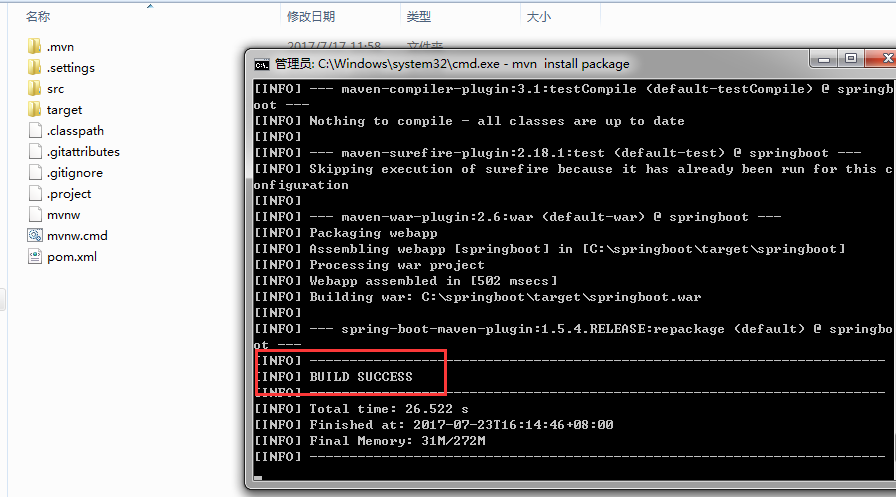
(3)打包:可以通过eclipse run as ->maven install,也可以进入项目的根目录,也就是pom.xml同一级目录,启动cmd控制台,执行mvn install package,如下:

(4)环境搭建(linux环境JDK安装与Tomacat安装(springboot支持tomcat7以上))
JDK安装参考:https://jingyan.baidu.com/article/ab0b56308966acc15afa7d18.html
Tomcat安装参考:https://jingyan.baidu.com/article/27fa73268002f246f9271f45.html
(5)将打包好的war包上传至tomcat目录下webapp目录下,启动tomcat服务器。
(6)访问项目路径:http://ip地址:端口号/项目打包名称/方法名(项目打包名称即pom.xml中的<finnalName>的值)
(7)设置tomcat开机自动启动
(1)修改脚本文件rc.local:vim /etc/rc.d/rc.local
(2)在rc.local中增加:export JAVA_HOME = jdk安装路径 ,tomcat安装路径/bin/startup.sh start