以LLBL Gen作为ORM数据访问框架,生成实体层,然后在实体层中绑定业务逻辑。有以下几个好处:
1 强类型对象,可以编译时发现错误,而不是运行时错误
2 可以借助于反射做扩展,灵活性高。
情境设定
如何让销售单中的客户编号,只能在第一次输入的时候,可以修改,保存后不能修改,如何实现?
最简单的实现方法是,在界面的OnLoad事件中,加上一行代码:
txtCustomerNo.ReadOnly=true;
但是如果一个界面中有10个字段有这种需求,则需要写10行。
很明显,发生了代码重复,为解决这一通用的问题,请参考下面我的做法。
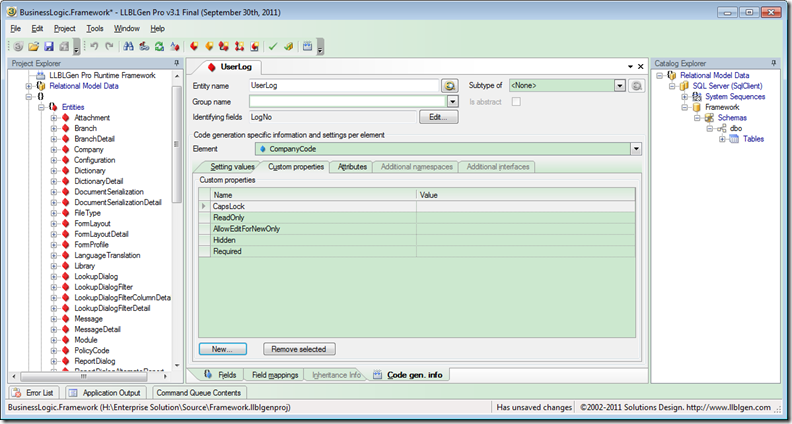
首先,打开LLBL Gen,添加业务对象,设计属性:
依照我的经验,添加了五个自定义属性,它的含义如下
CapsLock 表示属性输入时,会转化为大写,比如供应商编号VENDORNO001,VENDOR002,而不允许小写字母出现
ReadOnly 表示属性为只读,不允许修改。比如采购单中的供应商名称从供应商主档中带值过来,但不允许修改
AllowEditForReadOnly 表示属性只有在创建时可修改,一旦数据保存后,不允许修改。比如输入供应商发票,输入供应商编号后,带出供应商的首选货币,当前的兑换率,保存之后,不能再修改供应商编号,以防止日记帐数据与主档数据不匹配,减少重复。
Hidden 表示属性由系统生成,不需要界面人工调整。比如日记帐中的修改日期,修改人,由系统管理。
Required 表示属性必须输入,比如采购单必须输入供应商,销售单必须输入客户编号。
这五个属性,在界面中用得相当普遍,把它放到基础框架中,可以节省大量的重复代码。
在LLBL Gen设计器中按F7生成代码。这些自定义的属性会添加到类型的SetupCustomPropertyHashtables方法中。
#region Custom Property Hashtable Setup
/// <summary> Initializes the hashtables for the entity type and entity field custom properties. </summary>
private static void SetupCustomPropertyHashtables()
{
            _customProperties = new Dictionary<string, string>();
            _fieldsCustomProperties = new Dictionary<string, Dictionary<string, string>>();
            Dictionary<string, string> fieldHashtable;
            fieldHashtable = new Dictionary<string, string>();
            _fieldsCustomProperties.Add("Alternate", fieldHashtable);
            fieldHashtable = new Dictionary<string, string>();
            _fieldsCustomProperties.Add("AssemblyLine", fieldHashtable);
            fieldHashtable = new Dictionary<string, string>();
            _fieldsCustomProperties.Add("CreatedBy", fieldHashtable);
            fieldHashtable = new Dictionary<string, string>();
            _fieldsCustomProperties.Add("CreatedDate", fieldHashtable);
            fieldHashtable = new Dictionary<string, string>();
            fieldHashtable.Add("ReadOnly", @"");
            _fieldsCustomProperties.Add("Description", fieldHashtable);
......
}
再回到界面的控件中,对它进行数据绑定,设计效果如下图所示
如果设计界面中看不明白,可以看下面的代码,设置数据绑定成员。
this.txtCcy.AutoFind = true;
this.txtCcy.CharacterCasing = System.Windows.Forms.CharacterCasing.Upper;
 this.txtCcy.DataBindings.Add(new System.Windows.Forms.Binding("Value", this.currencyBindingSource, "Ccy", true));
this.txtCcy.Location = new System.Drawing.Point(118, 12);
this.txtCcy.Lookup.FilterName = "Non Suspended";
this.txtCcy.Lookup.LookupName = "CurrencyLookup";
this.txtCcy.Name = "txtCcy";
this.txtCcy.Required = true;
this.txtCcy.Size = new System.Drawing.Size(100, 21);
this.txtCcy.TabIndex = 0;
最重要的是第三行,对它进行数据成员绑定。Windows Form数据绑定的好处是双向绑定。如果有对控件绑定属性,修改控件的绑定属性值后,数据源即更新为新的值,反之,修改数据源,也同时会修改控件中的显示值。
因为这个特性,所以可以借助于反射对它进行深度的封装,请参考下面的代码例子:
public override EntityBase2 LoadEntity(string refNo)
{
            IItemManager manager = ClientProxyFactory.CreateProxyInstance<IItemManager>();
            ItemEntity customer = manager.GetItem(refNo);
            return customer;
}

public override void DeleteEntity(EntityBase2 entity)
{
            ItemEntity user = (ItemEntity)entity;
            IItemManager manager = ClientProxyFactory.CreateProxyInstance<IItemManager>();
            manager.DeleteItem(user);
}

public override void SaveEntity(EntityBase2 entity)
{
            ItemEntity user = (ItemEntity)entity;
            IItemManager manager = ClientProxyFactory.CreateProxyInstance<IItemManager>();
            manager.SaveItem(user);
 }
如代码所示,界面代码完全不需要知道是什么值被用户更改过,只需要做数据验证,在页面加载时把数据绑定到界面中,页面关闭时,把用户修改过的数据写回到数据库中。
再回到控件设计中,给它添加自定义属性绑定代码。
public void InitLayoutFromBinding()
{
          InitLayoutFromBinding(false);
}

public void InitLayoutFromBinding(bool forceReinit)
{
           Binding binding = null;

           if (this.DataBindings["Value"] != null)
           {
                binding = this.DataBindings["Value"];
            }
            else if (this.DataBindings["Text"] != null)
            {
                binding = this.DataBindings["Text"];
            }

            InitLayoutFromBinding(binding, forceReinit);
}

public void InitLayoutFromBinding(Binding binding)
{
            InitLayoutFromBinding(binding, false);
}
如您所看到的代码,这一层直接通过获取BindingSource的绑定属性,把第一步中设计的五个自定义属性值写到控件中。
举例说明如下:SalesOrder的Customer No属性被添加上面所列出的五个属性值中的ReadOnly,AllowEditForNewOnly,CapsLock三个属性,绑定控件txtCustomerNo到SalesOrder.CustomerNo属性。在窗体启动时,对已经绑定过属性的成员进行一个遍历操作,读取到它的BindingMember是CustomerNo属性
再通过反射读取到
BindingMemberInfo bindingInfo = binding.BindingMemberInfo;
EntityBase2 entity = ComponentCommon.GetBoundEntity(this, binding);
IEntityField2 field = null;
_bindingField = bindingInfo.BindingField;
Dictionary<string, string> fieldsCustProps = ComponentCommon.GetFieldsCustomProperties(entity, bindingInfo.BindingField);
if (fieldsCustProps != null)
{
     if (fieldsCustProps.ContainsKey("CapsLock"))
      {
          CharacterCasing = CharacterCasing.Upper;
      }
......
核心的骨架代码已经全盘托出,稍微加以整理即可实现这个特性,应用到您的实际项目中,减少代码重复。

