一. AOP切面源码分析
源码分析分为三部分
1. 解析切面
2. 创建动态代理
3. 调用
- 源码的入口
源码分析的入口, 从注解开始:
组件的入口是一个注解, 比如启用AOP的注解@EnableAspectJAutoProxy. 在注解的实现类里面, 会有一个@Import(""). 这个@Import("")就是引入的源码实现类. 比如AOP的@Import(AspectJAutoProxyRegistrar.class)
通常, Spring要开启某一个功能, 都会增加一个注解, 如果我们再想要看某一个功能的源码, 那么就可以从他的注解跟进去看,在找到@Import("")就找到源码的入口了
源码分析的入口, AOP注解:
package com.lxl.www.aop;

import org.springframework.beans.factory.annotation.Configurable;
import org.springframework.context.annotation.ComponentScan;
import org.springframework.context.annotation.EnableAspectJAutoProxy;

@Configurable
// 使用注解的方式引入AOP
@EnableAspectJAutoProxy
@ComponentScan("com.lxl.www.aop")
public class MainConfig {

}
引入AOP, 我们需要在配置文件中增加@EnableAspectJAutoProxy代理. 那么想要去掉AOP的引入, 只需要将这个注解注释掉就可以了. 这个注解解释整个AOP的入口.
提示: 其他组件的引入也是类似的, 通常引入组件, 需要增加一个注解, 而整个功能的入口就在这个主机上面.
接下来, 进入到注解类
package org.springframework.context.annotation;

import java.lang.annotation.Documented;
import java.lang.annotation.ElementType;
import java.lang.annotation.Retention;
import java.lang.annotation.RetentionPolicy;
import java.lang.annotation.Target;


@Target(ElementType.TYPE)
@Retention(RetentionPolicy.RUNTIME)
@Documented
@Import(AspectJAutoProxyRegistrar.class)
public @interface EnableAspectJAutoProxy {

    boolean proxyTargetClass() default false;

    boolean exposeProxy() default false;

}
这是, 我们看到EnableAspectJAutoProxy类增加了一个@Import注解类, 我们知道Import注解可以向IoC容器中增加一个bean.
下面进入到AspectJAutoProxyRegistrar类
package org.springframework.context.annotation;

import org.springframework.aop.config.AopConfigUtils;
import org.springframework.beans.factory.support.BeanDefinitionRegistry;
import org.springframework.core.annotation.AnnotationAttributes;
import org.springframework.core.type.AnnotationMetadata;

class AspectJAutoProxyRegistrar implements ImportBeanDefinitionRegistrar {

    /**
     * Register, escalate, and configure the AspectJ auto proxy creator based on the value
     * of the @{@link EnableAspectJAutoProxy#proxyTargetClass()} attribute on the importing
     * {@code @Configuration} class.
     */
    @Override
    public void registerBeanDefinitions(
            AnnotationMetadata importingClassMetadata, BeanDefinitionRegistry registry) {

        AopConfigUtils.registerAspectJAnnotationAutoProxyCreatorIfNecessary(registry);

        AnnotationAttributes enableAspectJAutoProxy =
                AnnotationConfigUtils.attributesFor(importingClassMetadata, EnableAspectJAutoProxy.class);
        if (enableAspectJAutoProxy != null) {
            if (enableAspectJAutoProxy.getBoolean("proxyTargetClass")) {
                AopConfigUtils.forceAutoProxyCreatorToUseClassProxying(registry);
            }
            if (enableAspectJAutoProxy.getBoolean("exposeProxy")) {
                AopConfigUtils.forceAutoProxyCreatorToExposeProxy(registry);
            }
        }
    }

}
我们看到, 使用ImportBeanDefinitionRegistrar注册了一个BeanDefinition.
需要记住的是, 通常使用ImportBeanDefinitionRegistrar结合@Import可以向容器中注册一个BeanDefinition.
如何注册的呢? 看具体实现.
AopConfigUtils.registerAspectJAnnotationAutoProxyCreatorIfNecessary(registry);
注册名字是internalAutoProxyCreator的AnnotationAwareAspectJAutoProxyCreator
@Nullable
    public static BeanDefinition registerAspectJAnnotationAutoProxyCreatorIfNecessary(
            BeanDefinitionRegistry registry, @Nullable Object source) {

        /**
         * 注册一个AnnotationAwareAspectJAutoProxyCreator类型的bean定义
         */
        return registerOrEscalateApcAsRequired(AnnotationAwareAspectJAutoProxyCreator.class, registry, source);
    }
如上结构梳理如下:
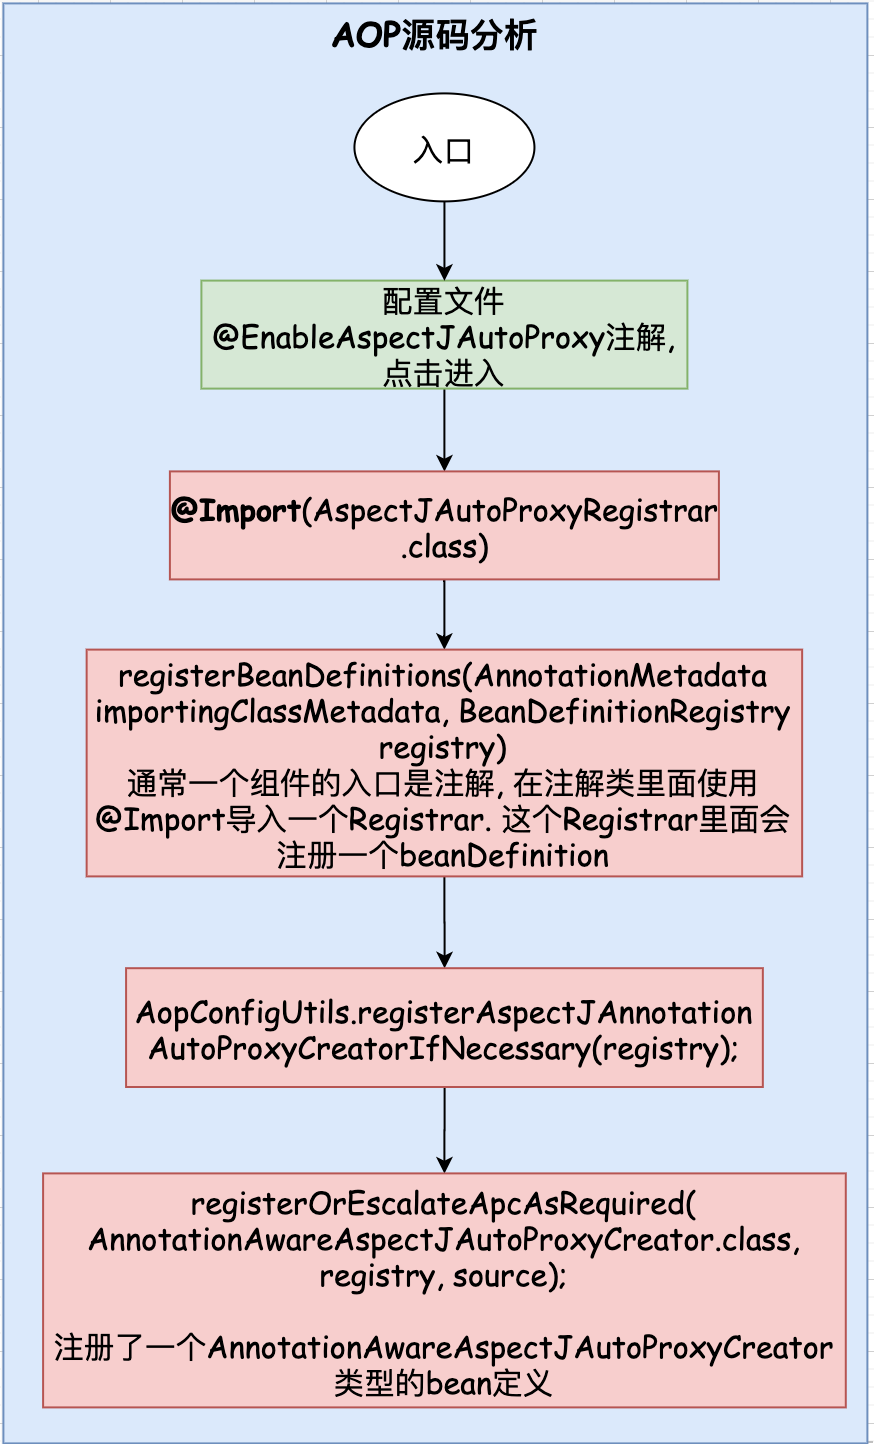
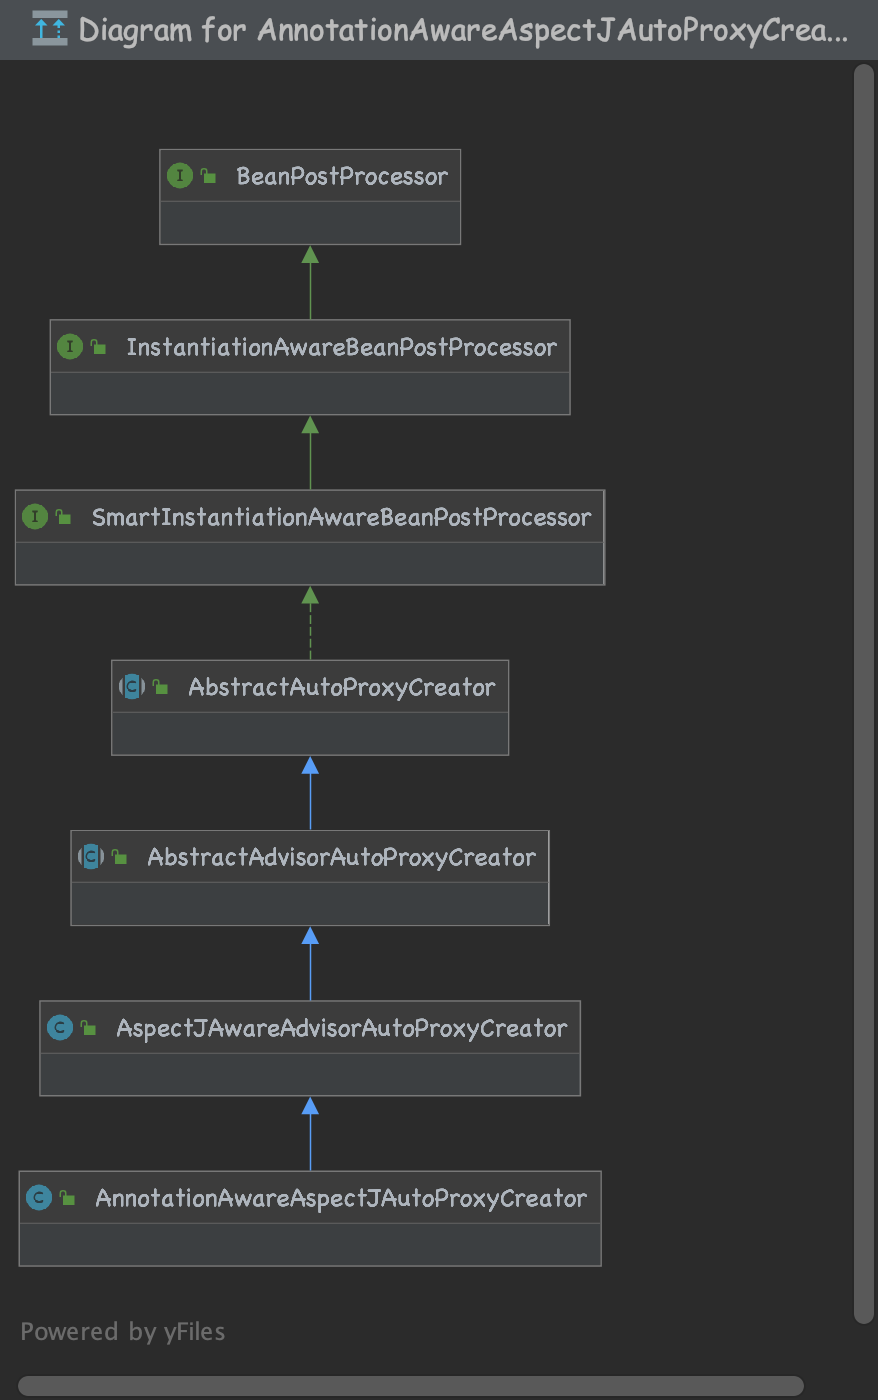
我们看到, 注册了类AnnotationAwareAspectJAutoProxyCreator类型的bean. 这是一个什么样的类呢? 我们来看一下类的结构. 这个类的继承结构很庞大, 我们只看和本次内容相关的继承结构
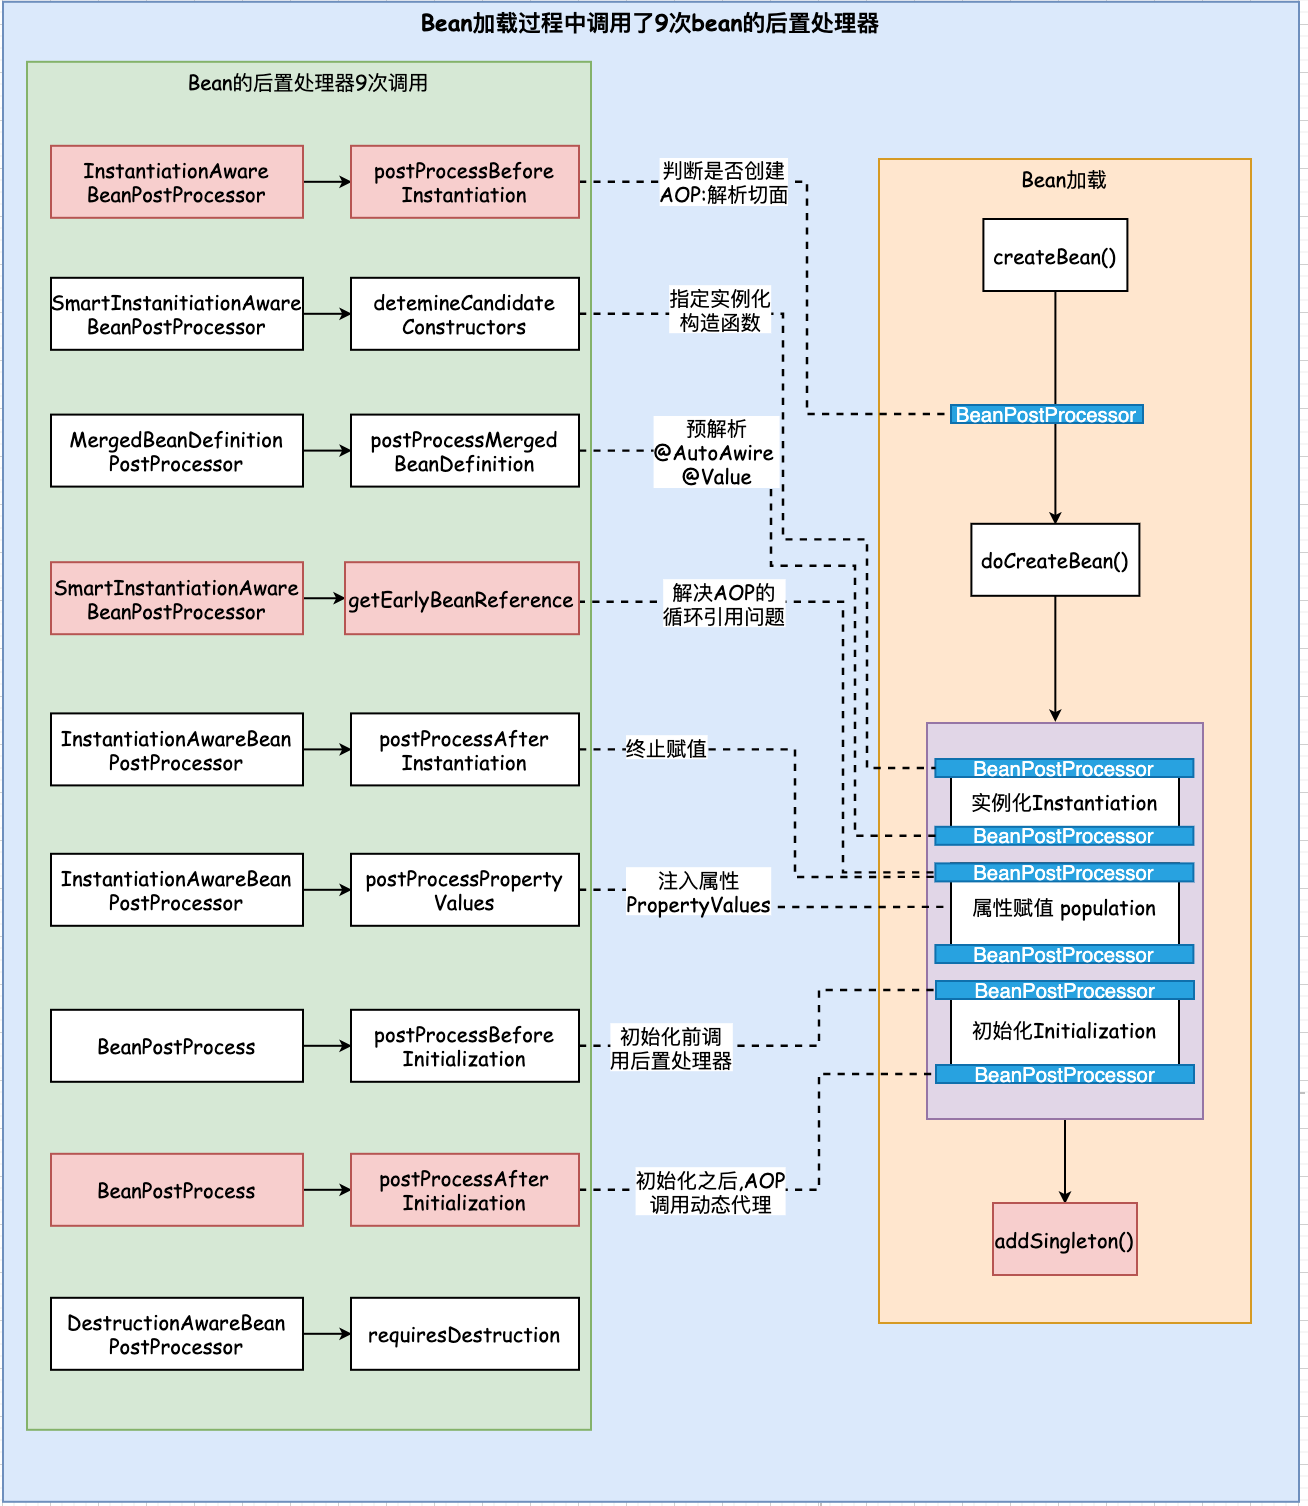
解析切面, 创建动态代理, 都是在bean的后置处理器中进行的, 下面对照着AOP的实现原理以及createBean(创建bean)的过程来看
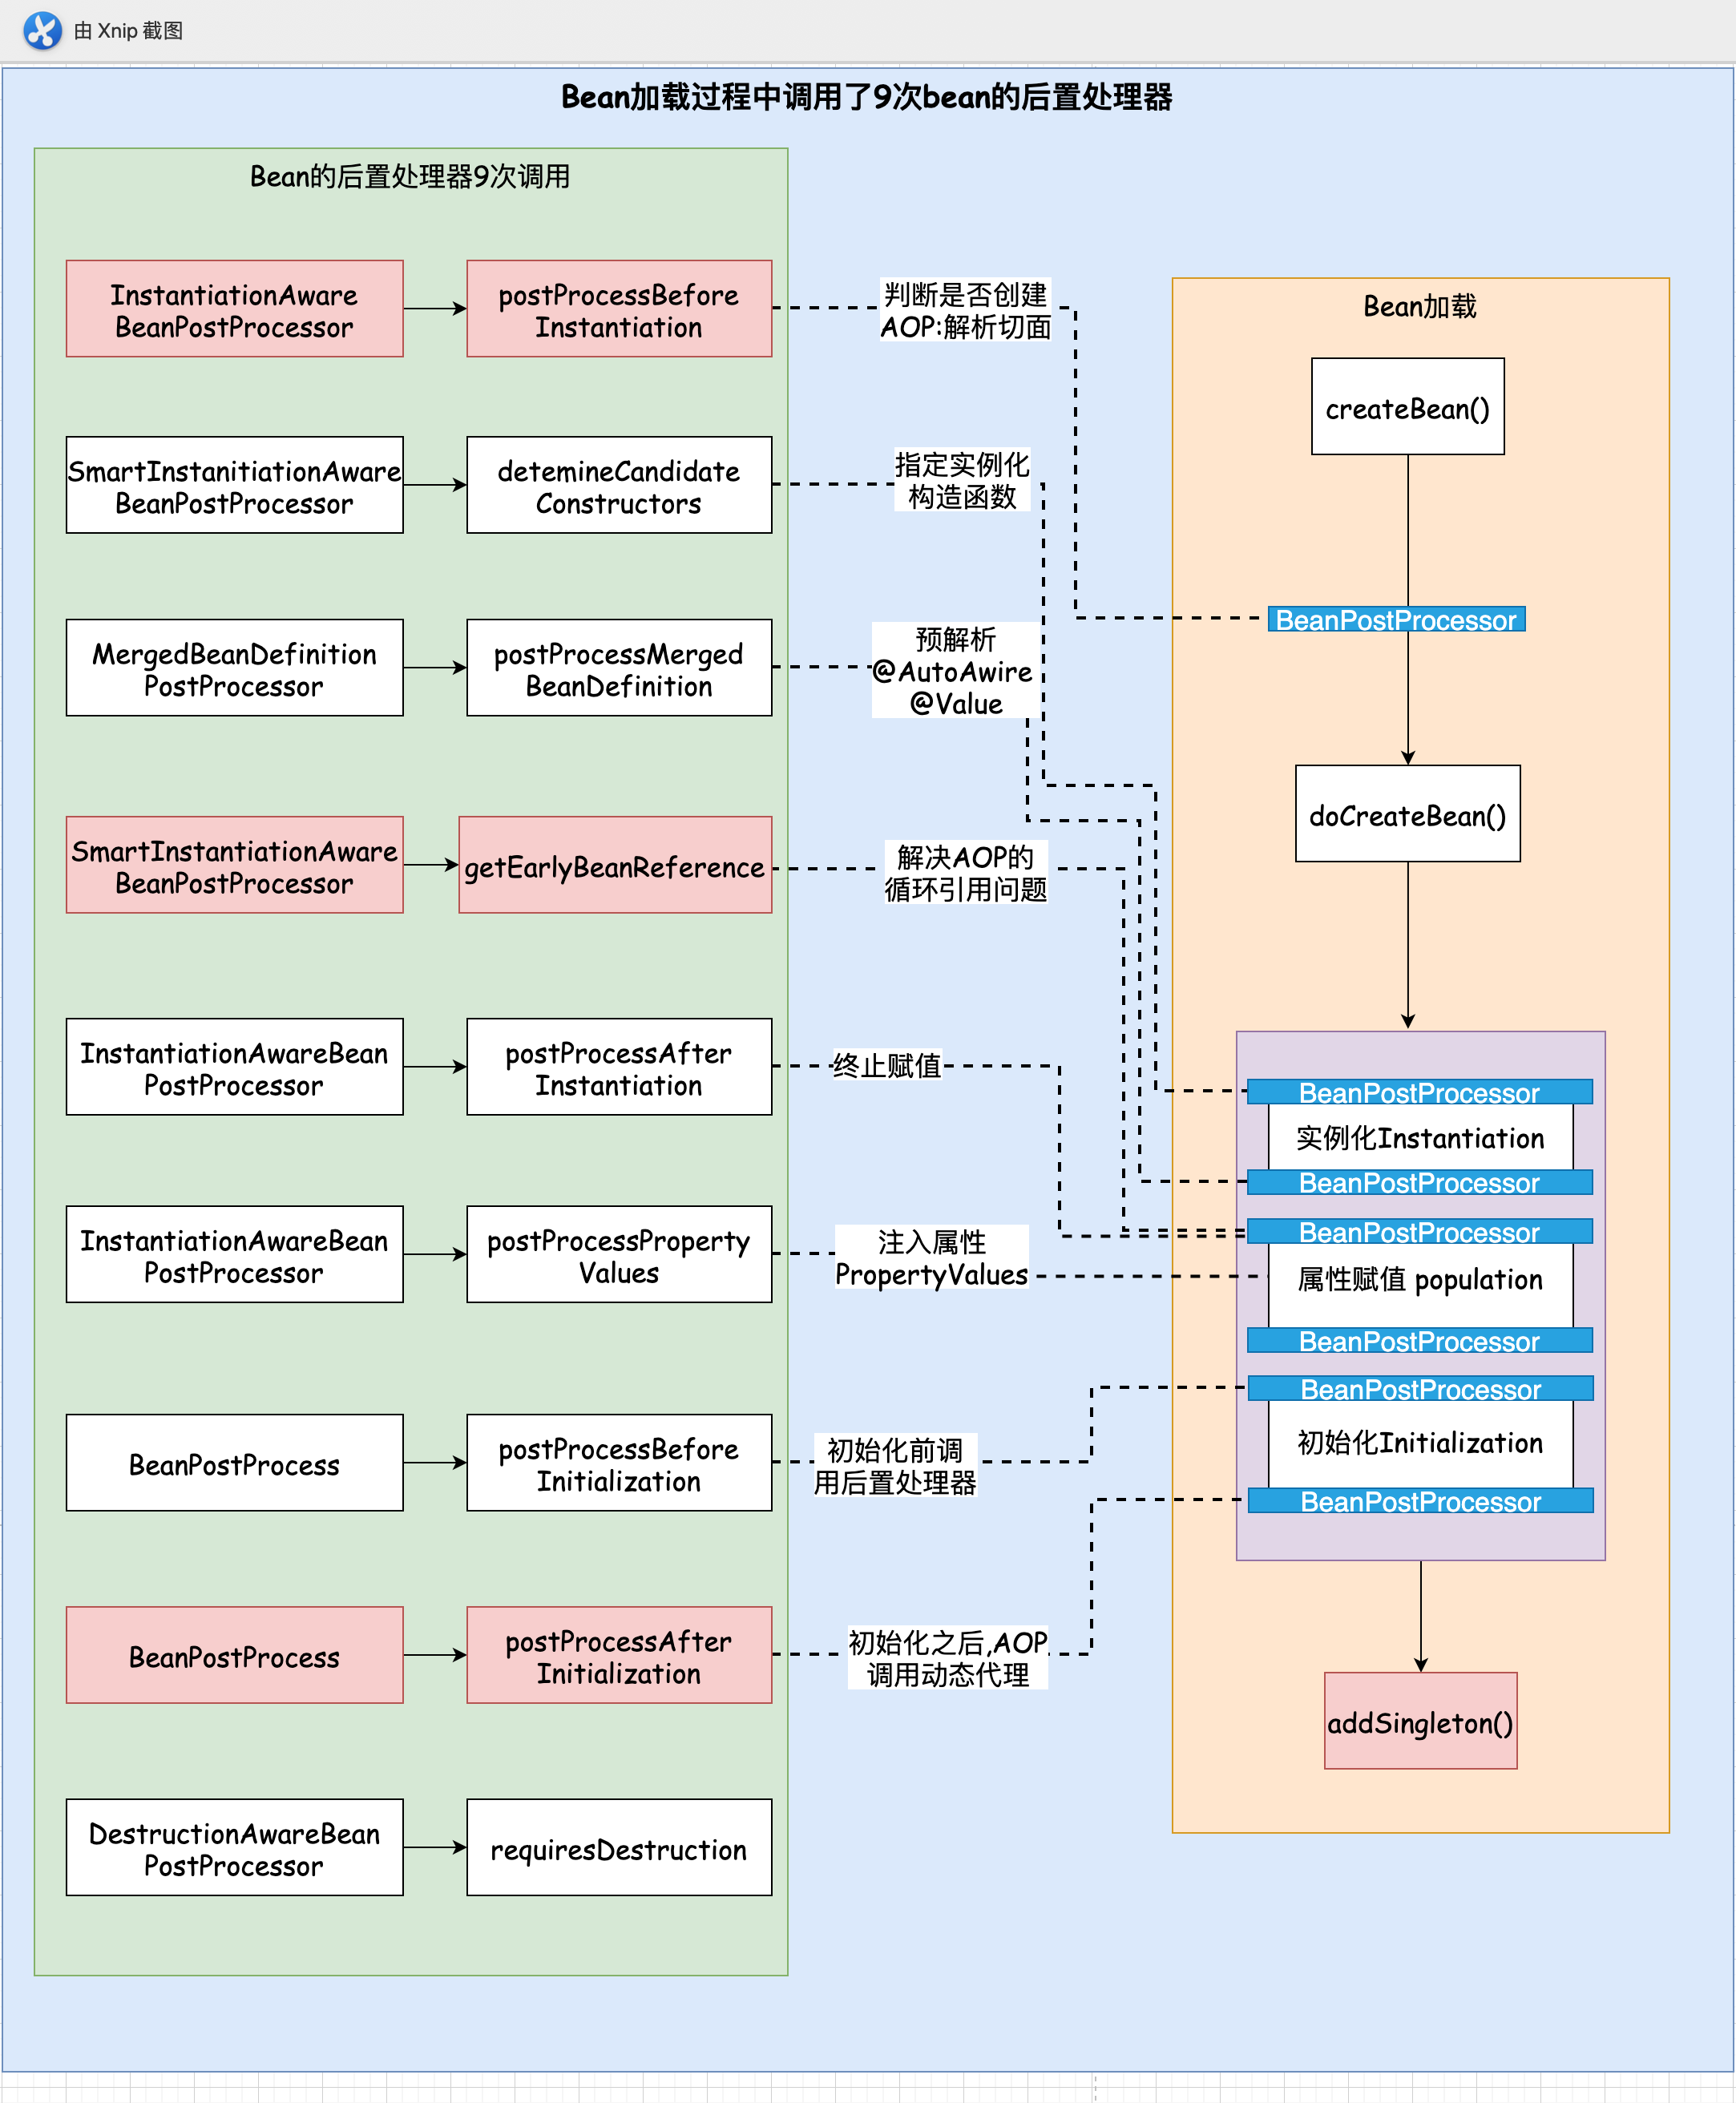
上图是bean加载过程中调用的9次后置处理器. 在创建bean之前调用了InstantiationAwareBeanPostProcessor后置处理器判断是否需要为这个类创建AOP, 也就是解析切面的过程. 所以在AnnotationAwareAspectJAutoProxyCreator里面实现了InstantiationAwareBeanPostProcessor后置处理器的接口. 重写了postProcessBeforeInstantiation方法.
在createBean的第三阶段初始化之后, 要创建AOP的动态代理, 调用了BeanPostProcess后置处理器, AnnotationAwareAspectJAutoProxyCreator也实现了BeanPostProcess接口. 重写了postProcessAfterInitialization.
同时也需要处理AOP的循环依赖的问题, 处理循环依赖是在属性赋值之前调用SmartInstantiationAwareBeanPostProcessor后置处理器, 然后重写getEarlyBeanReference方法. 我们看到AnnotationAwareAspectJAutoProxyCreator也实现了SmartInstantiationAwareBeanPostProcessor接口. 并重写getEarlyBeanReference方法.
1) AOP解析切面
通过上面的分析,我们知道了, 解析切面是在重写了InstantiationAwareBeanPostProcessor后置处理器的postProcessBeforeInstantiation方法. 所以,我们要找到AnnotationAwareAspectJAutoProxyCreator重写的postProcessBeforeInstantiation方法.
小贴士

如何找到呢? 在idea中使用快捷键ctrl + o, 找到当前类重写的所有方法. 在搜索postProcessBeforeInstantiation, 就可以找到了
进入创建动态代理的bean的后置处理器, 这是解析切面的第一个入口
@Override
    public Object postProcessBeforeInstantiation(Class<?> beanClass, String beanName) {
        ......
    }
我们在postProcessBeforeInstantiation方法的入口处打一个断点, 接下来看一下这个接口的调用链
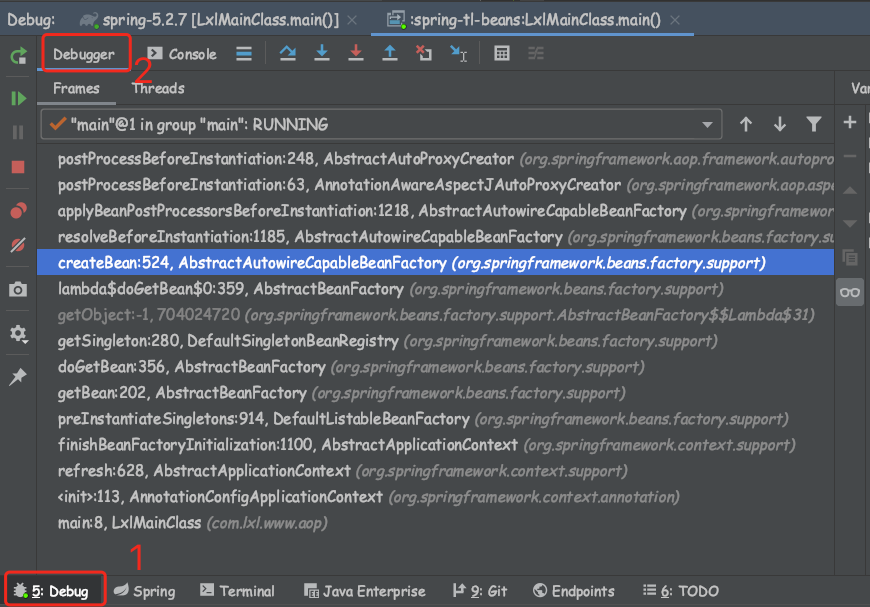
如上图, 可以看出我们的入口是main方法, 然后调用了refresh()方法, 执行的是refresh()方法的finishBeanFactoryInitialization()方法, 然胡调用了doGetBean()下的createBean().然后调用的是resolveBeforeInstantiation的applyBeanPostProcessorsBeforeInstantiation方法,在这里获取到所有的bean的后置处理器, 判断这个bean的后置处理器是否是InstantiationAwareBeanPostProcessor的一个实例. 如果是, 那么就调用postProcessBeforeInstantiation()方法.
@Nullable
    protected Object applyBeanPostProcessorsBeforeInstantiation(Class<?> beanClass, String beanName) {
        /**
         * 获取容器中所有的后置处理器
         * 这之前有一个注册bean定义的方法, 已经注册过了. 所以在这里可以获取到列表
         *
         * 9次bean的后置处理器, 都是一个类实现InstantiationAwareBeanPostProcessor类, 重写postProcessBeforeInstantiation方法
         */
        for (BeanPostProcessor bp : getBeanPostProcessors()) {
            if (bp instanceof InstantiationAwareBeanPostProcessor) {
                InstantiationAwareBeanPostProcessor ibp = (InstantiationAwareBeanPostProcessor) bp;
                Object result = ibp.postProcessBeforeInstantiation(beanClass, beanName);
                if (result != null) {
                    return result;
                }
            }
        }
        return null;
    }
下面就来分析postProcessBeforeInstantiation()方法
@Override
public Object postProcessBeforeInstantiation(Class<?> beanClass, String beanName) {
/**
* 在第一个bean创建的时候, 就会去调用所有的bean的后置处理器, 并且解析所有的切面.
* 这一步是非常消耗性能的. 所以, 会放到缓存当中
*/
// 构建缓存的key
Object cacheKey = getCacheKey(beanClass, beanName);
// 没有beanName或者不包含在targetSourcedBeans
if (!StringUtils.hasLength(beanName) || !this.targetSourcedBeans.contains(beanName)) {
// 判断是否已经被解析过?
if (this.advisedBeans.containsKey(cacheKey)) {
// 解析过, 则直接返回
return null;
}
/*
* 判断当前这个类是不是需要跳过的类.如果是基础类或者是应该跳过里的类, 则返回null, 表示这个类不需要被解析
*
* 判断是不是基础bean(是不是切面类, 通知, 切点). 因为如果类本身是一个通知, 切面, 那我们不需要解析它
* 跳过的类: 默认是false. 在shouldSkip里面拿到所有的bean定义, 标记是不是@Aspect, 然后将每一个通知生成一个advisor
*/
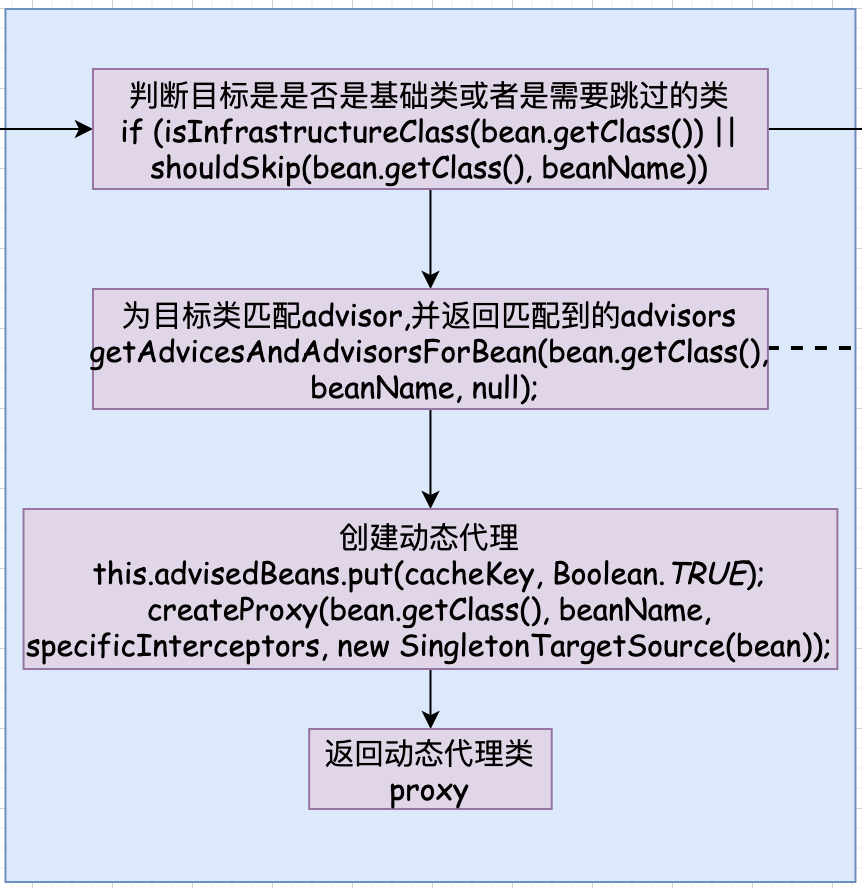
if (isInfrastructureClass(beanClass) || shouldSkip(beanClass, beanName)) {
/**
* advisedBean是一个集合, 用来保存类是否是一个advise
*/
this.advisedBeans.put(cacheKey, Boolean.FALSE);
return null;
}
}
// Create proxy here if we have a custom TargetSource.
// Suppresses unnecessary default instantiation of the target bean:
// The TargetSource will handle target instances in a custom fashion.
TargetSource targetSource = getCustomTargetSource(beanClass, beanName);
if (targetSource != null) {
if (StringUtils.hasLength(beanName)) {
this.targetSourcedBeans.add(beanName);
}
Object[] specificInterceptors = getAdvicesAndAdvisorsForBean(beanClass, beanName, targetSource);
// 创建了代理
Object proxy = createProxy(beanClass, beanName, specificInterceptors, targetSource);
this.proxyTypes.put(cacheKey, proxy.getClass());
return proxy;
}
return null;
}
第一步: 构建缓存
构建缓存的key
Object cacheKey = getCacheKey(beanClass, beanName);
在第一个bean创建的时候, 就会去调用所有的bean的后置处理器, 并且解析所有的切面.
这一步是非常消耗性能的. 所以, 会放到缓存当中. 已经创建过的,后面将不再创建
第二步: 校验bean是否被解析过. 如果已经解析过, 则不再解析
// 判断是否已经被解析过
if (this.advisedBeans.containsKey(cacheKey)) {
    // 解析过, 则直接返回
    return null;
}
第三步: 判断类是否是需要跳过的类
if (isInfrastructureClass(beanClass) || shouldSkip(beanClass, beanName)) {
    /**
     * advisedBean是一个集合, 用来保存类是否是一个advise
     */
    this.advisedBeans.put(cacheKey, Boolean.FALSE);
    return null;
}
如果是基础类或者是应该跳过的类, 则返回null, 表示这个类不需要被解析.
这里有两个判断.
isInfrastructureClass(beanClass) 判断当前这个类是不是基础类, 这里的基础类的含义如下: Advice、Pointcut、Advisor、AopInfrastructureBean。如果本身就是基础类,那么不用在解析了
protected boolean isInfrastructureClass(Class<?> beanClass) {
        // 如果这个类是一个Advice类型的类, 或者 Pointcut类型的类, 或者Adivsor类型的类, 或者AOPInsfrastructureBean类型的类.
        boolean retVal = Advice.class.isAssignableFrom(beanClass) ||
                Pointcut.class.isAssignableFrom(beanClass) ||
                Advisor.class.isAssignableFrom(beanClass) ||
                AopInfrastructureBean.class.isAssignableFrom(beanClass);
        if (retVal && logger.isTraceEnabled()) {
            logger.trace("Did not attempt to auto-proxy infrastructure class [" + beanClass.getName() + "]");
        }
        return retVal;
    }
shouldSkip(beanClass, beanName)判断当前是否是需要跳过的类 .
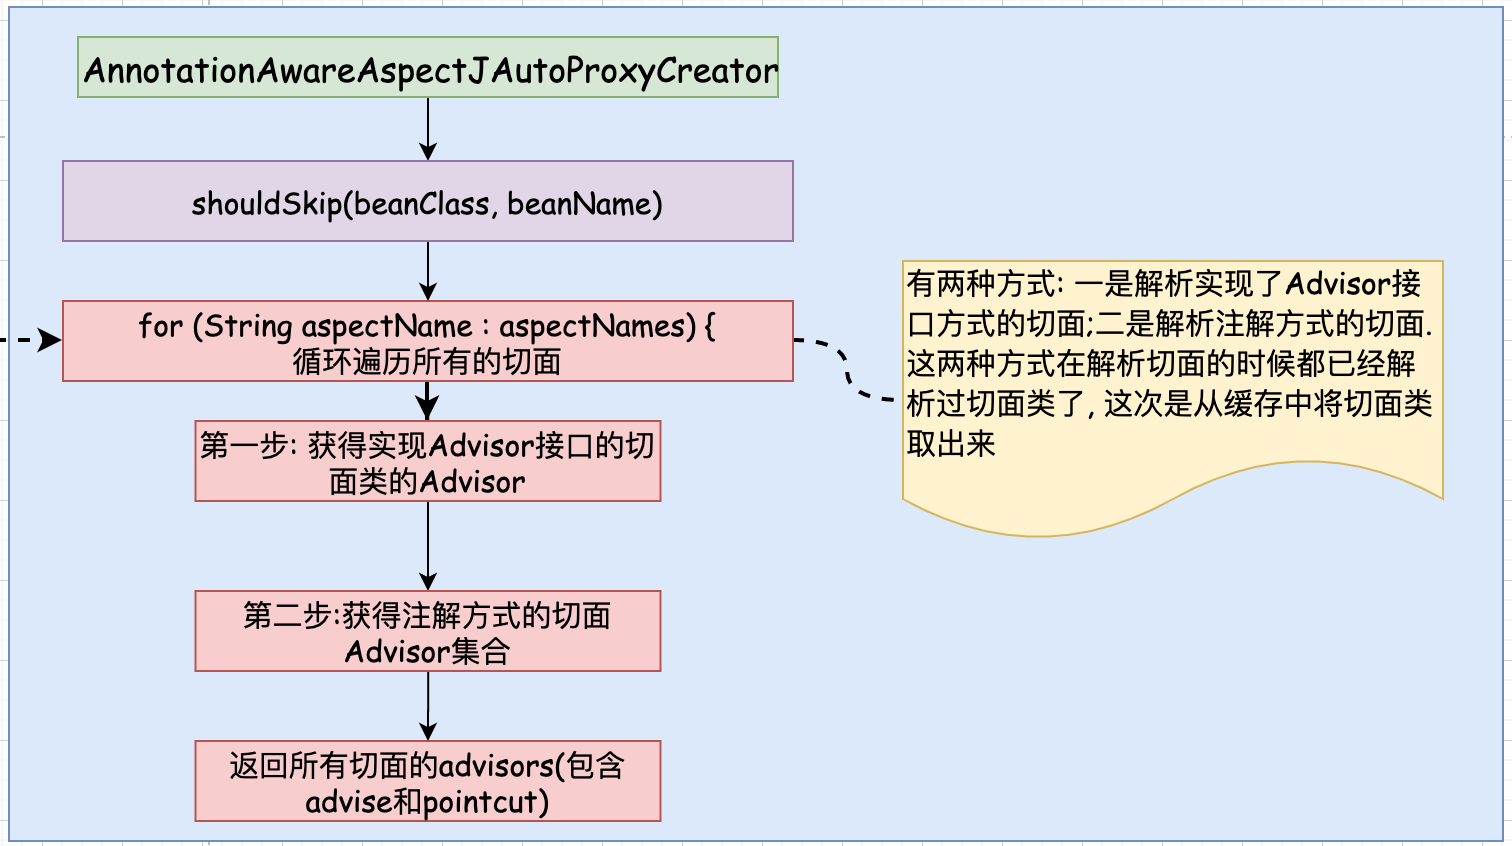
@Override
    protected boolean shouldSkip(Class<?> beanClass, String beanName) {
        // 找到候选的Advisors(前置通知, 后置通知等)
        List<Advisor> candidateAdvisors = findCandidateAdvisors();
        for (Advisor advisor : candidateAdvisors) {
            if (advisor instanceof AspectJPointcutAdvisor &&
                    ((AspectJPointcutAdvisor) advisor).getAspectName().equals(beanName)) {
                return true;
            }
        }
        return super.shouldSkip(beanClass, beanName);
    }
findCandidateAdvisors(); 找到候选的类, 然后将候选类构造成Advisor对象. 进到方法里看看是如何筛选出候选对象的.
AnnotationAwareAspectJAutoProxyCreator.findCandidateAdvisors()
@Override
    protected List<Advisor> findCandidateAdvisors() {
        // Add all the Spring advisors found according to superclass rules.
        // 找到xml方式配置的Advisor和原生接口的AOP的advisor 以及找到事务相关的advisor
        List<Advisor> advisors = super.findCandidateAdvisors();
        // Build Advisors for all AspectJ aspects in the bean factory.
        // 将找到的aspect, 封装为一个Advisor
        if (this.aspectJAdvisorsBuilder != null) {
            //buildAspectJAdvisors()方法就是用来解析切面类, 判断是否含有@Aspect注解, 然后将每一个通知生成一个advisor
            advisors.addAll(this.aspectJAdvisorsBuilder.buildAspectJAdvisors());
        }
        // 返回所有的通知
        return advisors;
    }
这里做了两件事
第一步: 解析xml方式配置的Advisor (包括原生接口方式配置的advisor 以及找到事务相关的advisor)
第二步: 解析注解方式的切面. buildAspectJAdvisors()方法是用来解析切面类的. 解析每一个切面类中的通知方法, 并为每个方法匹配切点表达式.
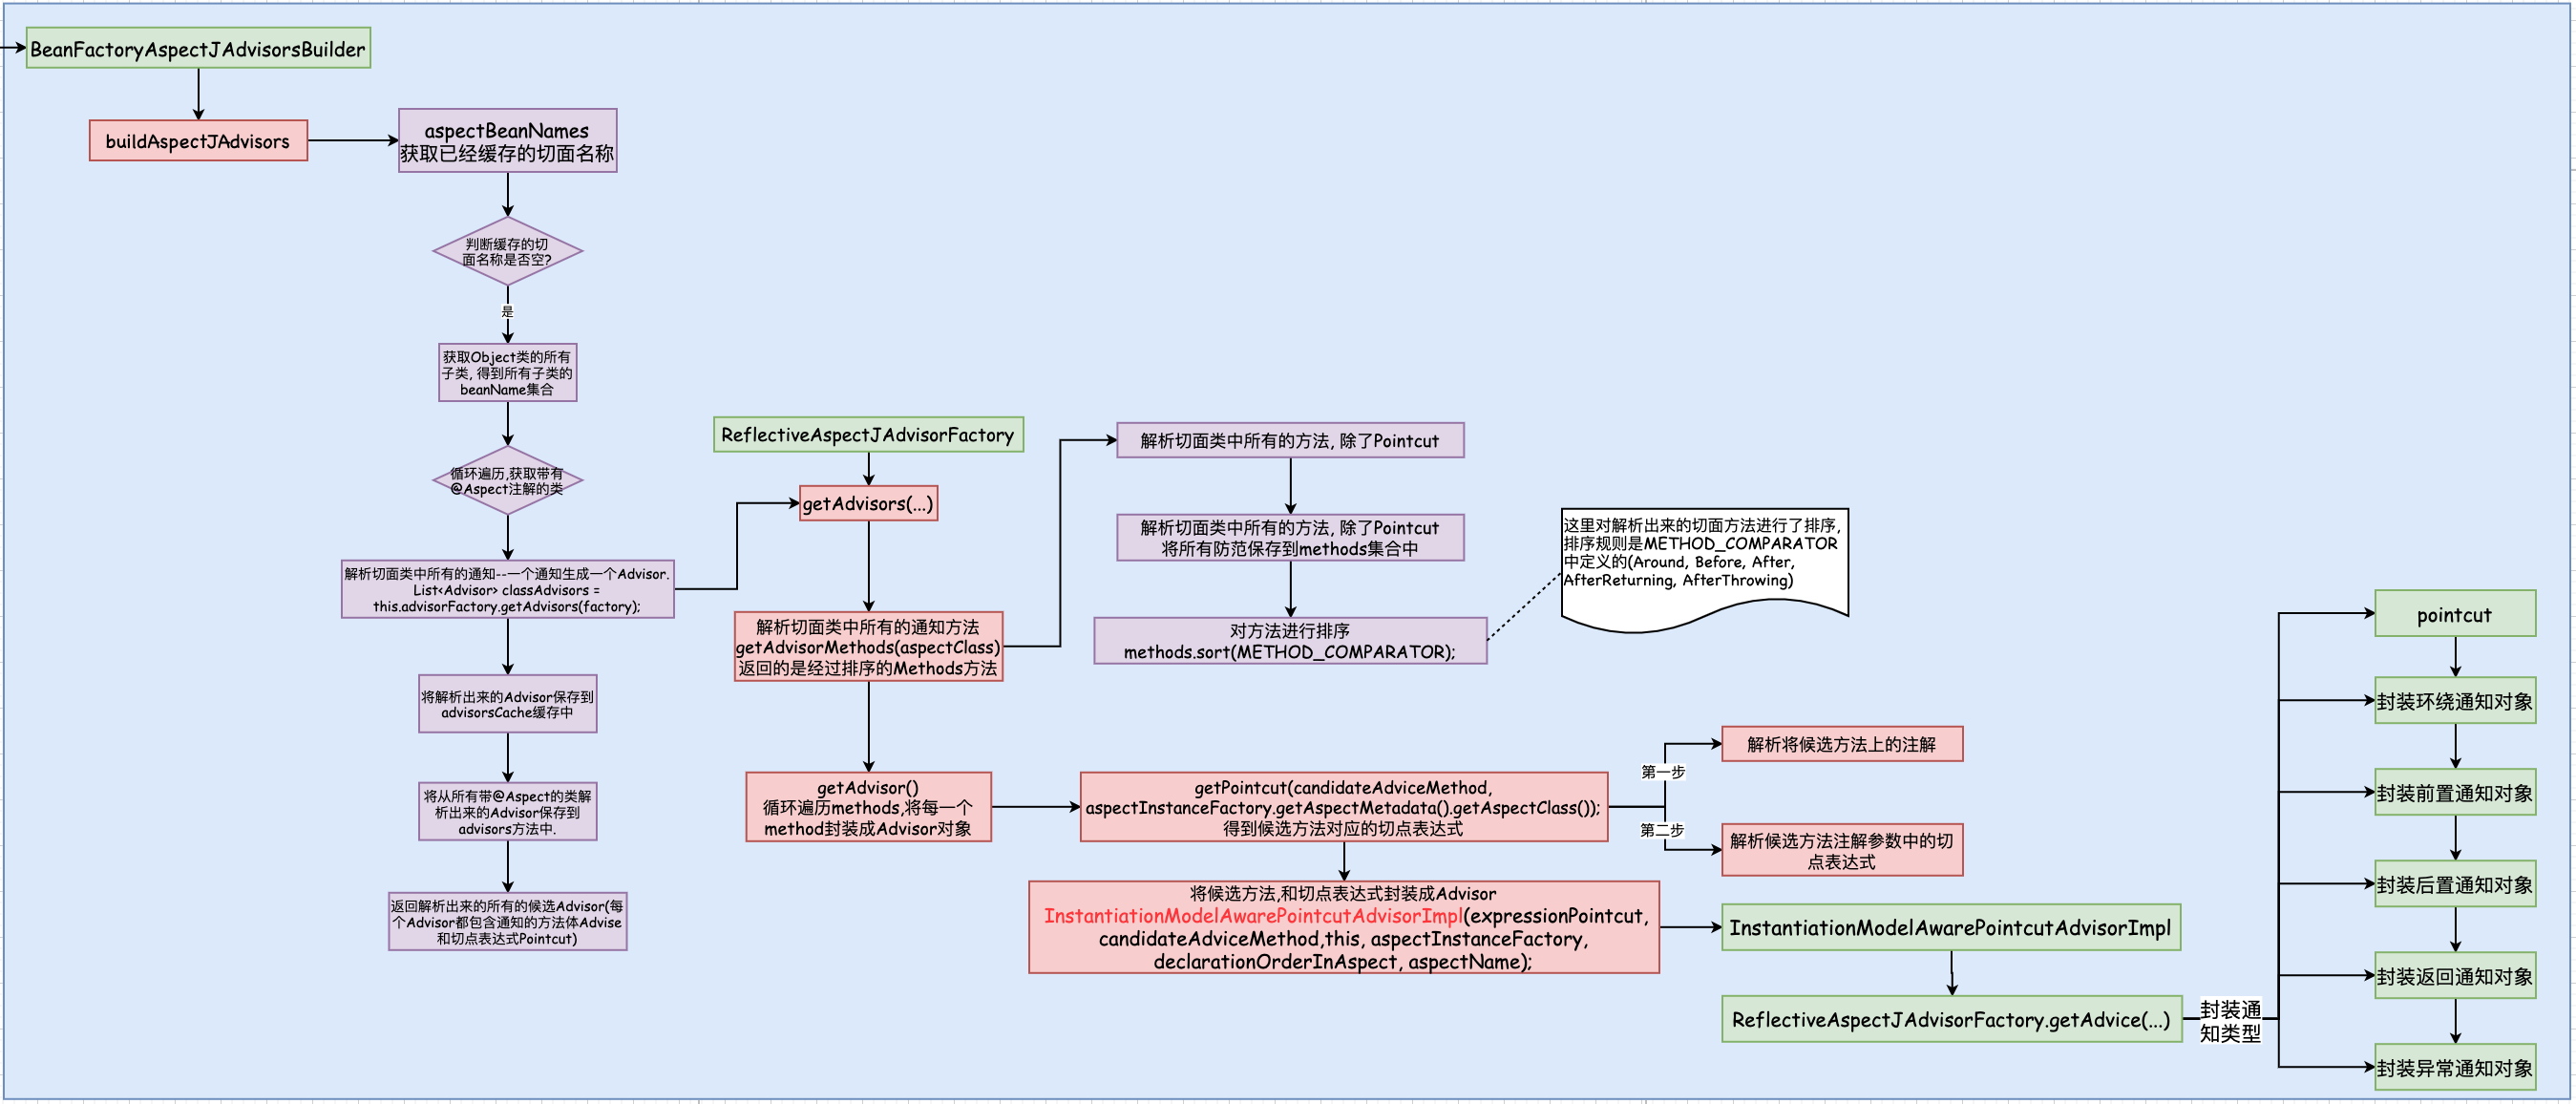
public List<Advisor> buildAspectJAdvisors() {
    /*
     * aspectNames: 用于保存切面名称的集合
     * aspectNames是缓存的类级别的切面, 缓存的是已经解析出来的切面信息
     */
    List<String> aspectNames = this.aspectBeanNames;

    // 如果aspectNames值为空, 那么就在第一个单例bean执行的时候调用后置处理器(AnnotationAwareAspectJAutoProxy)
    if (aspectNames == null) {
      // 加锁, 防止多个线程, 同时加载 Aspect
      synchronized (this) {
        aspectNames = this.aspectBeanNames;
        // 双重检查
        if (aspectNames == null) {
          // 保存所有从切面中解析出来的通知
          List<Advisor> advisors = new ArrayList<>();
          // 保存切面名称的集合
          aspectNames = new ArrayList<>();
          /*
           * 扫描Object的子类. 那就是扫描所有的类
           *
           * 这里传入要扫描的对象是Object.class. 也就是说去容器中扫描所有的类.
           * 循环遍历. 这个过程是非常耗性能的, 所以spring增加了缓存来保存切面
           *
           * 但事务功能除外, 事务模块是直接去容器中找到Advisor类型的类 选择范围小
           * spring 没有给事务模块加缓存
           */
          String[] beanNames = BeanFactoryUtils.beanNamesForTypeIncludingAncestors(
              this.beanFactory, Object.class, true, false);

          // 循环遍历beanNames
          for (String beanName : beanNames) {
            if (!isEligibleBean(beanName)) {
              continue;
            }
            // We must be careful not to instantiate beans eagerly as in this case they
            // would be cached by the Spring container but would not have been weaved.
            // 通过beanName去容器中获取到对应class对象
            Class<?> beanType = this.beanFactory.getType(beanName);
            if (beanType == null) {
              continue;
            }
            // 判断bean是否是一个切面, 也就是脑袋上是否有@Aspect注解
            if (this.advisorFactory.isAspect(beanType)) {
              aspectNames.add(beanName);
              // 将beanName和class对象构建成一个AspectMetadata对象
              AspectMetadata amd = new AspectMetadata(beanType, beanName);
              if (amd.getAjType().getPerClause().getKind() == PerClauseKind.SINGLETON) {
                MetadataAwareAspectInstanceFactory factory =
                    new BeanFactoryAspectInstanceFactory(this.beanFactory, beanName);
                // 解析切面类中所有的通知--一个通知生成一个Advisor.
                List<Advisor> classAdvisors = this.advisorFactory.getAdvisors(factory);

                // 加入到缓存中
                if (this.beanFactory.isSingleton(beanName)) {
                  this.advisorsCache.put(beanName, classAdvisors);
                } else {
                  this.aspectFactoryCache.put(beanName, factory);
                }
                advisors.addAll(classAdvisors);
              } else {
                // Per target or per this.
                if (this.beanFactory.isSingleton(beanName)) {
                  throw new IllegalArgumentException("Bean with name '" + beanName +
                      "' is a singleton, but aspect instantiation model is not singleton");
                }
                MetadataAwareAspectInstanceFactory factory =
                    new PrototypeAspectInstanceFactory(this.beanFactory, beanName);
                this.aspectFactoryCache.put(beanName, factory);
                advisors.addAll(this.advisorFactory.getAdvisors(factory));
              }
            }
          }
          this.aspectBeanNames = aspectNames;
          return advisors;
        }
      }
    }

    if (aspectNames.isEmpty()) {
      return Collections.emptyList();
    }
    List<Advisor> advisors = new ArrayList<>();
    for (String aspectName : aspectNames) {
      List<Advisor> cachedAdvisors = this.advisorsCache.get(aspectName);
      if (cachedAdvisors != null) {
        advisors.addAll(cachedAdvisors);
      } else {
        MetadataAwareAspectInstanceFactory factory = this.aspectFactoryCache.get(aspectName);
        advisors.addAll(this.advisorFactory.getAdvisors(factory));
      }
    }
    return advisors;
  }
我们来看看如何生成List<Advisor>的
// 解析切面类中所有的通知--一个通知生成一个Advisor.
List<Advisor> classAdvisors = this.advisorFactory.getAdvisors(factory);
public List<Advisor> getAdvisors(MetadataAwareAspectInstanceFactory aspectInstanceFactory) {
        // 获取标记了@Aspect的类
        Class<?> aspectClass = aspectInstanceFactory.getAspectMetadata().getAspectClass();
        // 获取切面类的名称
        String aspectName = aspectInstanceFactory.getAspectMetadata().getAspectName();
        // 验证切面类
        validate(aspectClass);

        // We need to wrap the MetadataAwareAspectInstanceFactory with a decorator
        // so that it will only instantiate once.
        // 使用包装的模式来包装 aspectInstanceFactory, 构建成MetadataAwareAspectInstanceFactory类
        MetadataAwareAspectInstanceFactory lazySingletonAspectInstanceFactory =
                new LazySingletonAspectInstanceFactoryDecorator(aspectInstanceFactory);

        // 通知的集合, 按照排序后
        List<Advisor> advisors = new ArrayList<>();
        // 获取切面类中所有的通知方法, 除了带有@Pointcut注解的方法
        for (Method method : getAdvisorMethods(aspectClass)) {
            // 将候选方法解析为Advisor. Advisor中包含advise和pointcut. 注意: getAdvisor()方法中定义了切面解析的顺序
            Advisor advisor = getAdvisor(method, lazySingletonAspectInstanceFactory, 0, aspectName);
            if (advisor != null) {
                advisors.add(advisor);
            }
        }

        // If it's a per target aspect, emit the dummy instantiating aspect.
        if (!advisors.isEmpty() && lazySingletonAspectInstanceFactory.getAspectMetadata().isLazilyInstantiated()) {
            Advisor instantiationAdvisor = new SyntheticInstantiationAdvisor(lazySingletonAspectInstanceFactory);
            advisors.add(0, instantiationAdvisor);
        }

        // Find introduction fields.
        for (Field field : aspectClass.getDeclaredFields()) {
            Advisor advisor = getDeclareParentsAdvisor(field);
            if (advisor != null) {
                advisors.add(advisor);
            }
        }

        return advisors;
    }
这里主要有两点, 第一个是getAdvisorMethods(aspectClass)获取当前切面类的所有的AdvisorMethod , 第二个是封装成的Advisor对象
- 第一步: 解析切面类中所有的通知方法.getAdvisorMethods(aspectClass)
/**
     * 获取切面类中所有的方法, 且方法中有@Pointcut注解
     * @param aspectClass
     * @return
     */
    private List<Method> getAdvisorMethods(Class<?> aspectClass) {
        final List<Method> methods = new ArrayList<>();
        // 调用doWithMethods. 第二个参数是一个匿名函数, 重写了doWith方法
        ReflectionUtils.doWithMethods(aspectClass, method -> {
            // 解析切面类中所有的方法, 除了Pointcut
            if (AnnotationUtils.getAnnotation(method, Pointcut.class) == null) {
                methods.add(method);
            }
        }, ReflectionUtils.USER_DECLARED_METHODS);
        if (methods.size() > 1) {
            // 对方法进行排序
            methods.sort(METHOD_COMPARATOR);
        }
        return methods;
    }
这个方法是, 扫描切面类的所有方法, 将其添加到methods中, 除了Pointcut注解的方法
然后对methods进行排序, 如何排序呢?
private static final Comparator<Method> METHOD_COMPARATOR;

    static {
        Comparator<Method> adviceKindComparator = new ConvertingComparator<>(
                new InstanceComparator<>(
                        Around.class, Before.class, After.class, AfterReturning.class, AfterThrowing.class),
                (Converter<Method, Annotation>) method -> {
                    AspectJAnnotation<?> ann = AbstractAspectJAdvisorFactory.findAspectJAnnotationOnMethod(method);
                    return (ann != null ? ann.getAnnotation() : null);
                });
        Comparator<Method> methodNameComparator = new ConvertingComparator<>(Method::getName);
        METHOD_COMPARATOR = adviceKindComparator.thenComparing(methodNameComparator);
    }
按照Aroud, Before, After, AferReturning, AfterThrowing的顺序对通知方法进行排序
- 第二步: 将候选的方法解析为Advisor. 这里也是有两步.具体如下:
/**
     * 解析切面类中的方法
     * @param candidateAdviceMethod 候选的方法
     */
    @Override
    @Nullable
    public Advisor getAdvisor(Method candidateAdviceMethod, MetadataAwareAspectInstanceFactory aspectInstanceFactory,
            int declarationOrderInAspect, String aspectName) {

        validate(aspectInstanceFactory.getAspectMetadata().getAspectClass());

        // 获取切面中候选方法的切点表达式
        AspectJExpressionPointcut expressionPointcut = getPointcut(
                candidateAdviceMethod, aspectInstanceFactory.getAspectMetadata().getAspectClass());
        if (expressionPointcut == null) {
            return null;
        }

        // 将切点表达式和通知封装到InstantiationModelAwarePointcutAdvisorImpl对象中, 这是一个Advisor通知
        return new InstantiationModelAwarePointcutAdvisorImpl(expressionPointcut, candidateAdviceMethod,
                this, aspectInstanceFactory, declarationOrderInAspect, aspectName);
    }
在getPointcut中解析了method,以及切点表达式pointcut
/**
     * 找到候选方法method属于哪一种类型的Aspectj通知
     * @param candidateAdviceMethod        候选的通知方法
     * @param candidateAspectClass        候选的切面类
     * @return
     */
    @Nullable
    private AspectJExpressionPointcut getPointcut(Method candidateAdviceMethod, Class<?> candidateAspectClass) {
        // 第一步: 解析候选方法上的注解,类似@Before(value="pointcut()")
        // 找到Aspectj注解:  @Pointcut, @Around, @Before, @After, @AfterReturning, @AfterThrowing
        AspectJAnnotation<?> aspectJAnnotation =
                AbstractAspectJAdvisorFactory.findAspectJAnnotationOnMethod(candidateAdviceMethod);
        if (aspectJAnnotation == null) {
            return null;
        }

        // 第二步: 解析aspect切面中的切点表达式
        AspectJExpressionPointcut ajexp =
                new AspectJExpressionPointcut(candidateAspectClass, new String[0], new Class<?>[0]);
        // 解析切点表达式
        ajexp.setExpression(aspectJAnnotation.getPointcutExpression());
        if (this.beanFactory != null) {
            ajexp.setBeanFactory(this.beanFactory);
        }
        return ajexp;
    }
如上代码, 可知, 这里也是有两个操作. 分别是将method解析为Advise, 另一个是解析切面类中的pointcut切点表达式. 返回返回切点表达式.
接下来, 就是将候选方法和切点表达式封装成Advisor. 在getAdvisor(...)方法中:
// 将切点表达式和通知封装到InstantiationModelAwarePointcutAdvisorImpl对象中, 这是一个Advisor通知
return new InstantiationModelAwarePointcutAdvisorImpl(expressionPointcut, candidateAdviceMethod,
      this, aspectInstanceFactory, declarationOrderInAspect, aspectName);
expressionPointcut: 即切点表达式; candidateAdviceMethod: 即候选方法
public InstantiationModelAwarePointcutAdvisorImpl(AspectJExpressionPointcut declaredPointcut,
            Method aspectJAdviceMethod, AspectJAdvisorFactory aspectJAdvisorFactory,
            MetadataAwareAspectInstanceFactory aspectInstanceFactory, int declarationOrder, String aspectName) {

        // 当前的切点
        this.declaredPointcut = declaredPointcut;
        // 切面类
        this.declaringClass = aspectJAdviceMethod.getDeclaringClass();
        // 切面方法名
        this.methodName = aspectJAdviceMethod.getName();
        //切面方法参数的类型
        this.parameterTypes = aspectJAdviceMethod.getParameterTypes();
        //切面方法对象
        this.aspectJAdviceMethod = aspectJAdviceMethod;
        // aspectJ的通知工厂
        this.aspectJAdvisorFactory = aspectJAdvisorFactory;
        // aspectJ的实例工厂
        this.aspectInstanceFactory = aspectInstanceFactory;
        // advisor的顺序
        /**
         * 前面我们看到, Advisor会进行排序, Around, Before, After, AfterReturning, AfterThrowing, 按照这个顺序.
         * 那么order值是什么呢?是advisors的size. 如果size是0, 那么就是第一个方法. 这里第一个不一定是Around, 他可能没有Around通知, 也没有Before通知.
         */
        this.declarationOrder = declarationOrder;
        // 切面名
        this.aspectName = aspectName;

        if (aspectInstanceFactory.getAspectMetadata().isLazilyInstantiated()) {
            // Static part of the pointcut is a lazy type.
            Pointcut preInstantiationPointcut = Pointcuts.union(
                    aspectInstanceFactory.getAspectMetadata().getPerClausePointcut(), this.declaredPointcut);


            this.pointcut = new PerTargetInstantiationModelPointcut(
                    this.declaredPointcut, preInstantiationPointcut, aspectInstanceFactory);
            this.lazy = true;
        }
        else {
            // A singleton aspect.
            this.pointcut = this.declaredPointcut;
            this.lazy = false;
            this.instantiatedAdvice = instantiateAdvice(this.declaredPointcut);
        }
    }
前面已经得到了切入点表达式, 这里会进行初始化Advice, 初始化的时候, 根据通知的类型进行初始化.
- 环绕通知, 构建一个环绕通知的对象
- 前置通知, 构建一个前置通知的对象
- 后置通知, 构建一个后置通知的对象
- 异常通知, 构建一个异常通知的对象
- 返回通知, 构建一个返回通知的对象
具体代码如下:
@Override
    @Nullable
    public Advice getAdvice(Method candidateAdviceMethod, AspectJExpressionPointcut expressionPointcut,
            MetadataAwareAspectInstanceFactory aspectInstanceFactory, int declarationOrder, String aspectName) {
        // 候选的切面类
        Class<?> candidateAspectClass = aspectInstanceFactory.getAspectMetadata().getAspectClass();
        validate(candidateAspectClass);
        // 通知方法上的注解内容
        AspectJAnnotation<?> aspectJAnnotation =
                AbstractAspectJAdvisorFactory.findAspectJAnnotationOnMethod(candidateAdviceMethod);
        if (aspectJAnnotation == null) {
            return null;
        }

        // If we get here, we know we have an AspectJ method.
        // Check that it's an AspectJ-annotated class
        if (!isAspect(candidateAspectClass)) {
            throw new AopConfigException("Advice must be declared inside an aspect type: " +
                    "Offending method '" + candidateAdviceMethod + "' in class [" +
                    candidateAspectClass.getName() + "]");
        }

        if (logger.isDebugEnabled()) {
            logger.debug("Found AspectJ method: " + candidateAdviceMethod);
        }

        AbstractAspectJAdvice springAdvice;

        switch (aspectJAnnotation.getAnnotationType()) {
            case AtPointcut:
                if (logger.isDebugEnabled()) {
                    logger.debug("Processing pointcut '" + candidateAdviceMethod.getName() + "'");
                }
                return null;
            case AtAround:
                // 封装成环绕通知的对象
                springAdvice = new AspectJAroundAdvice(
                        candidateAdviceMethod, expressionPointcut, aspectInstanceFactory);
                break;
            case AtBefore:
                // 封装成前置通知对象
                springAdvice = new AspectJMethodBeforeAdvice(
                        candidateAdviceMethod, expressionPointcut, aspectInstanceFactory);
                break;
            case AtAfter:
                // 封装成后置通知对象
                springAdvice = new AspectJAfterAdvice(
                        candidateAdviceMethod, expressionPointcut, aspectInstanceFactory);
                break;
            case AtAfterReturning:
                // 封装成返回通知对象
                springAdvice = new AspectJAfterReturningAdvice(
                        candidateAdviceMethod, expressionPointcut, aspectInstanceFactory);
                AfterReturning afterReturningAnnotation = (AfterReturning) aspectJAnnotation.getAnnotation();
                if (StringUtils.hasText(afterReturningAnnotation.returning())) {
                    springAdvice.setReturningName(afterReturningAnnotation.returning());
                }
                break;
            case AtAfterThrowing:
                // 封装异常通知对象
                springAdvice = new AspectJAfterThrowingAdvice(
                        candidateAdviceMethod, expressionPointcut, aspectInstanceFactory);
                AfterThrowing afterThrowingAnnotation = (AfterThrowing) aspectJAnnotation.getAnnotation();
                if (StringUtils.hasText(afterThrowingAnnotation.throwing())) {
                    springAdvice.setThrowingName(afterThrowingAnnotation.throwing());
                }
                break;
            default:
                throw new UnsupportedOperationException(
                        "Unsupported advice type on method: " + candidateAdviceMethod);
        }

        // Now to configure the advice...
        springAdvice.setAspectName(aspectName);
        springAdvice.setDeclarationOrder(declarationOrder);
        String[] argNames = this.parameterNameDiscoverer.getParameterNames(candidateAdviceMethod);
        if (argNames != null) {
            springAdvice.setArgumentNamesFromStringArray(argNames);
        }
        springAdvice.calculateArgumentBindings();

        return springAdvice;
    }
这就是我们在之前的结构中说过的, 在解析切面的时候, 会解析切面中的每一个方法, 将其解析成一个Advisor, 而每一个Advisor都包含两个部分:Advise和pointcut.
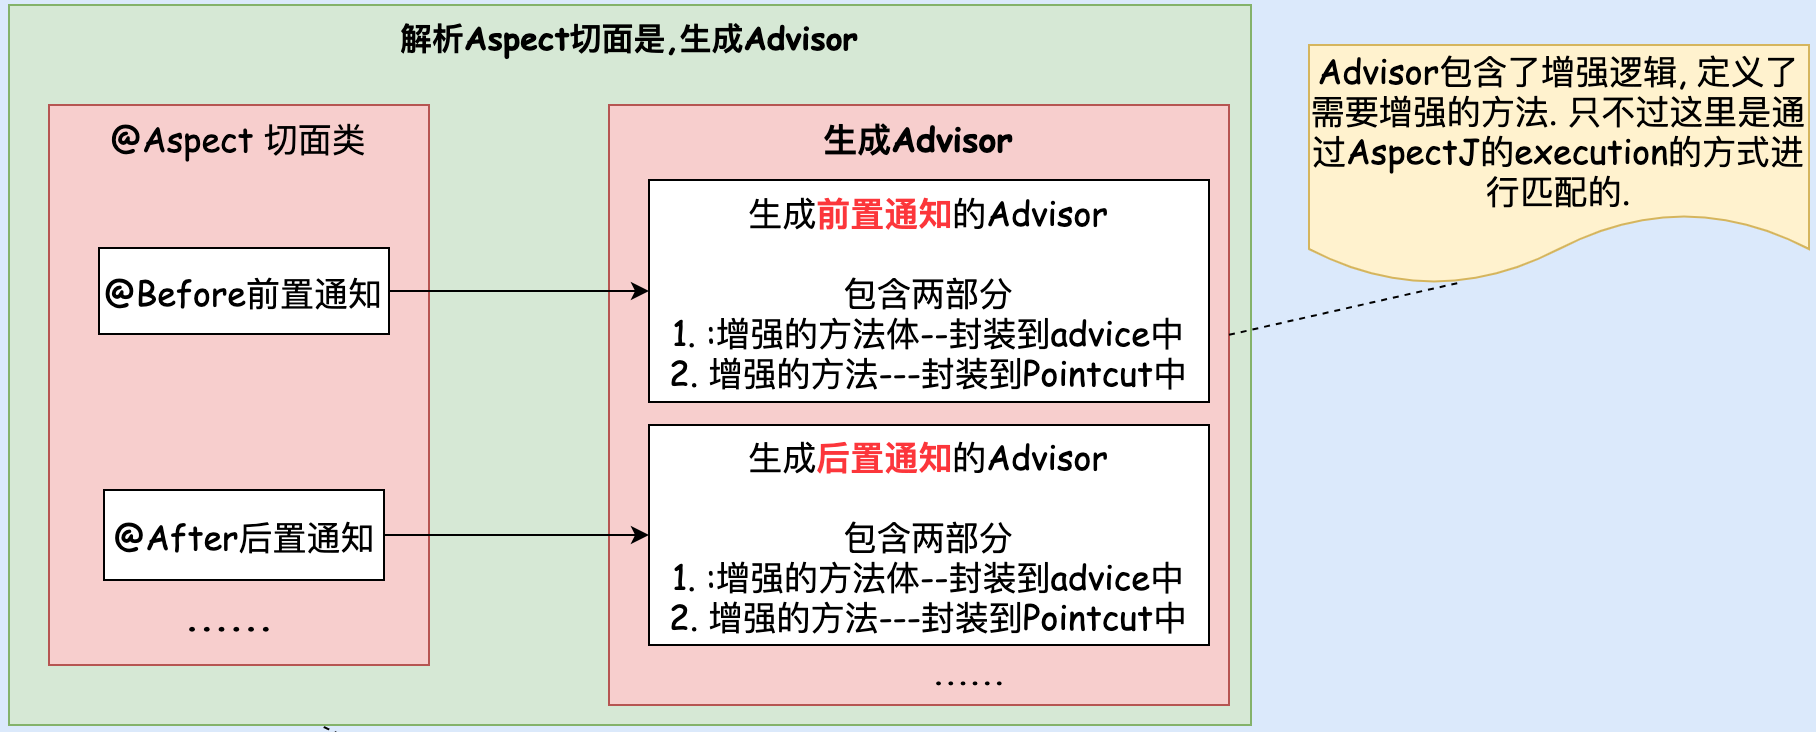
最后, 将所有的切面类都解析完, 将所有的Advisor放入到集合advisors中返回.
这样就完成了切面的解析.
2) 调用动态代理
在ioc解析的过程中, 是在什么时候创建动态代理的呢?
通常是在创建bean初始化之后创建动态代理. 如果有循环依赖, 会在实例化之后创建动态代理, 再来感受一下创建bean过程中的操作.
下面我们来看正常的流程, 在初始化之后创建AOP动态代理 .
在创建bean的过程中,一共有三步, 来看看AbstractAutowireCpableBeanFactory.doCreateBean()
protected Object doCreateBean(final String beanName, final RootBeanDefinition mbd, final @Nullable Object[] args)
            throws BeanCreationException {

        // Instantiate the bean.
        BeanWrapper instanceWrapper = null;
        if (mbd.isSingleton()) {
            instanceWrapper = this.factoryBeanInstanceCache.remove(beanName);
        }
        if (instanceWrapper == null) {
            //第一步: 实例化
            instanceWrapper = createBeanInstance(beanName, mbd, args);
        }
        // 这里使用了装饰器的设计模式
        final Object bean = instanceWrapper.getWrappedInstance();
        Class<?> beanType = instanceWrapper.getWrappedClass();
        ......
        try {
            // 第二步:填充属性, 给属性赋值(调用set方法)  这里也是调用的后置处理器
            populateBean(beanName, mbd, instanceWrapper);
            // 第三步: 初始化.
            exposedObject = initializeBean(beanName, exposedObject, mbd);
        }
        ......
    }
在第三步初始化的时候, 要处理很多bean的后置处理器.
@Override
    public Object applyBeanPostProcessorsAfterInitialization(Object existingBean, String beanName)
            throws BeansException {

        Object result = existingBean;
        for (BeanPostProcessor processor : getBeanPostProcessors()) {
            Object current = processor.postProcessAfterInitialization(result, beanName);
            if (current == null) {
                return result;
            }
            result = current;
        }
        return result;
    }
postProcessAfterInitialization(result, beanName);就是处理初始化之后的后置处理器, 下面就从这个方法作为入口分析.
AnnotationAwareAspectJAutoProxyCreator也实现了postProcessAfterInitialization(result, beanName);接口
@Override
    public Object  postProcessAfterInitialization(@Nullable Object bean, String beanName) {
        /**
         * 每一个bean在解析的时候都会解析一遍切面.
         * 为什么每次都要解析一遍呢? 因为还有另外一种方式-实现Advisor接口的方式实现AOP, 在加载过程中, 可能随时有新的bean被解析出来. 所以, 需要每次都重新解析一遍,.
         * 我们在第一次解析的Advisor都已经放入到缓存, 在这里会先从缓存中取, 也就是已经解析过的不会重复解析. 也就是不 消耗性能
         */
        if (bean != null) {
            // 获取缓存key
            Object cacheKey = getCacheKey(bean.getClass(), beanName);
            /**
             * 因为有可能在循环依赖处理的时候已经创建国一遍, 如果是那么现在就不再创建了,并且删除
             * 在这里, 我们要处理的是普通类的动态代理, 所以, 需要将循环以来创建的动态代理删掉
             */
            if (this.earlyProxyReferences.remove(cacheKey) != bean) {
                // 该方法将返回动态代理的实例
                return wrapIfNecessary(bean, beanName, cacheKey);
            }
        }
        return bean;
    }
接下来处理的流程如下:
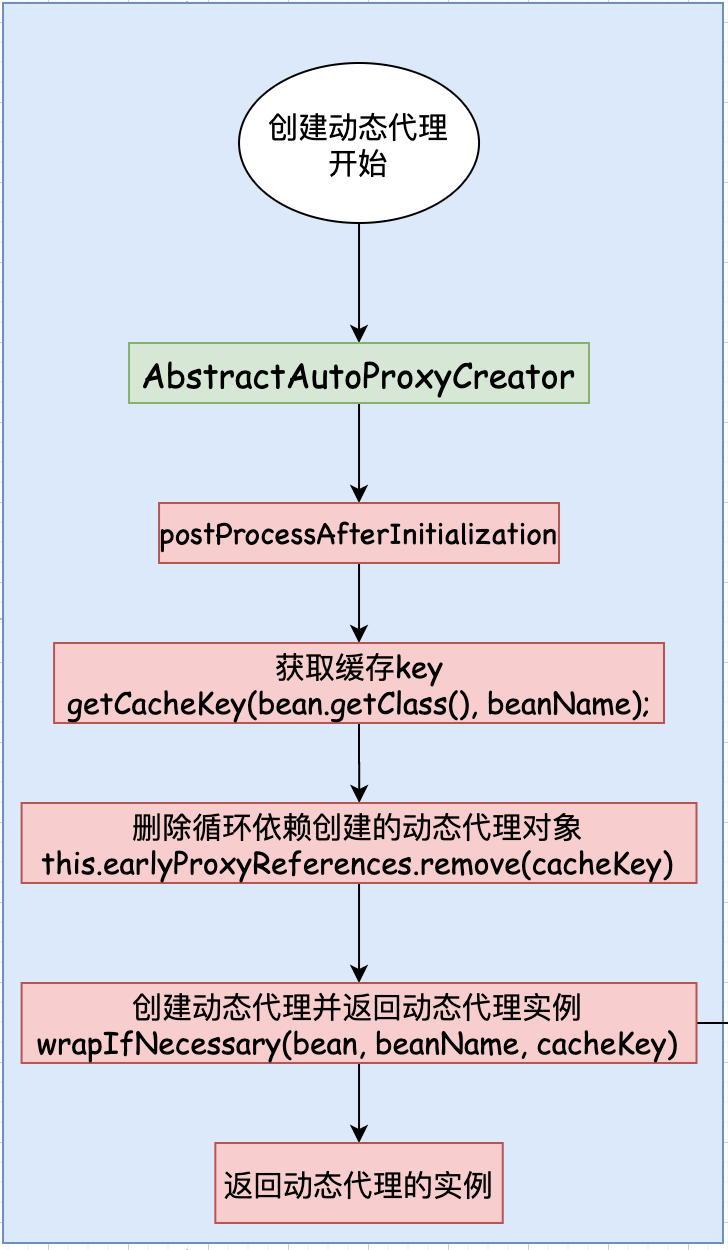
这里,第三步:删除循环依赖创建的动态代理对象, 为什么要这样处理呢?
protected Object wrapIfNecessary(Object bean, String beanName, Object cacheKey) {
        // 已经被处理过(解析切面的时候, targetSourcedBeans用来存储自己实现创建动态代理的逻辑)
        if (StringUtils.hasLength(beanName) && this.targetSourcedBeans.contains(beanName)) {
            return bean;
        }
        // 判断bean是否是需要增强的bean
        /**
         * 哪些类是不需要增强的呢?
         * 在解析切面的时候, 基础类和应该跳过的类是不需要增强的.
         */
        if (Boolean.FALSE.equals(this.advisedBeans.get(cacheKey))) {
            return bean;
        }
        // 判断是否是基础类, 或者是否是需要跳过的类
        if (isInfrastructureClass(bean.getClass()) || shouldSkip(bean.getClass(), beanName)) {
            // 将其标记为不需要增强的类
            this.advisedBeans.put(cacheKey, Boolean.FALSE);
            return bean;
        }

        // 匹配Advisor. 根据类匹配advisors, 至少匹配上一个, 才创建动态代理, 否则不创建动态代理
        Object[] specificInterceptors = getAdvicesAndAdvisorsForBean(bean.getClass(), beanName, null);

        // 匹配了至少一个advisor, 创建动态代理
        if (specificInterceptors != DO_NOT_PROXY) {
            this.advisedBeans.put(cacheKey, Boolean.TRUE);
            Object proxy = createProxy(
                    bean.getClass(), beanName, specificInterceptors, new SingletonTargetSource(bean));
            this.proxyTypes.put(cacheKey, proxy.getClass());
            return proxy;
        }

        this.advisedBeans.put(cacheKey, Boolean.FALSE);
        return bean;
    }
首先判断是否是需要跳过的类. 哪些类是需要跳过的类呢?
第一类:基础类. Advice, Pointcut, Advisor, AopInfrastructureBean.
第二类: 原始的接口类, 以.ORIGINAL开头的类
接下来, 匹配Advisor.
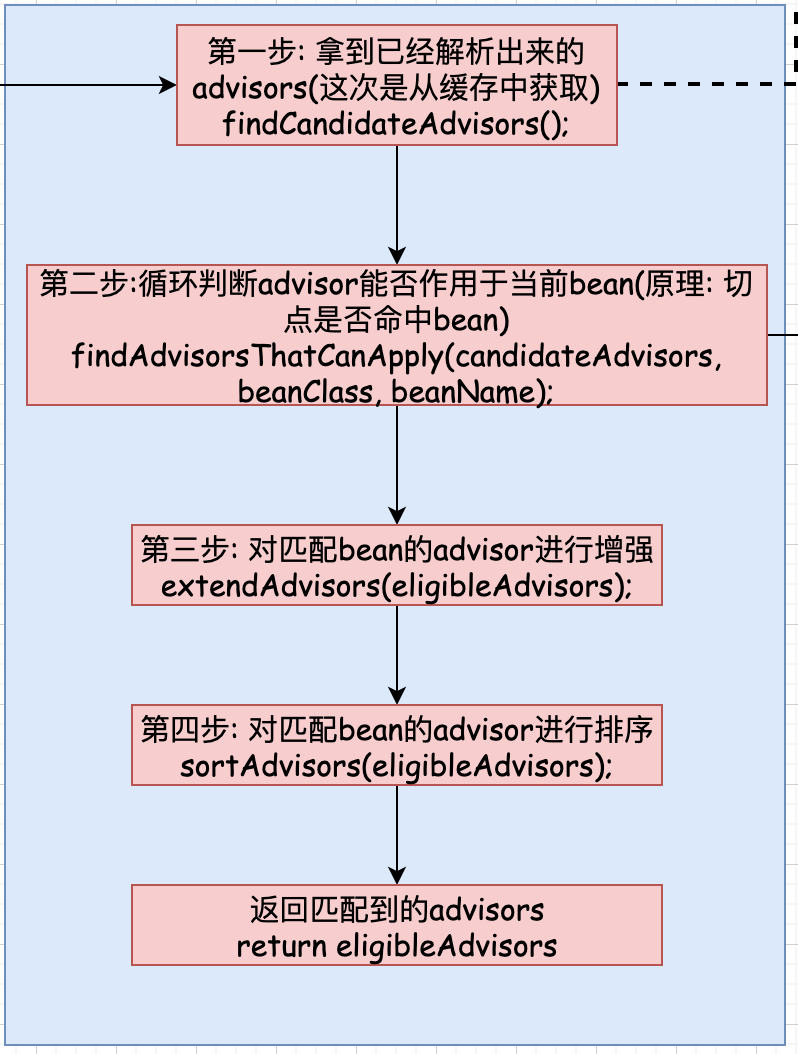
protected List<Advisor> findEligibleAdvisors(Class<?> beanClass, String beanName) {
        // 第一步: 拿到已经解析出来的advisors(这次是从缓存中获取)
        List<Advisor> candidateAdvisors = findCandidateAdvisors();
        // 第二步:循环判断advisor能否作用于当前bean(原理: 切点是否命中bean)
        List<Advisor> eligibleAdvisors = findAdvisorsThatCanApply(candidateAdvisors, beanClass, beanName);
       // 第三步: 对匹配bean的advisor进行增强
        extendAdvisors(eligibleAdvisors);
        // 第四步: 对匹配bean的advisor进行排序
        if (!eligibleAdvisors.isEmpty()) {
            eligibleAdvisors = sortAdvisors(eligibleAdvisors);
        }
        // 返回匹配到的advisors
        return eligibleAdvisors;
    }
这里经过了四步, 具体详见上述代码及注释.
- 第一步: 从缓存中拿到已经解析出来的advisors
- 第二步:循环判断advisor能否作用于当前bean
- 第三步: 对匹配bean的advisor进行增强
- 第四步: 对匹配bean的advisor进行排序
这里面的第一步: 从缓存中取出了已经解析出来的advisors集合. 解析方式是从缓存中取出已经解析的advisors
接下来,循环遍历获得到的advisors, 得到每一个advisor. 判断advisor是否是目标bean需要增强的通知.
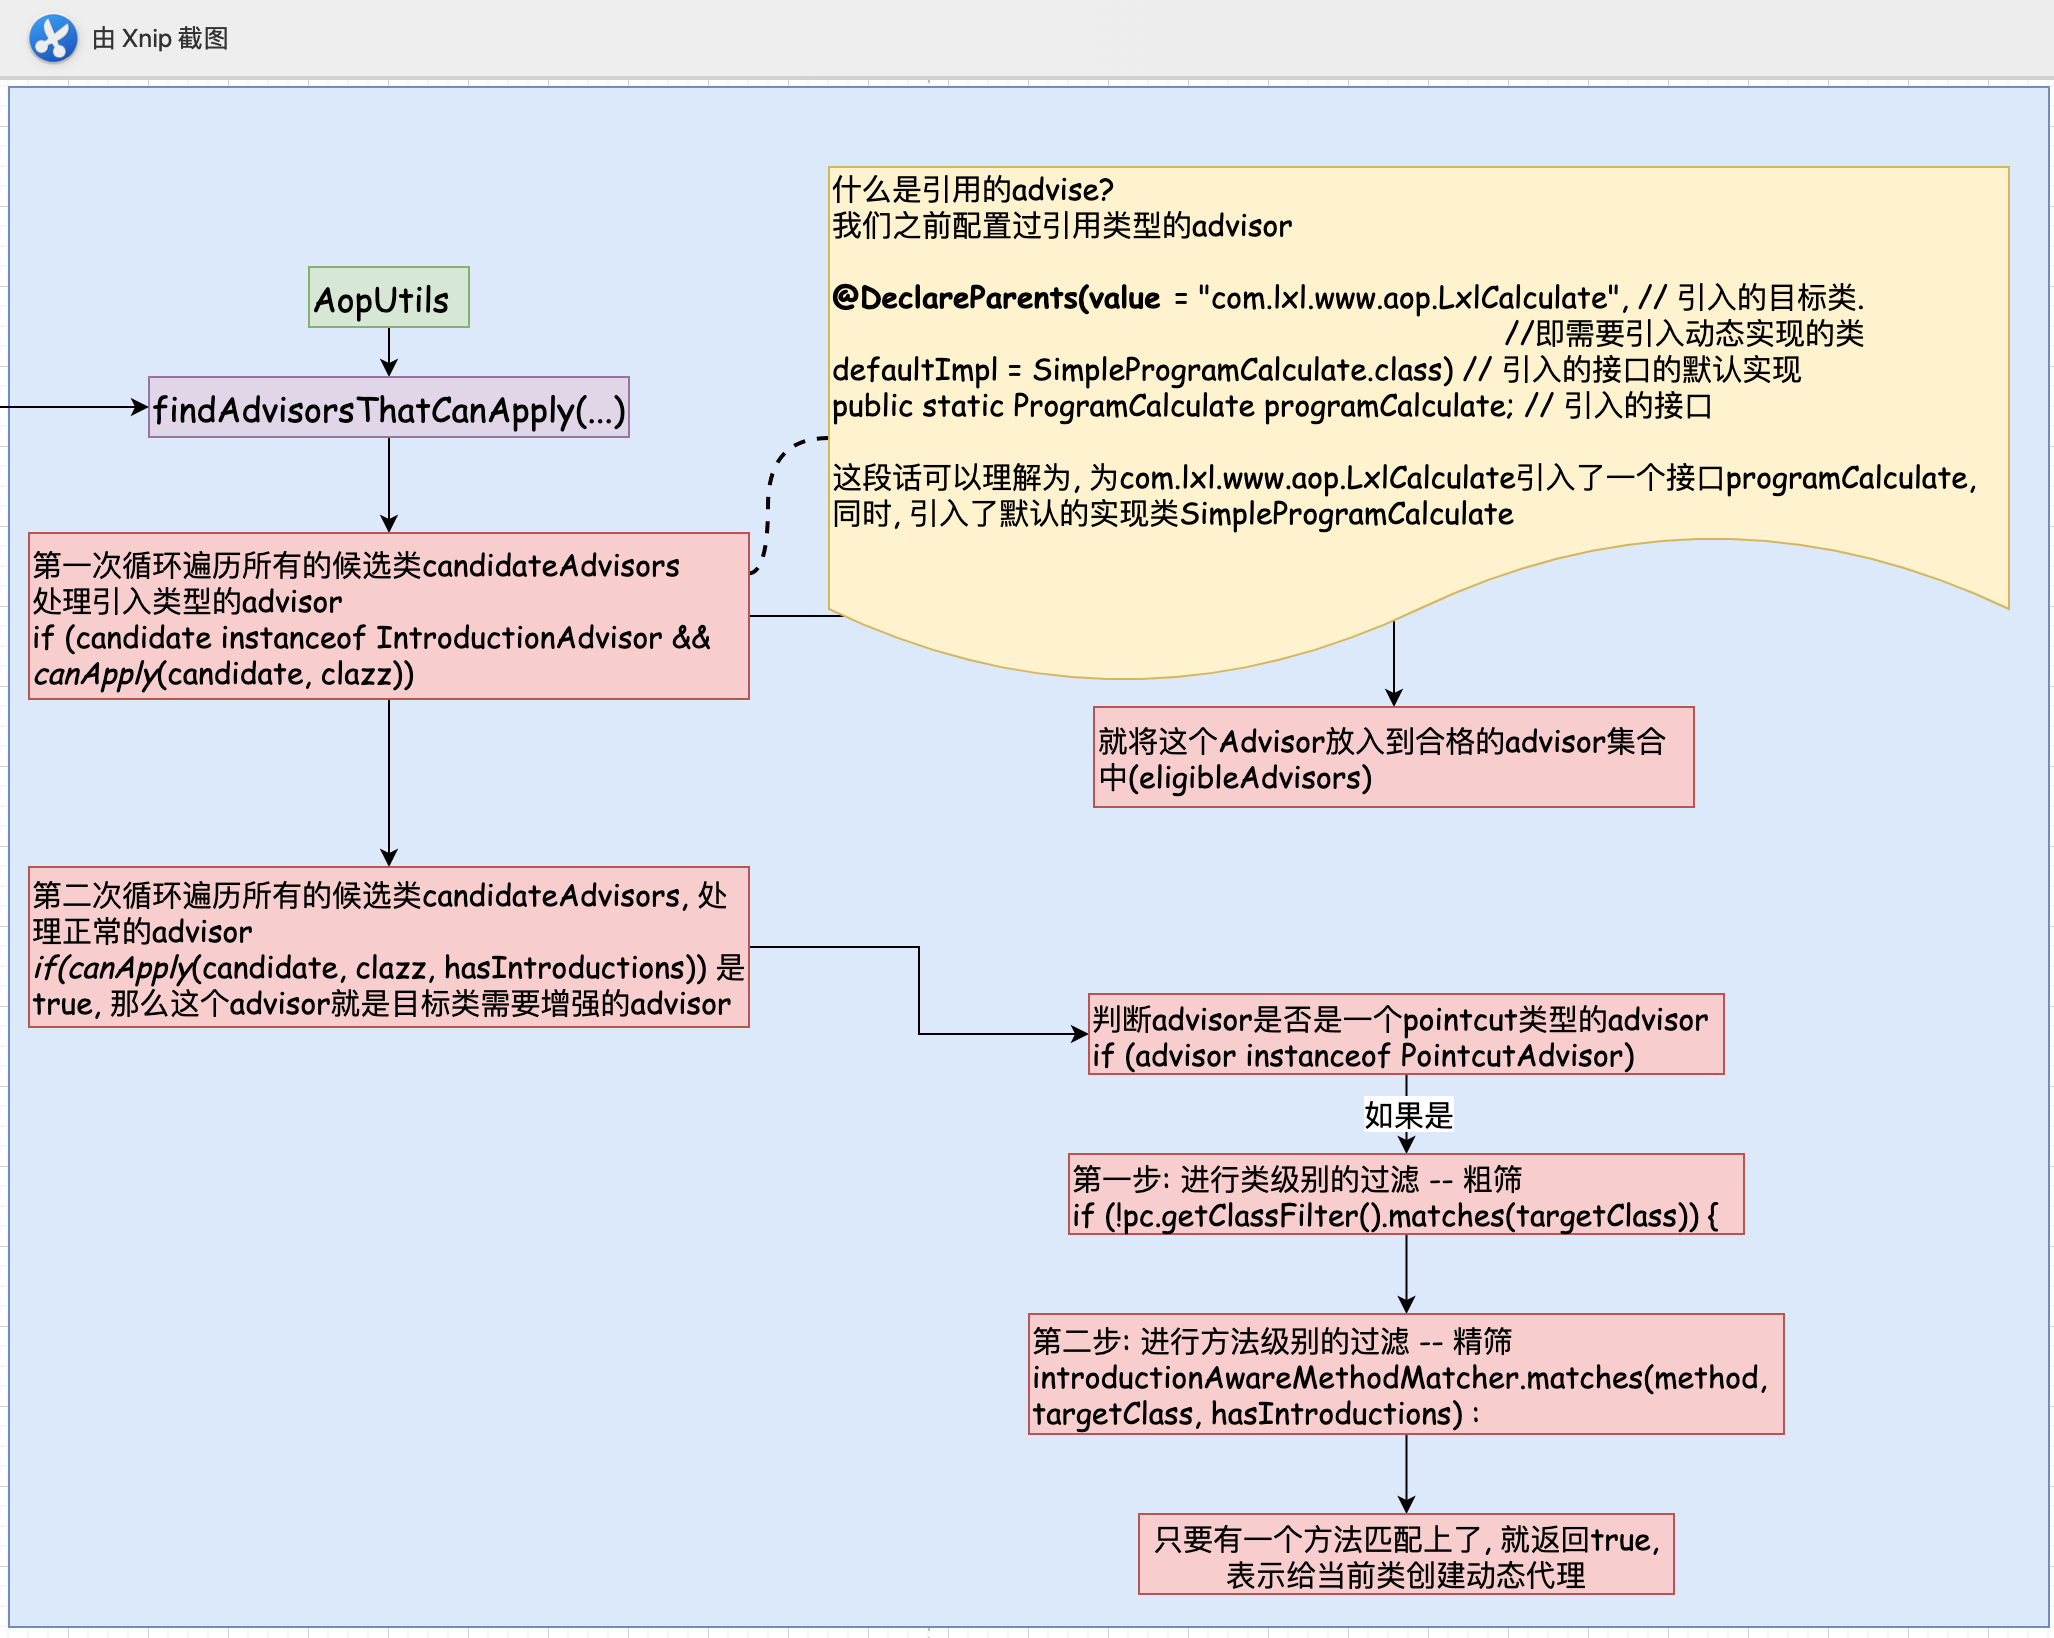
这里在筛选的时候, 根据切点表达式进行了两次筛选. 第一次粗筛, 第二次是精筛. 整个目标类, 只要有一个类命中切点表达式, 那么这个类就是需要被创建动态代理的类, 返回true.
接下来就是要创建动态代理了. 然后,返回创建的动态代理对象.
下面来看看是如何创建动态代理的.
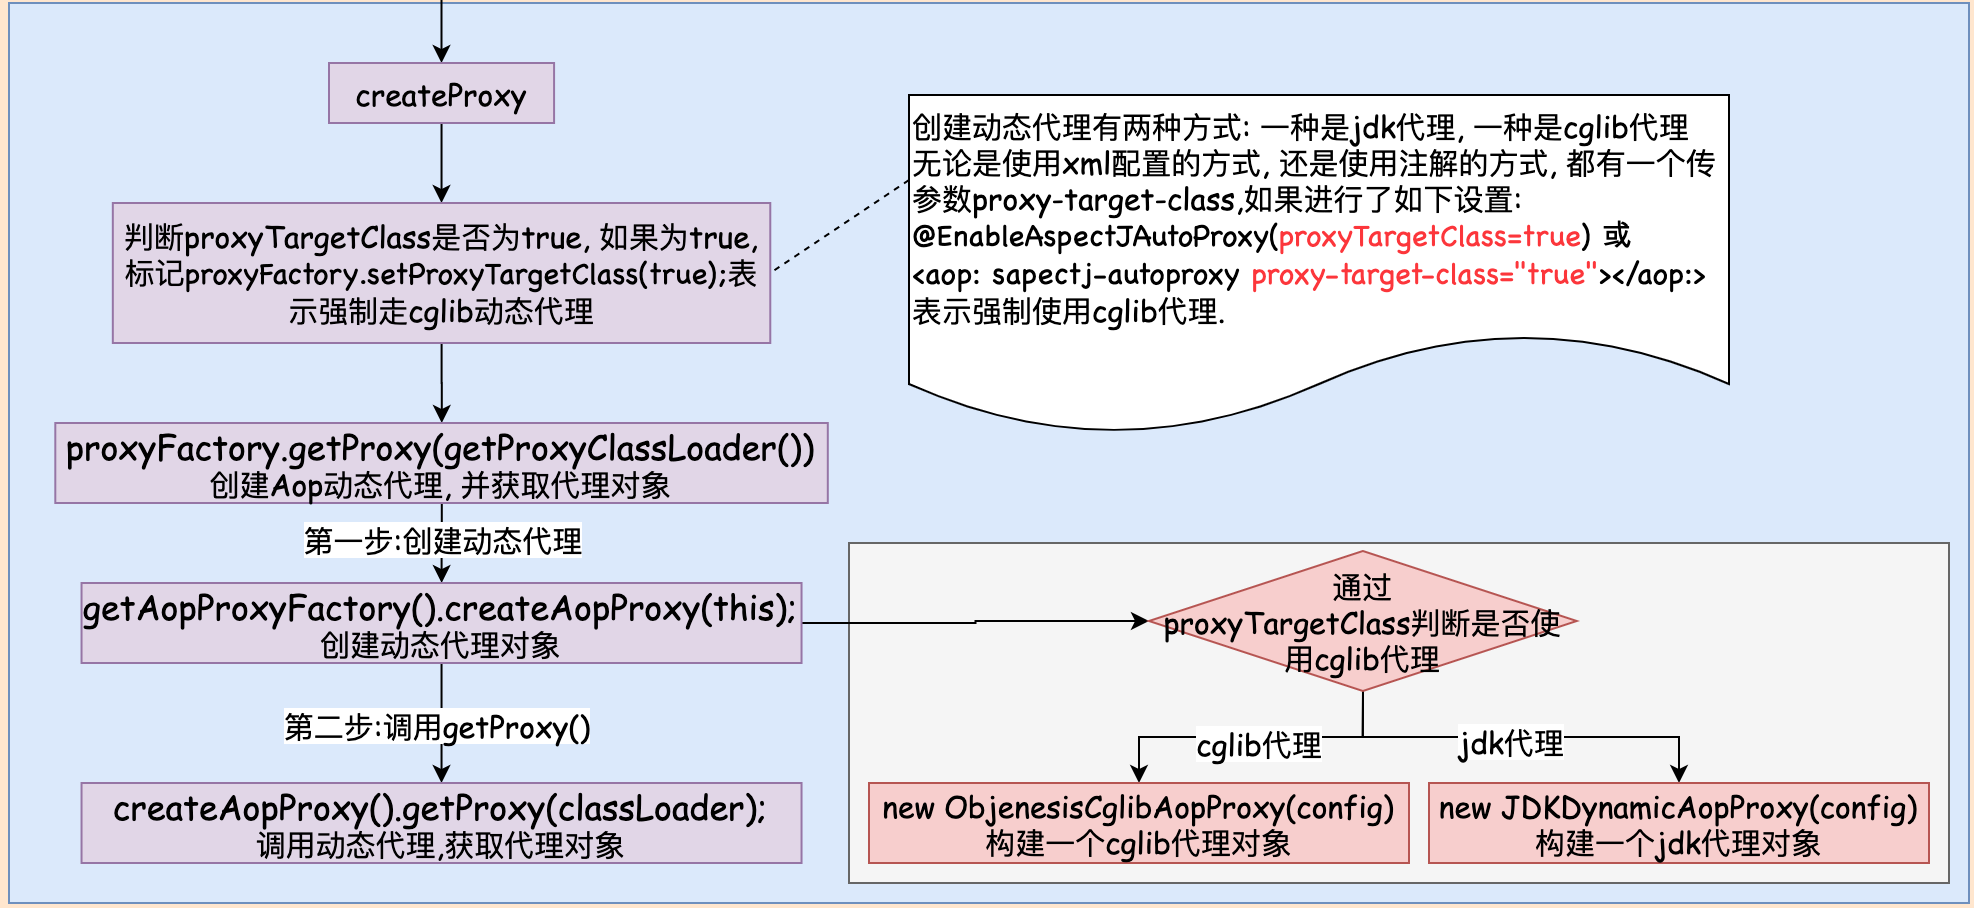
创建动态代理对象有两种方式: 一种是jdk代理, 一种是cglib代理.
无论是使用xml配置的方式, 还是使用注解的方式, 都有一个参数proxy-target-class, 如果将这个参数设置为true, 表示强制使用cglib代理. 如下所示设置:
使用注解的方式
@EnableAspectJAutoProxy(proxyTargetClass=true)

使用xml配置的方式
<aop: sapectj-autoproxy proxy-target-class="true"></aop:>
所以在创建动态代理之前, 先解析注解或者配置, 看是否配置了proxy-target-class参数. 如果配置了这个参数,且其值为true, 那么就创建一个cglib代理对象. 否则创建一个JDK代理对象.通常, 我们使用的更多的是spring自己定义的JDK代理对象. 通过Proxy.newProxyInstance(classLoader, proxiedInterfaces, this);创建动态代理
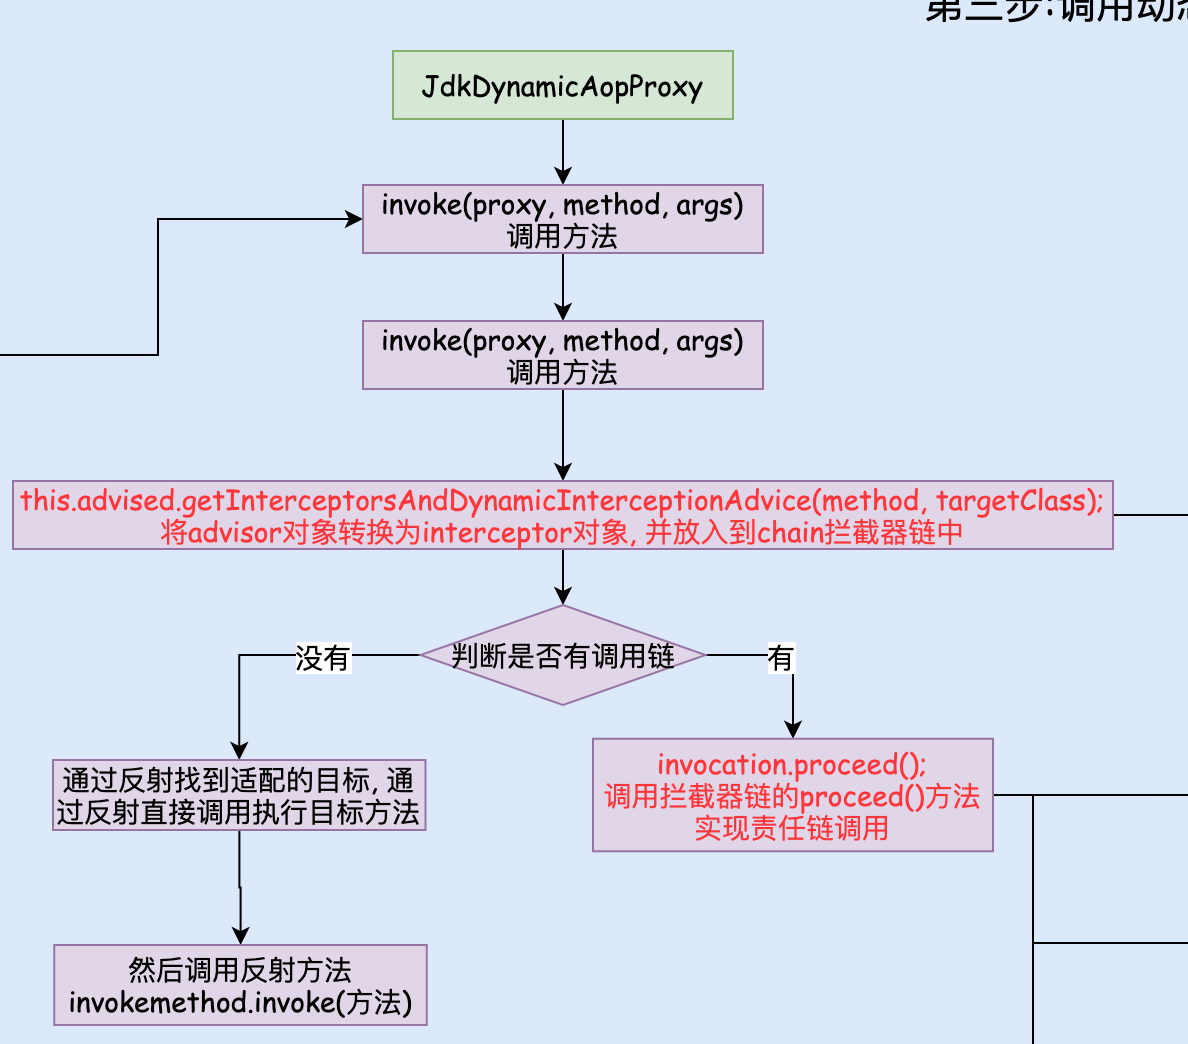
在JDKDynamicAopProxy代理类中有一个invoke()方法. 这个invoke方法, 就是执行代理对象的方法时调用的方法.
该方法是通过反射的方法执行目标类中定义的方法的.
public Object invoke(Object proxy, Method method, Object[] args) throws Throwable {

}
3. 调用动态代理.
调用这里有一个非常经典的调用逻辑--调用链.
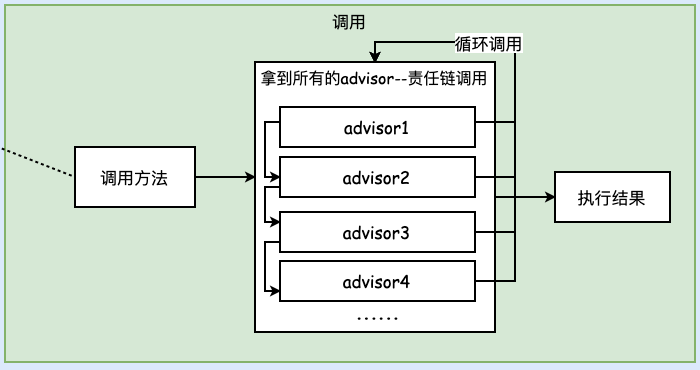
如上图, 调用链的逻辑是, 调用动态代理方法,比如说div(arg1, arg2), 然后执行调用链中第一个通知advisor1, 然后第一个通知调用第二个通知, 在执行第二个, 以此类推, 当所有的通知执行完, 调用目标方法div(arg1, arg2), 然后返回执行结果. 我们来看看代码的逻辑实现.
如下代码是调用动态代理的代码入口:
public class LxlMainClass {
  public static void main(String[] args) {

    AnnotationConfigApplicationContext ctx = new AnnotationConfigApplicationContext(MainConfig.class);

    Calculate calculate = (Calculate) ctx.getBean("lxlCalculate");
    /**
     * 上面的calculate, 就是返回的动态代理的类
     * 当调用下面的div方法时, 实际上调用的是JdkDynamicAopProxy.invoke(...)方法
     */
    calculate.div(2, 4);

    ProgramCalculate programCalculate = (ProgramCalculate) ctx.getBean("lxlCalculate");
    String s = programCalculate.toBinary(5);
    System.out.println(s);
  }
}
我们在main方法中, 获取的Calculate对象, 其实是动态代理生成的对象. 当调用calculate.div(2, 4)方法时, 其实调用的是动态代理的invoke()方法.
@Override
    @Nullable
    public Object invoke(Object proxy, Method method, Object[] args) throws Throwable {
        Object oldProxy = null;
        // 设置代理上下文
        boolean setProxyContext = false;

        // 目标源: 也就是目标代理的目标类
        TargetSource targetSource = this.advised.targetSource;
        Object target = null;

        try {

            if (!this.equalsDefined && AopUtils.isEqualsMethod(method)) {
                // The target does not implement the equals(Object) method itself.
                return equals(args[0]);
            }
            else if (!this.hashCodeDefined && AopUtils.isHashCodeMethod(method)) {
                // The target does not implement the hashCode() method itself.
                return hashCode();
            }
            else if (method.getDeclaringClass() == DecoratingProxy.class) {
                // There is only getDecoratedClass() declared -> dispatch to proxy config.
                return AopProxyUtils.ultimateTargetClass(this.advised);
            }
            // 如果方法所在类是一个接口 && 是可分配为Advised类型的方法
            else if (!this.advised.opaque && method.getDeclaringClass().isInterface() &&
                    method.getDeclaringClass().isAssignableFrom(Advised.class)) {
                // Service invocations on ProxyConfig with the proxy config...
                return AopUtils.invokeJoinpointUsingReflection(this.advised, method, args);
            }

            Object retVal;

            if (this.advised.exposeProxy) {
                // 把代理对象暴露在线程变量中.
                oldProxy = AopContext.setCurrentProxy(proxy);
                // 设置代理的上下文为true
                setProxyContext = true;
            }

            // Get as late as possible to minimize the time we "own" the target,
            // in case it comes from a pool.
            // 获取目标对象
            target = targetSource.getTarget();
            Class<?> targetClass = (target != null ? target.getClass() : null);

            // 把aop的advisor全部转化为拦截器, 通过责任链模式依次调用
            /**
             * 将advisor对象转换为interceptor对象.
             *
             * 问题: 为什么要将advisor都转化为interceptor拦截器呢?
             * 主要还是因为要进行责任链调用. 之前说过, 要想进行责任链调用, 他们要有一个共同的方法.
             * 转化为interceptor以后, 这里共同的方法就是invoke().
             * beforeAdivsor, afterAdvisor, returningAdvisor, throwingAdvisor. 这几种类型. 只有returningAdvisor和throwingAdvisor会转化为Interceptor.
             * 因为beforeAdvisor和adgerAdvisor本身就实现了interceptor接口
             */
            List<Object> chain = this.advised.getInterceptorsAndDynamicInterceptionAdvice(method, targetClass);

            // 拦截器链为空
            if (chain.isEmpty()) {
                // 通过反射直接调用执行目标方法
                Object[] argsToUse = AopProxyUtils.adaptArgumentsIfNecessary(method, args);
                retVal = AopUtils.invokeJoinpointUsingReflection(target, method, argsToUse);
            }
            else {
                // 创建一个 method invocation 拦截器
                MethodInvocation invocation =
                        new ReflectiveMethodInvocation(proxy, target, method, args, targetClass, chain);
                // Proceed to the joinpoint through the interceptor chain.
                // 通过拦截器链调用连接点
                retVal = invocation.proceed();
            }

            // Massage return value if necessary.
            Class<?> returnType = method.getReturnType();
            if (retVal != null && retVal == target &&
                    returnType != Object.class && returnType.isInstance(proxy) &&
                    !RawTargetAccess.class.isAssignableFrom(method.getDeclaringClass())) {
                // Special case: it returned "this" and the return type of the method
                // is type-compatible. Note that we can't help if the target sets
                // a reference to itself in another returned object.
                retVal = proxy;
            }
            else if (retVal == null && returnType != Void.TYPE && returnType.isPrimitive()) {
                throw new AopInvocationException(
                        "Null return value from advice does not match primitive return type for: " + method);
            }
            return retVal;
        }
        finally {
            if (target != null && !targetSource.isStatic()) {
                // Must have come from TargetSource.
                targetSource.releaseTarget(target);
            }
            if (setProxyContext) {
                // Restore old proxy.
                AopContext.setCurrentProxy(oldProxy);
            }
        }
    }
这里有两步很重要:
第一步: 将匹配的advisor转换为Interceptor
第二步: 调用责任链, 执行各类通知
先看第一步: 将匹配的advisor对象转换为interceptor拦截器对象. 为什么要将advisor转换为interceptor拦截器呢?
因为要进行责任链调用. 前面说过, 要想进行责任链调用, 他们要有一个共同的方法. 转化为interceptor以后, 共同的方法就是invoke().
@Override
    public List<Object> getInterceptorsAndDynamicInterceptionAdvice(
            Advised config, Method method, @Nullable Class<?> targetClass) {

        // This is somewhat tricky... We have to process introductions first,
        // but we need to preserve order in the ultimate list.
        AdvisorAdapterRegistry registry = GlobalAdvisorAdapterRegistry.getInstance();
        // 获取到匹配当前方法的所有advisor
        Advisor[] advisors = config.getAdvisors();
        List<Object> interceptorList = new ArrayList<>(advisors.length);
        Class<?> actualClass = (targetClass != null ? targetClass : method.getDeclaringClass());
        Boolean hasIntroductions = null;

        for (Advisor advisor : advisors) {
            /**
             * 如果advisor是PointcutAdvisor类型
             */
            if (advisor instanceof PointcutAdvisor) {
                // Add it conditionally.
                PointcutAdvisor pointcutAdvisor = (PointcutAdvisor) advisor;
                // 注解配置信息是一个前置过滤器 或者 目标类匹配advisor的切点表达式
                if (config.isPreFiltered() || pointcutAdvisor.getPointcut().getClassFilter().matches(actualClass)) {
                    MethodMatcher mm = pointcutAdvisor.getPointcut().getMethodMatcher();
                    boolean match;
                    if (mm instanceof IntroductionAwareMethodMatcher) {
                        if (hasIntroductions == null) {
                            hasIntroductions = hasMatchingIntroductions(advisors, actualClass);
                        }
                        match = ((IntroductionAwareMethodMatcher) mm).matches(method, actualClass, hasIntroductions);
                    }
                    else {
                        match = mm.matches(method, actualClass);
                    }
                    if (match) {
                        // 将advice转换为MethodInterceptor拦截器,
                        MethodInterceptor[] interceptors = registry.getInterceptors(advisor);
                        if (mm.isRuntime()) {
                            // Creating a new object instance in the getInterceptors() method
                            // isn't a problem as we normally cache created chains.
                            for (MethodInterceptor interceptor : interceptors) {
                                // 将MethodInterceptor拦截器和MethodMatcher组装为一个新的对象
                                interceptorList.add(new InterceptorAndDynamicMethodMatcher(interceptor, mm));
                            }
                        }
                        else {
                            // 将拦截器直接放到interceptorList中
                            interceptorList.addAll(Arrays.asList(interceptors));
                        }
                    }
                }
            }
            else if (advisor instanceof IntroductionAdvisor) { // 如果advisor是IntroductionAdvisor类型
                IntroductionAdvisor ia = (IntroductionAdvisor) advisor;
                if (config.isPreFiltered() || ia.getClassFilter().matches(actualClass)) {
                    Interceptor[] interceptors = registry.getInterceptors(advisor);
                    interceptorList.addAll(Arrays.asList(interceptors));
                }
            }
            else { // 其他类型的advisor
                Interceptor[] interceptors = registry.getInterceptors(advisor);
                interceptorList.addAll(Arrays.asList(interceptors));
            }
        }

        return interceptorList;
    }
这里最重要的方法就是registry.getInterceptors(advisor), 在getInterceptors(advisor)里面循环遍历了advisors, 然后将每一个advisor转换为Interceptor, 这是将advisor转换为interceptor的具体实现.
我们来看看源码和逻辑
@Override
    public MethodInterceptor[] getInterceptors(Advisor advisor) throws UnknownAdviceTypeException {
        List<MethodInterceptor> interceptors = new ArrayList<>(3);
        Advice advice = advisor.getAdvice();
        if (advice instanceof MethodInterceptor) {
            // 如果advice已经实现了MethodInterceptor接口, 那么直接将其添加到interceptors集合中
            interceptors.add((MethodInterceptor) advice);
        }
        for (AdvisorAdapter adapter : this.adapters) {
            // 判断是否是指定类型的advice
            if (adapter.supportsAdvice(advice)) {
                // 如果是就将其转换为对应类型的Interceptor
                interceptors.add(adapter.getInterceptor(advisor));
            }
        }
        if (interceptors.isEmpty()) {
            throw new UnknownAdviceTypeException(advisor.getAdvice());
        }
        return interceptors.toArray(new MethodInterceptor[0]);
    }
adapter.supportsAdvice(advice)判断advice是否是指定类型的adapter. adapter有如下几种
- MethodBeforeAdviceAdapter : 前置通知adapter
- AfterReturningAdviceAdapter:后置|放回通知adapter
- SimpleBeforeAdviceAdapter: simpler前置通知adapter
- ThrowsAdviceAdapter:异常通知adapter
这里采用的是适配器模式, 通过适配器来匹配各种不同类型的通知. 然后再调用adapter.getInterceptor(advisor)将advisor构建成Interceptor.
通常有beforeAdivsor, afterAdvisor, returningAdvisor, throwingAdvisor几种类型的通知. 只有returningAdvisor和throwingAdvisor会转化为Interceptor.
因为beforeAdvisor和afterAdvisor本身就实现了interceptor接口.

将所有的advisor转换成Interceptor以后放入到interceptors集合中返回.
接下来执行责任链调用.责任链调用的思想主要有两个
1. 递归调用
2. 所有的advisor最终都让其实现interceptor, 并重写invoke()方法.
来看一下源码
@Override
    @Nullable
    public Object proceed() throws Throwable {
        // We start with an index of -1 and increment early.
        // 如果是最后一个拦截器, 则直接执行. invokeJoinpoint()方法
        if (this.currentInterceptorIndex == this.interceptorsAndDynamicMethodMatchers.size() - 1) {
            return invokeJoinpoint();
        }

        // 取出interceptorsAndDynamicMethodMatchers对象
        Object interceptorOrInterceptionAdvice =
                this.interceptorsAndDynamicMethodMatchers.get(++this.currentInterceptorIndex);
        // 如果是InterceptorAndDynamicMethodMatcher类型
        if (interceptorOrInterceptionAdvice instanceof InterceptorAndDynamicMethodMatcher) {
            // Evaluate dynamic method matcher here: static part will already have
            // been evaluated and found to match.
            InterceptorAndDynamicMethodMatcher dm =
                    (InterceptorAndDynamicMethodMatcher) interceptorOrInterceptionAdvice;
            Class<?> targetClass = (this.targetClass != null ? this.targetClass : this.method.getDeclaringClass());
            // 调用methodMather的matchs()方法
            if (dm.methodMatcher.matches(this.method, targetClass, this.arguments)) {
                // 匹配成功, 则调用拦截器的invoke()方法
                return dm.interceptor.invoke(this);
            }
            else {
                // Dynamic matching failed.
                // Skip this interceptor and invoke the next in the chain.
                // 动态匹配失败, 跳过此拦截器, 调用拦截器链中的下一个拦截器
                return proceed();
            }
        }
        else {
            // It's an interceptor, so we just invoke it: The pointcut will have
            // been evaluated statically before this object was constructed.
            //它是一个拦截器,因此我们只需要调用它:切入点将在构造此对象之前进行静态评估。
            return ((MethodInterceptor) interceptorOrInterceptionAdvice).invoke(this);
        }
    }
在这里interceptorsAndDynamicMethodMatchers存放的就是所有匹配到的advisor. 按照顺序,取出advisor. 然后将其转换为MethodInterceptor以后, 调用他的invoke(this)方法,同时将传递当前对象, 在invoke(this)中在此调用proceed()方法. 循环调用. 从interceptorsAndDynamicMethodMatchers取advisor, 直到取出最后一个advisor. 再次调用proceed()则指定调用目标方法.
interceptorsAndDynamicMethodMatchers里面一共有6个advisor
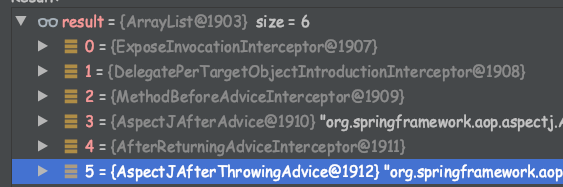
具体调用如下图:
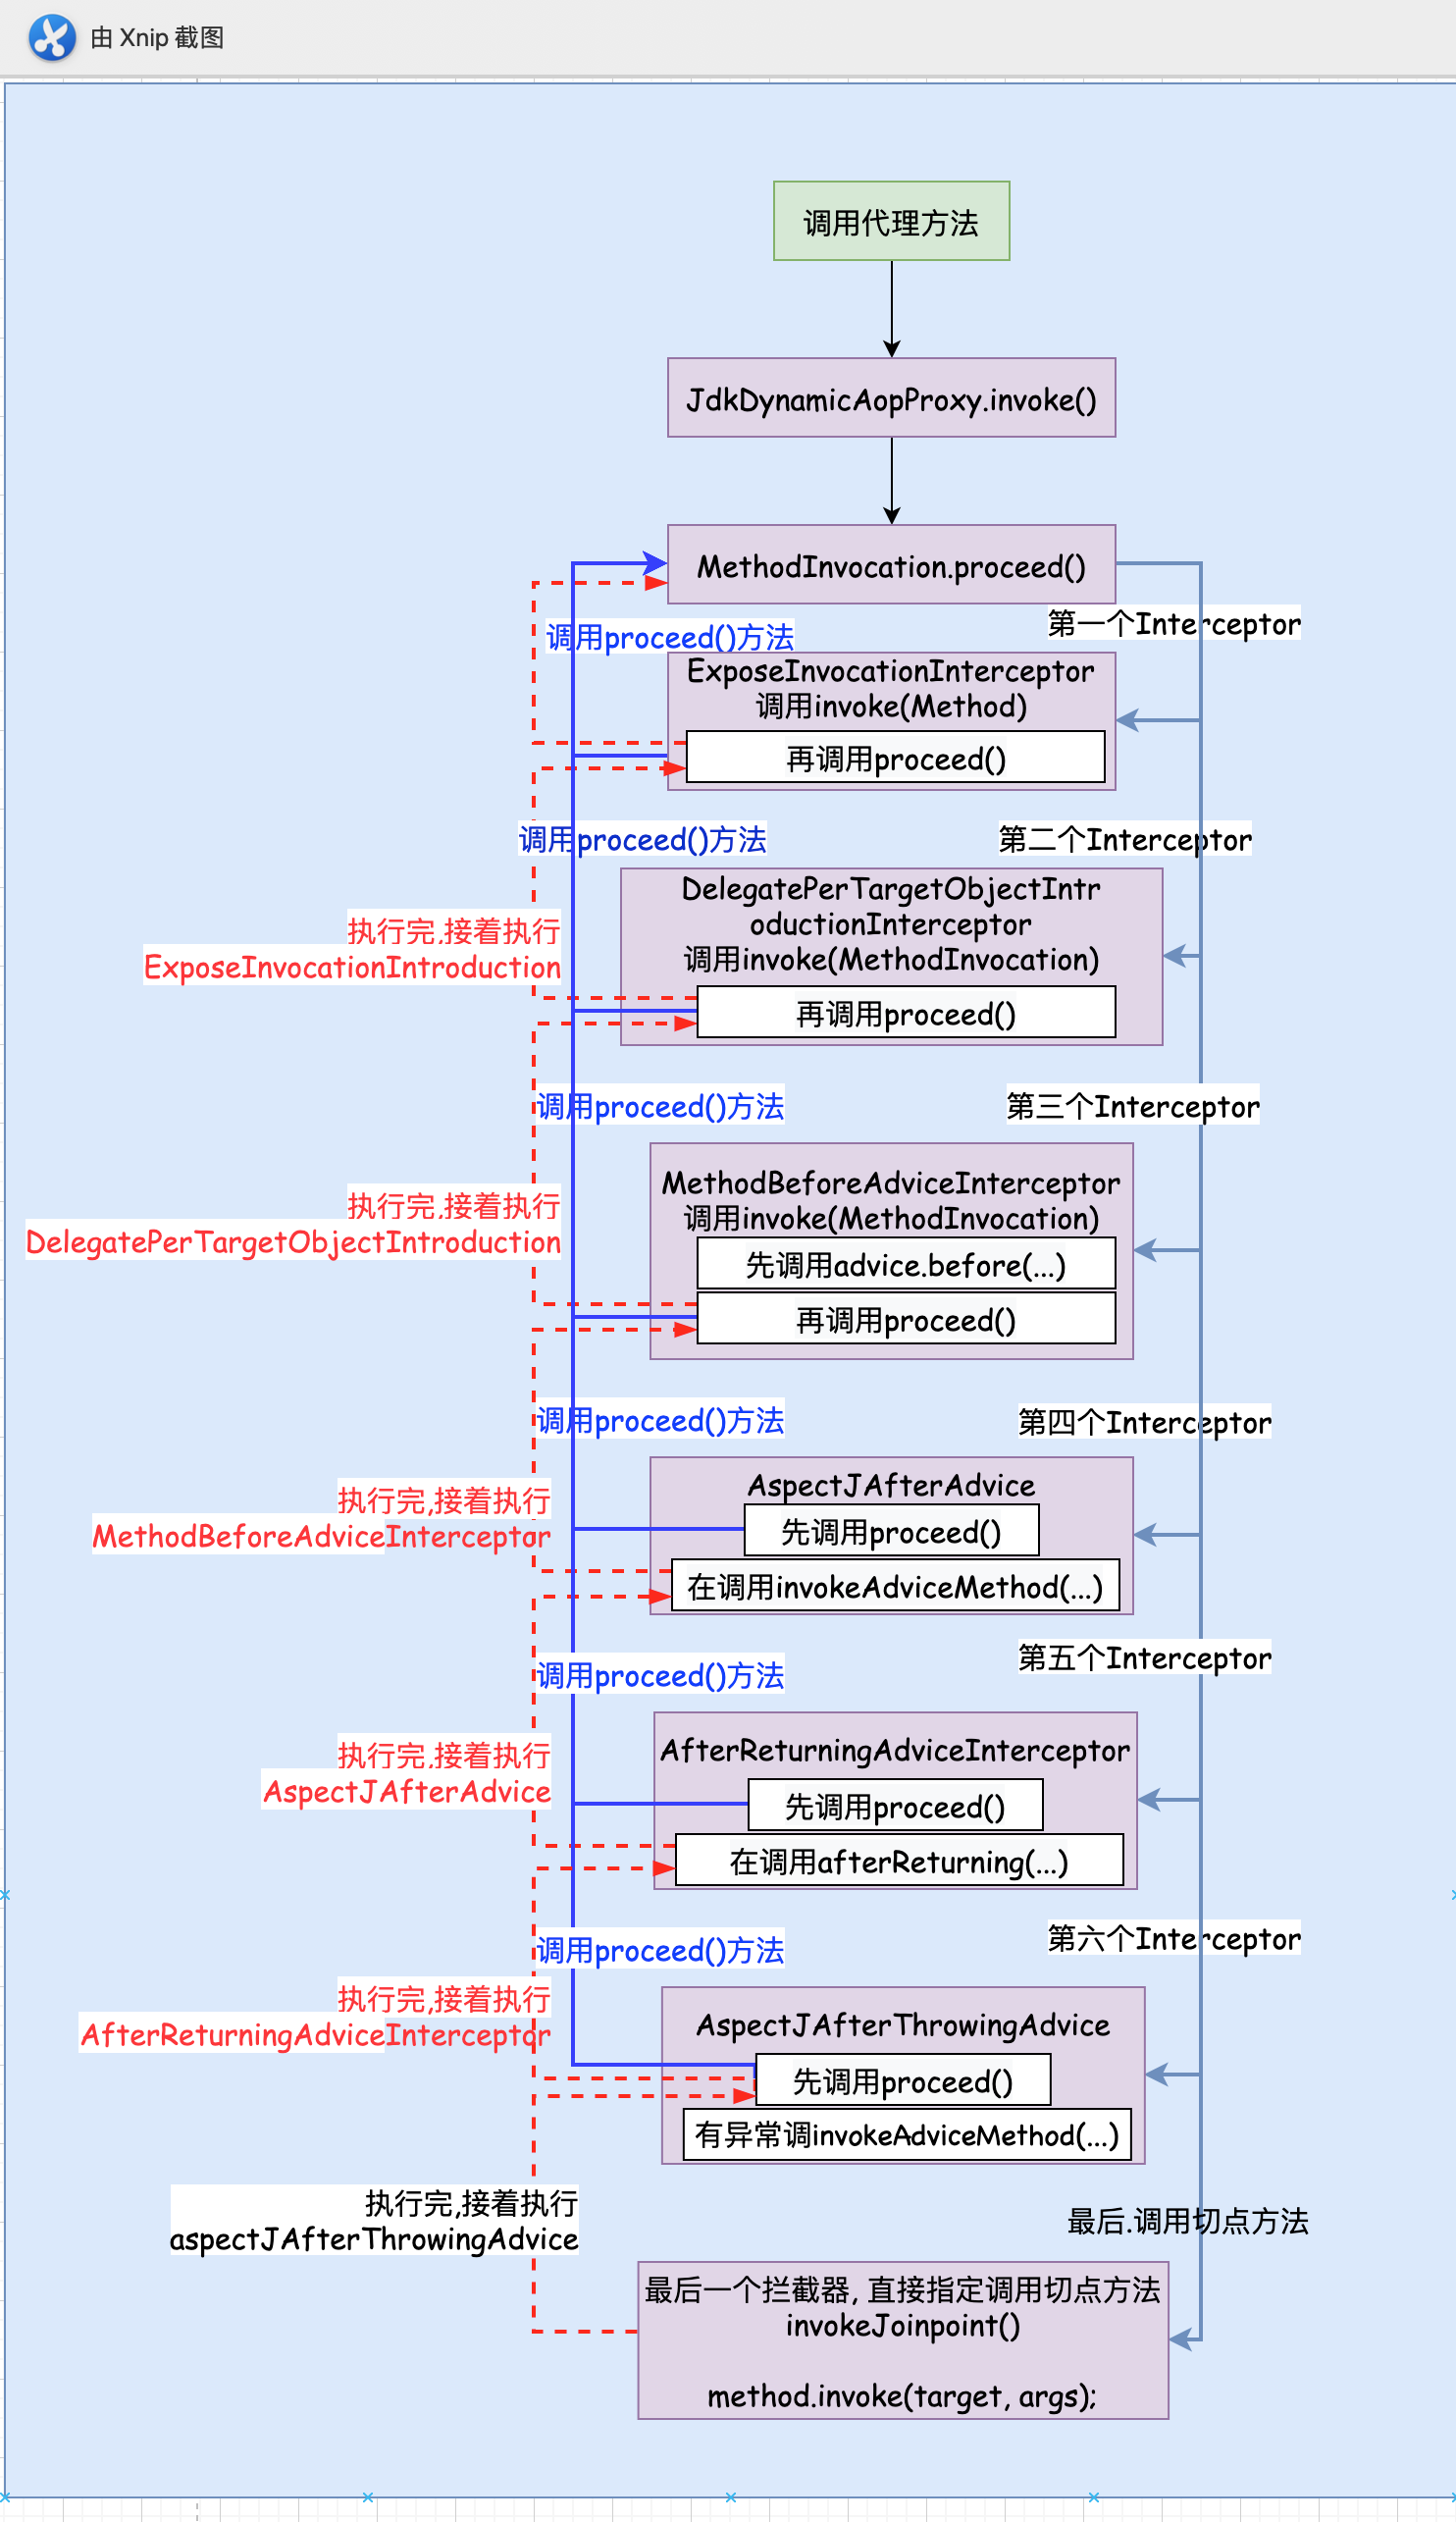
以上就是调用aop的整个过程. 内容还是很多的,需要时间消化.