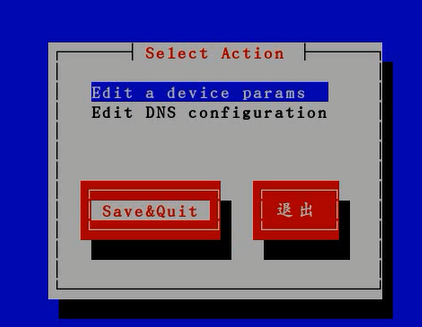
目录
如果是在虚拟机上实验,需要是桥接模式
一、windows访问windows
需在同一个局域网
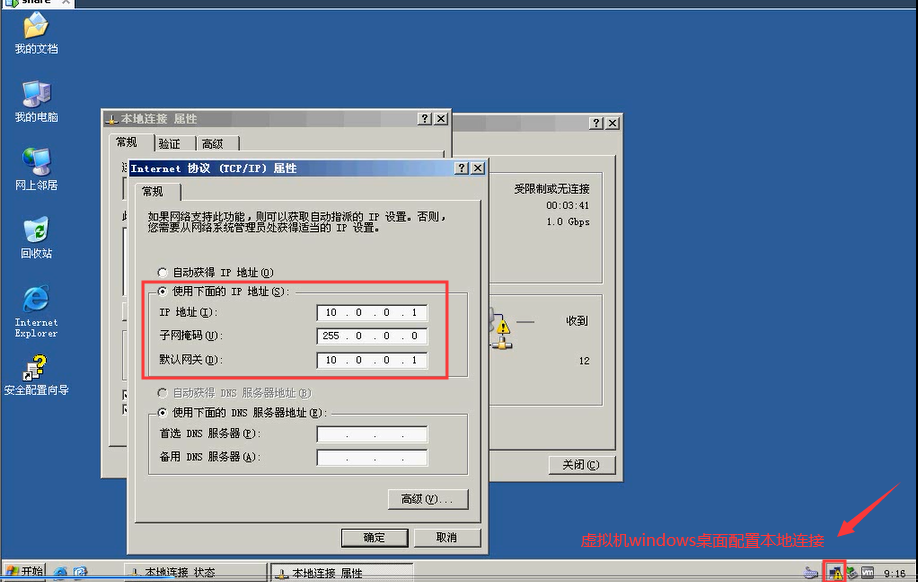
1.1 服务器端配置
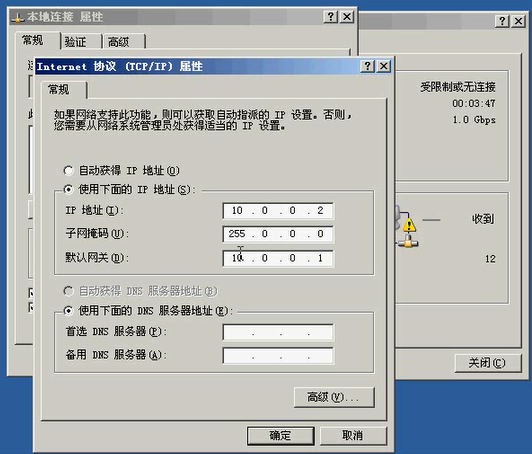
设置本地连接的ip地址
创建共享文件夹share(文件名自取,盘符自定义)

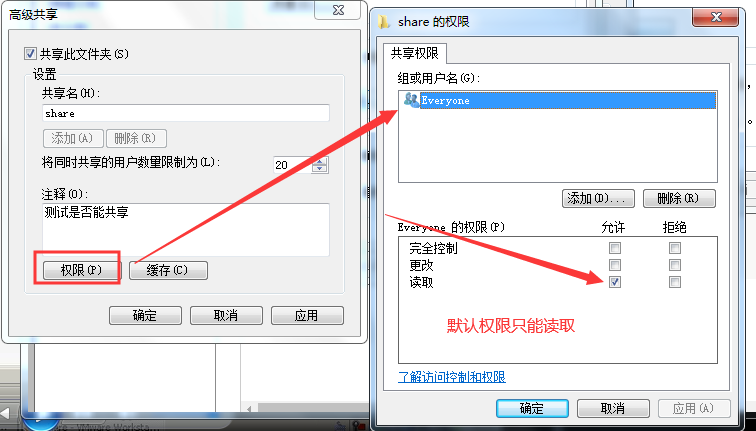
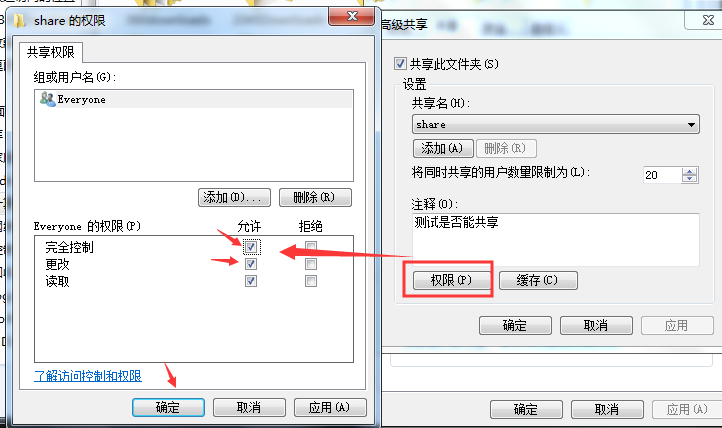
设置共享,也可以设置权限


在share目录下新建一些共享的内容

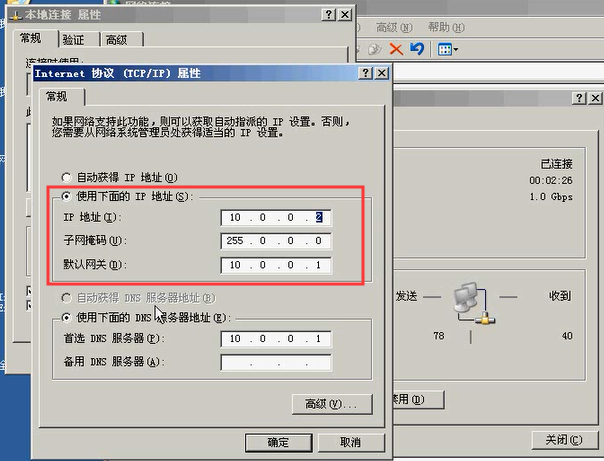
1.2 客户端
配置本地连接
客户端访问服务端:
unc路径访问:cmd==》\服务端ip地址
补充:如果登录不了,需设置下服务器端的用户密码
1.3 服务端的设置权限
1.4 服务端隐藏共享
服务端创建需隐藏的文件

客户端访问
二、windows访问linux
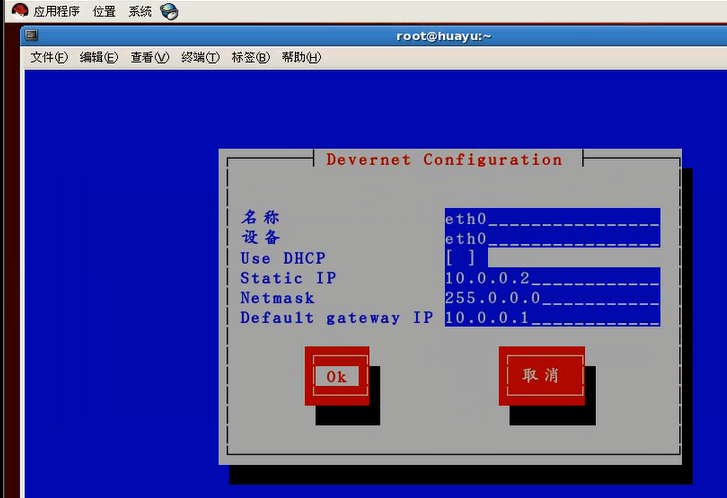
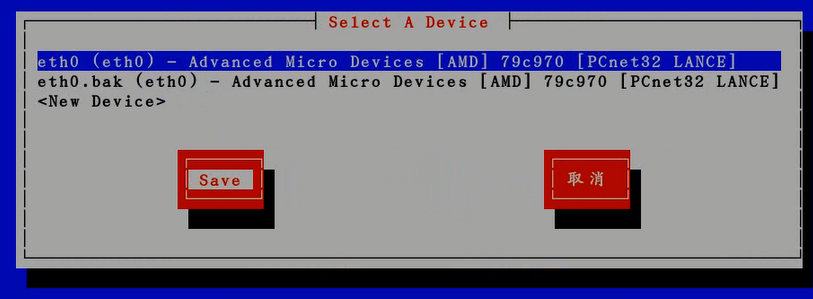
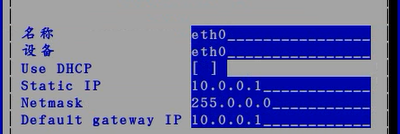
配置好ip地址
2.1 windows配置
创建共享目录,设置权限。设置用户密码,空密码不能访问
2.2 linux配置
配置同网段的ip地址
重启服务:service network restart
2.3 配置samba
win访问linux需要配置samba,实现局域网的共享文件。
2.3.1 linux服务器
配置ip地址,如上2.2所设置。配置完重启网络
检查samba软件安装情况
# rpm -qa | grep samba
samba-client-4.9.1-6.el7.x86_64
samba-client-libs-4.9.1-6.el7.x86_64
samba-common-4.9.1-6.el7.noarch
samba-common-libs-4.9.1-6.el7.x86_64
php-pear-Auth-samba-1.6.4-2.el7.noarch
修改主配置文件
# 在最后添加如下
# less /etc/samba/smb.conf
[share]    # 共享目录
    comment = study    # 对共享目录的描述,可配可不配
    path = /share    # 共享目录路径
    read only = no    # 设置只读
    public = yes    # 所有人可读
也可以设置匿名用户(根据需求设置即可)

# less /etc/samba/smb.conf
security = share    # 允许匿名访问
重启服务
# service smb restart
配置用户名访问,上面就可以实现匿名访问了,如果想用户名访问,配置如下
# less /etc/samba/smb.conf
security = user# 需要用户名访问
# 添加测试用户
# useradd test
# passwd test
# 设置smb账户
# smbpasswd -a test
回车设置密码
重启服务,然后在windows上通过unc路径访问,则需要输入用户名和密码才能访问
2.3.2 windows
设置同一网段,使用unc路径访问即可。
测试连通性,使用ping命令ping ip地址
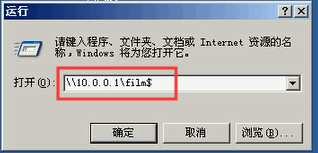
windows访问:cmd==》//ip地址/
三、linux访问windows
3.1 开启windows设置共享文件
3.2 linux访问windows
(上面基础部分在二大点的2.1,2.2已配置,)
samba
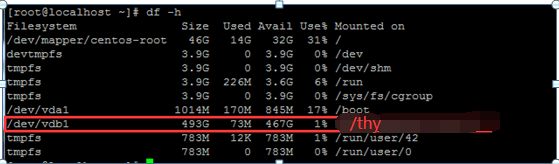
配置共享目录:mkdir /thy
挂载:mount //windows的ip地址/windows的共享目录名称 /thy -o username administrator
回车==》输入密码
查看:ll /thy
四、linux访问linux
设置好ip地址
4.1 安装软件(nfs服务端)
1)首先检查系统是否有安装好的软件
[root@VM_0_10_centos ~]# rpm -qa nfs* rpcbind
rpcbind-0.2.0-48.el7.x86_64
nfs-utils-1.3.0-0.65.el7.x86_64
PS:有则表示已安装好。没有下面有三种安装方法
1)    yum –y install nfs-utils rpcbind (我是使用的这个方法)
2)    rpm –ivh nfs-utils-1.3.0-0.54.el7.x86_64.rpm
     rpm –ivh rpcbind-0.2.0-44.el7.x86_64
3)    yum grouplist | grep –I nfs
     yum groupinstall “NFS file server” -y
2)启动相应服务
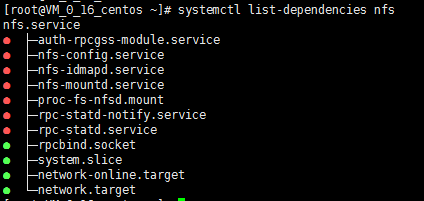
# 启动rpcbind服务
# service rpcbind start
或
# /usr/sbin/rpcbind start

# 启动nfs服务
# service nfs start

# 设置开机自启
# systemctl enable nfs.service
# systemctl enable rpcbind.service

# 使用nfs的依赖
# systemctl list-dependencies nfs
3)配置nfs服务器
nfs服务端配置文件路径(默认为空):
[root@VM_0_10_centos ~]# vi /etc/exports
/thy *(insecure,rw,no_root_squash,no_all_squash,sync)

PS:权限:ro只读,rw可读可写。
用户的映射选项:all_squash所有用户都可匿名登录,anonuid指定匿名用户的uid,anongid指定匿名用户的gid
数据操作选项:sync数据同步写入硬盘,async数据先存放内存中,不直接写入硬盘
*:表示所有ip都可访问,如果指定了ip,则只有指定ip地址的才能访问
创建共享目录:

重新加载nfs服务:
# systemctl restart nfs
# 重启之后才看etab文件自动生成如下内容,默认是为空的
[root@VM_0_10_centos ~]# cat /var/lib/nfs/etab
/thy    *(rw,sync,wdelay,hide,nocrossmnt,insecure,no_root_squash,no_all_squash,no_subtree_check,secure_locks,acl
,no_pnfs,anonuid=65534,anongid=65534,sec=sys,rw,insecure,no_root_squash,no_all_squash)

挂载之前检查权限需要挂载的信息:
# showmount -e 106.53.73.200

创建分区、格式化、挂载:(这一步不操作,默认创建的文件在系统盘,则在客户端挂载的时候使用的是系统盘的磁盘空间,看下面客户端挂载就知道了)
4.2 安装nfs软件(客户端)
1)安装软件nfs-utils、rpcbind(如4.1的第一步)
2)启动rpcbind服务
# 启动服务rpcbind
# /etc/init.d/rpcbind start

# 配置开机自启
# systemctl enable rpcbind
或
# chkconfig --level 35 rpcbind on(该命令和系统版本有关,有的版本不同会使用不了)

# 检测依赖
# systemctl list-dependencies rpcbind
或
# chkconfig --list rpcbind(和系统版本有关,有的版本不同会使用不了)

3)测试服务器的共享,挂载
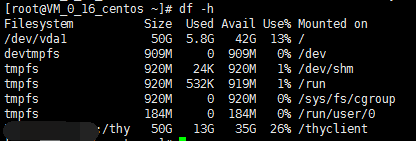
# 客户端创建目录
[root@VM_0_16_centos ~]# mkdir /thyclient
[root@VM_0_16_centos ~]# mount -t nfs 填写nfs服务ip地址:/thy /thyclient/
[root@VM_0_16_centos ~]# df -h
Filesystem          Size  Used Avail Use% Mounted on
/dev/vda1            50G  5.8G   42G  13% /
显示的nfs服务ip地址:/thy   50G   13G   35G  26% /thyclient
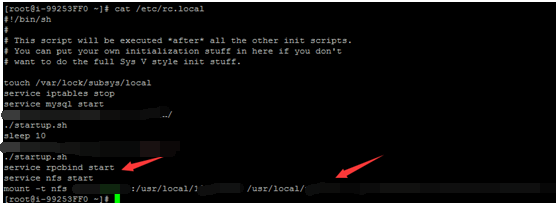
4)将rpcbind和nfs服务加入到开机自启
5)nfs内核优化
#cat >>/etc/sysctl.conf<<EOF
net.core.wmem_default = 8388608
net.core.rmem_default = 8388608
net.core.rmem_max = 16777216
net.core.wmem_max = 16777216
EOF