深入浅出KnockoutJS
写在前面,本文资料大多来源网上,属于自己的学习笔记整理。
其中主要内容来自learn.knockoutjs.com,源码解析部分资料来自司徒正美博文《knockout.js学习笔记》系列。
1. Knockout初体验
1.1 Before Knockout
<div id=”itemName”></div>
<input type=”text” id=”itemNameEdit”/>
使用JQuery,上述交互逻辑可以如下实现
var item = {
    id: 88,
    name: "Apple Pie"
};
$("#itemName").text(item.name);
$("#itemNameEdit").val(item.name).change(function() {
    item.name = $(this).val();
    $("#itemName").text(item.name);
});
采用这种方式的缺点
- 当UI和data的交互越来越多时,代码量迅速增长到难以维护
-
•Dom Query Based
- 上述代码耦合度高,不可重用
- Id、classname命名难以管理
1.2 Use Knockout
HTML View如下<div data-bind=”text:name”></div> <input type=”text” data-bind=”value:name”/>
Javascript如下
function ViewModel={
    this.id=88;
    this.name=ko.observable(“Apple”);
};
ko.applyBindings(new ViewModel());
现在,当输入框中值发生变化时,div中显示的值也会自动发送变化
2. Knockout基础
2.1 MVVM模式
Knockoutjs遵循Model(M)—View(V)—ViewModel(VM)模式


2.2 单次绑定
从ViewModel绑定至UI这一层只进行一次绑定,不追踪数据在任何一方的变化,适用于数据展现
Javascript与Html示例如下
function AppViewModel() {
    this.firstName = "Bert";
    this.lastName = "Bertington";
}
ko.applyBindings(new AppViewModel());
<p>First name: <strong data-bind="text: firstName"></strong></p>
<p>Last name: <strong data-bind="text: lastName"></strong></p>
效果如下图所示

2.3 双向绑定
无论数据在ViewModel或者是UI中变化,将会更新另一方,最为灵活的绑定方式,同时代价最大
function AppViewModel() {
    this.firstName = ko.observable("Bert");
    this.lastName = ko.observable("Bertington");
}
ko.applyBindings(new AppViewModel());
<p>First name: <strong data-bind="text: firstName"></strong></p>
<p>Last name: <strong data-bind="text: lastName"></strong></p>
<p>First name: <input data-bind="value: firstName" /></p>
<p>Last name: <input data-bind="value: lastName" /></p>
上述绑定,当输入框中值发生改变时,<p>标签中显示内容相应发生改变

2.4 依赖绑定
以其它observable的值为基础来组成新的值,新值也是双向绑定的
function AppViewModel() {
    this.firstName = ko.observable("Bert");
    this.lastName = ko.observable("Bertington");

    this.fullName = ko.computed(function() {
        return this.firstName() + " " + this.lastName();
    }, this);
}
ko.applyBindings(new AppViewModel());
<p>First name: <strong data-bind="text: firstName"></strong></p>
<p>Last name: <strong data-bind="text: lastName"></strong></p>
<p>First name: <input data-bind="value: firstName" /></p>
<p>Last name: <input data-bind="value: lastName" /></p>
<p>Full name: <strong data-bind="text: fullName"></strong></p>
上述代码示例中,fullName依赖于firstName和lastName,改变firstName和lastName任意值,fullName的显示也相应改变

2.5 绑定数组
可以为属性绑定集合
// Class to represent a row in the seat reservations grid
function SeatReservation(name, initialMeal) {
    var self = this;
    self.name = name;
    self.meal = ko.observable(initialMeal);
}

// Overall viewmodel for this screen, along with initial state
function ReservationsViewModel() {
    var self = this;

    // Non-editable catalog data - would come from the server
    self.availableMeals = [
        { mealName: "Standard (sandwich)", price: 0 },
        { mealName: "Premium (lobster)", price: 34.95 },
        { mealName: "Ultimate (whole zebra)", price: 290 }
    ];

    // Editable data
    self.seats = ko.observableArray([
        new SeatReservation("Steve", self.availableMeals[0]),
        new SeatReservation("Bert", self.availableMeals[0])
    ]);
}

ko.applyBindings(new ReservationsViewModel());
<h2>Your seat reservations</h2>

<table>
    <thead><tr>
        <th>Passenger name</th><th>Meal</th><th>Surcharge</th><th></th>
    </tr></thead>
    <tbody data-bind="foreach: seats">
        <tr>
            <td data-bind="text: name"></td>
            <td data-bind="text: meal().mealName"></td>
            <td data-bind="text: meal().price"></td>
        </tr>
    </tbody>
</table>
上述代码将seats对象绑定了一个集合对象,在html view中,通过foreach指令渲染视图,效果如下下图

2.6 增加添加和删除元素功能
// Class to represent a row in the seat reservations grid
function SeatReservation(name, initialMeal) {
    var self = this;
    self.name = name;
    self.meal = ko.observable(initialMeal);

    self.formattedPrice = ko.computed(function() {
        var price = self.meal().price;
        return price;
    });
}

// Overall viewmodel for this screen, along with initial state
function ReservationsViewModel() {
    var self = this;

    // Non-editable catalog data - would come from the server
    self.availableMeals = [
        { mealName: "Standard (sandwich)", price: 0 },
        { mealName: "Premium (lobster)", price: 34.95 },
        { mealName: "Ultimate (whole zebra)", price: 290 }
    ];

    // Editable data
    self.seats = ko.observableArray([
        new SeatReservation("Steve", self.availableMeals[0]),
        new SeatReservation("Bert", self.availableMeals[0])
    ]);

    // Operations
    self.addSeat = function() {
        self.seats.push(new SeatReservation("", self.availableMeals[0]));
    }
    self.removeSeat = function(seat) { self.seats.remove(seat) }
}

ko.applyBindings(new ReservationsViewModel());
<h2>Your seat reservations</h2>

<table>
    <thead><tr>
        <th>Passenger name</th><th>Meal</th><th>Surcharge</th><th></th>
    </tr></thead>
    <tbody data-bind="foreach: seats">
        <tr>
            <td><input data-bind="value: name" /></td>
            <td><select data-bind="options: $root.availableMeals, value: meal, optionsText: 'mealName'"></select></td>
            <td data-bind="text: formattedPrice"></td>
            <td><a href="#" data-bind="click: $root.removeSeat">Remove</a></td>
        </tr>
    </tbody>
</table>

<button data-bind="click: addSeat">Reserve another seat</button>
- 上述代码中,为viewmodel添加了addSeat和removeSeat方法。
- 调用addSeat方法时,为seats集合添加一个初始化SeatReservation对象
- 调用removeSeat方法时,knockout将当前dom元素绑定的seat对象作为参赛传入到方法中
效果如图

3. Knockout进阶
3.1 Custom bindings
-
Binding连接view和viewmodel,除了内置bindings,你可以创建自己的binding
- 将待注册的绑定,添加为ko.bindingHandlers的属性,然后可以在任意dom元素中使用它
ko.bindingHandlers.yourBindingName = {
    init: function(element, valueAccessor, allBindings, viewModel, bindingContext) {
        // This will be called when the binding is first applied to an element
        // Set up any initial state, event handlers, etc. here
    },
    update: function(element, valueAccessor, allBindings, viewModel, bindingContext) {
        // This will be called once when the binding is first applied to an element,
        // and again whenever any observables/computeds that are accessed change
        // Update the DOM element based on the supplied values here.
    }
};
<div data-bind="yourBindingName: someValue"> </div>
custom binding示例
// ----------------------------------------------------------------------------
// Reusable bindings - ideally kept in a separate file

ko.bindingHandlers.fadeVisible = {
    init: function(element, valueAccessor) {
        // Start visible/invisible according to initial value
        var shouldDisplay = valueAccessor();
        $(element).toggle(shouldDisplay);
    },
    update: function(element, valueAccessor) {
        // On update, fade in/out
        var shouldDisplay = valueAccessor();
        shouldDisplay ? $(element).fadeIn() : $(element).fadeOut();
    }
};

// ----------------------------------------------------------------------------
// Page viewmodel

function Answer(text) { this.answerText = text; this.points = ko.observable(1); }

function SurveyViewModel(question, pointsBudget, answers) {
    this.question = question;
    this.pointsBudget = pointsBudget;
    this.answers = $.map(answers, function(text) { return new Answer(text) });
    this.save = function() { alert('To do') };

    this.pointsUsed = ko.computed(function() {
        var total = 0;
        for (var i = 0; i < this.answers.length; i++)
            total += this.answers[i].points();
        return total;
    }, this);
}

ko.applyBindings(new SurveyViewModel("Which factors affect your technology choices?", 10, [
   "Functionality, compatibility, pricing - all that boring stuff",
   "How often it is mentioned on Hacker News",
   "Number of gradients/dropshadows on project homepage",
   "Totally believable testimonials on project homepage"
]));
<h3 data-bind="text: question"></h3>
<p>Please distribute <b data-bind="text: pointsBudget"></b> points between the following options.</p>

<table>
    <thead><tr><th>Option</th><th>Importance</th></tr></thead>
    <tbody data-bind="foreach: answers">
        <tr>
            <td data-bind="text: answerText"></td>
            <td><select data-bind="options: [1,2,3,4,5], value: points"></select></td>
        </tr>
    </tbody>
</table>

<h3 data-bind="fadeVisible: pointsUsed() > pointsBudget">You've used too many points! Please remove some.</h3>
<p>You've got <b data-bind="text: pointsBudget - pointsUsed()"></b> points left to use.</p>
<button data-bind="enable: pointsUsed() <= pointsBudget, click: save">Finished</button>
上述代码定义了一个fadeVisible绑定,用来控制元素显示动画效果。init方法根据dom元素传入参数当前状态设置初始显示效果;update方法在pointsUsed 每次发生更新时触发,更新元素显示效果
3.2 Template binding
- Native templating:内置,用于加强控制流程的绑定
- String-based templating:集成第三方模板引擎的方式,原理是将model value传递给第三方模板引擎,将结果字符串注入到当前document
Native templating示例
<h2>Participants</h2>
Here are the participants:
<div data-bind="template: { name: 'person-template', data: buyer }"></div>
<div data-bind="template: { name: 'person-template', data: seller }"></div>

<script type="text/html" id="person-template">
    <h3 data-bind="text: name"></h3>
    <p>Credits: <span data-bind="text: credits"></span></p>
</script>

<script type="text/javascript">
     function MyViewModel() {
         this.buyer = { name: 'Franklin', credits: 250 };
         this.seller = { name: 'Mario', credits: 5800 };
     }
     ko.applyBindings(new MyViewModel());
</script>
3.3 Components and Custom Elements
组件是将UI代码组织成可复用模块的方法
使用ko.components.register方法注册组件,组件定义包含viewModel和template
ko.components.register('some-component-name', {
    viewModel: <see below>,
    template: <see below>
});
一个like/dislike组件示例
ko.components.register('like-widget', {
    viewModel: function(params) {
        // Data: value is either null, 'like', or 'dislike'
        this.chosenValue = params.value;

        // Behaviors
        this.like = function() { this.chosenValue('like'); }.bind(this);
        this.dislike = function() { this.chosenValue('dislike'); }.bind(this);
    },
    template:
        '<div class="like-or-dislike" data-bind="visible: !chosenValue()">
            <button data-bind="click: like">Like it</button>
            <button data-bind="click: dislike">Dislike it</button>
        </div>
        <div class="result" data-bind="visible: chosenValue">
            You <strong data-bind="text: chosenValue"></strong> it
        </div>'
});

function Product(name, rating) {
    this.name = name;
    this.userRating = ko.observable(rating || null);
}

function MyViewModel() {
    this.products = [
        new Product('Garlic bread'),
        new Product('Pain au chocolat'),
        new Product('Seagull spaghetti', 'like') // This one was already 'liked'
    ];
}

ko.applyBindings(new MyViewModel());
<ul data-bind="foreach: products">
    <li class="product">
        <strong data-bind="text: name"></strong>
        <like-widget params="value: userRating"></like-widget>
    </li>
</ul>
viewModel中,为products单项绑定了一个Product集合,并为第三个Product对象userRating属性设置为like
html view中,使用like-widget指令使用上述定义的组件
效果如下图

4. Knockout实战
4.1 knockout版todo app

- 需要一个todo对象作为 Model
- 需要一个todos 的集合用来存储各个todo对象
- 需要filterTodos对象,根据All,Active,Completed过滤todos集合
- 需要添加、删除、编辑、清除等各种事件方法

4.2 todo app主要代码分析
- Todo Model,包含3 个属性分别是title,completed,editing
// represent a single todo item
    var Todo = function (title, completed) {
        this.title = ko.observable(title);
        this.completed = ko.observable(completed);
        this.editing = ko.observable(false);
    };
- todos Array、filteredTodos
// map array of passed in todos to an observableArray of Todo objects
this.todos = ko.observableArray(todos.map(function (todo) {
    return new Todo(todo.title, todo.completed);
}));

// store the new todo value being entered
this.current = ko.observable();

this.showMode = ko.observable('all');

this.filteredTodos = ko.computed(function () {
    switch (this.showMode()) {
    case 'active':
        return this.todos().filter(function (todo) {
            return !todo.completed();
        });
    case 'completed':
        return this.todos().filter(function (todo) {
            return todo.completed();
        });
    default:
        return this.todos();
    }
}.bind(this));
- Events binding

- Custom binding
提供了对键盘回车键ENTER_KEY、取消键ESCAPE_KEY的事件绑定
当为dom元素绑定enter_key、escape_key事件时,会以当前dom元素作用域执行赋予的valueAccessor函数
在selectAndFocus自定义绑定中,同时定义了init方法和update方法
在init中为dom元素注册了foucs方法,在update方法中来触发元素的focus,其目的是为了在选中todo元素,可以立即进入可编辑的状态
function keyhandlerBindingFactory(keyCode) {
    return {
        init: function (element, valueAccessor, allBindingsAccessor, data, bindingContext) {
            var wrappedHandler, newValueAccessor;

            // wrap the handler with a check for the enter key
            wrappedHandler = function (data, event) {
                if (event.keyCode === keyCode) {
                    valueAccessor().call(this, data, event);
                }
            };

            // create a valueAccessor with the options that we would want to pass to the event binding
            newValueAccessor = function () {
                return {
                    keyup: wrappedHandler
                };
            };

            // call the real event binding's init function
            ko.bindingHandlers.event.init(element, newValueAccessor, allBindingsAccessor, data, bindingContext);
        }
    };
}

// a custom binding to handle the enter key
ko.bindingHandlers.enterKey = keyhandlerBindingFactory(ENTER_KEY);

// another custom binding, this time to handle the escape key
ko.bindingHandlers.escapeKey = keyhandlerBindingFactory(ESCAPE_KEY);

// wrapper to hasFocus that also selects text and applies focus async
ko.bindingHandlers.selectAndFocus = {
    init: function (element, valueAccessor, allBindingsAccessor, bindingContext) {
        ko.bindingHandlers.hasFocus.init(element, valueAccessor, allBindingsAccessor, bindingContext);
        ko.utils.registerEventHandler(element, 'focus', function () {
            element.focus();
        });
    },
    update: function (element, valueAccessor) {
        ko.utils.unwrapObservable(valueAccessor()); // for dependency
        // ensure that element is visible before trying to focus
        setTimeout(function () {
            ko.bindingHandlers.hasFocus.update(element, valueAccessor);
        }, 0);
    }
};
- HTML View
<section id="todoapp">
    <header id="header">
        <h1>todos</h1>
        <input id="new-todo" data-bind="value: current,  enterKey: add" placeholder="What needs to be done?" autofocus>
    </header>
    <section id="main" data-bind="visible: todos().length">
        <input id="toggle-all" data-bind="checked: allCompleted" type="checkbox">
        <label for="toggle-all">Mark all as complete</label>
        <ul id="todo-list" data-bind="foreach: filteredTodos">
            <li data-bind="css: { completed: completed, editing: editing }">
                <div class="view">
                    <input class="toggle" data-bind="checked: completed" type="checkbox">
                    <label data-bind="text: title, event: { dblclick: $root.editItem }"></label>
                    <button class="destroy" data-bind="click: $root.remove"></button>
                </div>
                <input class="edit" data-bind="value: title,  enterKey: $root.saveEditing,
                escapeKey: $root.cancelEditing, selectAndFocus:editing, event: { blur: $root.cancelEditing }">
            </li>
        </ul>
    </section>
    <footer id="footer" data-bind="visible: completedCount() || remainingCount()">
        <span id="todo-count">
            <strong data-bind="text: remainingCount">0</strong>
            <span data-bind="text: getLabel(remainingCount)"></span> left
        </span>
        <ul id="filters">
            <li>
                <a data-bind="css: { selected: showMode() == 'all' }" href="#/all">All</a>
            </li>
            <li>
                <a data-bind="css: { selected: showMode() == 'active' }" href="#/active">Active</a>
            </li>
            <li>
                <a data-bind="css: { selected: showMode() == 'completed' }" href="#/completed">Completed</a>
            </li>
        </ul>
        <button id="clear-completed" data-bind="visible: completedCount, click: removeCompleted">
            Clear completed (<span data-bind="text: completedCount"></span>)
        </button>
    </footer>
</section>
5. Knockout源码解析
5.1 ko.observable是什么
this.firstName=ko.observable(“Bert”);
this.firstName();
this.firstName(“test”);
调用上面代码发生了什么
$.observable = function(value){
    var v = value;//将上一次的传参保存到v中,ret与它构成闭包
    function ret(neo){
        if(arguments.length){ //setter
            if(v !== neo ){
                v = neo;
            }
            return ret;
        }else{                //getter
            return v;
        }
    }
    return ret
}
5.2 ko.computed是什么
this.fullName = ko.computed(function() {
        return this.firstName() + " " + this.lastName();
    }, this);
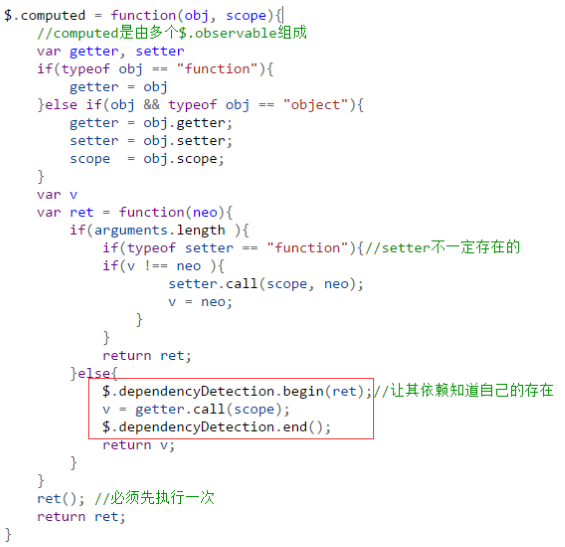
$.computed = function(obj, scope){
    //computed是由多个$.observable组成
    var getter, setter
    if(typeof obj == "function"){
        getter = obj
    }else if(obj && typeof obj == "object"){
        getter = obj.getter;
        setter = obj.setter;
        scope  = obj.scope;
    }
    var v
    var ret = function(neo){
        if(arguments.length ){
            if(typeof setter == "function"){//setter不一定存在的
                if(v !== neo ){
                    setter.call(scope, neo);
                    v = neo;
                }
            }
            return ret;
        }else{
            v = getter.call(scope);
            return v;
        }
    }
    return ret;
}
5.3 属性依赖如何实现
调用observable中getter方法时,ret函数对象收集所有对自身的依赖对象
调用observable中setter方法时,ret函数对象想依赖对象发生通知

调用computed中getter方法时,ret函数对象将自身传递给依赖探测的begin方法
然后通过call()方法获取函数值,这时,会触发observable中相对应的getter的调用,从而收集到computed中的ret函数对象
在调用完成后,再将自身移除
$.dependencyDetection = (function () {
    var _frames = [];
    return {
        begin: function (ret) {
            _frames.push(ret);
        },
        end: function () {
            _frames.pop();
        },
        collect: function (self) {
            if (_frames.length > 0) {
                self.list = self.list || [];
                var fn = _frames[_frames.length - 1];
                if ( self.list.indexOf( fn ) >= 0)
                    return;
                self.list.push(fn);
            }
        }
    };
})();
$.valueWillMutate = function(observable){
    var list = observable.list
    if($.type(list,"Array")){
        for(var i = 0, el; el = list[i++];){
            el();
        }
    }
}
5.4 双向绑定如何实现
The name is <span data-bind="text: fullName" id="node"></span>
$.buildEvalWithinScopeFunction =  function (expression, scopeLevels) {
    var functionBody = "return (" + expression + ")";
    for (var i = 0; i < scopeLevels; i++) {
        functionBody = "with(sc[" + i + "]) { " + functionBody + " } ";
    }
    return new Function("sc", functionBody);
}
$.applyBindings = function(model, node){

    var nodeBind = $.computed(function (){
        var str = "{" + node.getAttribute("data-bind")+"}"
        var fn = $.buildEvalWithinScopeFunction(str,2);
        var bindings = fn([node,model]);
        for(var key in bindings){
            if(bindings.hasOwnProperty(key)){
                var fn = $.bindingHandlers["text"]["update"];
                var observable = bindings[key]
                $.dependencyDetection.collect(observable);//绑定viewModel与UI
                fn(node, observable)
            }
        }
    },node);
    return nodeBind

}
$.bindingHandlers = {}
$.bindingHandlers["text"] = {
    'update': function (node, observable) {
        var val = observable()
        if("textContent" in node){
            node.textContent = val;
        }
    }
}
window.onload = function(){
    var model = new MyViewModel();
    var node = document.getElementById("node");
    $.applyBindings(model, node);
}
上述代码中,$.buildEvalWithinScopeFunction(str,2)返回一个匿名函数
function anonymous(sc/**/) {with(sc[1]) { with(sc[0]) { return ({text: fullName}) } } }
通过var bindings = fn([node,model]),bindings得到一个{text:fullName函数对象}的对象,其中,fullName是一个组合依赖属性,即fullName是一个computed中ret函数对象
6. 总结
6.1 优点
- 专注于data-binding,UI自动刷新,model依赖跟踪
- 简单易上手,学习成本低
- 轻量,方便与其他第三方JS框架集成
- 可扩展,支持自定义定制
- 浏览器兼容度高,几乎支持所有现代浏览器
6.2 不足
- 是一个MVVM library,不是一个前端解决方案
- 缺少Router等重要模块支持
- 缺少可测试性支持