SpringBoot介绍
引言
引言部分其实说的就是以前使用SSM框架时的糟心点。
初始化配置:为了使用SSM框架去开发,需要准备SSM框架的模板配置,而这些配置大部分是重复的,但又必须做。
整合第三方框架:Spring每整合一个第三方框架,就要单独去编写一个xml文件,太麻烦。
后期维护:由于每整合一个框架,都要编写一个xml文件,导致SSM项目后期xml文件特别多,维护xml文件的程本很高。
部署工程:SSM工程部署也是很麻烦的,需要依赖第三方容器,如Tomcat,而且这个第三方容器还需要我们单独指定一些它的配置,而且在部署工程时还要注意项目路径等问题。
敏捷式开发:基于上面的情况,SSM开发方式非常笨重,而现在的敏捷式开发语言越来越多,比如rubbo、python等,基于这些情况,SpringBoot应运而生。
SpringBoot介绍
SpringBoot是由Pivotal团队研发的,SpringBoot并不是一门新技术,只是将之前常用的Spring,SpringMVC,data-jpa等常用的框架封装到了一起,帮助你隐藏这些框架的整合细节,实现敏捷开发。
SpringBoot就是一个工具集。
SpringBoot特点:
- SpringBoot项目不需要模板化的配置,如以前的applicationContext.xml。
- 在SpringBoot中整合第三方框架时,只需要导入相应的starter依赖包,就自动整合了,而这些依赖包是SpringBoot帮你整理好的。一般不用写配置文件,当然一些自定义的还是要编写配置文件的。
- 对于上面第三点后期的xml文件特别多的情况,SpringBoot默认只有一个.properties配置文件,不推荐使用xml,后期会采用.java的文件去编写配置信息。当然你也不需要维护很多的.java文件,因为一些基本的配置文件,在starter依赖包中整合好了,你只需要些许自定义配置。
- SpringBoot工程在部署时,采用的是jar包的方式,内部自动依赖Tomcat容器(不需要依赖外部容器),并且提供了多环境配置(以前用SSM框架部署项目时,需要将开发环境转为运行环境)。
- 敏捷式开发就不用说了,上面这么多好处,当然是敏捷式了。
- 后期我们要学习的微服务框架SpringCloud需要建立在SpringBoot的基础上。
SpringBoot快速入门【重点】
快速构建SpringBoot(八步)
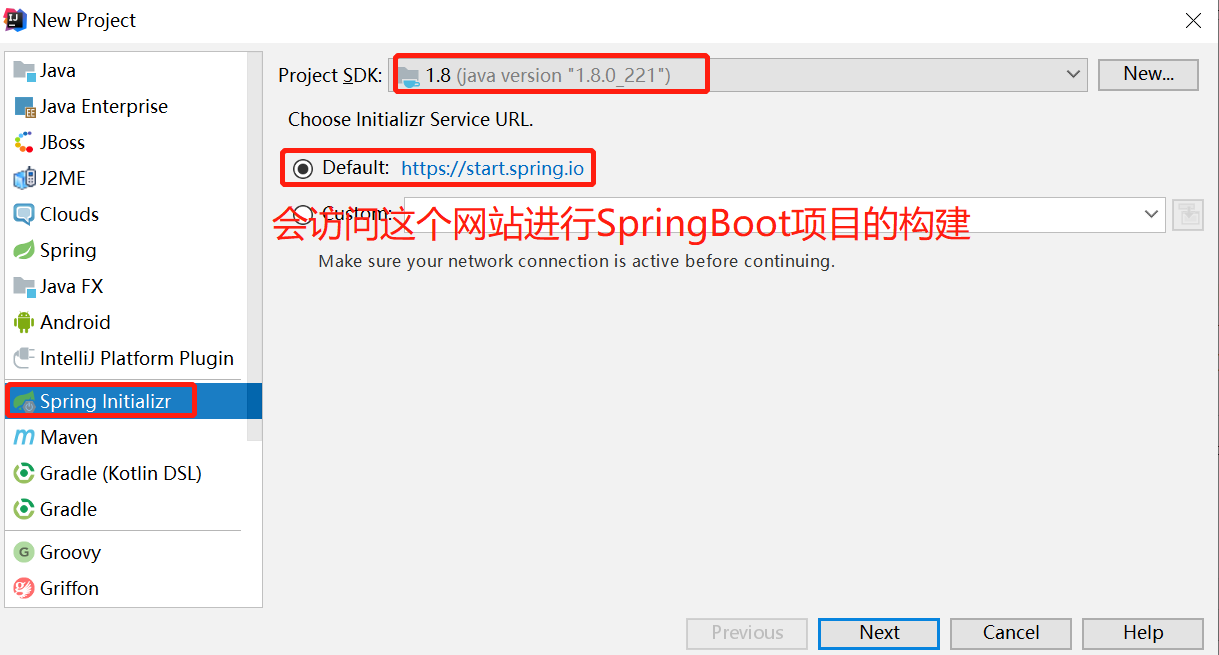
1.选择构建项目的类型,之前我们选择是Maven,现在先择Spring Initializr,其它还有选择JDK版本,注意要联网,因为此时需要访问https://start.spring.io网站进行构建;
2.项目的描述
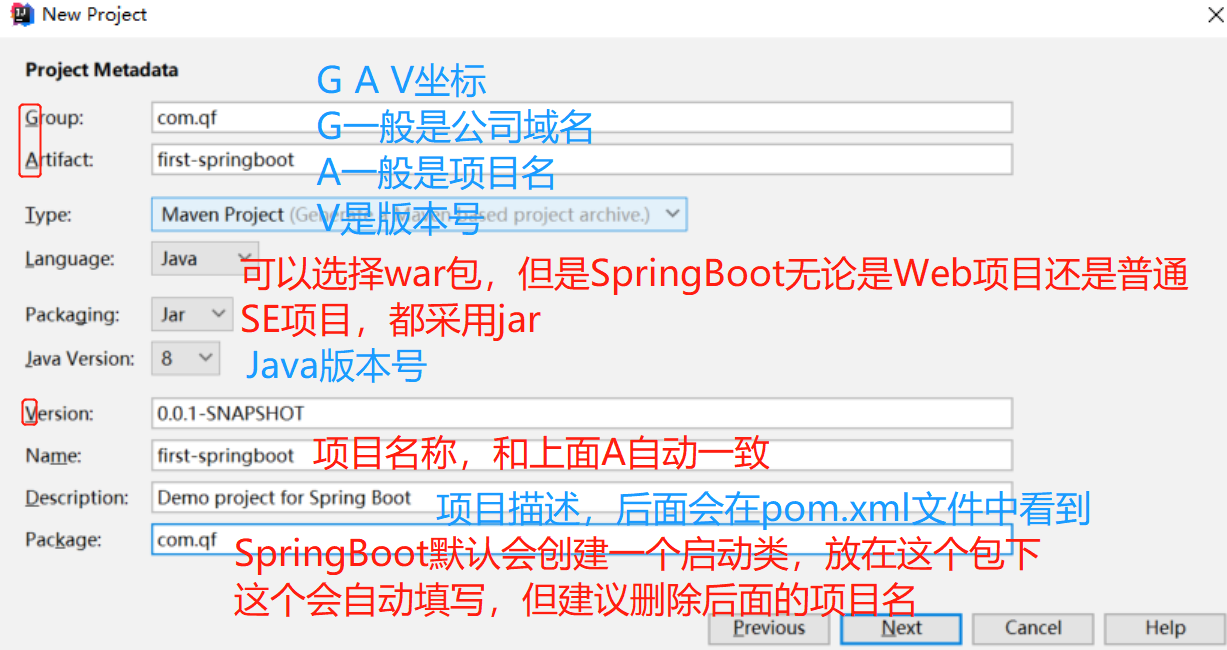
3.指定SpringBoot版本和需要的依赖
由于我们刚学,现在不添加依赖。

注意:第一次创建SpringBoot工程,下载大量依赖,保证,maven已经配置了阿里云的私服,否则下载会很缓慢。
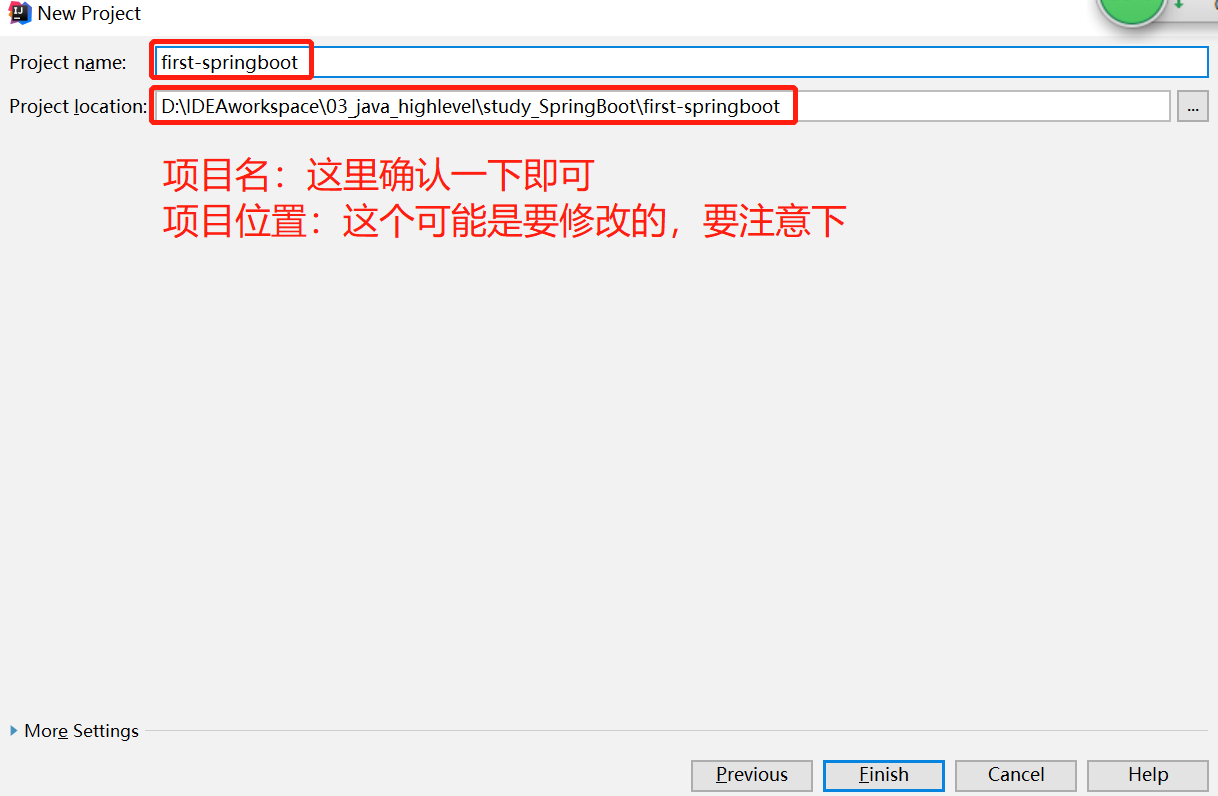
4.确认项目名,选择项目存放位置
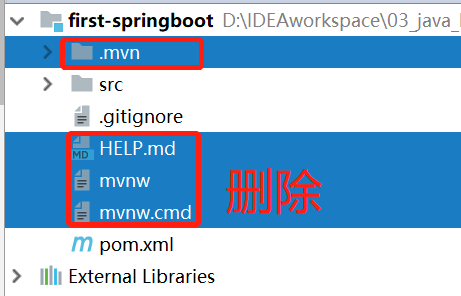
5.删除不需要的文件(删掉这4个不需要的文件,重点关注其它三个文件)
6.导入依赖
为了快速的让我们看到效果,我们打开pom.xml文件,里面的具体内容先不说,后面再将,但是我们将其中一个依赖改掉。
由于默认创建的是SE工程,为了实现web工程,在spring-boot-starter后面加-web,具体如下:

7.编写Controller
注意包和类的位置
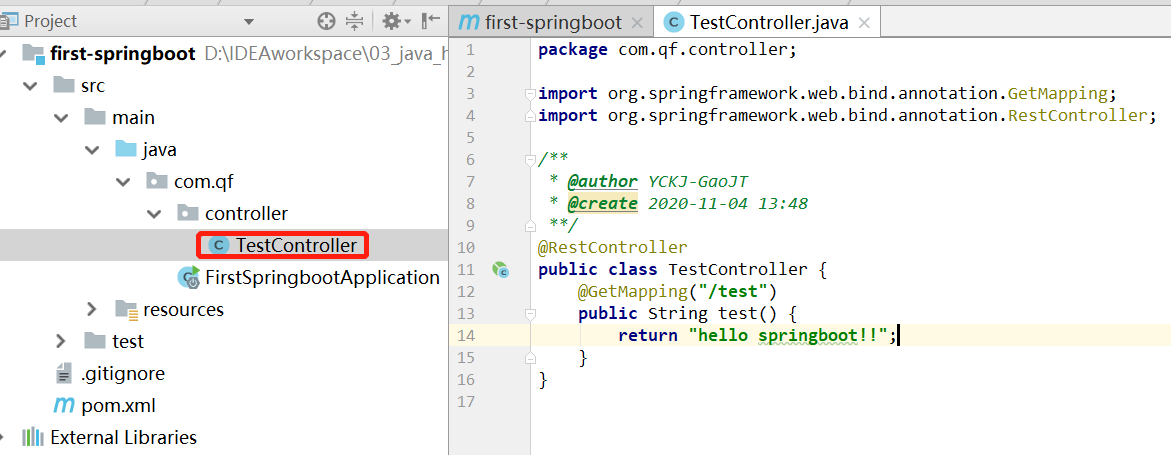
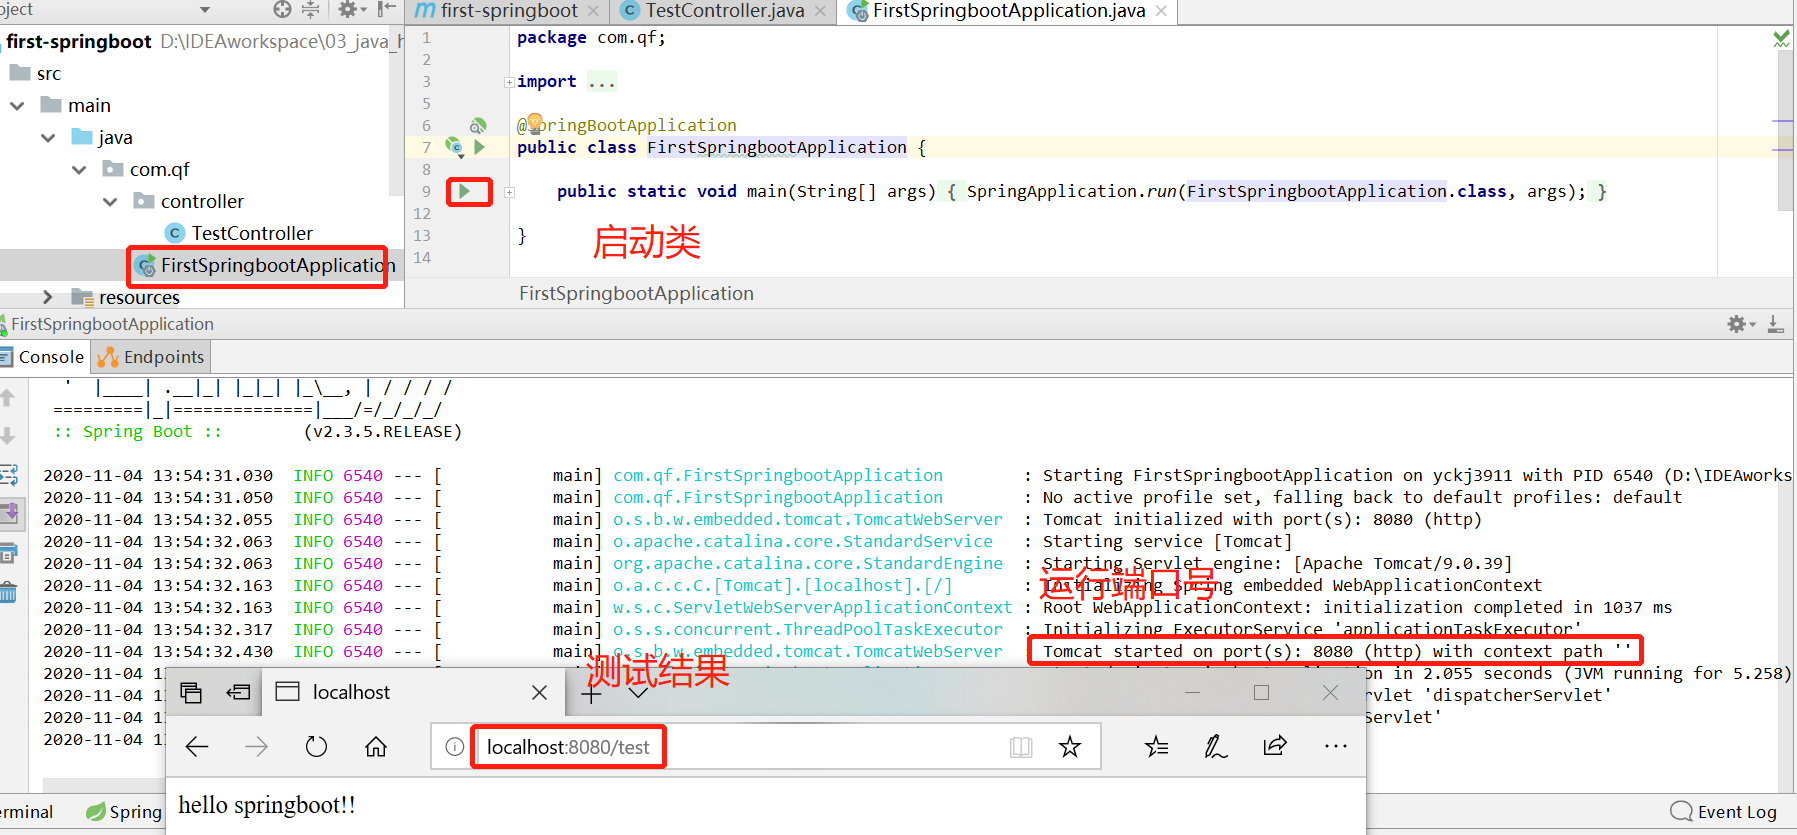
8.测试,即启动SpringBoot工程,运行启动类中的main方法
启动非常简单,选择SpringBoot自动帮我们创建的类,运行里面的run方法即可,然后在浏览器上测试。测试路径就是本机+端口号+Controller中的路径/test;
SpringBoot的目录结构
现在完成了一个简单的SpringBoot的web工程,那么下面说一下该工程的目录结构是怎么样的。
- pom.xml文件
- 指定了一个父工程:作用1是指定当前工程为SpringBoot工程,作用2是帮我们声明了starter依赖的版本,当我们引入依赖时,不需要写版本号。当然只有spring-boot-starter..类型的不需要,其它的还是需要的。
- 项目的元数据:包名、项目名、版本号。
- 指定了properties信息:这里只是指定了java的版本为1.8,如果后续有需要还可以再添加其它。
- 导入依赖:默认情况下导入spring-boot-starter,spring-boot-starter-test。对于spring-boot-starter可以理解为导入了SpringBoot的基本依赖,当然是不够用的,spring-boot-starter-test很好理解,就是帮我们导入了测试依赖,比如junit等依赖。而我们上面将spring-boot-starter修改为sping-boot-starter-web其实就是又帮我们导入了web项目需要的依赖,比如springmvc,内置tomcat等。
- 插件:默认导入spring-boot-maven-plugin,默认导入maven插件,毕竟我们的springboot还是一个maven项目。
- .gitignore文件:默认帮我们忽略了一些文件和目录,以便帮我们将该项目导入到git中。
- src目录
-src
  -main
    -java
      -包名 //是我们创建项目是指定的
        启动类.java //需要将controller类,放在启动类的子包或者同级包下
    -resources
      -static //存放静态资源的,如css样式,js脚本,html页面等  由于我们创建的是web项目,这个包默认没有
      -templates //存储模板页面的  由于我们创建的是web项目,这个包默认没有
      application.properties //SpringBoot提供的唯一的配置文件
  -test //只是为了测试用的
SpringBoot三种启动方式
方式一:运行启动类中的main方法(推荐)
方式二:由于SpringBoot是maven项目,因此可以用maven指令运行:mvn spring-boot:run
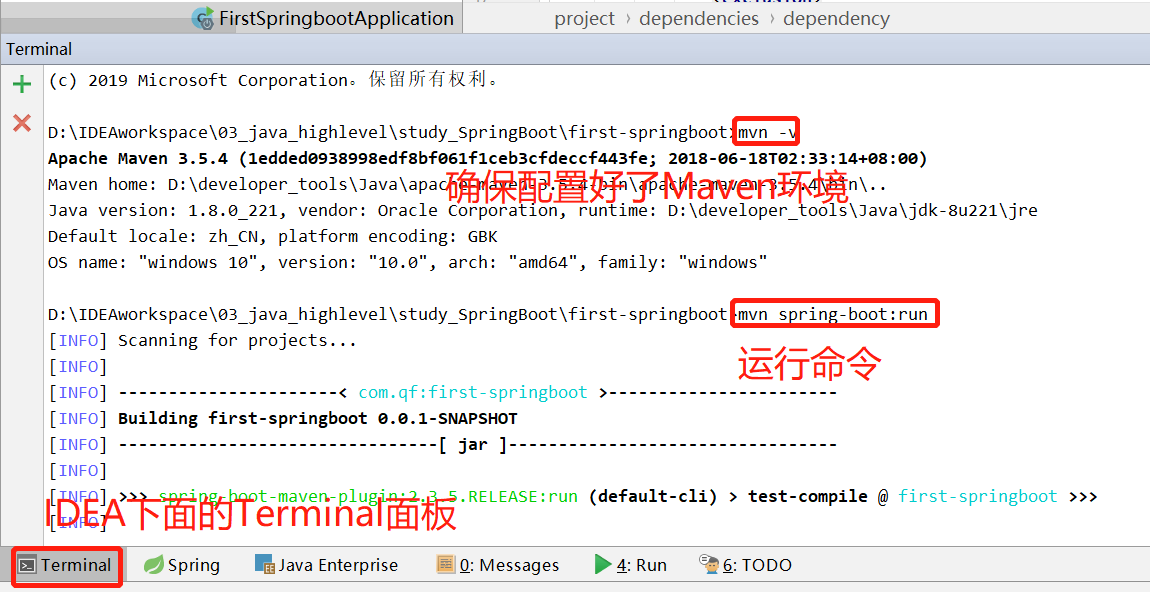
再次输入ctrl+c,和y或Y即可停掉。

方式三:【重要】
前面我们说过,springboot项目非常用日部署,通过mvn clean package即可打包,之后会在target下面看到打包好的jar包了。将其拖拽到桌面,

这里老师用了一个工具,我暂时没有,因此后续补充......
SpringBoot常用注解【重点】
@Configuration和@Bean
- 之前使用SSM去开发时,如果像放置一个对象到容器中,需要创建这个类,然后在xml文件中配置bean标签,但是SpringBoot不推荐使用xml文件。
- @Configuration注解相当于beans标签;@Bean注解相当于bean标签;id='方法名'相当于方法名或者是注解中的name属性(优先级最高);class="方法的返回结果,全路径"
User类,就是一个普通的实体类,只是这里使用了lombok依赖
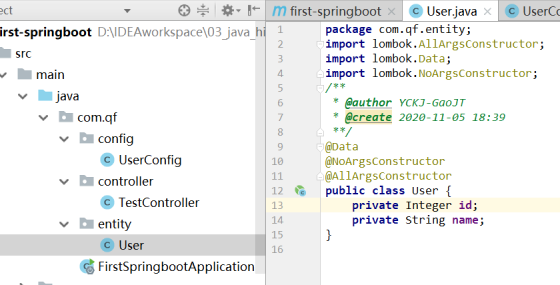
<!--springboot已经帮你控制了版本1.18.16-->
<dependency>
    <groupId>org.projectlombok</groupId>
    <artifactId>lombok</artifactId>
</dependency>
下面是配置类
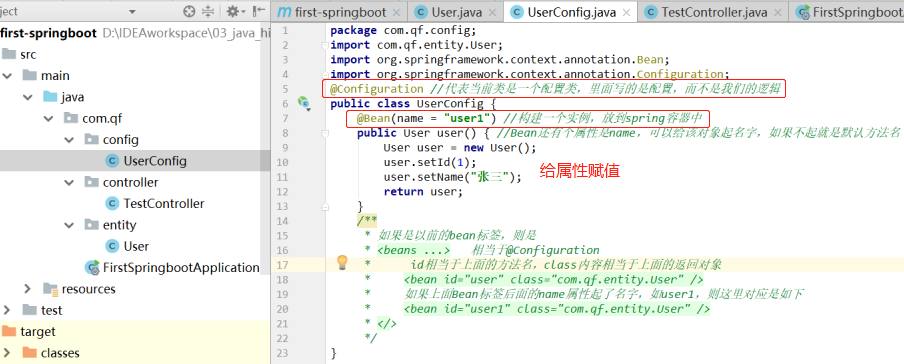
测试效果:在Controller中注入,并返回给页面
package com.qf.controller;
import com.qf.entity.User;
import org.springframework.web.bind.annotation.GetMapping;
import org.springframework.web.bind.annotation.RestController;
import javax.annotation.Resource;
@RestController
public class TestController {
    //或者用另外一个注解,然后通过name属性获得对象的名字,但是限免的Autowired就没有这个属性
    @Resource(name = "user1")
    //@Autowired
    private User user;
    @GetMapping("/test")
    public String test() {
        return "hello springboot!!";
    }
    @GetMapping("/user")
    public User user() {
        return user;
    }
}
下面启动后,通过网址http://localhost:8080/user即可调用。
这里需要说明一下两个注入标签的区别:下面内容是个人推测,@Atuowired是从Spring容器中找到一个User类的对象,至于这个对象名是什么不用管,然后放到下面的字段中(该字段类型肯定也是User,但是名字也是随意定义),即这种方式是两个类型对应即可,@Atuowired没有name属性;@Resource有name属性,如果不用,则和@Atuowired作用一样,如果用,则是通过查找name属性指定的对象名,然后将其赋给下面的对象(既然是赋值,当然也是只要类型一样即可,名字不一定一样)
@SpringBootApplication
@SpringBootApplication是一个组合注解,即有多个注解组成。点进去后发现有多个注解组成
@Target({ElementType.TYPE})
@Retention(RetentionPolicy.RUNTIME)
@Documented
@Inherited
@SpringBootConfiguration
@EnableAutoConfiguration
@ComponentScan
我们只需要关注后面三个,二上面的4个都是文档内容和其它信息,这里不需要关注。
点进@SpringBootConfiguration,看到如下内容:
@Target({ElementType.TYPE})
@Retention(RetentionPolicy.RUNTIME)
@Documented
@Configuration
public @interface SpringBootConfiguration {
    @AliasFor(
        annotation = Configuration.class
    )
    boolean proxyBeanMethods() default true;
}
@SpringBootConfiguration其实就是configuration注解,这标识着启动类就是一个配置类。
点进@EnableAutoConfiguration,看到如下内容:
@EnableAutoConfiguration帮你实现自动装配的,这是什么意思呢?即什么是自动装配呢?其实说白了,咱们当时为了编写一个Controllr类,我们将pom.xml中的spring-boot-starter依赖添加上了一个web,即spring-boot-starter-web,之后咱们就有了关于SpringMVC的各种注解,并且我可以直接启动项目就使用了。但是之前咱们是需要配置前端控制器,处理器,适配器,映射器等等内容,而现在都不需要了,这就是springboot中的自动装配帮咱们实现的。
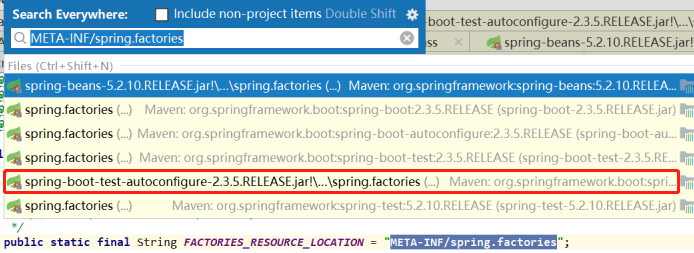
@EnableAutoConfiguration帮你实现自动装配的,而自动装配原理也是比较简单的,SpringBoot工程启动时,运行一个SpringFacyoriesLoader的类,我们在IDEA中搜索这个类:
public final class SpringFactoriesLoader {

    /**
     * The location to look for factories.
     * <p>Can be present in multiple JAR files.
     */
    public static final String FACTORIES_RESOURCE_LOCATION = "META-INF/spring.factories";


    private static final Log logger = LogFactory.getLog(SpringFactoriesLoader.class);

    private static final Map<ClassLoader, MultiValueMap<String, String>> cache = new ConcurrentReferenceHashMap<>();


    private SpringFactoriesLoader() {
    }


    /**
     * Load and instantiate the factory implementations of the given type from
     * {@value #FACTORIES_RESOURCE_LOCATION}, using the given class loader.
     * <p>The returned factories are sorted through {@link AnnotationAwareOrderComparator}.
     * <p>If a custom instantiation strategy is required, use {@link #loadFactoryNames}
     * to obtain all registered factory names.
     * @param factoryType the interface or abstract class representing the factory
     * @param classLoader the ClassLoader to use for loading (can be {@code null} to use the default)
     * @throws IllegalArgumentException if any factory implementation class cannot
     * be loaded or if an error occurs while instantiating any factory
     * @see #loadFactoryNames
     */
    public static <T> List<T> loadFactories(Class<T> factoryType, @Nullable ClassLoader classLoader) {
        Assert.notNull(factoryType, "'factoryType' must not be null");
        ClassLoader classLoaderToUse = classLoader;
        if (classLoaderToUse == null) {
            classLoaderToUse = SpringFactoriesLoader.class.getClassLoader();
        }
        List<String> factoryImplementationNames = loadFactoryNames(factoryType, classLoaderToUse);
        if (logger.isTraceEnabled()) {
            logger.trace("Loaded [" + factoryType.getName() + "] names: " + factoryImplementationNames);
        }
        List<T> result = new ArrayList<>(factoryImplementationNames.size());
        for (String factoryImplementationName : factoryImplementationNames) {
            result.add(instantiateFactory(factoryImplementationName, factoryType, classLoaderToUse));
        }
        AnnotationAwareOrderComparator.sort(result);
        return result;
    }
发现这个类会帮我们加载META-INT/spring.factories中的配置类,我们搜索META-INT/spring.factories看一下:
# AutoConfigureWebClient auto-configuration imports
org.springframework.boot.test.autoconfigure.web.client.AutoConfigureWebClient=
org.springframework.boot.test.autoconfigure.web.client.WebClientRestTemplateAutoConfiguration,
org.springframework.boot.autoconfigure.gson.GsonAutoConfiguration,
org.springframework.boot.autoconfigure.http.HttpMessageConvertersAutoConfiguration,
org.springframework.boot.autoconfigure.http.codec.CodecsAutoConfiguration,
org.springframework.boot.autoconfigure.jackson.JacksonAutoConfiguration,
org.springframework.boot.autoconfigure.jsonb.JsonbAutoConfiguration,
org.springframework.boot.autoconfigure.web.client.RestTemplateAutoConfiguration,
org.springframework.boot.autoconfigure.web.reactive.function.client.WebClientAutoConfiguration

# AutoConfigureWebMvc auto-configuration imports
org.springframework.boot.test.autoconfigure.web.servlet.AutoConfigureWebMvc=
org.springframework.boot.autoconfigure.context.MessageSourceAutoConfiguration,
org.springframework.boot.autoconfigure.data.web.SpringDataWebAutoConfiguration,
org.springframework.boot.autoconfigure.freemarker.FreeMarkerAutoConfiguration,
org.springframework.boot.autoconfigure.groovy.template.GroovyTemplateAutoConfiguration,
org.springframework.boot.autoconfigure.gson.GsonAutoConfiguration,
org.springframework.boot.autoconfigure.hateoas.HypermediaAutoConfiguration,
org.springframework.boot.autoconfigure.http.HttpMessageConvertersAutoConfiguration,
org.springframework.boot.autoconfigure.jackson.JacksonAutoConfiguration,
org.springframework.boot.autoconfigure.jsonb.JsonbAutoConfiguration,
org.springframework.boot.autoconfigure.mustache.MustacheAutoConfiguration,
org.springframework.boot.autoconfigure.task.TaskExecutionAutoConfiguration,
org.springframework.boot.autoconfigure.thymeleaf.ThymeleafAutoConfiguration,
org.springframework.boot.autoconfigure.validation.ValidationAutoConfiguration,
org.springframework.boot.autoconfigure.web.servlet.error.ErrorMvcAutoConfiguration,
org.springframework.boot.autoconfigure.web.servlet.HttpEncodingAutoConfiguration,
org.springframework.boot.autoconfigure.web.servlet.WebMvcAutoConfiguration

# AutoConfigureWebServiceClient
org.springframework.boot.test.autoconfigure.webservices.client.AutoConfigureWebServiceClient=
org.springframework.boot.test.autoconfigure.webservices.client.WebServiceClientTemplateAutoConfiguration,
org.springframework.boot.autoconfigure.webservices.client.WebServiceTemplateAutoConfiguration
发现这里面是眼花缭乱的信息,就大概能看到#后面是自动配置xxx,当我们搜索MVC时,可以找到WebMvcAutoConfiguration,这是帮我们自动配置了SpringMVC的内容:当我们点进这个WebMvcAutoConfiguration
@Configuration(
    proxyBeanMethods = false
)
@ConditionalOnWebApplication(
    type = Type.SERVLET
)
@ConditionalOnClass({Servlet.class, DispatcherServlet.class, WebMvcConfigurer.class})
@ConditionalOnMissingBean({WebMvcConfigurationSupport.class})
@AutoConfigureOrder(-2147483638)
@AutoConfigureAfter({DispatcherServletAutoConfiguration.class, TaskExecutionAutoConfiguration.class, ValidationAutoConfiguration.class})
public class WebMvcAutoConfiguration {
    public static final String DEFAULT_PREFIX = "";
    public static final String DEFAULT_SUFFIX = "";
    private static final String[] SERVLET_LOCATIONS = new String[]{"/"};

    public WebMvcAutoConfiguration() {
    }
发现这个WebMvcAutoConfiguration在加载之后会加载三个内容,其中第一个是我们非常熟悉的,前端控制器:
对于上面我们看到的META-INT/spring.factories里面的内容非常多,那么SpringBoot会帮我们全部配置吗?当然不是,只有我们引入依赖后才会启动该配置,比如我们引入了starter-web依赖,就自动装配SpringMVC的内容。那如果有些帮我们自动装配的,但我们又不想让其自动装配,该怎么办??在启动类上的@SpringBootApplication注解上加exclude属性,比如SpringBoot会帮我们自动装配QuartzAutoConfiguration,我们该怎么关闭??
package com.qf;
import org.springframework.boot.SpringApplication;
import org.springframework.boot.autoconfigure.SpringBootApplication;
import org.springframework.boot.autoconfigure.quartz.QuartzAutoConfiguration;

@SpringBootApplication(exclude = QuartzAutoConfiguration.class)
public class FirstSpringbootApplication {

    public static void main(String[] args) {
        SpringApplication.run(FirstSpringbootApplication.class, args);
    }

}
总结:@EnableAutoConfiguration帮你实现自动装配的,SpringBoot工程启动时,运行一个SpringFactoriesLoader的类,加载META-INT/spring.factories配置类(已经开启的,即引入依赖的),通过SpringFactoriesLoader中的Load方法,以for循环的方式,一个一个加载。
好处:无需编写大量的真个和配置信息,只需要按照SpringBoot提供好了约定去整合即可。
坏处:如果说你导入了一个starter依赖,那么你就需要填写他必须的配置信息。
如果想要手动关闭自动装配指定的内容:@SpringBootApplication(exclude = QuartzAutoConfiguration.class)
对于@ComponentScan非常好理解,就相当于<context:component-scan basePackage="包名" />,帮助扫描注解的。
这个注解@SpringBootApplication位于启动类上,而启动类的包位于package com.qf;,即会帮助我们扫描这个包下的注解
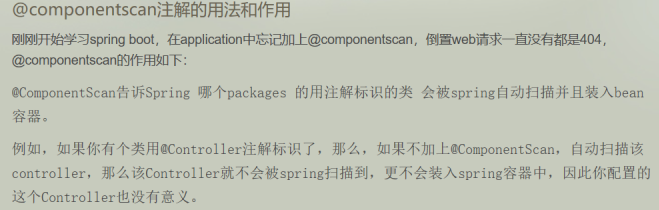
我们自然也可以让SpringBoot扫描其它包,只需要加上@ComponentScan注解即可,如下:当然一般没啥用。
package com.qf;

import org.springframework.boot.SpringApplication;
import org.springframework.boot.autoconfigure.SpringBootApplication;
import org.springframework.boot.autoconfigure.quartz.QuartzAutoConfiguration;
import org.springframework.context.annotation.ComponentScan;

@SpringBootApplication(exclude = QuartzAutoConfiguration.class)
@ComponentScan(basePackages = "com.qf.xxx")
public class FirstSpringbootApplication {

    public static void main(String[] args) {
        SpringApplication.run(FirstSpringbootApplication.class, args);
    }

}
总结:@ComponentScan非常好理解,就相当于<context:component-scan basePackage="包名" />,帮助扫描注解的。
SpringBoot常用配置【重点】
SpringBoot的配置文件支持properties和yml【推荐】,甚至他支持json【不推荐】。
更推荐使用yml文件格式:
- yml文件,会根据换行和缩进帮助咱们管理配置文件所在位置
- yml文件,相比properties更轻量级一些。
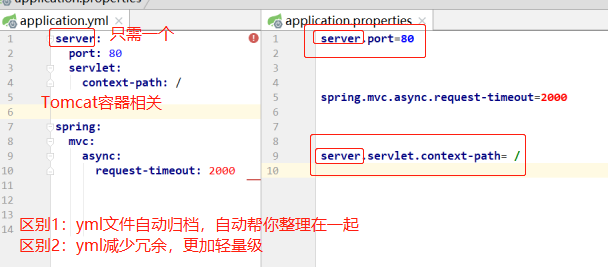
yml文件劣势(其实也不是劣势,就是约定):
- 严格遵循换行和缩进。
- 在填写value时,一定要在:后面跟上空格。
多环境配置
在开发和部署等过程中,配置项时不一样的,比如开发用的是8080端口,部署用的是8081端口,怎么办呢?写三个配置文件,分别是application.yml、application-dev.xml和application-prov.yml。我们只需要在application.yml中配置使用哪个环境即可,只需要在里面配置协商-后面的内容即可。这里说明一下,springboot默认是不会运行application-xxx.yml文件的,还是会运行application.yml。

即在application.yml文件中添加一个配置项:
spring:
profiles:
active: 环境名
在resource目录下,创建多个application-环境名.yml文件即可。
在部署工程时,通过java -jar jar文件 --spring.profiles.active=环境(这里老师用了powershell工具,我没有,暂时没用写,后面补充)
P9
引入外部配置文件信息
和传统的SSM方式一样,通过@Value的注解去获取properties/yml文件中的内容。
如果在yml文件中需要编写大量的自定义配置,并且具有统一的前缀时,怎么办??
对于通过@Value的注解获取yml配置文件中的内容如下所示:
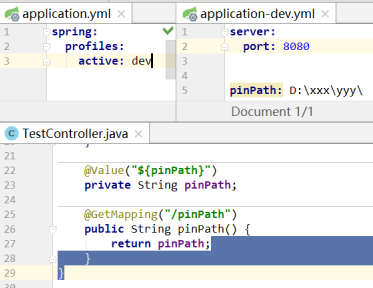
这时候访问得到如下结果:

上面就是在配置文件中添加了一个图片路径,然后直接用@Value注解注入,或者说是去获取配置文件中的内容。
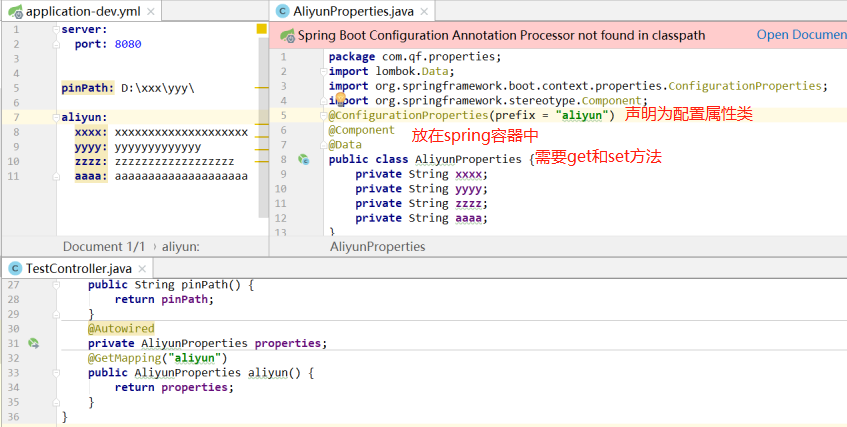
但是如果我们的配置信息是大量的,比如要配置阿里云的信息,又很多信息(如果在yml文件中需要编写大量的自定义配置,并且具有统一的前缀时),如:
server:
  port: 8080


pinPath: D:xxxyyy

aliyun:
  xxxx: xxxxxxxxxxxxxxxxxxxx
  yyyy: yyyyyyyyyyyyy
  zzzz: zzzzzzzzzzzzzzzzzz
  aaaa: aaaaaaaaaaaaaaaaaaaa
那此时怎么办?还是用@Value注解去获取吗?那就要4个@Value注解:
这显然是不合理的,最好的方式是:
运行结果如下:

这里有一点需要说明:上面有一处暴红,这个不用管,不影响程序,如果非要管,加一个依赖即可,可自行百度。
热加载
在实际开发过程中,我们一定会修改程序的一些地方,我们上面每次修改后都要重启服务器才能生效,但是实际开发中不会这样,因为有些大型项目可能要启动十几分钟。所以这里讲述热部署,修改后不用重启服务器。
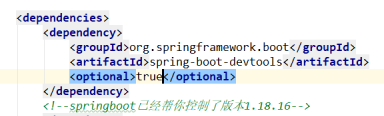
第一步:加入依赖(不用添加版本,因为SpringBoot已经帮忙管理,optional为true是说开启热部署)
第二步:settings配置
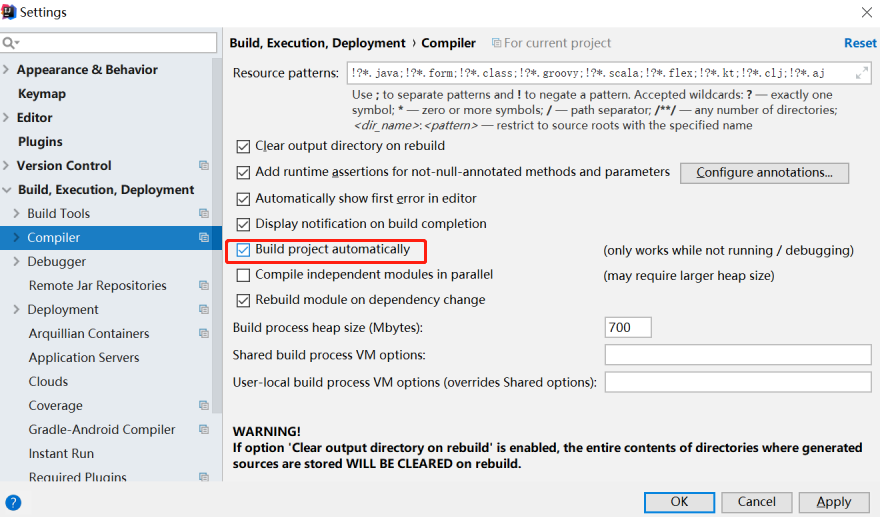
修改项目后,不用重启,点击,buile project即可:,可选择构建全部工程,也可以构建某个模块。

我的暂时没有生效,不知道为什么,不过暂时先不管了。
这个功能很简单,但很实用,我的怎么没有起作用。