本文重点讲述了自android4.0版本后新增的GridLayout网格布局的一些基本内容,并在此基础上实现了一个简单的计算器布局框架。通过本文,您可以了解到一些android UI开发的新特性,并能够实现相关应用。
在android4.0版本之前,如果想要达到网格布局的效果,首先可以考虑使用最常见的LinearLayout布局,但是这样的排布会产生如下几点问题:
1、不能同时在X,Y轴方向上进行控件的对齐。
2、当多层布局嵌套时会有性能问题。
3、不能稳定地支持一些支持自由编辑布局的工具。
其次考虑使用表格布局TabelLayout,这种方式会把包含的元素以行和列的形式进行排列,每行为一个TableRow对象,也可以是一个View 对象,而在TableRow中还可以继续添加其他的控件,每添加一个子控件就成为一列。但是使用这种布局可能会出现不能将控件占据多个行或列的问题,而且 渲染速度也不能得到很好的保证。
android4.0以上版本出现的GridLayout布局解决了以上问题。GridLayout布局使用虚细线将布局划分为行、列和单元格,也支持一 个控件在行、列上都有交错排列。而GridLayout使用的其实是跟LinearLayout类似的API,只不过是修改了一下相关的标签而已,所以对 于开发者来说,掌握GridLayout还是很容易的事情。GridLayout的布局策略简单分为以下三个部分:
首先它与LinearLayout布局一样,也分为水平和垂直两种方式,默认是水平布 局,一个控件挨着一个控件从左到右依次排列,但是通过指定android:columnCount设置列数的属性后,控件会自动换行进行排列。另一方面, 对于GridLayout布局中的子控件,默认按照wrap_content的方式设置其显示,这只需要在GridLayout布局中显式声明即可。
其次,若要指定某控件显示在固定的行或列,只需设置该子控件的android:layout_row和android:layout_column属性即 可,但是需要注意:android:layout_row=”0”表示从第一行开始,android:layout_column=”0”表示从第一列开 始,这与编程语言中一维数组的赋值情况类似。
最后,如果需要设置某控件跨越多行或多列,只需将该子控件的android:layout_rowSpan或者layout_columnSpan属性 设置为数值,再设置其layout_gravity属性为fill即可,前一个设置表明该控件跨越的行数或列数,后一个设置表明该控件填满所跨越的整行或 整列。
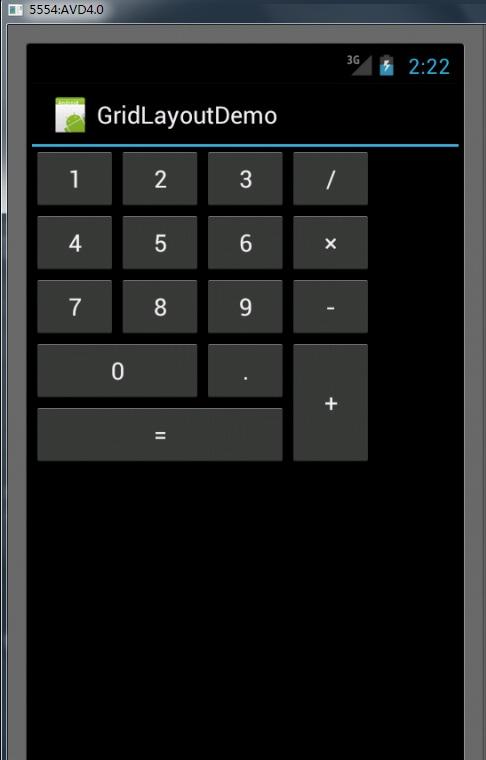
利用GridLayout布局编写的简易计算器代码如下(注意:仅限于android4.0及以上的版本):
- <?xml version="1.0" encoding="utf-8"?>
- <GridLayout xmlns:android="http://schemas.android.com/apk/res/android"
- android:layout_width="wrap_content"
- android:layout_height="wrap_content"
- android:orientation="horizontal"
- android:rowCount="5"
- android:columnCount="4" >
- <Button
- android:id="@+id/one"
- android:text="1"/>
- <Button
- android:id="@+id/two"
- android:text="2"/>
- <Button
- android:id="@+id/three"
- android:text="3"/>
- <Button
- android:id="@+id/devide"
- android:text="/"/>
- <Button
- android:id="@+id/four"
- android:text="4"/>
- <Button
- android:id="@+id/five"
- android:text="5"/>
- <Button
- android:id="@+id/six"
- android:text="6"/>
- <Button
- android:id="@+id/multiply"
- android:text="×"/>
- <Button
- android:id="@+id/seven"
- android:text="7"/>
- <Button
- android:id="@+id/eight"
- android:text="8"/>
- <Button
- android:id="@+id/nine"
- android:text="9"/>
- <Button
- android:id="@+id/minus"
- android:text="-"/>
- <Button
- android:id="@+id/zero"
- android:layout_columnSpan="2"
- android:layout_gravity="fill"
- android:text="0"/>
- <Button
- android:id="@+id/point"
- android:text="."/>
- <Button
- android:id="@+id/plus"
- android:layout_rowSpan="2"
- android:layout_gravity="fill"
- android:text="+"/>
- <Button
- android:id="@+id/equal"
- android:layout_columnSpan="3"
- android:layout_gravity="fill"
- android:text="="/>
- </GridLayout>
最终实现的界面如下所示:
参考资料:http://tech.it168.com/a2011/1122/1277/000001277274.shtml