Assignment5的要求
在这次作业中,我们需要实现两个部分:光线的生成和光线与三角的相交。本次代码框架的工作流程为:
- 从main 函数开始。我们定义场景的参数,添加物体(球体或三形)到场景中,并设置其材质,然后将光源添加到场景中。
- 调用Render(scene) 函数。在遍历所有像素的循环里,生成对应的光线并将返回的颜色保存在帧缓冲区(framebuffer)中。在渲染过程结束后,帧缓冲区中的信息将被保存为图像。
- 在生成像素对应的光线后,我们调用CastRay 函数,该函数调用trace 来查询光线与场景中最近的对象的交点。
- 然后,我们在此交点执行着色。我们设置了三种不同的着色情况,并且已经为你提供了代码。
你需要修改的函数是:
- Renderer.cpp 中的Render():这里你需要为每个像素生成一条对应的光线,然后调用函数castRay() 来得到颜色,最后将颜色存储在帧缓冲区的相应像素中。
- Triangle.hpp 中的rayTriangleIntersect(): v0, v1, v2 是三角形的三个顶点,orig 是光线的起点,dir 是光线单位化的方向向量。tnear, u, v 是你需要使用我们课上推导的Moller-Trumbore 算法来更新的参数。
具体步骤
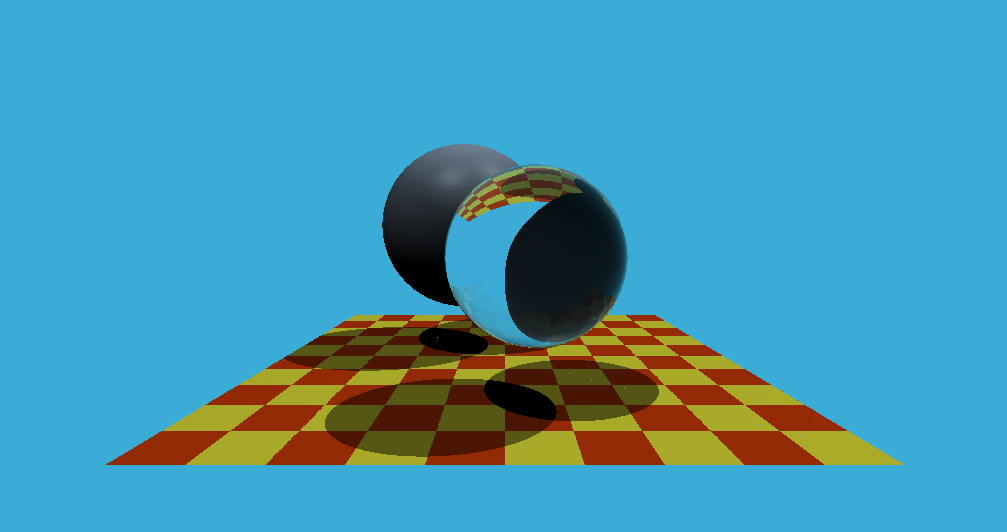
1.光线生成:实现光线生成部分,并且能够看到图像中的两个球体。
需要注意的是此时的相机是看向负z方向的。此处的[i,j]即为成像平面上的像素位置,目的是为了得到实际的坐标。首先要将像素水平坐标i除以图像宽度从而将其映射回[0,1],然后乘以缩放因子和图像宽高比将其映射回[-1,1] ,对y同样处理,但是y需要进行翻转。
// [comment]
// The main render function. This where we iterate over all pixels in the image, generate
// primary rays and cast these rays into the scene. The content of the framebuffer is
// saved to a file.
// [/comment]
void Renderer::Render(const Scene& scene)
{
    std::vector<Vector3f> framebuffer(scene.width * scene.height);

    float scale = std::tan(deg2rad(scene.fov * 0.5f));
    float imageAspectRatio = scene.width / (float)scene.height;

    // Use this variable as the eye position to start your rays.
    Vector3f eye_pos(0);
    int m = 0;
    for (int j = 0; j < scene.height; ++j)
    {
        for (int i = 0; i < scene.width; ++i)
        {
            // generate primary ray direction
            // TODO: Find the x and y positions of the current pixel to get the direction
            // vector that passes through it.
            // Also, don't forget to multiply both of them with the variable *scale*, and
            // x (horizontal) variable with the *imageAspectRatio*
            float x=(2 * (i + 0.5) / (float)scene.width - 1)*scale*imageAspectRatio;
            float y=(1 - 2 * (j + 0.5) / (float)scene.height)*scale;
            Vector3f dir = Vector3f(x, y, -1); // Don't forget to normalize this direction!
            dir=normalize(dir);
            framebuffer[m++] = castRay(eye_pos, dir, scene, 0);
        }
        UpdateProgress(j / (float)scene.height);
    }

    // save framebuffer to file
    FILE* fp = fopen("binary.ppm", "wb");
    (void)fprintf(fp, "P6
%d %d
255
", scene.width, scene.height);
    for (auto i = 0; i < scene.height * scene.width; ++i) {
        static unsigned char color[3];
        color[0] = (char)(255 * clamp(0, 1, framebuffer[i].x));
        color[1] = (char)(255 * clamp(0, 1, framebuffer[i].y));
        color[2] = (char)(255 * clamp(0, 1, framebuffer[i].z));
        fwrite(color, 1, 3, fp);
    }
    fclose(fp);
}
2.光线与三角形相交:实现了Moller-Trumbore 算法,并且能够看到图像中的地面。
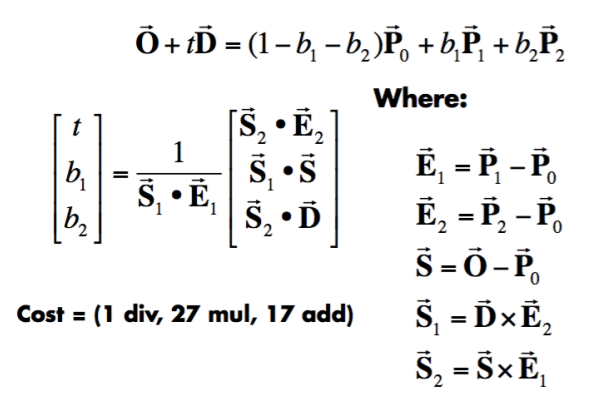
如上图所示,逐个带入计算即可。
bool rayTriangleIntersect(const Vector3f& v0, const Vector3f& v1, const Vector3f& v2, const Vector3f& orig,
                          const Vector3f& dir, float& tnear, float& u, float& v)
{
    // TODO: Implement this function that tests whether the triangle
    // that's specified bt v0, v1 and v2 intersects with the ray (whose
    // origin is *orig* and direction is *dir*)
    // Also don't forget to update tnear, u and v.
    auto e1=v1-v0,e2=v2-v0,s=orig-v0;
    auto s1=crossProduct(dir,e2),s2=crossProduct(s,e1);
    float co=1/(dotProduct(s1,e1));
    float t=co*dotProduct(s2,e2);
    float b1=co*dotProduct(s1,s);
    float b2=co*dotProduct(s2,dir);
    if(t>0.0 && b1>0.0 && b2>0.0 && (1-b1-b2)>=0.0){
        tnear=t;
        u=b1;
        v=b2;
        return true;
    }
    return false;
}
结果图