安装
pip install flask-mail
from flask import Flask
from flask_mail import Mail, Message

app = Flask(__name__)
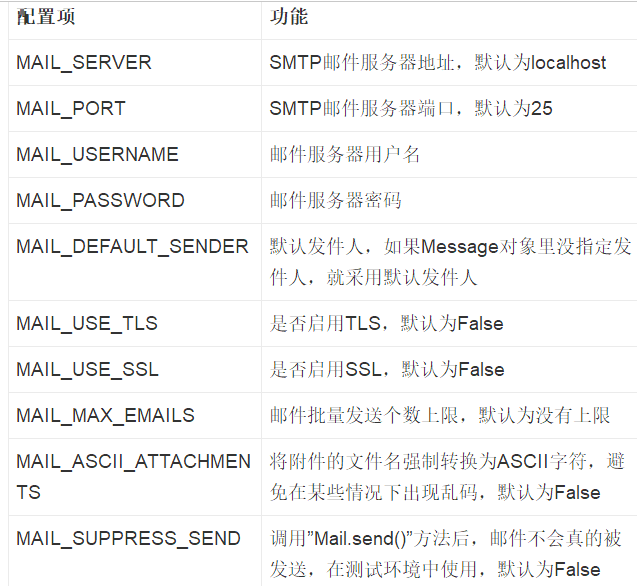
app.config.update(
    MAIL_SERVER='smtp.example.com',
    MAIL_USERNAME='bjhee',
    MAIL_PASSWORD='example'
)

mail = Mail(app)

@app.route('/mail')
def send_mail():
    msg = Message('Hello',
                  sender=('Billy.J.Hee', 'bjhee@example.com'),
                  recipients=['you@example.com'])
    msg.html = '<h1>Hello World</h1>'
    mail.send(msg)
    return 'Successful'

if __name__ == '__main__':
    app.run(host='0.0.0.0', debug=True)
配置参数

批量发送
@app.route('/batch')
def send_batch():
    with mail.connect() as conn:
        for user in users:
            msg = Message(subject='Hello, %s' % user['name'],
                          body='Welcome, %s' % user['name'],
                          recipients=[user['email']])
            conn.send(msg)

    return 'Successful'
这样应用同邮件服务器的连接”mail.connect()”会一直保持到所有邮件发送完毕,也就是退出with语句后再关闭,避免多次创建关闭连接的开销。批量发送邮件个数上限由配置项”MAIL_MAX_EMAILS”决定。
邮件带附件
@app.route('/mail')
def send_mail():
    msg = Message('Hello',
                  sender=('Billy.J.Hee', 'bjhee@example.com'),
                  recipients=['you@example.com'])
    msg.html = '<h1>Hello World</h1>'

    # Add Attachment
    with app.open_resource('blank.docx') as fp:
        msg.attach('blank.docx', 'application/msword', fp.read())

    mail.send(msg)
    return 'Successful'
上面的代码中,我们通过”app.open_resource()”方法打开了本地当前目录下的”blank.docx”文件,然后通过”Message.attach()”方法将其附到消息对象中即可。”Message.attach()”方法的第一个参数指定了附件上的文件名,第二个参数指定了文件内容的MIME类型,第三个参数就是文件内容。
email_dispatched信号
Flask-Mail扩展还提供了一个信号”email_dispatched”,当邮件被调度时,该信号就会被发出
from flask_mail import email_dispatched

def log_mail_sent(message, app):
    print 'Message "%s" is sent successfully' % (message.subject)

email_dispatched.connect(log_mail_sent)
另外,在跑测试时我们不希望邮件真的被发出去,此时可以将Flask应用的配置项”TESTING”设成True,或者将Flask-Mail扩展的配置项”MAIL_SUPPRESS_SEND”设成True。这样,调用”Mail.send()”方法后,邮件不会被发出,但是你依然可以接收到”email_dispatched”信号。