介绍
这是一个如何创建和使用遮罩和半透明位图按钮的例子,可以覆盖在任何背景,包括其他位图。按钮会自动与背景进行阿尔法混合(抗锯齿)来创建平滑的边缘,并提供区域剪裁来创建各种椭圆和其他形状。
绘制透明和创建区域的代码被添加到由Niek Albers编写并由Frederick Ackers修改的CHoverButtonEx类中,而不是创建一个复制所有者绘制按钮所有其他功能的新类。如果您已经在使用CHoverButtonEx类,您可以简单地把它换成这个版本,而不会影响现有功能,虽然我还添加了第四个图像的位图禁用视图,所以你需要这张图片在你现有的位图,或你需要改变引用回到3。
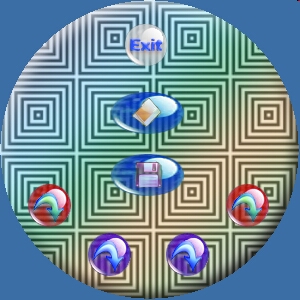
演示项目使用一个基于对话框的注册窗口,该窗口显示一个圆形的图形位图作为背景。这种类型的位图背景显示了这些按钮如何具有非常风格的外观和感觉。按下窗口下方的四个刷新按钮中的任何一个,背景就会变成一个不同的位图(总共有六个)。
另外要感谢保罗·纳特尔为他的风吹例程。
关于抗锯齿和阿尔法混合
在图像之上掩蔽图像的最棘手的部分之一是粗糙边缘,或像素化,这些图像的交汇处时,它们不是直边。解决这些粗糙边缘的方法是用一种叫做反走样的技术来混合边缘。在这个演示中,反走样是使用alpha混合技术完成的,其中前景位图像素的透明度决定了显示器上任何特定位置的颜色强度。
混合源和背景像素的公式为:
displayColor = sourceColor * sourceAlpha / 255 + backgroundColor * (255 - sourceAlpha) / 255
alpha值范围为0(透明)到255(不透明)。因此,按钮的位图的任何部分的alpha值为0都不会被看到,而大于0的区域将会以不同的强度与背景混合,直到255,按钮的位图将完全不透明。
// alphaBlend routine
static inline unsigned int alphaBlend(const unsigned
                      int bg, const unsigned int src)
{
    unsigned int    a = src >> 24;    // sourceColor alpha

    // If source pixel is transparent, just return the background
    if (0 == a) return bg;

    // alpha-blend the src and bg colors
    unsigned int rb = (((src & 0x00ff00ff) * a) +
          ((bg & 0x00ff00ff) * (0xff - a))) & 0xff00ff00;
    unsigned int    g  = (((src & 0x0000ff00) * a) +
          ((bg & 0x0000ff00) * (0xff - a))) & 0x00ff0000;

    return (src & 0xff000000) | ((rb | g) >> 8);
}
创建位图
如上所述,为了将按钮位图与背景混合,按钮位图必须为每个像素分配一个alpha值。这意味着这些位图必须是每像素32位(32bpp)图像,字节顺序为Alpha、红、绿、蓝(ARGB)。
创建这类图像的一种方法是使用Adobe Photoshop。使用颜色模式CMYK创建一个新图像,确保背景颜色设置为黑色。Photoshop可以自动为你在黑色背景下消除锯齿。将文件保存为. raw类型,这样只保存图像的实际字节,而不保存头部信息。不幸的是,. raw图像的顺序将是ABGR,所以在混合之前必须做一点重新排序,但这不是什么大问题。
将位图作为新的资源类型“RAW”导入到项目中。位图现在可以作为资源加载到按钮上。
 ,复制代码
,复制代码// This routine loads raw bitmap data from a resource.
// The width and height must be defined as there is no bitmap header
//
// Note that the resource type is "RAW" here, but can be changed to
// any name, or passed as a parameter if desired
BOOL CHoverButtonEx::LoadRaw(UINT rawid, long nWidth, long nHeight)
{
//If Bitmaps are being loaded and the BS_OWNERDRAW is not set
// then reset style to OwnerDraw.
UINT style = GetButtonStyle();
if (!(style & BS_OWNERDRAW))
{
style |= BS_OWNERDRAW;
SetButtonStyle(style);
}
m_pRaw = NULL;
CString resName;
resName.Format("#%d", rawid);
HGLOBAL hRaw = LoadResource(AfxGetResourceHandle(),
FindResource(AfxGetResourceHandle(), resName, "RAW"));
if (!hRaw)
return FALSE;
m_pRaw = (unsigned int*)LockResource(hRaw);
if (!m_pRaw)
return FALSE;
m_nRawWidth = nWidth;
m_nRawHeight = nHeight;
// The bitmap should contain four images:
// normal, selected, hover, and disabled.
// The images must be the same size within
// the bitmap, but can be laid out
// horizontally or vertically.
if (!m_bHorizontal)
{
m_ButtonSize.cy=nHeight/4;
m_ButtonSize.cx=nWidth;
}
else
{
m_ButtonSize.cy=nHeight;
m_ButtonSize.cx=nWidth/4;
}
SetWindowPos( NULL, 0,0, m_ButtonSize.cx,
m_ButtonSize.cy,SWP_NOMOVE | SWP_NOOWNERZORDER );
return TRUE;
}
使用的代码
添加透明的位图按钮非常容易实现。
- 在对话框或视图上创建任意数量的自绘制按钮。 在声明按钮的对话框或视图标题中包含HoverButton头部。隐藏,复制代码# include“HoverButton.h” 。 。 将按钮类型更改为CHoverButtonEx。隐藏,复制CodeCHoverButtonEx m_Btn1; CHoverButtonEx m_Btn2; CHoverButtonEx m_Btn3; 为按钮创建一个区域,并分配参数。隐藏,复制代码//创建圆形按钮 CreateEllipticRgn(0,0,48, 48); m_Btn1.SetHorizontal(真正的); m_Btn1.SetRegion (r); m_Btn1。LoadRaw (IDR_RED, 192年,48); m_Btn1。SetToolTipText(“按我!”); m_Btn2.SetHorizontal(真正的); m_Btn2.SetRegion (r); m_Btn2。LoadRaw (IDR_PURPLE, 192年,48); m_Btn2。SetToolTipText(“按我!”); m_Btn3.SetHorizontal(真正的); m_Btn3.SetRegion (r); m_Btn3。LoadRaw (IDR_PURPLE, 192年,48); m_Btn3。SetToolTipText(“按我!”); DeleteObject (r); 如果背景发生变化,只需调用RefreshBkgrnd。隐藏,复制Codem_Btn1.RefreshBkgrnd (); m_Btn2.RefreshBkgrnd (); m_Btn3.RefreshBkgrnd ();
就是这样!
的兴趣点
其中一个有趣的例程是如何确定背景是什么样子的。我决定在按钮第一次显示之前先读取背景,然后保存图片,直到按钮刷新。
 ,复制代码
,复制代码// If this is the first time drawing the button, or the background
// has been refreshed, we need to "read" the background and save
// it for transparency mixing (aka alpha blending).
if (m_pRaw && m_nRawWidth && m_nRawHeight && !m_bLoadBkgrnd)
{
unsigned int bkPix;
COLORREF c;
int bkWidth;
int bkHeight;
// Get the size of one image
if (!m_bHorizontal)
{
bkWidth = m_nRawWidth;
bkHeight = m_nRawHeight/4;
}
else
{
bkWidth = m_nRawWidth/4;
bkHeight = m_nRawHeight;
}
if (m_pBkGrnd)
delete m_pBkGrnd;
// Create array to hold background pixels
m_pBkGrnd = new unsigned int[bkWidth*bkHeight];
if (!m_pBkGrnd)
return;
unsigned int* pBkGrnd = m_pBkGrnd;
for (int iY = 0; iY < bkHeight; iY++)
{
for (int iX = 0; iX < bkWidth; iX++, pBkGrnd++)
{
// Get the background pixel
c = mydc->GetPixel(iX, iY);
bkPix = (unsigned int)c;
bkPix |= 0xff000000; // Set pixel opaque
// Set correct order of RGB
bkPix = (bkPix&0xff00ff00) | ((bkPix>>16)&0xff)
| ((bkPix<<16)&0xff0000);
// Save pixel in array
*pBkGrnd = bkPix;
}
}
m_bLoadBkgrnd = TRUE;
}
这种方法提供了一个准确的背景图像,特别是如果背景已经从原始图像拉伸或平铺。确定背景的另一种方法可能是将背景位图传递给button类,并计算偏移量,或者简单地传递一个颜色引用(如果背景不是位图)。在某些情况下,这些方法中的任何一种都可能更有效。
本文转载于:http://www.diyabc.com/frontweb/news14718.html