Spring Bean的生命周期详解
Spring IoC容器的本质目的就是为了管理Bean,对于Bean而言,在容器中存在其生命周期,它的初始化和销毁也需要一个过程,下面主要对其生命周期进行一个详解的解释。生命周期主要是为了了解Spring IoC容器初始化和销毁Bean的过程,通过下图即可以掌握Spring IoC容器初始化与销毁Bean的过程。
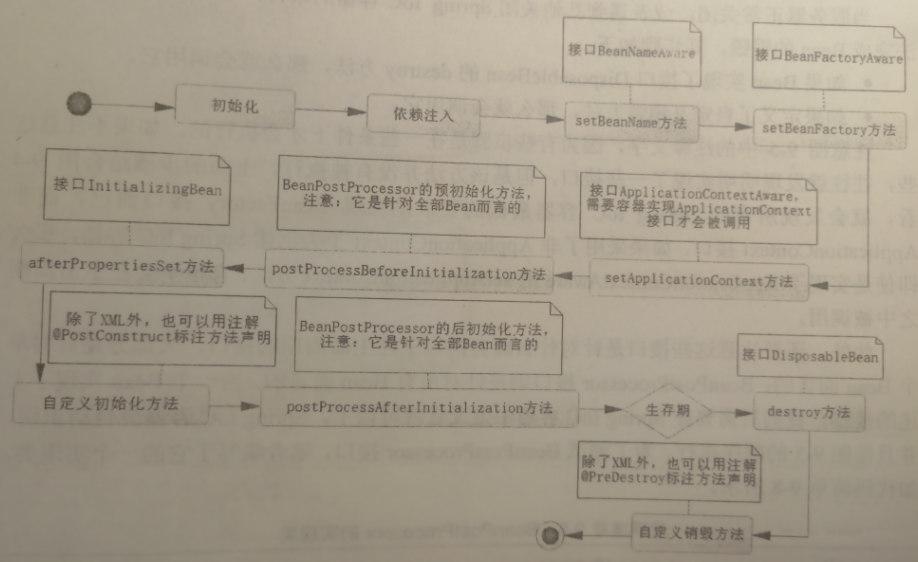
通过上图,我们首先可以看到生命周期的步骤。
1)如果Bean实现了接口 BeanNameAware 的 setBeanName 方法,那么它就会调用这个方法。
2)如果Bean实现了接口 BeanfactoryAware 的 setBeanFactory 方法,那么它就会调用这个方法。
3)如果Bean实现了接口 ApplicationContextAware 的 setApplicationContext方法,且 Spring IoC容器也必须是一个 ApplicationContext 接口的实现类,那么才会调用这个方法,否则是不调用的。
4)如果 Bean 实现了接口 BeanPostProcessor 的 postProcessBeforeInitialization 方法,那么它就会调用这个方法。
5)如果 Bean 实现了接口 BeanFactoryPostProcessor 的 afterPropertiesSet 方法,那么它就会调用这个方法。
6)如果 Bean 自定义了初始化方法,它就会调用已定义的初始化方法。
7)如果 Bean 实现了接口 BeanPostProcessor 的 postProcessAfterInitialization 方法,完成了这些调用,这时候Bean 就完成了初始化,那么Bean 就生存在 Spring IoC容器中,使用者就可以从中获取Bean的服务。
当服务器正常关闭,或者遇到其他关闭Spring IoC容器的事件,它就会调用对应的方法完成Bean的销毁,其步骤如下:
1)首先如果Bean实现了接口 DisposableBean 的 destory 方法,那么就会调用它。
2)如果定义了自定义销毁方法,那么就会调用它。
需要主要的是,上述的关于生命周期的接口,大部分都是针对单个Bean而言的,BeanPostProcessor 接口是针对所有Bean而言的,当一个Bean实现了上述的接口,只需要在Spring IoC容器中定义它就可以,Spring IoC容器会自动识别,并且按顺序执行,下面对BeanPostProcessor 接口进行实现和测试。
BeanPostProcessor 的实现类,处理Spring IoC容器所有的Bean
package com.cnblogs.demrystv.bean;

import org.springframework.beans.BeansException;
import org.springframework.beans.factory.config.BeanPostProcessor;

public class BeanPostProcessorImpl implements BeanPostProcessor {

    @Override
    public Object postProcessBeforeInitialization(Object bean, String beanName) throws BeansException {
        System.out.println("【" + bean.getClass().getSimpleName() + "】对象" + beanName + "开始实例化");
        return bean;
    }

    @Override
    public Object postProcessAfterInitialization(Object bean, String beanName) throws BeansException {
        System.out.println("【" + bean.getClass().getSimpleName() + "】对象" + beanName + "实例化完成");
        return bean;
    }

}
测试生命周期
package com.cnblogs.demrystv.pojo;

import org.springframework.beans.BeansException;
import org.springframework.beans.factory.BeanFactory;
import org.springframework.beans.factory.BeanFactoryAware;
import org.springframework.beans.factory.BeanNameAware;
import org.springframework.beans.factory.InitializingBean;
import org.springframework.context.ApplicationContext;
import org.springframework.context.ApplicationContextAware;

public class JuiceMaker implements BeanNameAware, BeanFactoryAware, ApplicationContextAware, InitializingBean {
    private String beverageShop = null;
    private Source source = null;

    public String getBeverageShop() {
        return beverageShop;
    }

    public void setBeverageShop(String beverageShop) {
        this.beverageShop = beverageShop;
    }

    public Source getSource() {
        return source;
    }

    public void setSource(Source source) {
        this.source = source;
    }

    public String makeJuice() {
        String juice = "这是一杯由" + beverageShop + "饮品店,提供的" + source.getSize() + source.getSugar() + source.getFruit();
        return juice;
    }

    public void init() {
        System.out.println("【" + this.getClass().getSimpleName() + "】执行自定义初始化方法");
    }

    public void destroy() {
        System.out.println("【" + this.getClass().getSimpleName() + "】执行自定义销毁方法");
    }

    @Override
    public void setBeanName(String arg0) {
        System.out.println("【" + this.getClass().getSimpleName() + "】调用BeanNameAware接口的setBeanName方法");

    }

    @Override
    public void setBeanFactory(BeanFactory arg0) throws BeansException {
        System.out.println("【" + this.getClass().getSimpleName() + "】调用BeanFactoryAware接口的setBeanFactory方法");
    }

    @Override
    public void setApplicationContext(ApplicationContext arg0) throws BeansException {
        System.out.println(
                "【" + this.getClass().getSimpleName() + "】调用ApplicationContextAware接口的setApplicationContext方法");
    }

    @Override
    public void afterPropertiesSet() throws Exception {
        System.out.println("【" + this.getClass().getSimpleName() + "】调用InitializingBean接口的afterPropertiesSet方法");
    }
}
同时,为了使自定义的方法生效,应该在xml中声明自定义的初始化和销毁方法的Bean
  <!--BeanPostProcessor定义 -->
    <bean id="beanPostProcessor" class="com.cnblogs.demrystv.bean.BeanPostProcessorImpl" />

    <bean id="source" class="com.cnblogs.demrystv.pojo.Source">
        <property name="fruit" value="橙汁" />
        <property name="sugar" value="少糖" />
        <property name="size" value="大杯" />
    </bean>

    <bean id="juiceMaker" class="com.cnblogs.demrystv.pojo.JuiceMaker2"
        destroy-method="destroy" init-method="init">
        <property name="beverageShop" value="贡茶" />
        <property name="source" ref="source" />
    </bean>
配置完成后,测试 Spring Bean的生命周期
ClassPathXmlApplicationContext ctx =
                new ClassPathXmlApplicationContext("spring-cfg.xml");
        JuiceMaker juiceMaker = (JuiceMaker) ctx.getBean("juiceMaker");
        System.out.println(juiceMaker.makeJuice());
        ctx.close();
运行它,可以得到下面的日志:
【Source】对象source开始实例化
【Source】对象source实例化完成
【JuiceMaker】调用BeanNameAware接口的setBeanName 方法
【JuiceMaker】调用BeanFactoryAware接口的setBeanFactory方法
【JuiceMaker】调用ApplicationContextAware 接口的setApplicationContext方法
【JuiceMaker】对象juicemaker开始实例化
【JuiceMaker】调用InitializingBean 接口的afterpropertiesSet方法
【JuiceMaker】执行自定义初始化方法
【JuiceMaker】对象juiceMaker 实例化完成
 这是一杯由贡茶饮品店,提供的大杯少糖橙汁
【JuiceMaker】调用DisposableBean接口的destory方法
【JuiceMaker】执行自定义销毁方法
从日志中就可以发现所有的生命周期的方法都已经被执行了,从打印的日志可以看到,BeanPostProcessor针对全部Bean,这样就可以利用生命周期来完成一些需要自定义的初始化和销毁Bean的行为。