本月做了一个小讲座,主要是WPF的开发技术介绍,由于是上班时间,去听的人不多,但对于自己来说至少是又巩固了Winform的知识,抽时间写一篇文章,在此分享给大家,有什么宝贵建议大家也可以提给我,谢谢。
本次讲座主要分三个模块:
1.WPF的历史
2.WPF的特性
3.WPF的开发流程
首先,让我们开始慢慢讲来:
1.WPF的历史
说到WPF的历史,我们可以从Winform的历史谈起,Winform的历史分为四个阶段,第一个阶段是在85到91年,C搭配Windows API的出现,这门技术现在看来虽然很古老,但是现在在很多地方,比如在我们的驱动、显卡比较底层的应用上或者Winform第三方控件,视频播放器,编译解码的时候都会调用到驱动;第二个阶段在92到01年,MFC的出现,MFC是历史上最多用的Windows编程方法,主要偏向于用户对界面美观等要求不高的情况,MFC速度比较快,在考虑到速度方面还是会有很多人用,虽然硬件技术的发展使得我们可以用Windiws Form或者WPF的速度赶上MFC,但是一些传统的公司因为已经用惯了MFC。。。第三个阶段就是02到06年,C#搭配Windows Form的出现,Windows Form要比MFC好,但是当时IT技术的关注点是Web上,所以当时虽然大家都在用.NET,但是真正的主角是ASP.NET(当然ASP.NET代替了ASP),而不是Windows Form,WIndows Form还没熬出头WPF就出现了。第四个阶段在07年至今,我们的WPF的出现,它和MFC或者Windows Form相比,功能相似,但是它们有着互不兼容的.NET API,他们偏向于传统的应用,很类似于Java Swing,没有考虑Web/Markup的需求,但是WPF考虑到了,我们的siverlight就是诞生于WPF。
2.WPF的特性
- XAML的引入
使得美工和程序可以实现分离,使得定制化主题/外观/行为更加方便也易于维护;
- 强大的 “数据绑定”功能
使得MVVM得以实现,成为“属性驱动”,而非WinForm的“事件驱动”;属性的更改可以自动获得,甚至通过转换器触发各种展示/行为的变更;
MVVM、MVC、MVP是目前比较流行的三大开发框架,MVVM主要用来和我们的WPF一起来做Windows的开发;
事件驱动是一种被动的,必须由用户的触发;而属性驱动是一种主动的,一种路由机制,只要数据的变更就可层层触发。
- 绚丽的展示效果
WPF(Windows Presentation Fundation)顾名思义其强大的图形化API为程序提供了超乎想象的图形效果。
WPF的开发流程
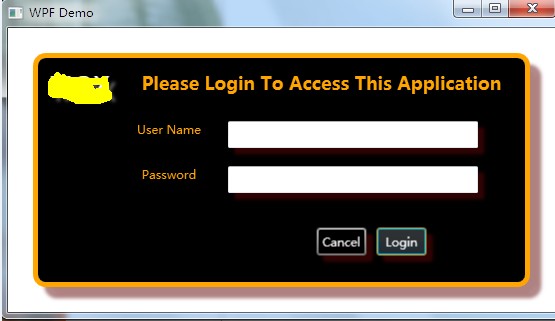
效果图:

源码:

  1 <Window x:Class="WpfApplicationDemo.Window1"
  2  xmlns="http://schemas.microsoft.com/winfx/2006/xaml/presentation"
  3     xmlns:x="http://schemas.microsoft.com/winfx/2006/xaml"
  4     Title="WPF Demo" Height="322" Width="563">
  5 <Style TargetType="Button">
  6             <Setter Property="Margin" Value="6"></Setter>
  7             <Setter Property="Padding" Value="4"></Setter>
  8             <Setter Property="MinWidth" Value="50"></Setter>
  9             <Setter Property="Width" Value="50"></Setter>
 10             <Setter Property="Height" Value="30"></Setter>
 11         </Style>
 12     </Window.Resources>
 13
 14         <Border CornerRadius="10"
 15           BorderBrush="Gray"
 16           BorderThickness="3"
 17           Background="BlueViolet"
 18           Margin="24"
 19           Padding="4">
 20         <Border.Effect>
 21             <DropShadowEffect Color="Gray"
 22                         Opacity=".50"
 23                         ShadowDepth="16" />
 24         </Border.Effect>
 25  <Window.Resources>
 26         <Style TargetType="Label">
 27             <Setter Property="Margin" Value="4"></Setter>
 28             <Setter Property="Foreground" Value="Orange"></Setter>
 29             <Setter Property="HorizontalAlignment" Value="Center"></Setter>
 30         </Style>
 31         <Style TargetType="TextBox">
 32             <Setter Property="Margin" Value="9"></Setter>
 33             <Setter Property="HorizontalAlignment" Value="Left"></Setter>
 34             <Setter Property="Width" Value="250"></Setter>
 35         </Style>
 36         <Style TargetType="PasswordBox">
 37             <Setter Property="Margin" Value="4"></Setter>
 38             <Setter Property="HorizontalAlignment" Value="Left"></Setter>
 39         </Style>
 40         <Style TargetType="Button">
 41             <Setter Property="Margin" Value="5"></Setter>
 42             <Setter Property="Width" Value="50"></Setter>
 43             <Setter Property="Height" Value="28"></Setter>
 44             <Setter Property="Foreground" Value="White"></Setter>
 45             <Setter Property="Background" Value="Black"></Setter>
 46             <Setter Property="BorderBrush" Value="Orange"></Setter>
 47         </Style>
 48     </Window.Resources>
 49 <Border CornerRadius="10"
 50           BorderBrush="Orange"
 51           BorderThickness="5"
 52           Background="Black"
 53           Margin="25"
 54           Padding="1">
 55         <Border.Effect>
 56             <DropShadowEffect Color="Brown"
 57                         Opacity=".50"
 58                         ShadowDepth="16" />
 59         </Border.Effect>
 60 <Grid>
 61             <Grid.ColumnDefinitions>
 62                 <ColumnDefinition Width="80"/>
 63                 <ColumnDefinition Width="100"/>
 64                 <ColumnDefinition Width="*" />
 65             </Grid.ColumnDefinitions>
 66             <Grid.RowDefinitions>
 67                 <RowDefinition Height="53"/>
 68                 <RowDefinition Height="45"/>
 69                 <RowDefinition Height="45"/>
 70                 <RowDefinition/>
 71             </Grid.RowDefinitions>
 72 <Label Grid.Column="1"
 73                    Grid.Row="0"
 74                    Grid.ColumnSpan="2"
 75                    FontSize="18"
 76                    FontWeight="Bold"
 77                    Margin="7">Please Login To Access This Application</Label>
 78             <Label Grid.Column="1"
 79                    Grid.Row="1">User Name</Label>
 80             <TextBox Grid.Column="2"
 81                      Grid.Row="1"
 82                      ToolTip="Enter Your User Name"
 83                      Name="txtUserName">
 84                 <TextBox.Effect>
 85                     <DropShadowEffect Color="Brown"
 86                               Opacity=".50"
 87                               ShadowDepth="9"/>
 88                 </TextBox.Effect>
 89             </TextBox>
 90 <Label Grid.Column="1"
 91                    Grid.Row="2">Password</Label>
 92             <TextBox Grid.Column="2"
 93                      Grid.Row="2"
 94                      ToolTip="Enter Your Password"
 95                      Name="txtPassword">
 96                 <TextBox.Effect>
 97                     <DropShadowEffect Color="Brown"
 98                               Opacity=".50"
 99                               ShadowDepth="9"/>
100                 </TextBox.Effect>
101             </TextBox>
102 <StackPanel Grid.Column="2"
103                         Grid.Row="3"
104                         Margin="5"
105                         HorizontalAlignment="Center"
106                         Orientation="Horizontal">
107                 <Button Name="btnCancel"
108                     IsCancel="True"
109                     Content="Cancel"
110                     Click="BtnCancel_Click" BorderBrush="#FF707070">
111                     <Button.Effect>
112                         <DropShadowEffect Color="Brown"
113                                           Opacity=".50"
114                                           ShadowDepth="9"/>
115                     </Button.Effect>
116                 </Button>
117                 <Button Name="btnLogin"
118                 IsDefault="True"
119                 Content="Login"
120                 Click="btnLogin_Click">
121                     <Button.Effect>
122                         <DropShadowEffect Color="Brown"
123                               Opacity=".50"
124                               ShadowDepth="9" />
125                     </Button.Effect>
126                 </Button>
127             </StackPanel>
128 <Label Grid.Column="0" Grid.Row="0"
129                    VerticalAlignment="Center"
130                    HorizontalAlignment="Center"
131                    FontSize="25"
132                    Foreground="White">MOX
133                 <Label.Effect>
134                     <DropShadowEffect Color="White"
135                                       Opacity=".50"
136                                       ShadowDepth="9"/>
137                 </Label.Effect>
138             </Label>
139         </Grid>
140     </Border>
141 </Window>
