这次让我们来看下控件可编辑设计区域的设计时支持.
一.单区域编辑
1.介绍
在内置控件中,典型的则是Panel控件,如下图
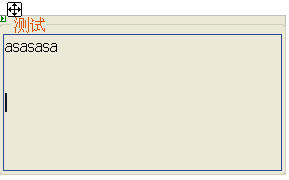
其在设计时提供了一个编辑区域,可方便的编辑控件内部文本,并提供了一个标题属性,此设计时呈现效果并非呈现以后的效果.另外除Panel控件外,MultiView控件也提供相似的设计时支持.下面我们看一下类图
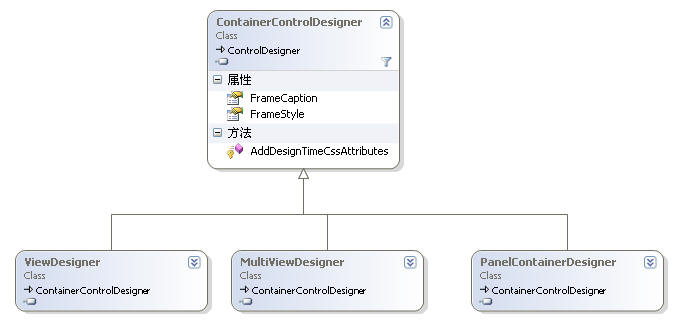
ContainerControlDesigner 提供单个带框区域来表示控件,注意是单个,你只需要关注以上两个属性和一个方法既可,最终的封装实现还是调用GetDesignTimeHtml 方法的,以下为属性简单说明
FrameCaption 设置时显示的标题
FrameStyle 设置时显示的标题样式
2.实现
2.1 自定义一个继承ContainerControlDesigner的类,并重写相关属性
 public class SimpleContainerControlDesigner : ContainerControlDesigner
 {
{

 private Style _style = null; //设计时标题 public override string FrameCaption
 {
{ get { return "我的测试控件";
 } } //设计时标题样式 public override Style FrameStyle { get { if (_style == null) { _style = new Style(); _style.Font.Name = "Verdana"; _style.Font.Size = new FontUnit(FontSize.XLarge); _style.BackColor = Color.LavenderBlush; _style.ForeColor = Color.DarkBlue; } return _style; } }
 }
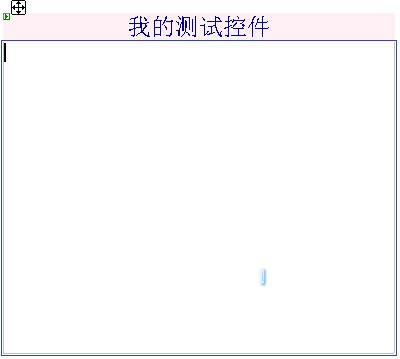
}2.2 自定义控件,并与控件相关联,该控件只提供了一个背景图片的属性
[ Designer(typeof(SimpleContainerControlDesigner)), ParseChildren(false) ] public class SimpleContainerControl : WebControl { public string BackgroundImage { get { return ViewState["BackgroundImage"] != null ? (string)ViewState["BackgroundImage"] : ""; } set { ViewState["BackgroundImage"] = value; } } protected override void AddAttributesToRender(HtmlTextWriter writer) { base.AddAttributesToRender(writer); writer.AddStyleAttribute(HtmlTextWriterStyle.BackgroundImage, BackgroundImage); } }好了,大功告成,可以看下效果了
2.3 设计时区域样式
还没完呢,为什么我故意设置一个BackgroundImage属性呢,现在我们设置BackgroundImage属性,当设置好以后(请一定设置此属性),你有没发现此控件区域内并没有出现背景图片.还不如不加自定义的设计时支持呢?
原因: 区域编辑区域样式的设计时的每个属性都是由ContainerControlDesigner帮你写好的,里面包括WebControl公有属性,这些不需要你重写,但当你自定义属性需要呈现,而你又想完美的在设计时看到效果时,则你必须重写AddDesignTimeCssAttributes方法了,如BackgroundImage属性,Panel控件也有背景图片这个属性,其设计时支持也是这么做的.实现方法如下
//添加设计时样式属性 protected override void AddDesignTimeCssAttributes(System.Collections.IDictionary styleAttributes) { base.AddDesignTimeCssAttributes(styleAttributes); SimpleContainerControl control = base.ViewControl as SimpleContainerControl; string BackgroundImage = control.BackgroundImage; if (BackgroundImage.Trim().Length > 0) { styleAttributes["background-image"] = "url(" + BackgroundImage + ")"; } }好了再测试下,效果出来了.以上我认为是理解的重点,其他倒没什么,大家多修改即可理解.
二.多区域编辑
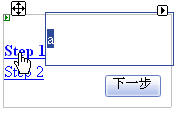
让我们来看下asp.net2.0中的Wizard控件的设计时,当点击 Step1和Step2时,你可以在区域中编辑不同的内容,我称之为多区域编辑
设计时支持什么呢?多区域则比刚才编辑一个区域复杂,刚才的几乎不需要做什么事情,现在要做的多一些
需要注意的地方如下
1.控件区域点击事件 刚才已经试过了当点击 Step1和Step2时,你可以在区域中编辑不同的内容
此部分操作在ControlDesignerd的OnClick事件中完成
2.设置区域
区域包括两种
(1).点击的区域,即step1和step2 (DesignerRegion类)
(2).编辑的区域,即那个小边框 (EditableDesignerRegion类)
此部分操作在GetDesignTimeHtml方法中完成
3.模板数据操作
包括两部分操作
(1)选择一个区域后,编辑区域显示要获取的数据
(2)当编辑完区域里数据后,更新数据
4.寻找事件触发对象
万事具备,刚才的第一步中,Step1和Step2也是呈现也页面上的,此做为事件触发者,所以我们还需要对其做一下标记.
好了,重要部门都已经说清楚了.下面来看例子
先看效果吧,方便理解.这里大多的例子直接来自MSDN
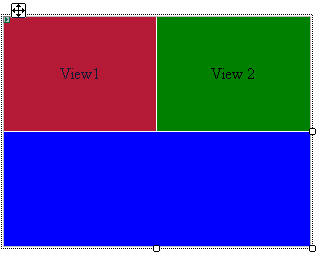
当点击View1和View2时,在蓝色区域会呈现不同模板的内容,还记得上篇模板控件的设计时支持吗?这里又有新方法了,而且更加简单.
下面为自定义控件代码,你只需要知道以下两点
1.提供了两个模板属性
2.Table提供了三个区域
步骤
(1).自定义一个从CompositeControlDesigner继承的类,CompositeControlDesigner为复合控件提供设计时支持,我们需要重写CreateChildControl方法
protected override void CreateChildControls() { base.CreateChildControls(); Table t = (Table)myControl.Controls[0]; if (t != null) { t.Rows[0].Cells[0].BackColor = Color.Red; //定义区域事件触发对象 t.Rows[0].Cells[0].Attributes[DesignerRegion.DesignerRegionAttributeName] = "0"; t.Rows[0].Cells[1].BackColor = Color.Green; t.Rows[0].Cells[1].Attributes[DesignerRegion.DesignerRegionAttributeName] = "1"; t.Rows[1].Cells[0].BackColor = Color.Blue; t.Rows[1].Cells[0].Attributes[DesignerRegion.DesignerRegionAttributeName] = "2"; } }主要工作就是为Click事件定义了区域事件出发对象,方法则是为控件属性集合提供DesignerRegion.DesignerRegionAttributeName属性,注意值0,1,2和GetDesignTimeHtml方法中的DesignerRegionCollection集合顺序是一样的,不可以弄乱,按上面效果图
你可以看到0和1是触发区域事件的对象(即View1和View2),2则是编辑区域
(2)添加区域,接同上面步骤,在GetDesignTimeHtml方法中完成,这里命名哦,跟各个操作步骤紧密联系在一起的
public override String GetDesignTimeHtml(DesignerRegionCollection regions) { //注意构造函数命名以及区域顺序 //区域顺序与DesignerRegion.DesignerRegionAttributeName相对应 regions.Add(new DesignerRegion(this, "Header0")); regions.Add(new DesignerRegion(this, "Header1")); EditableDesignerRegion editableRegion = new EditableDesignerRegion(this, "Content" + myControl.CurrentView, false); regions.Add(editableRegion); //突出编辑区域 regions[myControl.CurrentView].Highlight = true; return base.GetDesignTimeHtml(); }(4)更新和获取模板数据操作
//获取模板内部数据 public override string GetEditableDesignerRegionContent(EditableDesignerRegion region) { IDesignerHost host = (IDesignerHost)Component.Site.GetService(typeof(IDesignerHost)); if (host != null) { ITemplate template = myControl.View1; if (region.Name == "Content1") template = myControl.View2; if (template != null) return ControlPersister.PersistTemplate(template, host); } return String.Empty; } //设置模板内部数据 public override void SetEditableDesignerRegionContent(EditableDesignerRegion region, string content) { if (content == null) return; IDesignerHost host = (IDesignerHost)Component.Site.GetService(typeof(IDesignerHost)); if (host != null) { ITemplate template = ControlParser.ParseTemplate(host, content); if (template != null) { if (region.Name.EndsWith("0")) myControl.View1 = template; else if (region.Name.EndsWith("1")) myControl.View2 = template; } } }好了,又完成了一个.里面一些新出现的类,大家查查MSDN熟悉下就好,知道如何做才是最重要的,如果还不是很清楚,建议你把里面的程序改改,再编译,这样会出现不同的效果,多次反复测试就会明白了.
这里主要是讨论区域编辑,作为控件开发很重要的一部分,设计时支持也很重要.下次我们继续