1、前提说明
- 通常
2、代码使用说明
-
2.1 脚本基本代码
#!/bin/sh iPhoneIcon() { sips -z 30 25 if_connected_green.png --out ./AppIcon/netdetail_down.png sips -z 60 50 if_connected_green.png --out ./AppIcon/netdetail_down@2x.png sips -z 90 75 if_connected_green.png --out ./AppIcon/netdetail_down@3x.png } rm -r -f AppIcon mkdir AppIcon iPhoneIcon -
2.2 参数说明
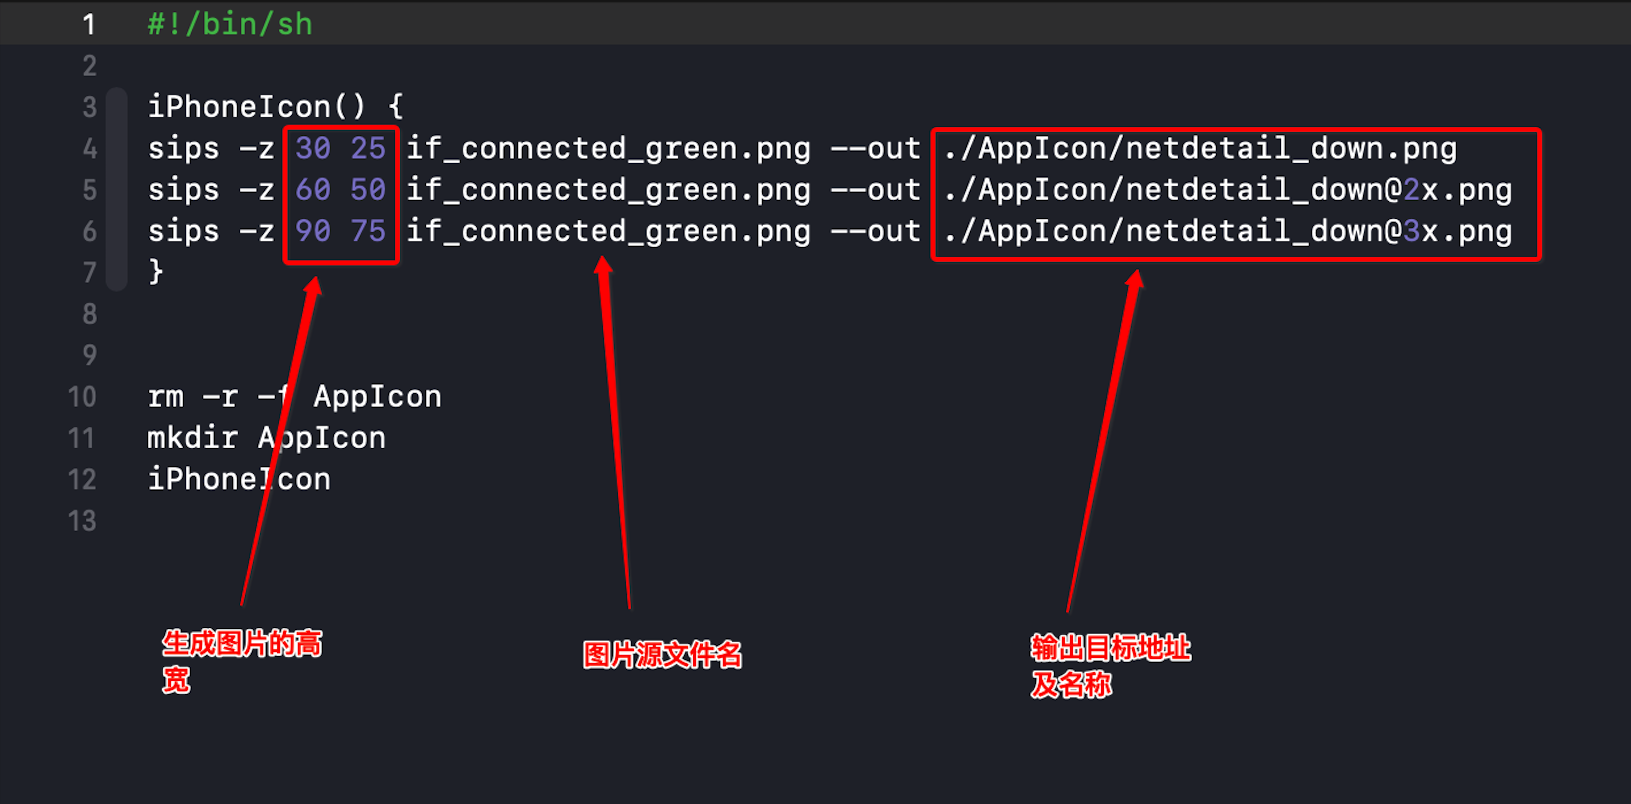
-
2.3 使用流程
- 打开命令窗口

- 进入文件夹及各文件说明

- 运行脚本 sh AppIcon.sh

- 运行结果查看,进入输出文件夹
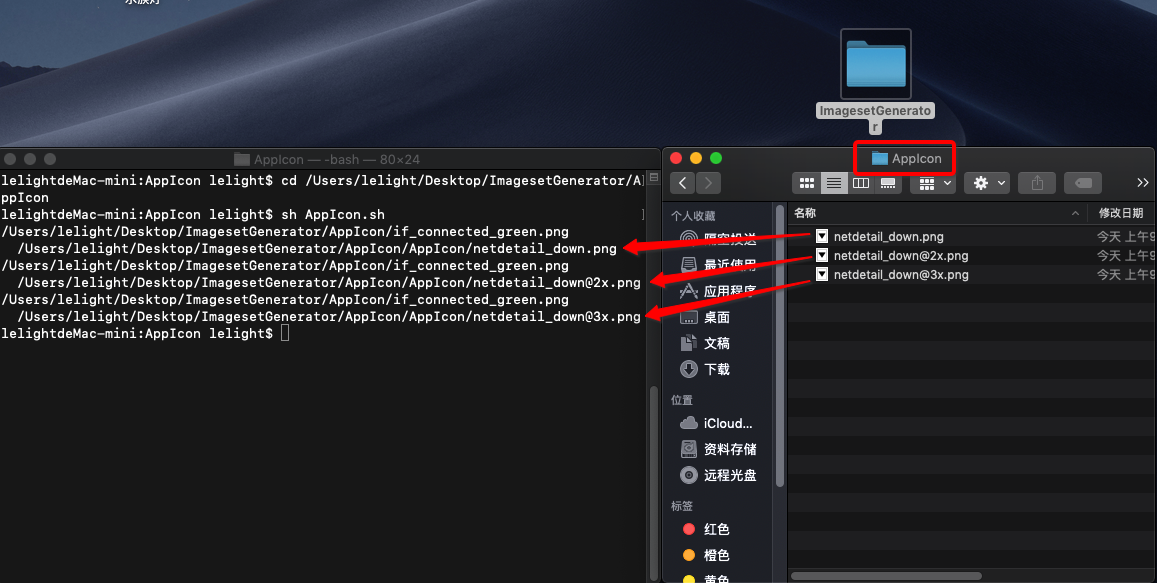

- 打开命令窗口
3、app 图标与启动图尺寸脚本程序
- 适配时间:2018年,适配iphoneX Max
-
3.1 app图标AppIcon.sh
#!/bin/sh iPhoneIcon() { sips -z 40 40 icon.png --out ./AppIcon/icon_20@2x.png sips -z 60 60 icon.png --out ./AppIcon/icon_20@3x.png sips -z 58 58 icon.png --out ./AppIcon/icon_29@2x.png sips -z 87 87 icon.png --out ./AppIcon/icon_29@3x.png sips -z 80 80 icon.png --out ./AppIcon/icon_40@2x.png sips -z 120 120 icon.png --out ./AppIcon/icon_40@3x.png sips -z 120 120 icon.png --out ./AppIcon/icon_60@2x.png sips -z 180 180 icon.png --out ./AppIcon/icon_60@3x.png sips -z 1024 1024 icon.png --out ./AppIcon/appStore_1024.png } iPadIcon() { sips -z 20 20 icon.png --out ./AppIcon/iPad_20.png sips -z 40 40 icon.png --out ./AppIcon/iPad_20@2x.png sips -z 29 29 icon.png --out ./AppIcon/iPad_29.png sips -z 58 58 icon.png --out ./AppIcon/iPad_29@2x.png sips -z 40 40 icon.png --out ./AppIcon/iPad_40.png sips -z 80 80 icon.png --out ./AppIcon/iPad_40@2x.png sips -z 76 76 icon.png --out ./AppIcon/iPad_76.png sips -z 152 152 icon.png --out ./AppIcon/iPad_76@2x.png sips -z 167 167 icon.png --out ./AppIcon/iPad_83.5@2x.png } rm -r -f AppIcon mkdir AppIcon iPhoneIcon iPadIcon -
3.2 启动图AppLaunch.sh
#!/bin/sh

setImage(){
    sips -z 960 640 default.png --out ./LaunchImage/Default640x960.png
    sips -z 1136 640 default.png --out ./LaunchImage/Default640x1136.png
    sips -z 1334 750 default.png --out ./LaunchImage/Default750x1334.png
    sips -z 2208 1242 default.png --out ./LaunchImage/Default1242x2208.png
    sips -z 2436 1125 default.png --out ./LaunchImage/Default1125x2436.png
    sips -z 1792 828 default.png --out ./LaunchImage/Default828x1792.png
    sips -z 2688 1242 default.png --out ./LaunchImage/Default1242x2688.png

    sips -z 640 960 ./AllSourceImage/AppLaunch.png --out ./OutPut/LaunchImage/Default640x960.png
    sips -z 640 1136 ./AllSourceImage/AppLaunch.png --out ./OutPut/LaunchImage/Default640x1136.png
    sips -z 750 1334 ./AllSourceImage/AppLaunch.png --out ./OutPut/LaunchImage/Default750x1334.png
    sips -z 1242 2208 ./AllSourceImage/AppLaunch.png --out ./OutPut/LaunchImage/Default1242x2208.png
    sips -z 1125 2436 ./AllSourceImage/AppLaunch.png --out ./OutPut/LaunchImage/Default1125x2436.png
    sips -z 828 1792 ./AllSourceImage/AppLaunch.png --out ./OutPut/LaunchImage/Default828x1792.png
    sips -z 1242 2688 ./AllSourceImage/AppLaunch.png --out ./OutPut/LaunchImage/Default1242x2688.png
}

#调用函数
mkdir LaunchImage
setImage