1.glance介绍
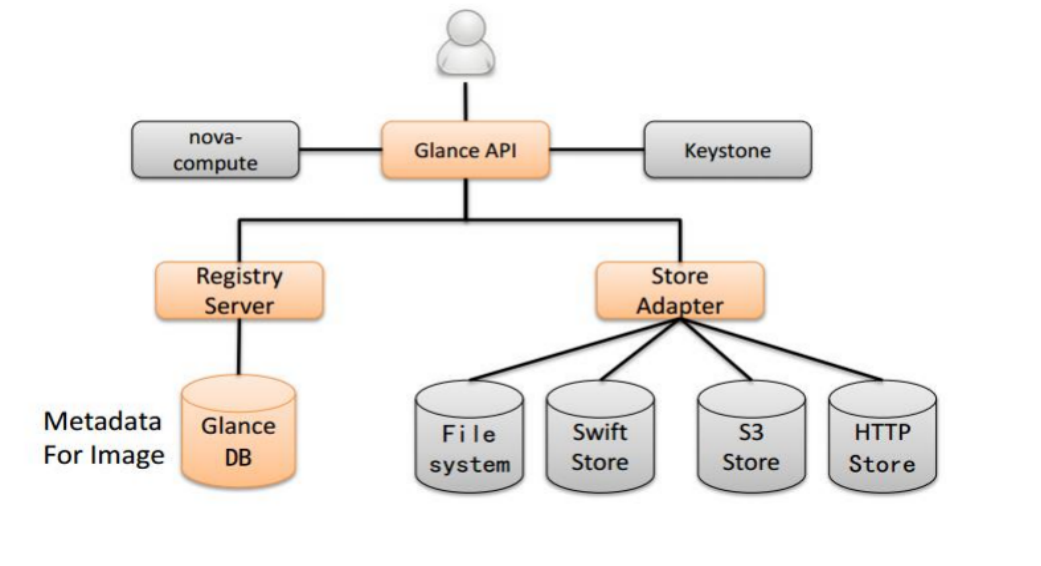
Glance是Openstack项目中负责镜像管理的模块,其功能包括虚拟机镜像的查找、注册和检索等。 Glance提供Restful API可以查询虚拟机镜像的metadata及获取镜像。 Glance可以将镜像保存到多种后端存储上,比如简单的文件存储或者对象存储。

2.image介绍
1)在传统 IT 环境下,安装一个系统要么从安装 CD 从头安装,要么用 Ghost 等克隆工具恢复。这两种方式有如下几个问题:
(1)如果要安装的系统多了效率就很低
(2)时间长,工作量大
(3)安装完还要进行手工配置,比如安装其他的软件,设置 IP 等
(4)备份和恢复系统不灵活
2)云环境下需要更高效的方案,这就是 Image。 Image 是一个模板,里面包含了基本的操作系统和其他的软件。
举例来说,有家公司需要为每位员工配置一套办公用的系统,一般需要一个 Windows系统再加 office 软件。 OpenStack 是这么做的:
(1)先手工安装好这么一个虚机
(2)然后对虚机执行 snapshot,这样就得到了一个 image
(3)当有新员工入职需要办公环境时,立马启动一个或多个该 image 的 instance(虚机)就可以了
在这个过程中,第 1 步跟传统方式类似,需要手工操作和一定时间,但第 2、3 步非常快,全自动化,一般都是秒级别。而且 2、3 步可以循环做。 比如公司新上了一套 OA 系统,每个员工的 PC 上都得有客户端软件。 那么可以在某个现有虚机中先手工安装好 OA 客户端,然后执行 snapshot 操作,得到新的 image,以后可以就直接使用新 image 创建虚机了。另外,snapshot 还有备份的作用,能够非常方便的恢复系统。
3)Image Service 的功能是管理 Image,让用户能够发现、获取和保存 Image。在 OpenStack 中,提供 Image Service 的是 Glance,其具体功能如下:
(1)提供 REST API 让用户能够查询和获取 image 的元数据和 image 本身
(2)支持多种方式存储 image,包括普通的文件系统、Swift、Amazon S3 等
(3)对 Instance 执行 Snapshot 创建新的 image
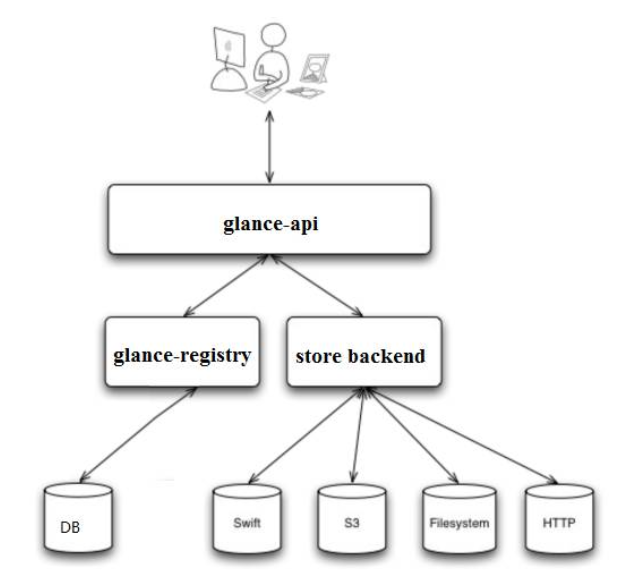
4)glance架构

(1)glance-api
glance-api 是系统后台运行的服务进程。 对外提供 REST API,响应 image 查询、获取和存储的调用。
glance-api 不会真正处理请求。 如果操作是与 image metadata(元数据)相关,glance-api 会把请求转发给glance-registry; 如果操作是与 image 自身存取相关,glance-api 会把请求转发给该 image 的 store backend。
    在控制节点上可以查看 glance-api 与 进程

    ps aux | grep glance-api

    glance     7394  1.5  2.8 392164 81780 ?        Ss   11:55   2:13 /usr/bin/python2 /usr/bin/glance-api

    glance     7414  0.0  2.8 399992 82164 ?        S    11:55   0:00 /usr/bin/python2 /usr/bin/glance-api

    glance     7415  0.0  2.8 400524 83012 ?        S    11:55   0:00 /usr/bin/python2 /usr/bin/glance-api

    root      10501  0.0  0.0 112664   972 pts/0    S+   14:19   0:00 grep --color=auto glance-api
(2)glance-registry
glance-registry 是系统后台运行的服务进程。 负责处理和存取 image 的 metadata,例如 image 的大小和类型。
    在控制节点上可以查看 glance-registry 进程

    ps aux | grep glance-registry

    glance     7395  0.0  2.4 350724 72232 ?        Ss   11:55   0:01 /usr/bin/python2 /usr/bin/glance-registry

    glance     7412  0.0  2.3 350724 67444 ?        S    11:55   0:00 /usr/bin/python2 /usr/bin/glance-registry

    glance     7413  0.0  2.3 350724 67444 ?        S    11:55   0:00 /usr/bin/python2 /usr/bin/glance-registry

    root      10538  0.0  0.0 112664   976 pts/0    S+   14:20   0:00 grep --color=auto glance-registry
(3)Glance 支持多种格式的 image,包括

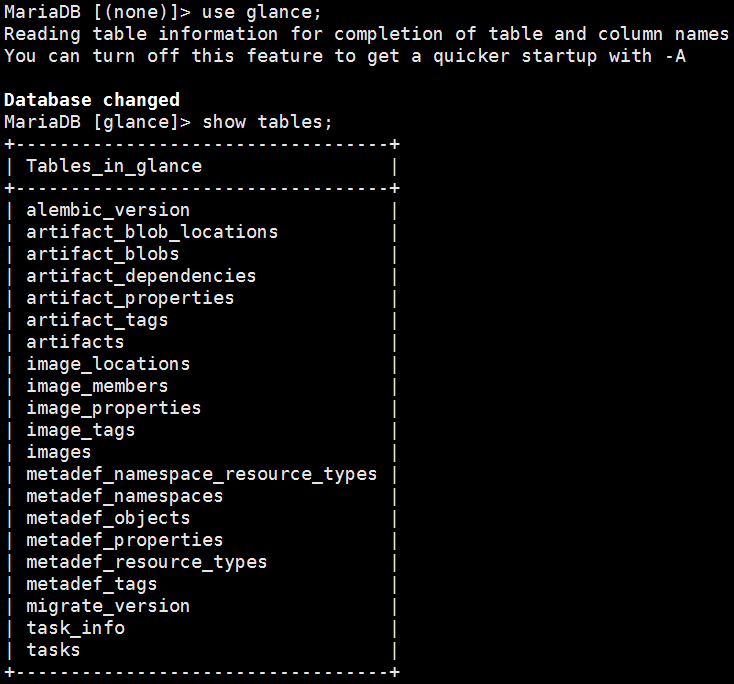
(4)Database
Image 的 metadata 会保持到 database 中,默认是 MySQL。 在控制节点上可以查看 glance 的 database 信息

(5)Store backend
Glance 自己并不存储 image。 真正的 image 是存放在 backend 中的。 Glance 支持多种 backend,包括:
A directory on a local file system(这是默认配置)
GridFS
Ceph RBD
Amazon S3
Sheepdog
OpenStack Block Storage (Cinder)
OpenStack Object Storage (Swift)
VMware ESX
具体使用哪种 backend,是在 /etc/glance/glance-api.conf 中配置的。

其他 backend 的配置可参考http://docs.openstack.org/liberty/config-reference/content/configuring-image-service-backends.html。每个 image 在目录下都对应有一个文件,文件以 image 的 ID 命名。
3.glance服务搭建
1)条件准备
(1)准备数据库
  create database glance;

  grant all privileges on glance.* to 'glance'@'localhost' identified by 'GLANCE_DBPASS';

  grant all privileges on glance.* to 'glance'@'%' identified by 'GLANCE_DBPASS';
(2)登录openstack
source openrc
(3)创建用户、服务
创建用户
    openstack user create --domain default --password=glance glance
    +---------------------+----------------------------------+
    | Field               | Value                            |
    +---------------------+----------------------------------+
    | domain_id           | default                          |
    | enabled             | True                             |
    | id                  | 394ed512341541fa827181877505ef4a |
    | name                | glance                           |
    | options             | {}                               |
    | password_expires_at | None                             |
    +---------------------+----------------------------------+

    openstack user list
    +----------------------------------+--------+
    | ID                               | Name   |
    +----------------------------------+--------+
    | 394ed512341541fa827181877505ef4a | glance |
    | cd9ce1eb589b445e9b98c53a36bdc8d8 | admin  |
    | e880cc125bb541128c9bc47233d91732 | demo   |
    +----------------------------------+--------+
将glance用户角色设置为admin
openstack role add --project service --user glance admin
创建glance服务
    openstack service create --name glance --description "OpenStack Image" image
    +-------------+----------------------------------+
    | Field       | Value                            |
    +-------------+----------------------------------+
    | description | OpenStack Image                  |
    | enabled     | True                             |
    | id          | d533cf98bd2f41f8958c2eadbad5d34f |
    | name        | glance                           |
    | type        | image                            |
    +-------------+----------------------------------+
(4)创建镜像服务API的endpoints
    openstack endpoint create --region RegionOne image public http://node1:9292
    +--------------+----------------------------------+
    | Field        | Value                            |
    +--------------+----------------------------------+
    | enabled      | True                             |
    | id           | dcc9722a128a43a58f23eb1e9c368292 |
    | interface    | public                           |
    | region       | RegionOne                        |
    | region_id    | RegionOne                        |
    | service_id   | d533cf98bd2f41f8958c2eadbad5d34f |
    | service_name | glance                           |
    | service_type | image                            |
    | url          | http://node1:9292                |
    +--------------+----------------------------------+

    openstack endpoint create --region RegionOne image internal http://node1:9292
    +--------------+----------------------------------+
    | Field        | Value                            |
    +--------------+----------------------------------+
    | enabled      | True                             |
    | id           | 3b48b8b801d1486988efed0059faa6ac |
    | interface    | internal                         |
    | region       | RegionOne                        |
    | region_id    | RegionOne                        |
    | service_id   | d533cf98bd2f41f8958c2eadbad5d34f |
    | service_name | glance                           |
    | service_type | image                            |
    | url          | http://node1:9292                |
    +--------------+----------------------------------+

    openstack endpoint create --region RegionOne image admin http://node1:9292
    +--------------+----------------------------------+
    | Field        | Value                            |
    +--------------+----------------------------------+
    | enabled      | True                             |
    | id           | 53eeb5d0e431444eb47de36a77ce04cb |
    | interface    | admin                            |
    | region       | RegionOne                        |
    | region_id    | RegionOne                        |
    | service_id   | d533cf98bd2f41f8958c2eadbad5d34f |
    | service_name | glance                           |
    | service_type | image                            |
    | url          | http://node1:9292                |
    +--------------+----------------------------------+
2)安装和配置glance服务
(1)安装软件包
yum install openstack-glance -y
(2)修改配置文件
    vim /etc/glance/glance-api.conf
    [database]
    connection = mysql+pymysql://glance:GLANCE_DBPASS@node1/glance
    ...
    [keystone_authtoken]
    auth_uri = http://node1:5000
    auth_url = http://node1:35357
    memcached_servers = node1:11211
    auth_type = password
    project_domain_name = default
    user_domain_name = default
    project_name = service
    username = glance
    password = GLANCE_PASS
    ...
    [paste_deploy]
    flavor = keystone
    ...
    [glance_store]
    stores = file,http
    default_store = file
    filesystem_store_datadir = /var/lib/glance/images/

    vim /etc/glance/glance-registry.conf
    [database]
    connection = mysql+pymysql://glance:GLANCE_DBPASS@node1/glance
    ...
    [keystone_authtoken]
    auth_uri = http://node1:5000
    auth_url = http://node1:35357
    memcached_servers = node1:11211
    auth_type = password
    project_domain_name = default
    user_domain_name = default
    project_name = service
    username = glance
    password = GLANCE_PASS
    . . .
    [paste_deploy]
    flavor = keystone
或者可以用如下方法

    cd /etc/glance/

    cp glance-api.conf glance-api.conf.bak -a

    cp glance-registry.conf glance-registry.conf.bak -a

    vim glance-api.conf
    [DEFAULT]

    [cors]

    [cors.subdomain]

    [database]
    connection = mysql+pymysql://glance:GLANCE_DBPASS@node1/glance

    [glance_store]
    stores = file,http
    default_store = file
    filesystem_store_datadir = /var/lib/glance/images/

    [image_format]

    [keystone_authtoken]
    auth_uri = http://node1:5000
    auth_url = http://node1:35357
    memcached_servers = node1:11211
    auth_type = password
    project_domain_name = default
    user_domain_name = default
    project_name = service
    username = glance
    password = glance

    [matchmaker_redis]

    [oslo_concurrency]

    [oslo_messaging_amqp]

    [oslo_messaging_kafka]

    [oslo_messaging_notifications]

    [oslo_messaging_rabbit]

    [oslo_messaging_zmq]

    [oslo_middleware]

    [oslo_policy]

    [paste_deploy]
    flavor = keystone

    [profiler]

    [store_type_location_strategy]

    [task]

    [taskflow_executor]


    vim glance-registry.conf
    [DEFAULT]

    [database]
    connection = mysql+pymysql://glance:GLANCE_DBPASS@node1/glance

    [keystone_authtoken]
    auth_uri = http://node1:5000
    auth_url = http://node1:35357
    memcached_servers = node1:11211
    auth_type = password
    project_domain_name = default
    user_domain_name = default
    project_name = service
    username = glance
    password = glance

    [matchmaker_redis]

    [oslo_messaging_amqp]

    [oslo_messaging_kafka]

    [oslo_messaging_notifications]

    [oslo_messaging_rabbit]

    [oslo_messaging_zmq]

    [oslo_policy]

    [paste_deploy]
    flavor = keystone

    [profiler]
(3)同步数据库
su -s /bin/sh -c "glance-manage db_sync" glance
(4)设置开机自启
    systemctl restart openstack-glance-api.service  openstack-glance-registry.service

    systemctl enable openstack-glance-api.service  openstack-glance-registry.service
3)导入镜像进行验证
(1)下载镜像
wget http://download.cirros-cloud.net/0.3.5/cirros-0.3.5-x86_64-disk.img
(2)上传镜像
    openstack image create "cirrors"
    > --file cirros-0.3.3-x86_64-disk.img
    > --disk-format qcow2 --container-format bare
    > --public
    +------------------+------------------------------------------------------+
    | Field            | Value                                                |
    +------------------+------------------------------------------------------+
    | checksum         | 133eae9fb1c98f45894a4e60d8736619                     |
    | container_format | bare                                                 |
    | created_at       | 2019-07-30T06:12:37Z                                 |
    | disk_format      | qcow2                                                |
    | file             | /v2/images/cf5c5c98-30a2-494a-b24d-379511491a28/file |
    | id               | cf5c5c98-30a2-494a-b24d-379511491a28                 |
    | min_disk         | 0                                                    |
    | min_ram          | 0                                                    |
    | name             | cirrors                                              |
    | owner            | 7d3f0cd56a104c60a36196675f62428e                     |
    | protected        | False                                                |
    | schema           | /v2/schemas/image                                    |
    | size             | 13200896                                             |
    | status           | active                                               |
    | tags             |                                                      |
    | updated_at       | 2019-07-30T06:12:37Z                                 |
    | virtual_size     | None                                                 |
    | visibility       | public                                               |
    +------------------+------------------------------------------------------+
(3)查看镜像
    openstack image list
    +--------------------------------------+---------+--------+
    | ID                                   | Name    | Status |
    +--------------------------------------+---------+--------+
    | cf5c5c98-30a2-494a-b24d-379511491a28 | cirrors | active |
    +--------------------------------------+---------+--------+
(4)删除镜像
openstack image delete cf5c5c98-30a2-494a-b24d-379511491a28
