文件I/O
一、先来了解下什么是文件I/O和标准I/O:
文件I/O:文件I/O称之为不带缓存的IO(unbuffered I/O)。不带缓存指的是每个read,write都调用内核中的一个系统调用。也就是一般所说的低级I/O——操作系统提供的基本IO服务,与os绑定,特定于linix或unix平台。
标准I/O:标准I/O是ANSI C建立的一个标准I/O模型,是一个标准函数包和stdio.h头文件中的定义,具有一定的可移植性。标准I/O库处理很多细节。例如缓存分配,以优化长度执行I/O等。标准的I/O提供了三种类型的缓存。
(1)全缓存:当填满标准I/O缓存后才进行实际的I/O操作。
(2)行缓存:当输入或输出中遇到新行符时,标准I/O库执行I/O操作。
(3)不带缓存:stderr就是了。
二、二者的区别
文件I/O 又称为低级磁盘I/O,遵循POSIX相关标准。任何兼容POSIX标准的操作系统上都支持文件I/O。标准I/O被称为高级磁盘I/O,遵循ANSI C相关标准。只要开发环境中有标准I/O库,标准I/O就可以使用。(Linux 中使用的是GLIBC,它是标准C库的超集。不仅包含ANSI C中定义的函数,还包括POSIX标准中定义的函数。因此,Linux 下既可以使用标准I/O,也可以使用文件I/O)。
通过文件I/O读写文件时,每次操作都会执行相关系统调用。这样处理的好处是直接读写实际文件,坏处是频繁的系统调用会增加系统开销,标准I/O可以看成是在文件I/O的基础上封装了缓冲机制。先读写缓冲区,必要时再访问实际文件,从而减少了系统调用的次数。
文件I/O中用文件描述符表现一个打开的文件,可以访问不同类型的文件如普通文件、设备文件和管道文件等。而标准I/O中用FILE(流)表示一个打开的文件,通常只用来访问普通文件。
————————————————
版权声明:上面内容为CSDN博主「zqixiao_09」的原创文章,遵循CC 4.0 BY-SA版权协议,转载请附上原文出处链接及本声明。
原文链接:https://blog.csdn.net/zqixiao_09/article/details/50444465
三、文件I/O常见函数
(1)open函数:打开文件

参数介绍:
*pathname:文件路径和文件名
flags:标志位,用来指定打开的模式,O_RDONLY(只读),O_WRONLY(只写),O_RDWR (可读可写),还有以下几个参数
O_APPEND: 追加到文件尾。
O_CREAT: 若文件不存在则创建它。使用此选择项时,需同时说明第三个参数mode,用其说明新闻件的访问权限。
O_EXCL: 如果同时指定O_CREAT,而该文件又是存在的,报错;也可以测试一个文件是否存在,不存在则创建。
O_TRUNC: 如果文件存在,而且为读写或只写成功打开,则将其长度截短为0,与O_APPEND相对,若文件存在将会把内容清空。
O_SYNC: 使每次write都等到物理IO操作完成。
mode:只有在文件创建才用到,用于指定文件访问权限:
| 参数 | 说明 | 参数 | 说明 |
| S_IRUSR |
所有者拥有 读权限 |
S_IXGRP |
群组拥有执 行权限 |
| S_IWUSR |
所有者拥有 写权限 |
S_IROTH |
其他用户拥 有读权限 |
| S_IXUSR |
所有者拥有 执行权限 |
S_IWOTH |
其他用户拥 有写权限 |
| S_IRGRP | 群组拥有读权限 | S_IXOTH |
其他用户拥 有执行权限 |
| S_IWGRP | 群组拥有写权限 |
文件权限标志也可以使用加权数字表示,这组数字被称为umask变量,它的类型是mode_t,是一个无符号八进制数。umask变量的定义方法如表13.4所示。umask变量由3位数字组成,数字的每一位代表一类权限。用户所获得的权限是加权数值的总和。例如764表示所有者拥有读、写和执行权限,群组拥有读和写权限,其他用户拥有读权限。
open函数的返回值:
1、返回值是一个整数。
2、打开文件成功,返回文件描述符。
3、打开文件失败,返回-1。
我们用一段代码来演示函数如何使用,从上面的截图中我们可以看到open函数有两种情况。
情况一:
1 #include <sys/types.h>
2 #include <sys/stat.h>
3 #include <fcntl.h>
4
5 int open(const char *pathname, int flags);
首先我们创建一个名为file.txt的文件,接下来我们就打开这个文件。

代码如下:
 1 #include<sys/types.h>
 2 #include<sys/stat.h>
 3 #include<unistd.h>
 4 #include<stdlib.h>
 5 #include<stdio.h>
 6 #include<fcntl.h>
 7 int main() {
 8     int fd=open("file.txt",O_RDONLY);
 9     if(fd == -1)
10     {
11         perror("Fail to open:");
12         return -1;
13     }
14     printf("fd=%d
",fd);
15     printf("Open successfull
");
16     return 0;
17 }
运行结果

这是文件存在的情况,文件可以正常打开,如果文件不存在,将会用perror输出错误信息

如果文件不存在,我们就需要用到标志位的O_CREAT。
代码如下:
 1 #include<sys/types.h>
 2 #include<sys/stat.h>
 3 #include<unistd.h>
 4 #include<stdlib.h>
 5 #include<stdio.h>
 6 #include<fcntl.h>
 7 int main() {
 8     int fd=open("file.txt",O_RDONLY|O_CREAT);
 9     if(fd == -1)
10     {
11         perror("Fail to open:");
12         return -1;
13     }
14     printf("fd=%d
",fd);
15     printf("Open successfull
");
16     return 0;
17 }
运行结果:

可以通过终端发现,刚开始在文件夹下并没有file.txt,运行程序之后新建了一个file.txt,但是我们想,Linux下的文件都是有权限的,这样才能更好的控制这个文件,这里就需要open函数的第二种用法了。
int open(const char *pathname, int flags, mode_t mode);

这是我们没有设置权限的情况下,系统默认加的,当我们使用设置权限时
 1 #include<sys/types.h>
 2 #include<sys/stat.h>
 3 #include<unistd.h>
 4 #include<stdlib.h>
 5 #include<stdio.h>
 6 #include<fcntl.h>
 7 int main() {
 8     int fd=open("file.txt",O_RDONLY|O_CREAT,0664);
 9     if(fd == -1)
10     {
11         perror("Fail to open:");
12         return -1;
13     }
14     printf("fd=%d
",fd);
15     printf("Open successfull
");
16     return 0;
17 }
运行结果:

可以看到文件已经设置成了我们想要的权限。
(2)close函数:关闭文件

该函数只有一个参数,就是文件的描述符,返回值是整型,如果返回0就表示关闭成功,返回-1就表示失败。
代码:
 1 #include<sys/types.h>
 2 #include<sys/stat.h>
 3 #include<unistd.h>
 4 #include<stdlib.h>
 5 #include<stdio.h>
 6 #include<fcntl.h>
 7 int main() {
 8     int fd=open("file.txt",O_RDONLY|O_CREAT,0664);
 9     if(fd == -1)
10     {
11         perror("Fail to open:");
12         return -1;
13     }
14     printf("fd=%d
",fd);
15     printf("Open successfull
");
16     int flag;
17     if((flag = close(fd)) == 0)
18     {
19         printf("flag=%d
",flag);
20         printf("Close successful
");
21     }
22     return 0;
23 }
运行结果:

我们需要注意一点,如果我们文件操作完之后一定要记得关闭文件,否则可能会造成文件损坏。
(3)write函数:向文件中写内容

参数介绍:
fd:文件描述符
buf:要写入文件的内容
count:要写入文件的内容的长度,以字节为单位
返回值:写入成功则返回写入的字节数,失败则返回-1
代码演示:
 1 #include<sys/types.h>
 2 #include<sys/stat.h>
 3 #include<unistd.h>
 4 #include<stdlib.h>
 5 #include<stdio.h>
 6 #include<fcntl.h>
 7 int main() {
 8     int fd = open("file.txt",O_WRONLY|O_CREAT,0664);
 9     if(fd == -1)
10     {
11         perror("Fail to open:");
12         return -1;
13     }
14     printf("Open successful
");
15     char buf[] = "hello world";
16     if(write(fd,buf,11) == -1)
17     {
18         perror("Fail to write:");
19         close(fd);
20         return -1;
21     }
22     printf("Write successful
");
23     close(fd);
24     return 0;
25 }
运行结果:

这里我们要提一下open函数的两个flag——O_TRUNC和O_APPEND,前者表示清除文件的内容,后者表示在文件原有内容的后面加上,我们用代码来演示一下。
 1 #include<sys/types.h>
 2 #include<sys/stat.h>
 3 #include<unistd.h>
 4 #include<stdlib.h>
 5 #include<stdio.h>
 6 #include<fcntl.h>
 7 int main() {
 8     int fd = open("file.txt",O_WRONLY|O_CREAT,0664);
 9     if(fd == -1)
10     {
11         perror("Fail to open:");
12         return -1;
13     }
14     printf("Open successful
");
15     char buf[] = "hello world";
16     if(write(fd,buf,11) == -1)
17     {
18         perror("Fail to write:");
19         close(fd);
20         return -1;
21     }
22     printf("file.txt中写入的内容是:%s
",buf);
23     close(fd);
24     fd = open("file.txt",O_WRONLY|O_TRUNC);
25     if(fd == -1)
26     {
27         perror("Fail to open:");
28         return -1;
29     }
30     char buf2[] = "welcome to ChangSha";
31     if(write(fd,buf2,19) == -1)
32     {
33         perror("Fail to write:");
34         close(fd);
35         return -1;
36     }
37     printf("file.txt中又写入了%s
",buf2);
38     close(fd);
39     return 0;
40 }
运行结果:

在这段代码中我们用得是O_TRUNC,我们先写入了hello world,然后又写入了welcome to ChangSha,但最后我们发现只剩第二句了,那是因为第一次写得被清空了。接下来让我们再用一下O_APPEND来看一下区别。
代码:
 1 #include<sys/types.h>
 2 #include<sys/stat.h>
 3 #include<unistd.h>
 4 #include<stdlib.h>
 5 #include<stdio.h>
 6 #include<fcntl.h>
 7 int main() {
 8     int fd = open("file.txt",O_WRONLY|O_CREAT,0664);
 9     if(fd == -1)
10     {
11         perror("Fail to open:");
12         return -1;
13     }
14     printf("Open successful
");
15     char buf[] = "hello world";
16     if(write(fd,buf,11) == -1)
17     {
18         perror("Fail to write:");
19         close(fd);
20         return -1;
21     }
22     printf("file.txt中写入的内容是:%s
",buf);
23     close(fd);
24     fd = open("file.txt",O_WRONLY|O_APPEND);
25     if(fd == -1)
26     {
27         perror("Fail to open:");
28         return -1;
29     }
30     char buf2[] = "welcome";
31     if(write(fd,buf2,7) == -1)
32     {
33         perror("Fail to write:");
34         close(fd);
35         return -1;
36     }
37     printf("file.txt中又写入了%s
",buf2);
38     close(fd);
39     return 0;
40 }
运行结果:

可以看到在hello world后面又加入了welcome,这就是O_APPEND的效果。
(4)read函数:读取文件中内容

参数介绍:
fd:文件描述符
buf:读取到的内容存放的位置
count:读取到的字节数
返回值:
成功:有两种情况,一种是返回读取到的字节数,一种是0(注意:返回0并不是就表示出错了,而是我们读取到了文件末尾)
失败:返回-1,并且可通过perror打印错误信息。
代码演示:
我们首先创建一个文件,在文件中写入hello linux,接下来将用read函数读取这个文件的内容。

代码演示:
 1 #include<sys/types.h>
 2 #include<unistd.h>
 3 #include<stdio.h>
 4 #include<fcntl.h>
 5 #include<stdlib.h>
 6 #include<sys/stat.h>
 7 int main(int argc, char const *argv[])
 8 {
 9     int fd = open("test.txt",O_RDONLY);
10     if(fd == -1)
11     {
12         perror("Fail to open:");
13         exit(2);
14     }
15     char buf[128]="";
16     ssize_t byte;
17     if((byte = read(fd,buf,sizeof(buf))) == -1)
18     {
19         perror("Fail to read");
20         exit(2);
21     }
22     printf("the number of bytes read is %ld,%s
",byte,buf);
23     close(fd);
24     return 0;
25 }
输出结果:

我们在看下返回值为0的情况,我们读取的文件还是同上个示例一样,这次有所不同的就是当我们读取了一次内容之后再读一次,很明显,buf的长度大于文件内容,所以第二次我们就要读到文件的结尾了,这次我们再看read的返回值。
 1 #include<sys/types.h>
 2 #include<unistd.h>
 3 #include<stdio.h>
 4 #include<fcntl.h>
 5 #include<stdlib.h>
 6 #include<sys/stat.h>
 7 #include<string.h>
 8 int main(int argc, char const *argv[])
 9 {
10     int fd = open("test.txt",O_RDONLY);
11     if(fd == -1)
12     {
13         perror("Fail to open:");
14         exit(2);
15     }
16     char buf[128]="";
17     ssize_t byte;
18     if((byte = read(fd,buf,sizeof(buf))) == -1)
19     {
20         perror("Fail to read");
21         exit(2);
22     }
23     printf("the number of bytes read is %ld,%s
",byte,buf);
24     memset(buf,0,sizeof(buf));
25     if((byte = read(fd,buf,sizeof(buf))) == -1)
26     {
27         perror("Fail to read");
28         exit(2);
29     }
30     printf("the number of bytes read is %ld,%s
",byte,buf);
31     close(fd);
32     return 0;
33 }
运行结果:

那么为什么会这样呢?这里我们就需要提到一个概念,就是文件指针,刚开始文件指针的位置是在文件开头,当我们读取文件文件内容后指针就会移动到我们读取到的位置,因此当我们在读时,就会使文件结尾,那我们如果想继续读,就要修改文件指针的位置,这时候就要用到lseek函数。
(5)lseek函数:修改文件指针的位置

参数介绍:
fd:文件描述符
offset:基于whence的偏移量
whence:有三个值
①SEEK_SET:文件开头位置
②SEEK_CUR:文件指针当前位置
③SEEK_END:文件末尾
返回值:
文件读写指针距文件开头的字节大小,出错,返回-1
lsee的作用是打开文件下一次读写的开始位置,因此还有以下两个作用:
1.拓展文件,不过一定要一次写的操作。迅雷等下载工具在下载文件时候先扩展一个空间,然后再下载的。
2.获取文件大小。
接下来的示例基于上面那个示例,让我们修改文件指针的位置然后再读。
 1 #include<sys/types.h>
 2 #include<unistd.h>
 3 #include<stdio.h>
 4 #include<fcntl.h>
 5 #include<stdlib.h>
 6 #include<sys/stat.h>
 7 #include<string.h>
 8 int main(int argc, char const *argv[])
 9 {
10     int fd = open("test.txt",O_RDONLY);
11     if(fd == -1)
12     {
13         perror("Fail to open:");
14         exit(2);
15     }
16     char buf[128]="";
17     ssize_t byte;
18     if((byte = read(fd,buf,sizeof(buf))) == -1)
19     {
20         perror("Fail to read");
21         exit(2);
22     }
23     printf("the number of bytes read is %ld,%s
",byte,buf);
24     lseek(fd,0,SEEK_SET);
25     memset(buf,0,sizeof(buf));
26     if((byte = read(fd,buf,sizeof(buf))) == -1)
27     {
28         perror("Fail to read");
29         exit(2);
30     }
31     printf("the number of bytes read is %ld,%s
",byte,buf);
32     close(fd);
33     return 0;
34 }
运行结果:

(四)案例实践
案例一:用lseek函数获取文件长度
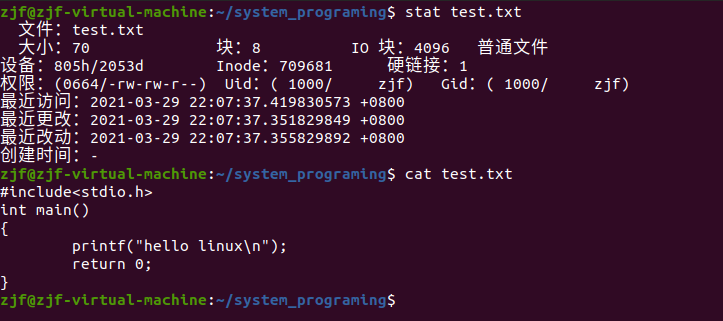
首先我们先看下我们事先准备好的一个文本文件,看一下它的大小

我们可以看到文件的大小为70
 1 #include<sys/types.h>
 2 #include<unistd.h>
 3 #include<stdio.h>
 4 #include<fcntl.h>
 5 #include<stdlib.h>
 6 #include<sys/stat.h>
 7 #include<string.h>
 8 int main(int argc, char const *argv[])
 9 {
10     int fd;
11     fd = open(argv[1],O_RDONLY);
12     if(fd < 0)
13     {
14         perror("open:");
15         exit(1);
16     }
17     int ret = lseek(fd,0,SEEK_END);
18     printf("the file size is:%d
",ret);
19     close(fd);
20     return 0;
21 }
运行结果:

案例二:lseek拓展文件大小
我们基于上面的示例文件,我们把它的大小拓展到100,拓展的时候要注意,必须要进行一次写的操作,我们要首先让文件指针偏移一定的位置,然后写点内容,文件拓展后的大小应当等于偏移量加写入内容的大小,比如说我们文件原本大小70,要拓展到100,并且要写入的内容是"hello",我们就先便宜25个,再写入"hello",大小就变成100了。
 1 #include<sys/types.h>
 2 #include<unistd.h>
 3 #include<stdio.h>
 4 #include<fcntl.h>
 5 #include<stdlib.h>
 6 #include<sys/stat.h>
 7 #include<string.h>
 8 int main(int argc, char const *argv[])
 9 {
10     int fd;
11     fd = open(argv[1],O_RDWR);
12     if(fd < 0)
13     {
14         perror("open");
15         exit(1);
16     }
17     int ret;
18     if((ret =  lseek(fd,0,SEEK_END)) == -1)
19     {
20         perror("lseek");
21         exit(1);
22     }
23     printf("befork expand,the file size is:%d
",ret);
24     if((ret =  lseek(fd,25,SEEK_END)) == -1)
25     {
26         perror("lseek");
27         exit(1);
28     }
29     if(write(fd,"hello",5) == -1)
30     {
31         perror("write");
32         exit(1);
33     }
34     if((ret =  lseek(fd,0,SEEK_END)) == -1)
35     {
36         perror("lseek");
37         exit(1);
38     }
39     printf("after expand,the file size is:%d
",ret);
40     close(fd);
41     return 0;
42 }
运行结果:


案例三:write和read实现cp命令
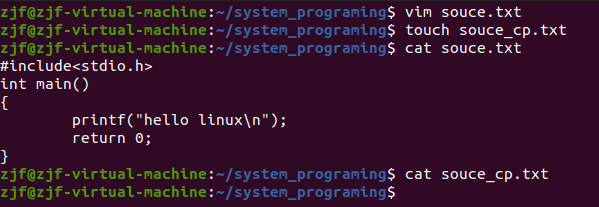
首先我们创建两个文件,一个文件名叫souce.txt,里面存有我们要复制的内容,另外那个文件叫souce_cp.txt,内容为空,将souce.txt中的内容复制到里面。

 1 #include<sys/types.h>
 2 #include<unistd.h>
 3 #include<stdio.h>
 4 #include<fcntl.h>
 5 #include<stdlib.h>
 6 #include<sys/stat.h>
 7 #include<string.h>
 8 int main(int argc, char const *argv[])
 9 {
10     int fd1,fd2;
11     char buf[1024] = "";
12     if((fd1 = open(argv[1],O_RDWR)) < 0)
13     {
14         perror("open");
15         exit(1);
16     }
17     if((fd2 = open(argv[2],O_RDWR)) < 0)
18     {
19         perror("open");
20         exit(1);
21     }
22     while ((read(fd1,buf,sizeof(buf))) > 0)
23     {
24         if(write(fd2,buf,sizeof(buf)) < 0)
25         {
26             perror("write");
27             exit(1);
28         }
29         memset(buf,0,sizeof(buf));
30     }
31     printf("cp successed!
");
32     close(fd1);
33     close(fd2);
34     return 0;
35 }
运行结果:


两个文件的内容一模一样。
以上是本次内容,大家有什么不懂的可以和我交流,或者我有写错的地方,欢迎大家指正,Q:1033278524。