一、线性布局----LinearLayout
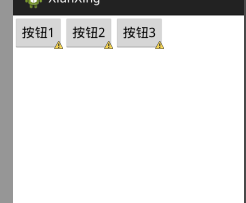
horizontal 水平

<?xml version="1.0" encoding="utf-8"?>
<LinearLayout xmlns:android="http://schemas.android.com/apk/res/android"
    android:layout_width="match_parent"
    android:layout_height="match_parent"
    android:orientation="horizontal" >

    <Button
        android:layout_height="wrap_content"
        android:layout_width="wrap_content"
        android:text="按钮1"
        />
    <Button
        android:layout_height="wrap_content"
        android:layout_width="wrap_content"
        android:text="按钮2"
        />
    <Button
        android:layout_height="wrap_content"
        android:layout_width="wrap_content"
        android:text="按钮3"
        />
</LinearLayout>
vertical 垂直

<?xml version="1.0" encoding="utf-8"?>
<LinearLayout xmlns:android="http://schemas.android.com/apk/res/android"
    android:layout_width="match_parent"
    android:layout_height="match_parent"
    android:orientation="vertical" >

    <Button
        android:layout_height="wrap_content"
        android:layout_width="wrap_content"
        android:text="按钮1"
        />
    <Button
        android:layout_height="wrap_content"
        android:layout_width="wrap_content"
        android:text="按钮2"
        />
    <Button
        android:layout_height="wrap_content"
        android:layout_width="wrap_content"
        android:text="按钮3"
        />
</LinearLayout>
如果你可以看懂了,那请做一个来练练手

参考答案:http://www.cnblogs.com/896240130Master/p/6090786.html
二、相当布局----RelativeLayout
RelativeLayout是Android五大布局结构中最灵活的一种布局结构,比较适合一些复杂界面的布局。
按照各子元素之间的位置关系完成布局。在此布局中的子元素里与位置相关的属性将生效。例如android:layout_below, android:layout_above, android:layout_centerVertical等。注意在指定位置关系时,引用的ID必须在引用之前,先被定义,否则将出现异常。
默认左上角。所以使用的时候会重叠

我们可以加上你在哪个布局的下面:下图

android:layout_below="@id/xxxx" //在谁的下面
参考属性:
- android:layout_above 将该控件的底部至于给定ID的控件之上
- android:layout_below 将该控件的顶部至于给定ID的控件之下
- android:layout_toLeftOf 将该控件的右边缘和给定ID的控件的左边缘对齐
- android:layout_toRightOf 将该控件的左边缘和给定ID的控件的右边缘对齐
- android:layout_alignBaseline 该控件的baseline和给定ID的控件的baseline对齐
- android:layout_alignBottom 将该控件的底部边缘与给定ID控件的底部边缘
- android:layout_alignLeft 将该控件的左边缘与给定ID控件的左边缘对齐
- android:layout_alignRight 将该控件的右边缘与给定ID控件的右边缘对齐
- android:layout_alignTop 将给定控件的顶部边缘与给定ID控件的顶部对齐
- android:alignParentBottom 如果该值为true,则将该控件的底部和父控件的底部对齐
- android:layout_alignParentLeft 如果该值为true,则将该控件的左边与父控件的左边对齐
- android:layout_alignParentRight 如果该值为true,则将该控件的右边与父控件的右边对齐
- android:layout_alignParentTop 如果该值为true,则将空间的顶部与父控件的顶部对齐
- android:layout_centerHorizontal 如果值为真,该控件将被至于水平方向的中央
- android:layout_centerInParent 如果值为真,该控件将被至于父控件水平方向和垂直方向的中央
- android:layout_centerVertical 如果值为真,该控件将被至于垂直方向的中央
结果图如下:

三、帧布局------FrameLayout
FrameLayout是五大布局中最简单的一个布局,可以说成是层布局方式。在这个布局中,整个界面被当成一块空白备用区域,所有的子元素都不能被指定放置的位置,它们统统放于这块区域的左上角,并且后面的子元素直接覆盖在前面的子元素之上,将前面的子元素部分和全部遮挡。如下,第一个TextView被第二个TextView完全遮挡,第三个TextView遮挡了第二个TextView的部分位置。
待更新。。。。
四、表格布局----TableLayout

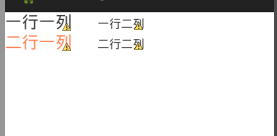
代码如下:
<?xml version="1.0" encoding="utf-8"?>
<TableLayout xmlns:android="http://schemas.android.com/apk/res/android"
    android:layout_width="match_parent"
    android:layout_height="match_parent" >

    <!-- tablerow 代表一行 -->
        <TableRow
             android:layout_width="match_parent"
             android:layout_height="match_parent">

            <TextView
                android:layout_width="match_parent"
                android:layout_height="wrap_content"
                android:text="一行一列"
                android:textSize="20sp"
                />
             <TextView
                android:layout_width="match_parent"
                android:layout_height="wrap_content"
                android:text="一行二列"
                android:layout_marginLeft="30dp"
                />
        </TableRow>

        <!-- tablerow 代表一行 -->
        <TableRow
             android:layout_width="match_parent"
             android:layout_height="match_parent">

            <TextView
                android:layout_width="match_parent"
                android:layout_height="wrap_content"
                android:textColor="#FF7F50"
                android:text="二行一列"
                android:textSize="20sp"
                />
             <TextView
                android:layout_width="match_parent"
                android:layout_height="wrap_content"
                android:text="二行二列"
                android:layout_marginLeft="30dp"
                />
        </TableRow>

</TableLayout>
五、绝对布局---谷歌工程师已经废弃掉了。这里就不多加了解