Class containerClass = loader.loadClass("org.jivesoftware.openfire.XMPPServer");
containerClass.newInstance();
- 初始化配置参数
- 检查是否需要安装
- 初始化Module
- 启动统计模块
- 启动plugin
if (!setupMode) {
    verifyDataSource();
    // First load all the modules so that modules may access other modules while
    // being initialized
    loadModules();
    // Initize all the modules
    initModules();
    // Start all the modules
    startModules();
}
public interface Module {

    /**
     * Returns the name of the module for display in administration interfaces.
     *
     * @return The name of the module.
     */
    String getName();

    /**
     * Initialize the module with the container.
     * Modules may be initialized and never started, so modules
     * should be prepared for a call to destroy() to follow initialize().
     *
     * @param server the server hosting this module.
     */
    void initialize(XMPPServer server);

    /**
     * Start the module (must return quickly). Any long running
     * operations should spawn a thread and allow the method to return
     * immediately.
     */
    void start();

    /**
     * Stop the module. The module should attempt to free up threads
     * and prepare for either another call to initialize (reconfigure the module)
     * or for destruction.
     */
    void stop();

    /**
     * Module should free all resources and prepare for deallocation.
     */
    void destroy();
}
// Load this module always last since we don't want to start listening for clients
// before the rest of the modules have been started
loadModule(ConnectionManagerImpl.class.getName());
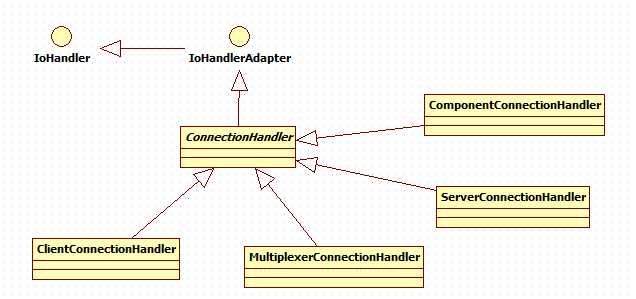
  private final ConnectionListener clientListener;
    private final ConnectionListener clientSslListener;
    private final ConnectionListener boshListener;
    private final ConnectionListener boshSslListener;
    private final ConnectionListener serverListener;
    private final ConnectionListener componentListener;
    private final ConnectionListener componentSslListener;
    private final ConnectionListener connectionManagerListener; // Also known as 'multiplexer'
    private final ConnectionListener connectionManagerSslListener; // Also known as 'multiplexer'
    private final ConnectionListener webAdminListener;
    private final ConnectionListener webAdminSslListener;
- client:表示客户端连接
- bosh:就是HTTP绑定的连接
- server:服务器到服务器的socket连接
- component:组件到服务器的连接
- connectionManager:是指通过connectionManager连接器过来的连接
- webAdmin:是指web控制台的连接
if ( getType() == ConnectionType.SOCKET_S2S )
{
    connectionAcceptor = new LegacyConnectionAcceptor( generateConnectionConfiguration() );
}
else
{
    connectionAcceptor = new MINAConnectionAcceptor( generateConnectionConfiguration() );
}
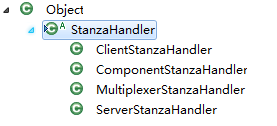
@Override
    StanzaHandler createStanzaHandler(NIOConnection connection) {
        return new ClientStanzaHandler(XMPPServer.getInstance().getPacketRouter(), connection);
    }
@Override
public void sessionOpened(IoSession session) throws Exception {
    // Create a new XML parser for the new connection. The parser will be used by the XMPPDecoder filter.
    final XMLLightweightParser parser = new XMLLightweightParser(StandardCharsets.UTF_8);
    session.setAttribute(XML_PARSER, parser);
    // Create a new NIOConnection for the new session
    final NIOConnection connection = createNIOConnection(session);
    session.setAttribute(CONNECTION, connection);
    session.setAttribute(HANDLER, createStanzaHandler(connection));
    // Set the max time a connection can be idle before closing it. This amount of seconds
    // is divided in two, as Openfire will ping idle clients first (at 50% of the max idle time)
    // before disconnecting them (at 100% of the max idle time). This prevents Openfire from
    // removing connections without warning.
    final int idleTime = getMaxIdleTime() / 2;
    if (idleTime > 0) {
        session.getConfig().setIdleTime(IdleStatus.READER_IDLE, idleTime);
    }
}
这样每一个session在打开时都会设置handler,而具体的handler由各个派生类创建返回。这里的StanzHandler就是Openfire里的数据包处理单元。和connection类型一样,包处理也是对应的几个类:
@Override
public void messageReceived(IoSession session, Object message) throws Exception {
    // Get the stanza handler for this session
    StanzaHandler handler = (StanzaHandler) session.getAttribute(HANDLER);
    // Get the parser to use to process stanza. For optimization there is going
    // to be a parser for each running thread. Each Filter will be executed
    // by the Executor placed as the first Filter. So we can have a parser associated
    // to each Thread
    final XMPPPacketReader parser = PARSER_CACHE.get();
    // Update counter of read btyes
    updateReadBytesCounter(session);
    //System.out.println("RCVD: " + message);
    // Let the stanza handler process the received stanza
    try {
        handler.process((String) message, parser);
    } catch (Exception e) {
        Log.error("Closing connection due to error while processing message: " + message, e);
        final Connection connection = (Connection) session.getAttribute(CONNECTION);
        if ( connection != null ) {
            connection.close();
        }

    }
}
在接收到数据包后获取到StanzaHandler,然后调用了它的process方法,也就是让实际的包处理者去处理数据。这样就回到了StanzeHanler,以ClientStanzaHandler为例子。只不过这个派生类中没有重写process方法,也就是说要看父类的实现:
public void process(String stanza, XMPPPacketReader reader) throws Exception {

    boolean initialStream = stanza.startsWith("<stream:stream") || stanza.startsWith("<flash:stream");
    if (!sessionCreated || initialStream) {
        if (!initialStream) {
..........
        // Found an stream:stream tag...
        if (!sessionCreated) {
            sessionCreated = true;
            MXParser parser = reader.getXPPParser();
            parser.setInput(new StringReader(stanza));
            createSession(parser);
        }
..........
        return;
    }
..........
}
由于代码较多,我省略了一些代码。看到这应该明白了吧,对于当前的连接没有创建Openfire的session对象时,会进行创建过程createSession,对于不同的StanzeHandler会有些不一样,这里ClientStanzaHandler的实现就是把创建好的session放到本地的LocalClientSession中:
@Override
boolean createSession(String namespace, String serverName, XmlPullParser xpp, Connection connection)
        throws XmlPullParserException {
    if ("jabber:client".equals(namespace)) {
        // The connected client is a regular client so create a ClientSession
        session = LocalClientSession.createSession(serverName, xpp, connection);
        return true;
    }
    return false;
}
public ClientSession getSession(JID from) {
    // Return null if the JID is null or belongs to a foreign server. If the server is
    // shutting down then serverName will be null so answer null too in this case.
    if (from == null || serverName == null || !serverName.equals(from.getDomain())) {
        return null;
    }

    // Initially Check preAuthenticated Sessions
    if (from.getResource() != null) {
        ClientSession session = localSessionManager.getPreAuthenticatedSessions().get(from.getResource());
        if (session != null) {
            return session;
        }
    }

    if (from.getResource() == null || from.getNode() == null) {
        return null;
    }

    return routingTable.getClientRoute(from);
}
先是获取本地的session,如果能找到直接返回,找不到则跳到routingTable里获取客户端的路由信息。
@Override
public ClientSession getClientRoute(JID jid) {
    // Check if this session is hosted by this cluster node
    ClientSession session = (ClientSession) localRoutingTable.getRoute(jid.toString());
    if (session == null) {
        // The session is not in this JVM so assume remote
        RemoteSessionLocator locator = server.getRemoteSessionLocator();
        if (locator != null) {
            // Check if the session is hosted by other cluster node
            ClientRoute route = usersCache.get(jid.toString());
            if (route == null) {
                route = anonymousUsersCache.get(jid.toString());
            }
            if (route != null) {
                session = locator.getClientSession(route.getNodeID().toByteArray(), jid);
            }
        }
    }
    return session;
}
这里更直接的可以看到,查找本地路由不null则会通过RemoteSessionLocator来完成。当然这里最大的奥秘其实是usersCache和anonymousUsersCache这两个cache。之前写的集群源码分析中提过,最终openfire集群后会对缓存进行同步,这样每台服务器上都会有缓存的副本。所以usersCache是拥有所有用户信息的,有了user的信息就有了jid的信息,这样不管是哪台服务器都可以对数据包处理并发送给客户端。
public Collection<ClientSession> getSessions() {
        return routingTable.getClientsRoutes(false);
    }
其实就是访问路由表,因为路由表里有所有的cache,和获取单个的session不一样,需要对所有的路由都遍历返回。
@Override
public Collection<ClientSession> getClientsRoutes(boolean onlyLocal) {
    // Add sessions hosted by this cluster node
    Collection<ClientSession> sessions = new ArrayList<ClientSession>(localRoutingTable.getClientRoutes());
    if (!onlyLocal) {
        // Add sessions not hosted by this JVM
        RemoteSessionLocator locator = server.getRemoteSessionLocator();
        if (locator != null) {
            // Add sessions of non-anonymous users hosted by other cluster nodes
            for (Map.Entry<String, ClientRoute> entry : usersCache.entrySet()) {
                ClientRoute route = entry.getValue();
                if (!server.getNodeID().equals(route.getNodeID())) {
                    sessions.add(locator.getClientSession(route.getNodeID().toByteArray(), new JID(entry.getKey())));
                }
            }
            // Add sessions of anonymous users hosted by other cluster nodes
            for (Map.Entry<String, ClientRoute> entry : anonymousUsersCache.entrySet()) {
                ClientRoute route = entry.getValue();
                if (!server.getNodeID().equals(route.getNodeID())) {
                    sessions.add(locator.getClientSession(route.getNodeID().toByteArray(), new JID(entry.getKey())));
                }
            }
        }
    }
    return sessions;
}