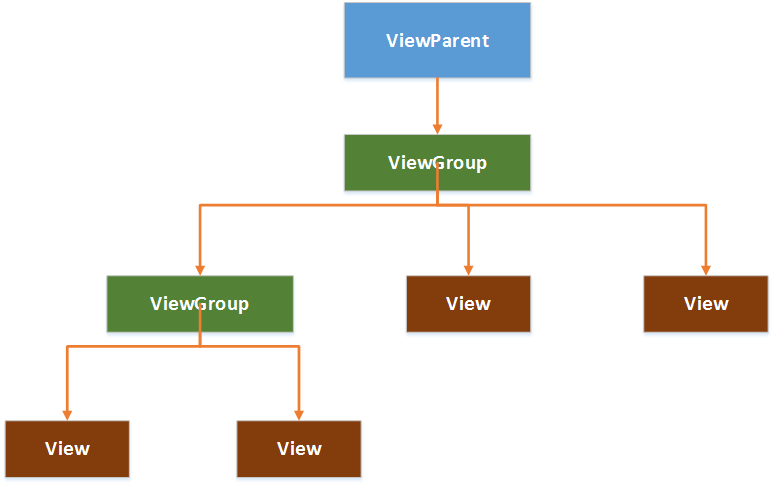
在Android中,视图控件大致被分为两类,即ViewGroup和View,ViewGroup控件作为父控件,包含并管理着子View,通过ViewGroup和View便形成了控件树,各个ViewGoup对象和View对象就是控件树中的节点。在控件树中,以树的深度来遍历查找对应的控件元素,同时,上层控件负责子控件的测量与绘制,并传递交互事件。
Android控件树:
AndroidUI界面架构图:

一.测量View的工具类:MeasureSpec
1.MeasureSpec包含了测量的模式和测量的大小,通过MeasureSpec.getMode()获取测量模式,通过MeasureSpec.getSize()获取测量大小;
2.MeasureSpec是一个32位的int值,高2位为测量的模式,低30位为测量的大小,使用位运算的目的在于提高优化效率。
二.测量的模式
1.EXACTLY,精确值模式:将layout_width或layout_height属性指定为具体数值或者match_parent。
2.AT_MOST,最大值模式:将layout_width或layout_height指定为wrap_content。
3.UNSPECIFIED: View想多大就多大
三.View类默认的onMeasure()方法只支持EXACTLY模式,如果要支持其它模式,就必须重写onMeasure(),重写onMeasure()的模板代码:
 1 package com.example.demoapp.views;
 2
 3 import android.content.Context;
 4 import android.view.View;
 5
 6 public class MeasuredView extends View {
 7     public MeasuredView(Context context) {
 8         super(context);
 9     }
10
11     @Override
12     protected void onMeasure(int widthMeasureSpec, int heightMeasureSpec) {
13         // 调用父类的onMeasure()
14         super.onMeasure(measureWidth(widthMeasureSpec), measureHeight(heightMeasureSpec));
15         // 或者直接调用父类的setMeasuredDimension(),因为父类的onMeasure()最终调用了setMeasuredDimension()
16         // setMeasuredDimension(measureWidth(widthMeasureSpec), measureHeight(heightMeasureSpec));
17     }
18
19     /**
20      * 测量View的width
21      * @param measureSpec MeasureSpec对象
22      * @return View的width
23      */
24     private int measureWidth(int measureSpec) {
25         int result = 0;
26         int specMode = MeasureSpec.getMode(measureSpec);
27         int specSize = MeasureSpec.getSize(measureSpec);
28
29         if (specMode == MeasureSpec.EXACTLY) {
30             result = specSize;
31         } else {
32             result = 200;
33             if (specMode == MeasureSpec.AT_MOST) {
34                 result = Math.min(result, specSize);
35             }
36         }
37         return result;
38     }
39
40     /**
41      * 测量View的height
42      * @param measureSpec MeasureSpec对象
43      * @return View的height
44      */
45     private int measureHeight(int measureSpec) {
46         int result = 0;
47         int specMode = MeasureSpec.getMode(measureSpec);
48         int specSize = MeasureSpec.getSize(measureSpec);
49
50         if (specMode == MeasureSpec.EXACTLY) {
51             result = specSize;
52         } else {
53             result = 200;
54             if (specMode == MeasureSpec.AT_MOST) {
55                 result = Math.min(result, specSize);
56             }
57         }
58         return result;
59     }
60 }
四.View的绘制
1.2D绘图必备利器——Canvas
1)获取Canvas对象的方式:
a.由方法中的参数传入,例如,View的onDraw()中有一个参数就是Canvas对象
b.通过构造方法构造,即:Canvas canvas = new Canvas(bitmap),在Canvas的构造方法传入一个Bitmap对象,即可获取一个Canvas对象。通过传入Bitmap对象构造Canvas对象的过程称为“画布的装载”,传入的Bitmap对象承载了多有绘制在Canvas上的像素信息,调用Canvas.drawXXX方法(如:Canvas.drawBitmap(bitmap, 0, 0, null))都将发生在该Bitmap对象上。
2)利用Canvas绘图
a.通过Canvas.drwaXXX进行绘制操作将直接作用于Bitmap对象,当再次刷新View的时候,我们将会被绘制的Bitmap对象发生了改变;
b.利用Canvas和Paint进行绘图;
c.不管多么复杂、精美的空间,都可以被拆分为一个个小的图形单元,我们只要找到这些图形单元,就可以将控件绘制出来。
五.ViewGroup的测量
1.ViewGroup的作用:管理子View,如子View的大小、位置;
2.ViewGroup通过遍历子View,调用子View的Measure()来获得每一个子View的测量结果;
3.ViewGroup测量完子View,调用子View的Layout()将子View放到合适的位置;
4.在自定义ViewGroup的时候,通常会重写onLayout()控制子View的显示;
5.如果需要支持wrap_content属性,必须重写onMeasure()。
六、ViewGroup的绘制
通常情况下,ViewGoup不需要绘制,但是ViewGroup会使用dispatchDraw()来绘制其子View。
七.自定义View
1.自定义View的时候,通常需要重写onDraw()来绘制View要显示的内容,如果还需要支持wrap_content属性,必须重写onMeasure();
2.通过自定义attrs属性,可以设置新的View属性;
3.View中一些重要的回调方法:
1)onFinishInflate():从XML中加载组建后回调;
2)onSizeChanged():组件大小改变时回调;
3)onMeasure():进行测量;
4)onLayout():设置显示的位置;
5)onTouchEvent():触摸事件。
4.实现自定义View的三种常用方法:
1)通过重写onDraw()对原生控件进行扩展;
2)通过组合实现新的控件,通常集成一个合适的额ViewGoup,再通过addView()给它添加指定功能的控件,从而组合成新的复合控件。
3)重写View实现全新的控件,通过重写onDraw(),onMeasure()实现绘制逻辑,重写onTouchEvent()实现交互逻辑。
5.自定义属性
1)自定义属性的方法:在res资源目录的values目录下创建一个attrs.xml的属性定义文件,文件模板:
 1 <?xml version="1.0" encoding="utf-8"?>
 2 <resources>
 3     <declare-styleable name="customAttr">
 4         <attr name="title" format="string" />
 5         <attr name="fontSize" format="dimension" />
 6         <attr name="fontColor" format="color" />
 7         <attr name="background" format="reference|color" />
 8         <attr name="fontStyle" format="enum" />
 9         <attr name="shadeSupport" format="boolean" />
10     </declare-styleable>
11 </resources>
2)通过TypedArray获取自定义属性集,通过TypedArray.getString()、TypedArray.getColor()等方法获取属性值,模板代码:
 1 package com.jy.myrecyclerview.test;
 2
 3 import android.content.Context;
 4 import android.content.res.TypedArray;
 5 import android.util.AttributeSet;
 6 import android.view.View;
 7
 8 import com.jy.myrecyclerview.R;
 9
10 /**
11  * Created by 123 on 2016/5/6.
12  */
13 public class TestCustomAttrs extends View {
14     private Context mContext;
15     private AttributeSet mAttrs;
16     private String mTitle;
17     private float mFontSize;
18     private int mFontColor;
19     private int mBackground;
20     private int mFontStyle;
21     private boolean mShadeSupport;
22
23     public TestCustomAttrs(Context context) {
24         super(context);
25         this.mContext = context;
26     }
27
28     public TestCustomAttrs(Context context, AttributeSet attrs) {
29         super(context, attrs);
30         this.mContext = context;
31         this.mAttrs = attrs;
32     }
33
34     public TestCustomAttrs(Context context, AttributeSet attrs, int defStyleAttr) {
35         super(context, attrs, defStyleAttr);
36         this.mContext = context;
37         this.mAttrs = attrs;
38     }
39
40     private void getCustomAttrs() {
41         TypedArray ta = mContext.obtainStyledAttributes(mAttrs, R.styleable.customAttr);
42         mTitle = ta.getString(R.styleable.customAttr_title);
43         mFontSize = ta.getDimension(R.styleable.customAttr_fontSize, 10);
44         mFontColor = ta.getColor(R.styleable.customAttr_fontColor, 0);
45         mBackground = ta.getColor(R.styleable.customAttr_background, 0);
46         mFontStyle = ta.getInt(R.styleable.customAttr_fontStyle, 0);
47         mShadeSupport = ta.getBoolean(R.styleable.customAttr_shadeSupport, false);
48         ta.recycle();
49     }
50 }
6.定义回调接口,实现自定义控件的灵活控制;
7.引用UI模板
1)自定义控件需要使用命名空间进行引入:xmlns:custom="http://schemas.android.com/apk/res-auto",即将自定义控件的命名空间取名为custom
2)在XML文件中使用自定义属性的时候,就可以通过这个命名空间来引用,代码模板如下:
<?xml version="1.0" encoding="utf-8"?>
<RelativeLayout xmlns:android="http://schemas.android.com/apk/res/android"
    xmlns:custom="http://schemas.android.com/apk/res-auto"
    android:layout_width="match_parent"
    android:layout_height="match_parent" >

    <com.jy.myrecyclerview.test.TestCustomAttrs
        android:id="@+id/id_recyclerview"
        android:divider="#ffff0000"
        android:dividerHeight="10dp"
        android:layout_width="match_parent"
        android:layout_height="match_parent"
        custom:title="title"
        custom:fontSize="12sp"
        custom:fontColor="@color/colorPrimary"
        custom:background="@color/colorPrimary"
        custom:shadeSupport="false" />

</RelativeLayout>
九.自定义ViewGroup
1.需要重写的方法:
1)onMeasure():对子View进行测量;
2)onLayout():设置子View的位置;
3)onTouchEvent():设置触摸交互事件。
注:本文参阅了徐宜生的《Android群英传》一书。