0x01、Spring
1什么是Spring
Spring 是一个开源框架,是为了解决企业应用程序开发复杂性而创建的(解耦)。
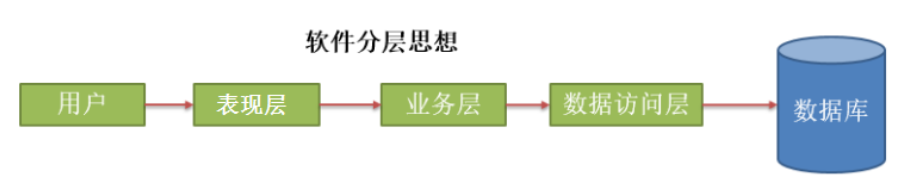
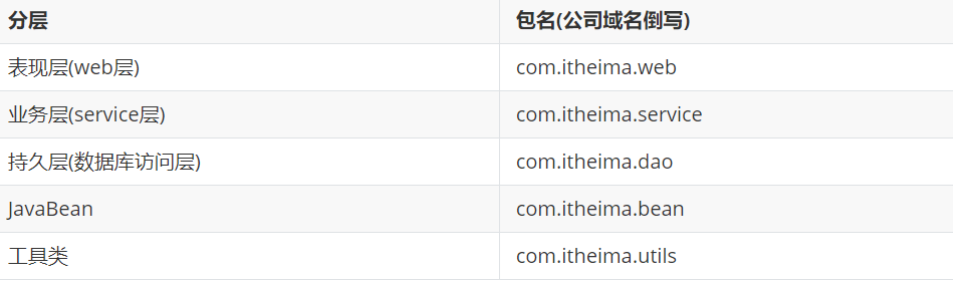
框架的主要优势之一就是其分层架构,分层架构允许您选择使用哪一个组件,同时为 J2EE 应用程序开发提供集成的框架。
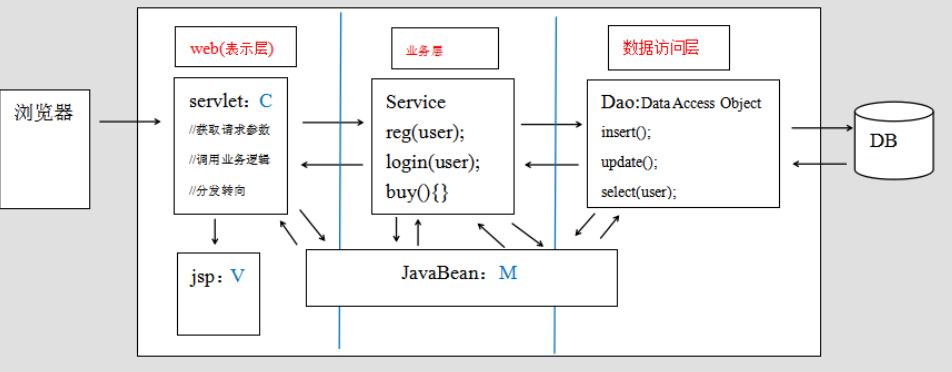
简单来说,Spring是一个分层的JavaSE/EE full-stack(一站式) 轻量级开源框架。
一站式:Spring提供了三层解决方案.
0x02、IOC
它的核心思想就是:
1、通过Bean工厂读取配置文件使用反射创建对象。
2、把创建出来的对象都存起来,当使用者需要对象的时候,不再自己创建对象,而是调用Bean工厂的方法从容器中获取对象
这里面要解释两个问题:
第一个:存哪去?
分析:由于我们是很多对象,肯定要找个集合来存。这时候有 Map 和 List 供选择。
到底选 Map 还是 List 就看我们有没有查找需求。有查找需求,选 Map。
所以我们的答案就是:在应用加载时,创建一个 Map,用于存放三层对象。我们把这个 map 称之为容器。
第二个: 什么是工厂?
工厂就是负责给我们从容器中获取指定对象的类。这时候我们获取对象的方式发生了改变。
原来:我们在获取对象时,都是采用 new 的方式。 是主动的。
1、Spring的IOC入门案例
步骤:
1. 创建Maven工程, 添加坐标

2. 准备好接口和实现类

3. 创建spring的配置文件 (applicationContext.xml), 配置bean标签

4. 创建工厂对象 获得bean 调用
- 1.1、引入spring的依赖(使用5.0.2版本)
<dependency>
        <groupId>org.springframework</groupId>
        <artifactId>spring-context</artifactId>
        <version>5.0.2.RELEASE</version>
    </dependency>
-
1.2、接口和实现类
- UserServiceImpl.java
public interface UserService { String getName(); }-
UserServiceImpl.java
```java
import com.itheima.service.UserService;
public class UserServiceImpl implements UserService{
public void init(){
System.out.println("UserServiceImpl对象创建了...");
}
public void destroy(){
    System.out.println("UserServiceImpl对象销毁了...");
}

@Override
public String getName() {
    return "周杰棍";
}
}
```
- 1.3、在类的根路径下创建spring的配置文件
<?xml version="1.0" encoding="UTF-8"?>
<beans xmlns="http://www.springframework.org/schema/beans"
       xmlns:xsi="http://www.w3.org/2001/XMLSchema-instance"
       xsi:schemaLocation="http://www.springframework.org/schema/beans
       http://www.springframework.org/schema/beans/spring-beans.xsd">
    <!--
        每一个实现类就对应一个bean标签
            id属性: 对象的唯一标识,根据这个唯一标识,就可以从核心容器中获取对象
            class属性: 对象所属的实现类的全限定名
    -->
    <bean class="org.example.Impl.UserServiceImpl" id="userService"></bean>
</beans>
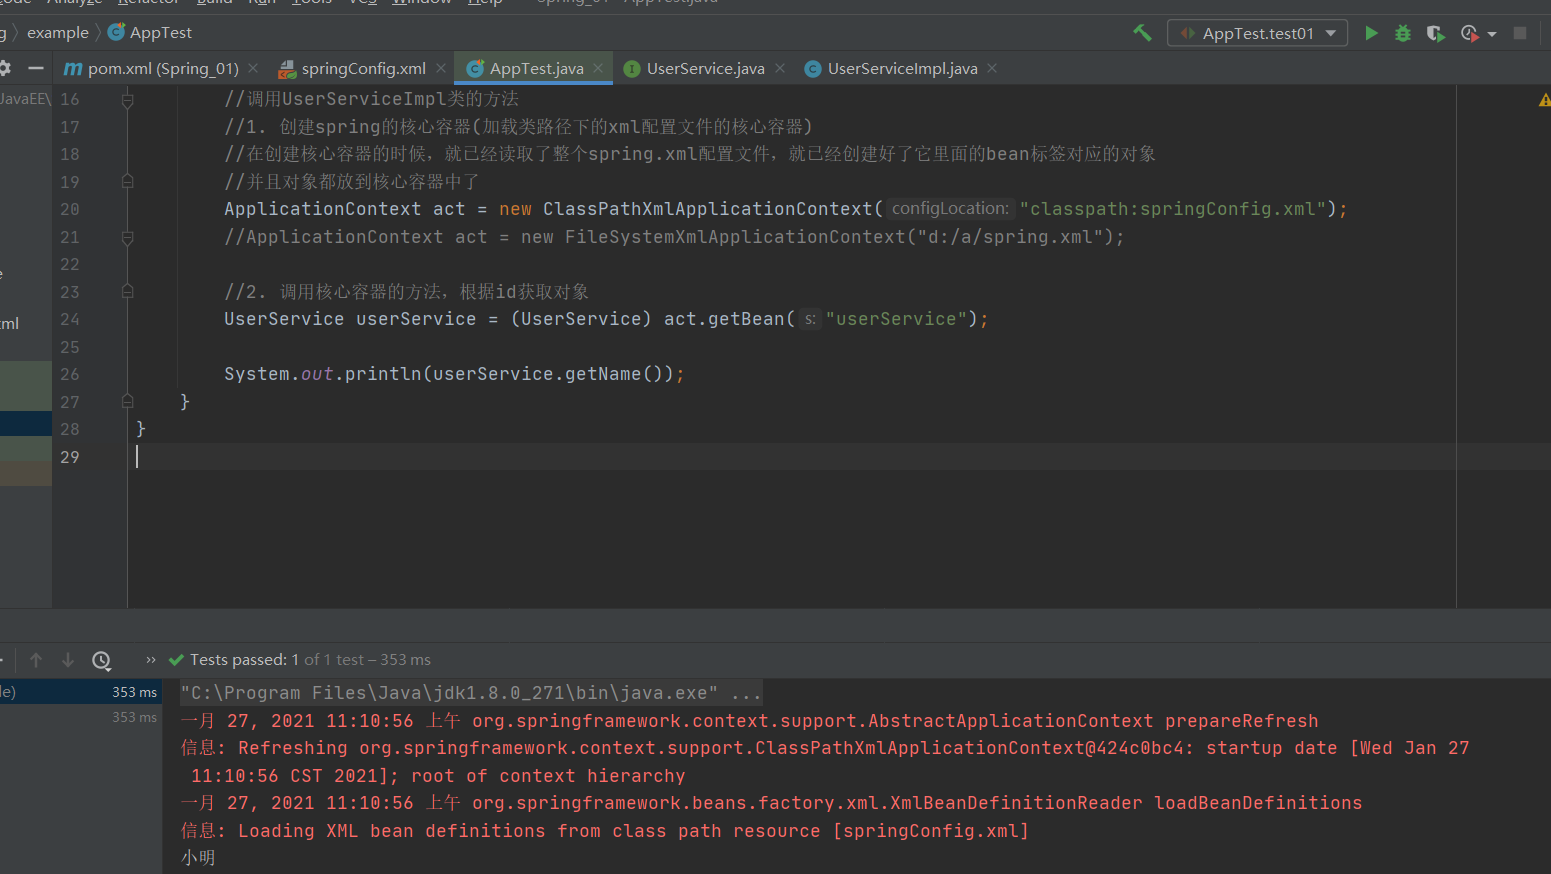
- 1.4、测试代码
public class AppTest
{
    @Test
    public void test01(){
        //调用UserServiceImpl类的方法
        //1. 创建spring的核心容器(加载类路径下的xml配置文件的核心容器)
        //在创建核心容器的时候,就已经读取了整个spring.xml配置文件,就已经创建好了它里面的bean标签对应的对象
        //并且对象都放到核心容器中了
        ApplicationContext act = new ClassPathXmlApplicationContext("classpath:springConfig.xml");
        //ApplicationContext act = new FileSystemXmlApplicationContext("d:/a/spring.xml");

        //2. 调用核心容器的方法,根据id获取对象
        UserService userService = (UserService) act.getBean("userService");

        System.out.println(userService.getName());
    }
}
2、Spring配置文件下的Bean标签 配置
- 配置文件详解(Bean标签)
- bean的作用范围和生命周期
(一)、配置文件详解(Bean标签)
<?xml version="1.0" encoding="UTF-8"?>
<beans xmlns="http://www.springframework.org/schema/beans"
       xmlns:xsi="http://www.w3.org/2001/XMLSchema-instance"
       xsi:schemaLocation="http://www.springframework.org/schema/beans
       http://www.springframework.org/schema/beans/spring-beans.xsd">
    <!--
        每一个实现类就对应一个bean标签
            id属性: 对象的唯一标识,根据这个唯一标识,就可以从核心容器中获取对象
            class属性: 对象所属的实现类的全限定名
            scope属性: 对象的范围
                 1. singleton 单例(默认)
                 2. prototype 多例
            lazy-init: 配置懒加载,核心容器创建的时候是否创建出该类对象
            init-method: 配置类的对象初始化的时候,要调用哪个方法
            destroy-method: 配置这个类的对象销毁的时候,要调用哪个方法
            单例模式下(默认没有开启懒加载),由核心容器进行管理的对象什么时候创建什么时候销毁?
            1. 核心容器创建的时候,会创建出它所配置的所有类的对象
            2. 核心容器销毁的时候,它里面的对象才会被销毁

            多例模式下,由spring管理的对象什么时候创建什么时候销毁
            1. 当核心容器调用getBean(id)的时候,创建对象
            2. 垃圾回收机制才能销毁这个对象
    -->
    <bean class="com.itheima.service.impl.UserServiceImpl"
          id="userService"
          scope="prototype" lazy-init="false"
          init-method="init"
          destroy-method="destroy"></bean>
</beans>
-
id或者name属性
用于标识bean , 其实id 和 name都必须具备唯一标识 ,两种用哪一种都可以。但是一定要唯一、 一般开发中使用id来声明.
-
class属性: 用来配置要实现化类的全限定名
-
scope属性: 用来描述bean的作用范围
singleton: 默认值,单例模式。spring创建bean对象时会以单例方式创建。(默认)
prototype: 多例模式。spring创建bean对象时会以多例模式创建。
request: 针对Web应用。spring创建对象时,会将此对象存储到request作用域。(不用管)
session: 针对Web应用。spring创建对象时,会将此对象存储到session作用域。(不用管)
-
init-method属性:spring为bean初始化提供的回调方法
-
destroy-method属性:spring为bean销毁时提供的回调方法. 销毁方法针对的都是单例bean , 如果想销毁bean , 可以关闭工厂
(二)、bean的作用范围和生命周期
- 单例对象: scope="singleton",一个应用只有一个对象的实例。它的作用范围就是整个引用。
- 核心容器创建的时候,会创建出它所配置的所有类的对象
- 核心容器销毁的时候,它里面的对象才会被销毁
- 多例对象: scope="prototype",每次访问对象时,都会重新创建对象实例。
- 当核心容器调用getBean(id)的时候,创建对象
- 垃圾回收机制才能销毁这个对象
3、Spring的工厂模式
ApplicationContext接口的三种实现类
1、ClassPathXmlApplicationContext:它是从类的根路径下加载配置文件

2、FileSystemXmlApplicationContext:它是从磁盘路径上加载配置文件,配置文件可以在磁盘的任意位置。

3、AnnotationConfigApplicationContext:当我们使用注解配置容器对象时,需要使用此类来创建 spring 容器。它用来读取注解。

    继承自 ApplicationContext
ApplicationContext加载方式是框架启动时就开始创建所有单例的bean,存到了容器里面
- 非懒加载: 在核心容器创建的时候,创建出所有的bean对象,存到核心容器中
- 懒加载: 第一次调用getBean()的时候,创建出bean对象,存到核心容器中
4、实例化Bean
需要实例化的类,提供无参构造方法
配置代码
<bean class="com.itheima.service.impl.UserServiceImpl" id="userService"></bean>
0x03、依赖注入
依赖注入全称是 dependency Injection 翻译过来是依赖注入.其实就是如果我们托管的某一个类中存在属性,需要spring在创建该类实例的时候,顺便给这个对象里面的属性进行赋值。 这就是依赖注入。
现在, Bean的创建交给Spring了, 需要在xml里面进行注册
我们交给Spring创建的Bean里面可能有一些属性(字段), Spring帮我创建的同时也把Bean的一些属性(字段)给赋值, 这个赋值就是注入.
简单的来说如下:
- 注册: 把bean的创建交给Spring
- 依赖注入: bean创建的同时, bean里面可能有一些字段需要赋值, 这个赋值交给Spring, 这个过程就是依赖注入
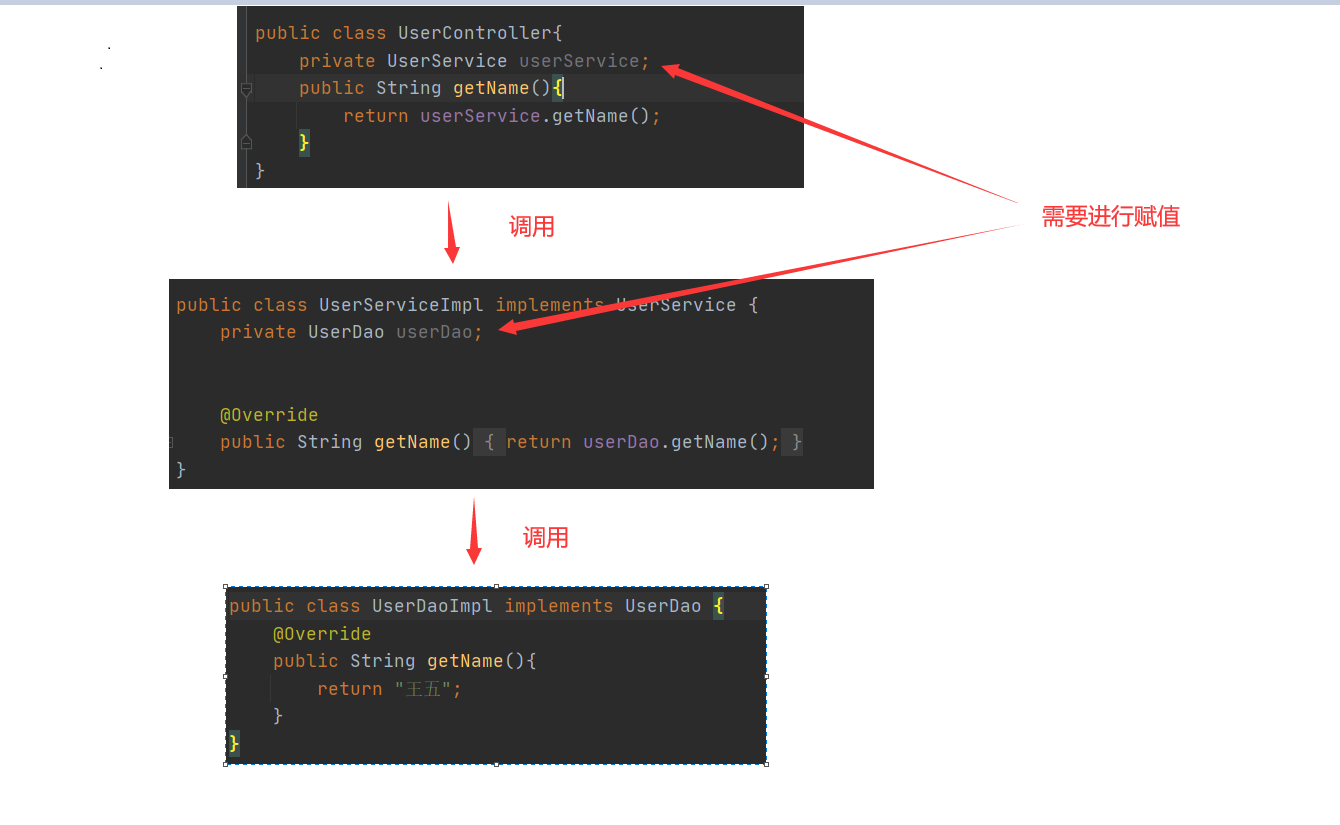
测试代码(环境):

- Controller.UserController
import com.idea.service.UserService;

public class UserController{
    private UserService userService;

    public String getName(){
        return userService.getName();
    }
}
- service.UserService
public interface UserService {
    String getName();
}
- service.Impl.UserServiceImpl
import com.idea.dao.UserDao;
import com.idea.service.UserService;

public class UserServiceImpl implements UserService {
    private UserDao userDao;


    @Override
    public String getName() {
        return userDao.getName();
    }
}
- dao.UserDao:
public interface UserDao {
    String getName();
}
- dao.Impl.UserDaoImpl
import com.idea.dao.UserDao;

public class UserDaoImpl implements UserDao {
	//模拟数据库执行语句,并得到名字为王五
    @Override
    public String getName(){
        return "王五";
    }
}
然后我们创建springConfig.xml的配置文件,我们需要把实现类放进来
<?xml version="1.0" encoding="UTF-8"?>
<beans xmlns="http://www.springframework.org/schema/beans"
       xmlns:xsi="http://www.w3.org/2001/XMLSchema-instance"
       xsi:schemaLocation="http://www.springframework.org/schema/beans
       http://www.springframework.org/schema/beans/spring-beans.xsd">

    <bean id="UserController" class="com.idea.controller.UserController"></bean>
    <bean id="UserService" class="com.idea.service.Impl.UserServiceImpl"></bean>
    <bean id="UserDao" class="com.idea.dao.Impl.UserDaoImpl"></bean>
</beans>
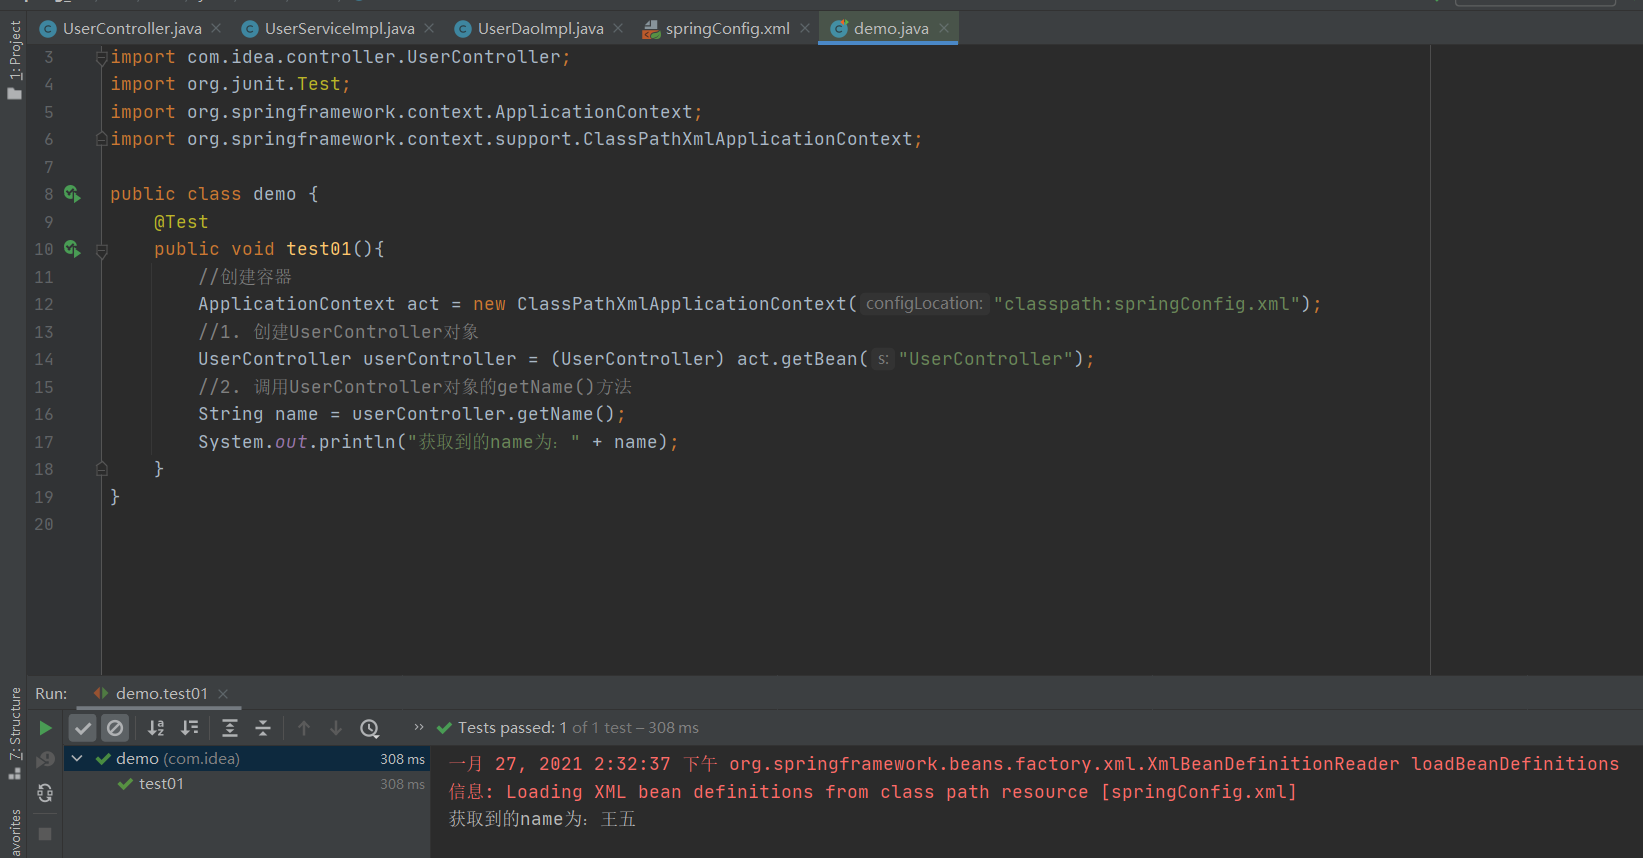
- 测试代码:(最外层的Controller不用解耦)
import com.idea.controller.UserController;
import org.junit.Test;
import org.springframework.context.ApplicationContext;
import org.springframework.context.support.ClassPathXmlApplicationContext;

public class demo {
    @Test
    public void test01(){
        //创建容器
        ApplicationContext act = new ClassPathXmlApplicationContext("classpath:springConfig.xml");

        //1. 创建UserController对象
        UserController userController = (UserController) act.getBean("UserController");

        //2. 调用UserController对象的getName()方法
        String name = userController.getName();
        System.out.println("获取到的name为:" + name);
    }
}
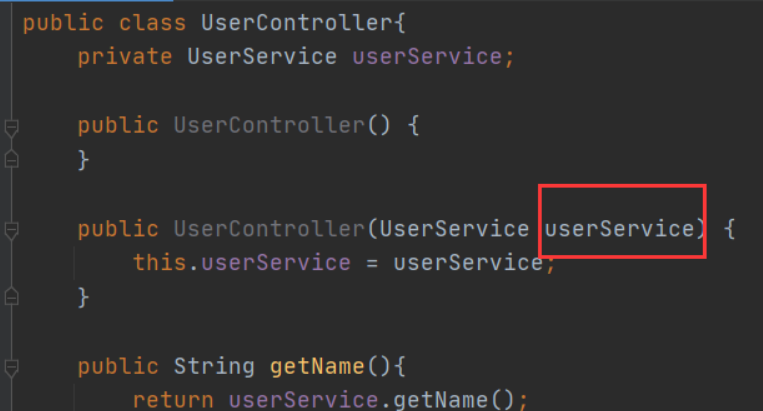
1、构造方法方式注入
通过上面的环境搭建,我们执行一下
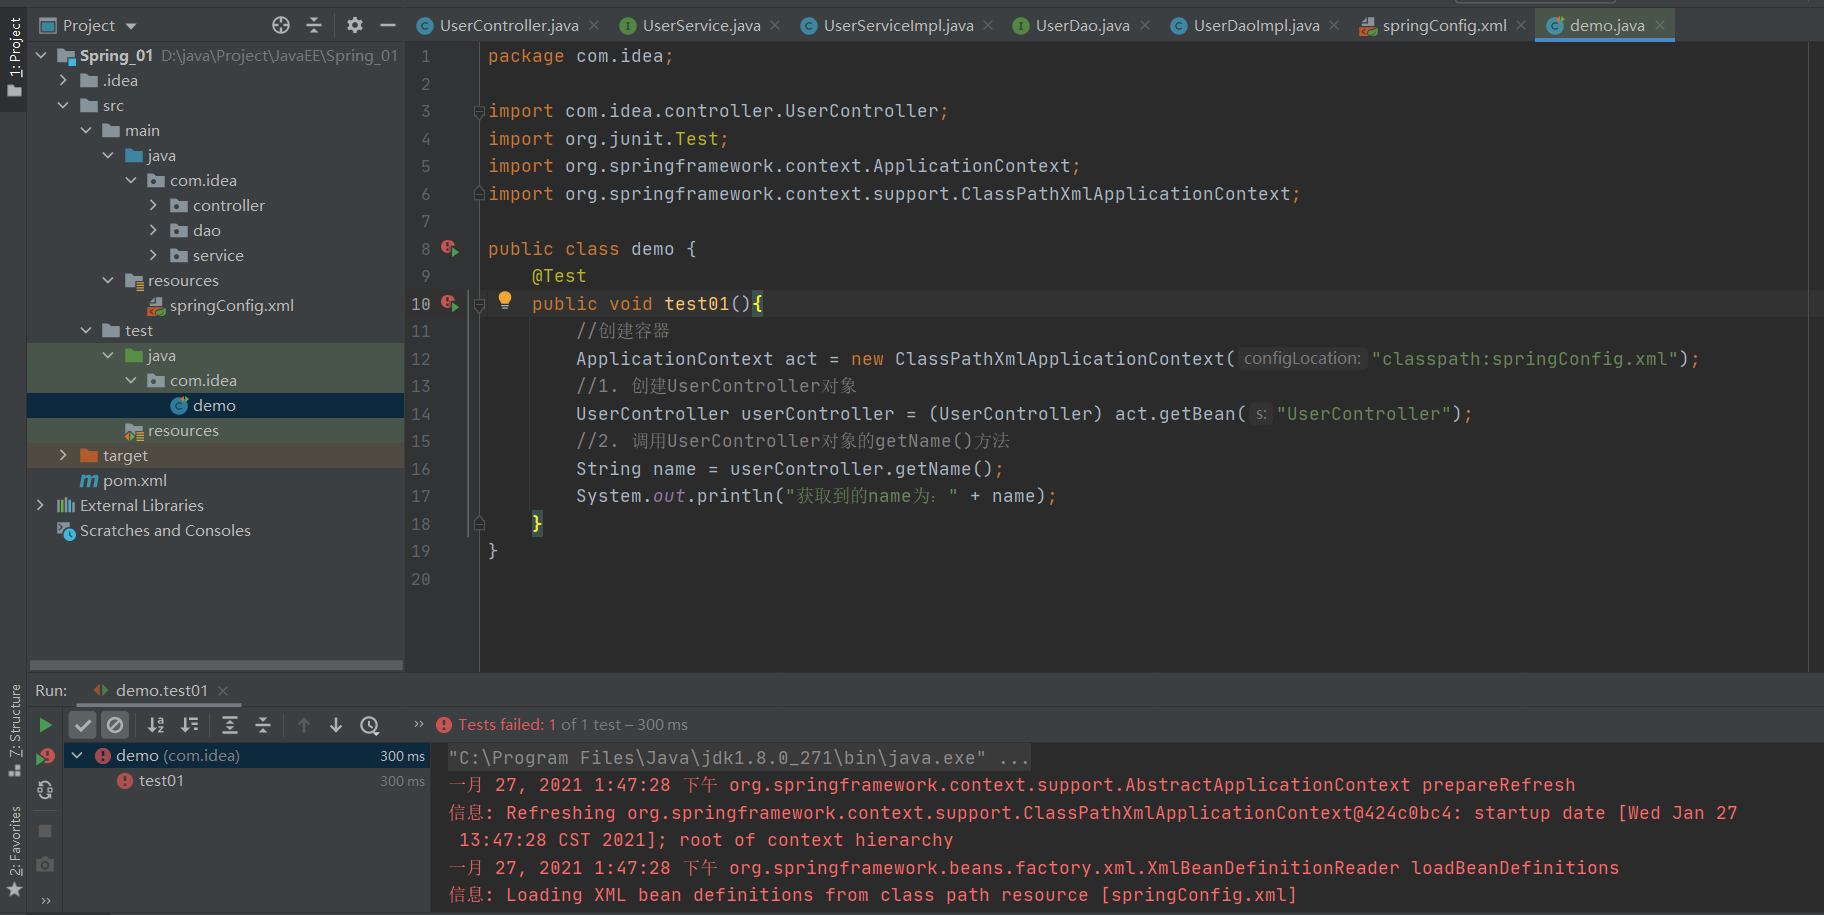
发现调用失败了;UserService和UserDao还没有赋值。但是我们不能直接在里面赋值,这样就耦合了,这时候就用到了依赖注入
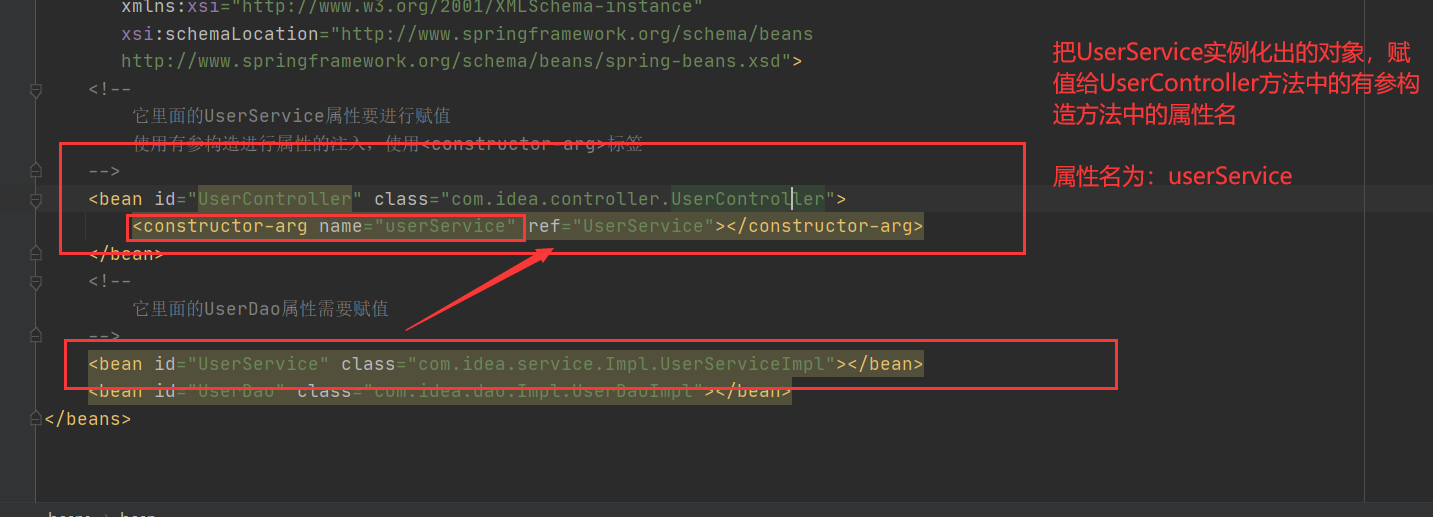
1、构造方法赋值
有参构造方法赋值的时候,就必须要有无参构造方法,不然会报错
<?xml version="1.0" encoding="UTF-8"?>
<beans xmlns="http://www.springframework.org/schema/beans"
       xmlns:xsi="http://www.w3.org/2001/XMLSchema-instance"
       xsi:schemaLocation="http://www.springframework.org/schema/beans
       http://www.springframework.org/schema/beans/spring-beans.xsd">
    <!--
        它里面的UserService属性要进行赋值
        使用有参构造进行属性的注入,使用<constructor-arg>标签
    -->
    <bean id="UserController" class="com.idea.controller.UserController">
        <constructor-arg name="userService" ref="UserService"></constructor-arg>
    </bean>
    <!--
        它里面的UserDao属性需要赋值
    -->
    <bean id="UserService" class="com.idea.service.Impl.UserServiceImpl"></bean>
    <bean id="UserDao" class="com.idea.dao.Impl.UserDaoImpl"></bean>
</beans>
-
1、bean是实例化出对象,id就是对象名,
ref="UserService"就是获取UserService对象,要传进去的内容 -
2、
name="userService"是属性名,也就是要传的参数
完整代码
<?xml version="1.0" encoding="UTF-8"?>
<beans xmlns="http://www.springframework.org/schema/beans"
       xmlns:xsi="http://www.w3.org/2001/XMLSchema-instance"
       xsi:schemaLocation="http://www.springframework.org/schema/beans
       http://www.springframework.org/schema/beans/spring-beans.xsd">
    <!--
        它里面的UserService属性要进行赋值
        使用有参构造进行属性的注入,使用<constructor-arg>标签
    -->
    <bean id="UserController" class="com.idea.controller.UserController">
        <constructor-arg name="userService" ref="UserService"></constructor-arg>
    </bean>
    <!--
        它里面的UserDao属性需要赋值
    -->
    <bean id="UserService" class="com.idea.service.Impl.UserServiceImpl">
        <constructor-arg name="userDao" ref="UserDao"></constructor-arg>
    </bean>
    <bean id="UserDao" class="com.idea.dao.Impl.UserDaoImpl"></bean>
</beans>
2、set方法方式的注入
要通过set方法注入,那就得有setter
- springConfig.xml
name:就是setter设置的参数名
ref: 对象UserService赋值给name标签的userService
<?xml version="1.0" encoding="UTF-8"?>
<beans xmlns="http://www.springframework.org/schema/beans"
       xmlns:xsi="http://www.w3.org/2001/XMLSchema-instance"
       xsi:schemaLocation="http://www.springframework.org/schema/beans
       http://www.springframework.org/schema/beans/spring-beans.xsd">
    <!--
        它里面的UserService属性要进行赋值
        使用set方法进行属性的注入
    -->
    <bean id="UserController" class="com.idea.controller.UserController">
        <property name="userService" ref="UserService"></property>
    </bean>
    <!--
        它里面的UserDao属性需要赋值
    -->
    <bean id="UserService" class="com.idea.service.Impl.UserServiceImpl">
        <property name="userDao" ref="UserDao"></property>
    </bean>
    <bean id="UserDao" class="com.idea.dao.Impl.UserDaoImpl"></bean>
</beans>
- UserController
import com.idea.service.UserService;

public class UserController{
    private UserService userService;

    public void setUserService(UserService userService) {
        this.userService = userService;
    }

    public String getName(){
        return userService.getName();
    }
}
- UserServiceImpl
import com.idea.dao.UserDao;
import com.idea.service.UserService;

public class UserServiceImpl implements UserService {
    private UserDao userDao;

    public void setUserDao(UserDao userDao) {
        this.userDao = userDao;
    }

    @Override
    public String getName() {
        return userDao.getName();
    }
}
3.2.2 注入数组类型(了解一下)
-
java代码
package com.itheima.dao.impl; import com.itheima.dao.UserDao; import java.util.Arrays; import java.util.Map; /** * 包名:com.itheima.dao.impl * * @author Leevi * 日期2020-08-09 12:05 */ public class UserDaoImpl implements UserDao{ private String[] stringArray; public void setStringArray(String[] stringArray) { this.stringArray = stringArray; } @Override public String getName() { System.out.println("数组stringArray:" + Arrays.toString(stringArray)); //模拟调用数据库方法获取name return "奥巴马"; } } -
配置文件
<bean id="userDao" class="com.itheima.dao.impl.UserDaoImpl">
    <!--注入数组-->
    <property name="stringArray">
        <array>
            <value>hello1</value>
            <value>hello2</value>
            <value>hello3</value>
            <value>hello4</value>
        </array>
     </property>
</bean>
3.2.3 注入Map类型(了解)
-
Java代码
package com.itheima.dao.impl; import com.itheima.dao.UserDao; import java.util.Arrays; import java.util.Map; /** * 包名:com.itheima.dao.impl * * @author Leevi * 日期2020-08-09 12:05 */ public class UserDaoImpl implements UserDao{ private Map map; public void setMap(Map map) { this.map = map; } @Override public String getName() { System.out.println("map的值为:" + map); //模拟调用数据库方法获取name return "奥巴马"; } } -
配置文件
<bean id="userDao" class="com.itheima.dao.impl.UserDaoImpl"">
   <!--注入map-->
    <property name="map">
        <map>
            <entry key="username" value="aobama"></entry>
            <entry key="pwd" value="123456"></entry>
            <entry key="address" value="召唤师峡谷"></entry>
        </map>
    </property>
</bean>
3.2.4 注入简单类型数据(掌握)
- Java代码
  package com.itheima.dao.impl;

  import com.itheima.dao.UserDao;

  import java.util.Arrays;
  import java.util.Map;

  /**
   * 包名:com.itheima.dao.impl
   *
   * @author Leevi
   * 日期2020-08-09  12:05
   */
  public class UserDaoImpl implements UserDao{
      private String username;
      private Integer age;

      public void setAge(Integer age) {
          this.age = age;
      }

      public void setUsername(String username) {
          this.username = username;
      }

      @Override
      public String getName() {
          System.out.println("年龄是:" + age);
          //模拟调用数据库方法获取name
          return username;
      }
  }
-
配置文件
<!--
        它里面的userDao属性要进行赋值
    -->
<bean id="userService" class="com.itheima.service.impl.UserServiceImpl" p:userDao-ref="userDao">
    <!--构造函数方式注入-->
    <!--<constructor-arg name="userDao" ref="userDao"></constructor-arg>-->
    <!--set方法注入-->
    <!--<property name="userDao" ref="userDao"></property>-->
</bean>


<bean id="userDao" class="com.itheima.dao.impl.UserDaoImpl">
    <!--set方法注入-->
    <property name="age" value="28"></property>
    <property name="username" value="奥巴马"></property>
</bean>
0x04、番外&总结
今天内容有IOC,和依赖注入
1、IOC是什么?
IOC就是spring.xml中bean标签:让我们不用去new对象,让spring实例化对象,进行解耦