JWT使用方式
关于jwt的三个部分,我这里不介绍了,我们看看JWT的使用方式:
-
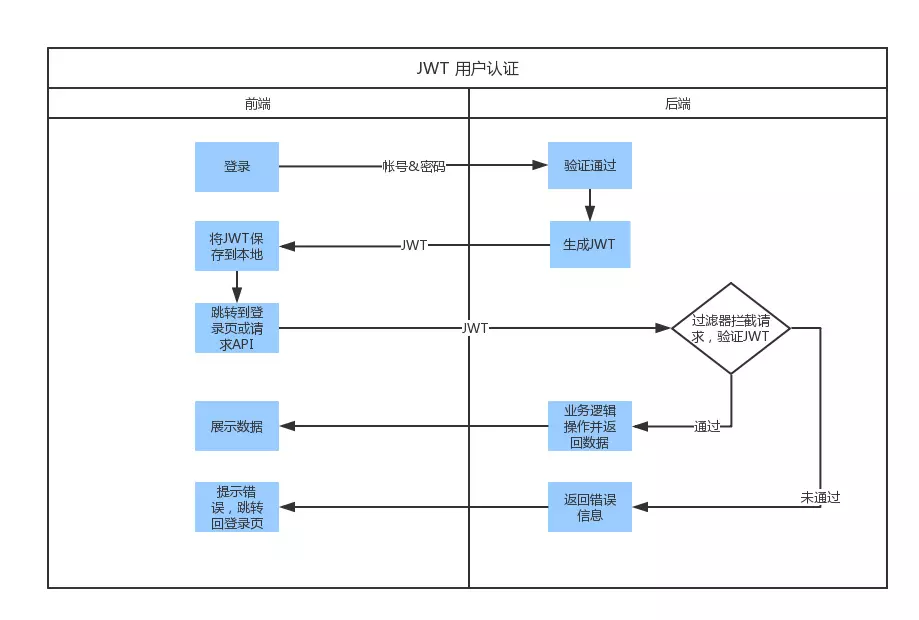
首先,前端通过Web表单将自己的用户名和密码发送到后端的接口。这一过程一般是一个HTTP POST请求。建议的方式是通过SSL加密的传输(https协议),从而避免敏感信息被嗅探。
-
后端核对用户名和密码成功后,将用户的id等其他信息作为JWT Payload(负载),将其与头部分别进行Base64编码拼接后签名,形成一个JWT。形成的JWT就是一个形同lll.zzz.xxx的字符串。
-
后端将JWT字符串作为登录成功的返回结果返回给前端。前端可以将返回的结果保存在localStorage或sessionStorage上,退出登录时前端删除保存的JWT即可。
-
前端在每次请求时将JWT放入HTTP Header中的Authorization位。(解决XSS和XSRF问题)
5. 后端检查JWT是否存在,及其他,例如,检查签名是否正确;检查Token是否过期;检查Token的接收方是否是自己(可选),如果签名验证通过,我们也可以获得此JWT所属的用户。
Django REST framework 中使用 JWT认证
准备工作
1.安装
pip install djangorestframework-jwt
2.settings.py配置:我这里没有配置全局的权限与认证,等会在单独的接口单独配置;另外配置JWT时效与JWT字符串的前缀;最后设置验证类,主要是验证类中的authenticate方法。
REST_FRAMEWORK = {
    # 设置所有接口都需要被验证
    'DEFAULT_PERMISSION_CLASSES': (
        #’rest_framework.permissions.IsAuthenticatedOrReadOnly’,
    ),
    # 用户登陆认证方式
    'DEFAULT_AUTHENTICATION_CLASSES': (
        # 'rest_framework_jwt.authentication.JSONWebTokenAuthentication',
        #’rest_framework.authentication.SessionAuthentication’,
        #’rest_framework.authentication.BasicAuthentication’,
    ),
}
# jwt载荷中的有效期设置
JWT_AUTH = {
    #token 有效期
    'JWT_EXPIRATION_DELTA': datetime.timedelta(seconds=1800),
    'JWT_AUTH_HEADER_PREFIX': 'JWT',
}
AUTHENTICATION_BACKENDS = (
    #选择django自己的验证类
    'django.contrib.auth.backends.ModelBackend',
)
其他设置
你可以覆盖一些其他设置,比如变更Token过期时间,以下是所有可用设置的默认值。在settings.py文件中设置。
JWT_AUTH = {
    'JWT_ENCODE_HANDLER':
    'rest_framework_jwt.utils.jwt_encode_handler',

    'JWT_DECODE_HANDLER':
    'rest_framework_jwt.utils.jwt_decode_handler',

    'JWT_PAYLOAD_HANDLER':
    'rest_framework_jwt.utils.jwt_payload_handler',

    'JWT_PAYLOAD_GET_USER_ID_HANDLER':
    'rest_framework_jwt.utils.jwt_get_user_id_from_payload_handler',

    'JWT_RESPONSE_PAYLOAD_HANDLER':
    'rest_framework_jwt.utils.jwt_response_payload_handler',

    // 这是用于签署JWT的密钥,确保这是安全的,不共享不公开的
    'JWT_SECRET_KEY': settings.SECRET_KEY,
    'JWT_GET_USER_SECRET_KEY': None,
    'JWT_PUBLIC_KEY': None,
    'JWT_PRIVATE_KEY': None,
    'JWT_ALGORITHM': 'HS256',
    // 如果秘钥是错误的,它会引发一个jwt.DecodeError
    'JWT_VERIFY': True,
    'JWT_VERIFY_EXPIRATION': True,
    'JWT_LEEWAY': 0,
    // Token过期时间设置
    'JWT_EXPIRATION_DELTA': datetime.timedelta(seconds=300),
    'JWT_AUDIENCE': None,
    'JWT_ISSUER': None,

    // 是否开启允许Token刷新服务,及限制Token刷新间隔时间,从原始Token获取开始计算
    'JWT_ALLOW_REFRESH': False,
    'JWT_REFRESH_EXPIRATION_DELTA': datetime.timedelta(days=7),

    // 定义与令牌一起发送的Authorization标头值前缀
    'JWT_AUTH_HEADER_PREFIX': 'JWT',
    'JWT_AUTH_COOKIE': None,
}
快速开始
urls.py
from django.contrib import admin
from django.urls import path
from django.conf.urls import url
from rest_framework_jwt.views import obtain_jwt_token

urlpatterns = [
    path('admin/', admin.site.urls),
   #登录成功自动签发token
    url(r'^login/', obtain_jwt_token)
]
这里面主要是obtain_jwt_token,实践调用ObtainJSONWebToken.as_view(),ObtainJSONWebToken类下面,有如下serializer_class = JSONWebTokenSerializer
而JSONWebTokenSerializer就是最重要的类,后面如果你的登录不只有username,password时,需要传入更多的参数,需要更改这两个方法。
- __init__方法反序列化前端传递的username与password
- validate方法通过authenticate方法验证username与password是否存在 你的 user 表里,通过验证则签发token
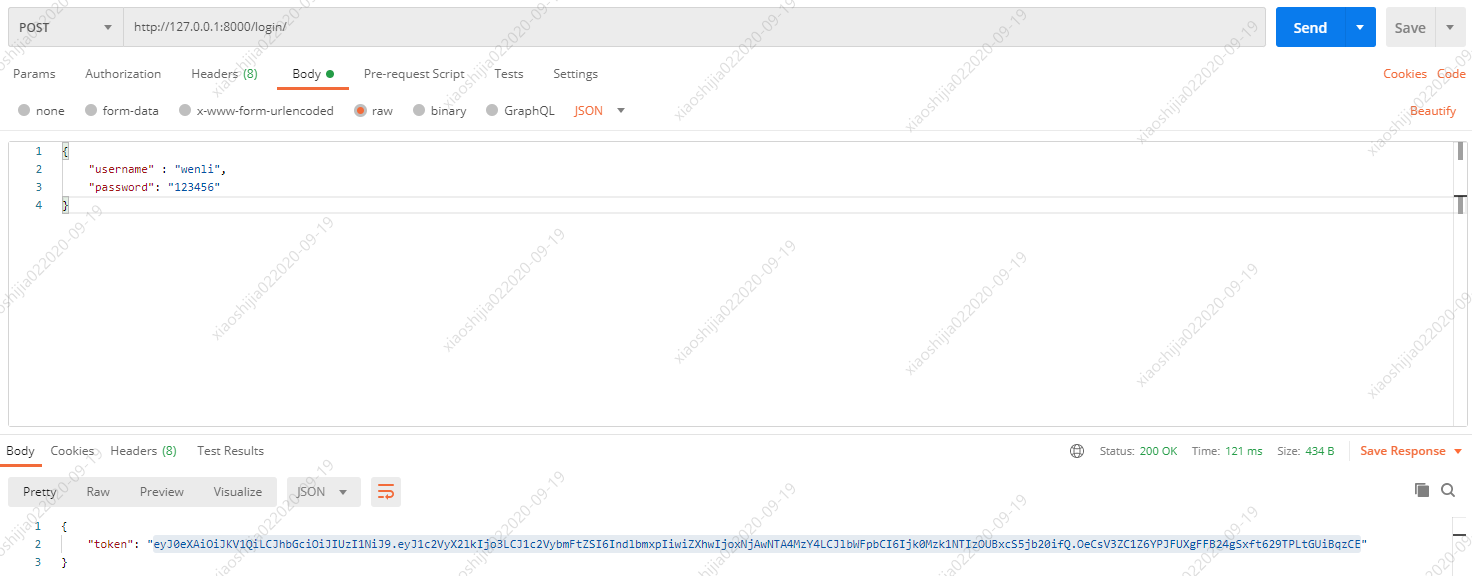
POSTMAN测试:注意首先确保你的这个用户已经存在
如何给接口加上JWT验证
views.py
from rest_framework.views import APIView
from rest_framework_jwt.authentication import JSONWebTokenAuthentication
from rest_framework import authentication
from rest_framework.response import Response

class IndexViewset(APIView):

  #单独给这个接口增加JWT认证
    authentication_classes = (JSONWebTokenAuthentication, authentication.SessionAuthentication,)
    def get(self, request, *args, **kwargs):
        return Response('POST请求,响应内容')
    def post(self, request, *args, **kwargs):
        return Response('POST请求,响应内容')
注意一个事,配置验证,权限类的格式:authentication_classes = (验证类,验证类, ),要不然就会报这个错误:TypeError: 'xxx' object is not iterable。
上面代码中,通过验证则代表JWT有效,那么如何获取到此token所属于的用户,看如下代码:
from rest_framework.views import APIView
from rest_framework_jwt.authentication import JSONWebTokenAuthentication
from rest_framework import authentication
from rest_framework.response import Response
from rest_framework_jwt.utils import jwt_decode_handler

class IndexViewset(APIView):

    authentication_classes = (JSONWebTokenAuthentication, authentication.SessionAuthentication,)

    def get(self, request, *args, **kwargs):
        print("验证后的token:",bytes.decode(request.auth))
        token_user = jwt_decode_handler(bytes.decode(request.auth))
        print(token_user['user_id'])
        return Response('POST请求,响应内容')

    def post(self, request, *args, **kwargs):
        return Response('POST请求,响应内容')
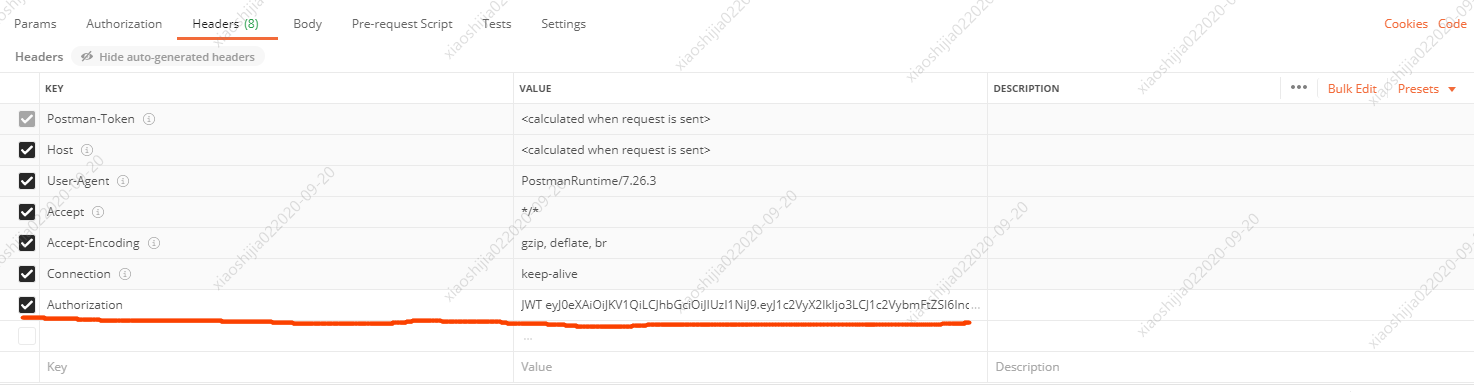
如何测试接口:在请求头里面加上Authorization字段,值为JWT+ 空格 + token
最后介绍一下另一种情况:需要配合身份验证+JWT的方式:请求的时候带有已验证的token且没有过期,就会通过执行对应请求方式,要不就没有通过,request.user拿到用户名。
from rest_framework.views import APIView
from rest_framework_jwt.authentication import JSONWebTokenAuthentication
from rest_framework import authentication
from rest_framework.response import Response
from rest_framework_jwt.utils import jwt_decode_handler
from rest_framework.permissions import IsAuthenticated

class IndexViewset(APIView):

   permission_classes = (IsAuthenticated,)
    authentication_classes = (JSONWebTokenAuthentication, authentication.SessionAuthentication,)

    def get(self, request, *args, **kwargs):
        print(request.user) #获取请求的用户    return Response('POST请求,响应内容')
     return Response('GER请求,响应内容')

    def post(self, request, *args, **kwargs):
        return Response('POST请求,响应内容')
特殊情况
1.如果你想扩展django user字段,新建UserProfile类,继承AbstractUser,settings.py里指定user model,并迁移数据库。
2.如果用户登录中不仅有用户名,密码,还有验证码等,就需要重写验证类,新建CustomBackend类,继承ModelBackend,实现authenticate方法,settings.py里指定:
AUTHENTICATION_BACKENDS = (
  #选择自己的验证类
  users.views.CustomBackend',
  #选择django的验证类
  #'django.contrib.auth.backends.ModelBackend',
)
- 修改Libsite-packagesdjangocontribauth\__init__.py,替换authenticate。


def authenticate(request=None, **credentials):
    """
    If the given credentials are valid, return a User object.
    """
    for backend, backend_path in _get_backends(return_tuples=True):
        try:
            inspect.getcallargs(backend.authenticate, request, **credentials)
        except TypeError:
            args = ()
            credentials.pop('request', None)
            # Does the backend accept a request keyword argument?
            try:
                inspect.getcallargs(backend.authenticate, request=request, **credentials)
            except TypeError:
                # Does the backend accept credentials without request?
                try:
                    inspect.getcallargs(backend.authenticate, **credentials)
                except TypeError:
                    # This backend doesn't accept these credentials as arguments. Try the next one.
                    return None
                else:
                    warnings.warn(
                        "Update %s.authenticate() to accept a positional "
                        "`request` argument." % backend_path
                    )
            else:
                credentials['request'] = request
                warnings.warn(
                    "In %s.authenticate(), move the `request` keyword argument "
                    "to the first positional argument." % backend_path
                )
        # Annotate the user object with the path of the backend.
        return backend.authenticate(*args, **credentials)

    # The credentials supplied are invalid to all backends, fire signal

    user_login_failed.send(sender=__name__, credentials=_clean_credentials(credentials), request=request)
- 修改ObtainJSONWebToken下的__init__方法与validate的字段。
注意:validate方法中的调用authenticate方法是哪个authenticate?
django.contrib.auth.backends.ModelBackend为django默认的authenticate,只能处理用户名和密码。
users.views.CustomBackend为自定义authenticate,可以处理更多参数。
JWT存储在哪里?
JWT在服务端是无状态的,只需要解密,查看token是否有效,解密出来的信息中含有用户信息,而客户端需要保存token,并且当登录验证成功以后的请求就应该携带token,那么客户端如何存储token,客户端可以通过什么方式传递token?
token存储在哪里:
- HTML5 Web Storage (localStorage或sessionStorage)
- Cookies
HTML5 Web Storage (localStorage或sessionStorage)
当你使用ajax post请求登录成功拿到token,触发回调函数,存储token到sessionStorage
function tokenSuccess(err, response) {
    if(err){
        throw err;
    }
    $window.sessionStorage.accessToken = response.body.access_token;
}
再次请求时通过ajax 在请求头添加Authorization: Bearer token字符串
JWT Cookie Storage
这种方式就很简单了,登录验证成功,服务端将token设置到cookie中。
客户端每次请求就会自动带上set-Cookie,服务端获取cookie中的token。
JWT sessionStorage和localStorage的安全性