配置Bean的形式可以基于XML文件的方式,也可以基于注解的方式,而Bean的配置方式可以通过全类名(反射),通过工厂方式和FactoryBean。
XML形式
<?xml version="1.0" encoding="UTF-8"?>
<beans xmlns="http://www.springframework.org/schema/beans"
       xmlns:xsi="http://www.w3.org/2001/XMLSchema-instance"
       xsi:schemaLocation="http://www.springframework.org/schema/beans http://www.springframework.org/schema/beans/spring-beans.xsd">

    <!--     配置bean  id:标识  class:全类名   name:属性名,注意是针对set方法的属性名,不是变量的属性名    value:属性值  -->
    <bean id="student" class="com.lql.spring01.Student">
        <property name="name" value="lql"></property>
        <property name="age" value="18"></property>
    </bean>
</beans>
这是第一个HelloWorld的applicationContext.xml的代码,基于xml形式的Bean配置,其中的class="com.lql.spring01.Student"就是通过反射的方式在IOC容器中创建Bean,所以要求Bean中必须有无参构造。而id="student'则是引用Bean,唯一标识,需要注意的是,如果id没有被指定,那么Spring自动将类名作为Bean的名字。
Spring容器
在第一个HelloWorld中有这么一段代码;
    public static void main(String[] args) {
        //创建IOC容器
        ApplicationContext app = new ClassPathXmlApplicationContext("applicationContext.xml");
        //获取bean
        Student student = app.getBean("student", Student.class);
        //调用方法
        student.Hello();
    }
其中 ApplicationContext就是IOC容器,实际上它是个接口,Spring中提供了两种类型的IOC容器的实现,一个是BeanFactory: IOC容器的基本实现,一个是ApplicationContext: 提供了更多的高级特性,也是BeanFactory的子接口 , BeanFactory是Spring框架的基础设施,是面向Spring本身;而ApplicationContext面向使用Spring框架的开发者,几乎所有的应用场合都直接使用了ApplicationContext而非底层的BeanFactory,
但是无论是哪一种方式,配置文件是相同的;这里给出ApplicationContext的继承机构:
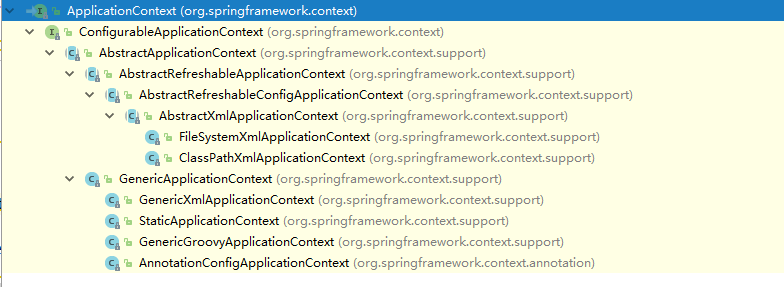
ApplicationContext的主要实现类:
-| ClassPathXmlApplicationContext: 从类路径下加载配置文件,
-| FileSystemXmlApplicationContext: 从文件系统中加载配置文件
ConfigurableApplicationContext扩展于ApplicationContext,新增了两个主要方法:refresh() 和 close(),这让ApplicationContext具有启动,刷新和关闭上下文的能力。
ApplicationContext在初始化上下文的时候就实例化所有单例的Bean.(BeanFactory在启动的时候不会去实例化Bean,只有从容器中拿Bean的时候才会去实例化)
实际上还有个WebApplicationContext: 是专门为WEB应用而准备的,它允许从相对于WEB根目录的路径完成初始化工作(SpringMVC)。
依赖注入的方式
Spring支持三种依赖注入的方式:
①属性注入,②构造器注入 , ③工厂方法注入(不推荐),第三种我工作2年都没见过一次,很少使用,不推荐,所以只说前两者,后者知道就行了
属性注入(setter()注入):属性注入即通过setter()方法注入Bean的属性值或依赖的对象;属性注入使用<property>元素,name属性指定Bean的属性名,value属性(或者使用<value>子标签)指定属性值。实际上,属性注入是实际应用中最常用的注入方式。示例如下:
  <bean id="student" class="com.lql.spring01.Student">
        <property name="name" value="lql"></property>
        <property name="age" value="18"></property>
    </bean>
构造器注入:通过构造方法注入Bean的属性值或者依赖的对象,它保证了Bean的实例在实例化后就可以使用,构造器注入在<constructor-arg>元素里声明属性,<constructor-arg>里面没有name属性。示例如下:
    <bean id="student1" class="com.lql.spring01.Student">
        <constructor-arg value="tom" index="0"></constructor-arg>
        <constructor-arg value="19" index="1"></constructor-arg>
    </bean>
需要注意的是需要在类中提供对应的构造方法,index是从0开始的,当有多个构造器的时候,可以使用type来区分参数类型;如下
  <bean id="student1" class="com.lql.spring01.Student">
        <constructor-arg value="tom" index="0" type="java.lang.String"></constructor-arg>
        <constructor-arg value="19" index="1" type="int"></constructor-arg>
    </bean>
上述的value="19" 是字符串形式,而我们代码中的age是int类型的,那Spring是怎么处理的?首先介绍一个概念 "字面值",可用字符串表示的值,可以通过<value>元素标签或value属性进行注入,基本数据类型及其封装类、String 等类型都可以采取字面值注入的方式,若字面值中包含特殊字符,可以使用<![CDATA[]]>把字面值包裹起来。所以上述的注入可以这么写:
 <bean id="student2" class="com.lql.spring01.Student">
        <constructor-arg index="0"  type="java.lang.String">
            <value><![CDATA[tom^]]></value>
        </constructor-arg>
        <constructor-arg index="1" type="java.lang.Integer">
            <value>20</value>
        </constructor-arg>
    </bean>