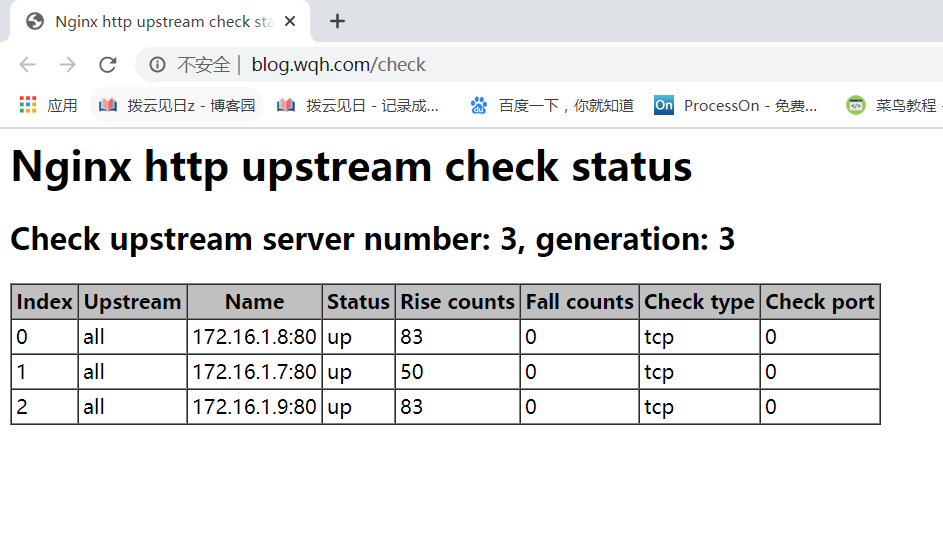
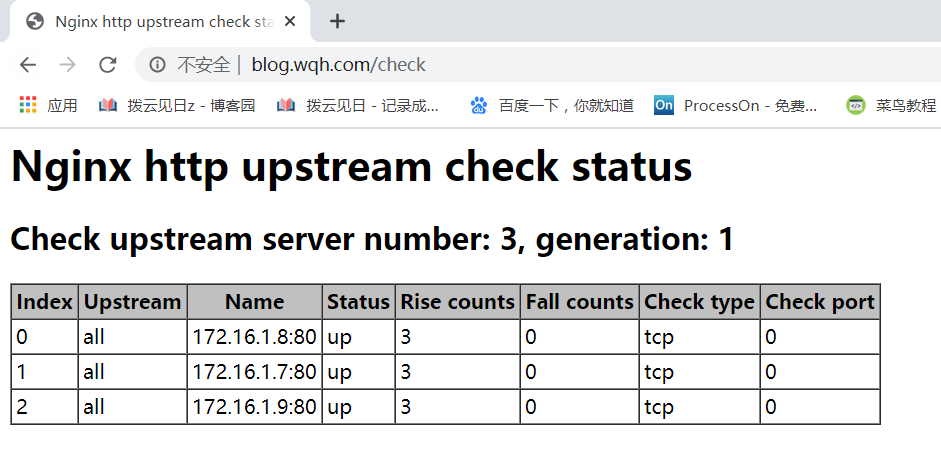
①.对于软件的版本升级、添加官方模块、添加第三方模块,都需要用源码安装包重新生成(configure)、编译(make)、安装(make install),在企业生产中的源码安装包,一般需要存放在固定的位置,以便不时之需;
②.对于软件的版本回滚,只需要将软链接文件重新指向版本升级前的目录即可;
③.对于升级后(或添加了新模块)的版本,需要将旧版本中的 .pid 文件、.conf 配置文件以及我们修改(或创建)的其他重要文件和目录 拷贝到新版本目录的对应位置,再使用平滑重启,避免影响用户体验,也升级了版本,添加了新的功能 ;
④.对于添加某些第三方模块,需要使用 patch 命令,在源码安装包目录下指定补丁文件,再进行生成(configure)、编译(make)、安装(make install);
⑤.patch 命令,本质上是对源码文件作出修改(补丁),进行了升级:
参考信息
# 先参考使用官方YUM仓库 安装的 nginx-1.18.0 的配置参数,源码安装时,可以在此基础上稍作修改
[root@blog ~]# nginx -V
nginx version: nginx/1.18.0
built by gcc 4.8.5 20150623 (Red Hat 4.8.5-39) (GCC)
built with OpenSSL 1.0.2k-fips  26 Jan 2017
TLS SNI support enabled
configure arguments: --prefix=/etc/nginx --sbin-path=/usr/sbin/nginx --modules-path=/usr/lib64/nginx/modules --conf-path=/etc/nginx/nginx.conf --error-log-path=/var/log/nginx/error.log --http-log-path=/var/log/nginx/access.log --pid-path=/var/run/nginx.pid --lock-path=/var/run/nginx.lock --http-client-body-temp-path=/var/cache/nginx/client_temp --http-proxy-temp-path=/var/cache/nginx/proxy_temp --http-fastcgi-temp-path=/var/cache/nginx/fastcgi_temp --http-uwsgi-temp-path=/var/cache/nginx/uwsgi_temp --http-scgi-temp-path=/var/cache/nginx/scgi_temp --user=nginx --group=nginx --with-compat --with-file-aio --with-threads --with-http_addition_module --with-http_auth_request_module --with-http_dav_module --with-http_flv_module --with-http_gunzip_module --with-http_gzip_static_module --with-http_mp4_module --with-http_random_index_module --with-http_realip_module --with-http_secure_link_module --with-http_slice_module --with-http_ssl_module --with-http_stub_status_module --with-http_sub_module --with-http_v2_module --with-mail --with-mail_ssl_module --with-stream --with-stream_realip_module --with-stream_ssl_module --with-stream_ssl_preread_module --with-cc-opt='-O2 -g -pipe -Wall -Wp,-D_FORTIFY_SOURCE=2 -fexceptions -fstack-protector-strong --param=ssp-buffer-size=4 -grecord-gcc-switches -m64 -mtune=generic -fPIC' --with-ld-opt='-Wl,-z,relro -Wl,-z,now -pie'
源码安装 nginx-1.14.2
# 安装 nginx 依赖包,以及 patch 包
[root@lb02 ~]# yum install -y gcc glibc gcc-c++ pcre-devel openssl-devel patch

# 下载 nginx-1.14.2 源码安装包,下载 nginx_upstream_check_module 模块补丁
[root@lb01 ~]# wget http://nginx.org/download/nginx-1.14.2.tar.gz
[root@lb01 ~]# wget https://github.com/yaoweibin/nginx_upstream_check_module/archive/master.zip

# 解压 nginx 源码包,以及第三方模块 nginx_upstream_check_module
[root@lb01 ~]# tar xf nginx-1.14.2.tar.gz
[root@lb01 ~]# unzip master.zip

# 进入 nginx-1.14.2 目录,打补丁(-p1 表示源码安装包和补丁文件的绝对路径中,不同的目录的层数)
[root@lb01 ~]# cd nginx-1.14.2/
[root@lb01 nginx-1.14.2]# patch -p1 <../nginx_upstream_check_module-master/check_1.14.0+.patch

# 生成,将第三方模块加入
[root@lb01 nginx-1.14.2]# ./configure --prefix=/app/nginx-1.14.2  --user=www --group=www --with-compat --with-file-aio --with-threads --with-http_addition_module --with-http_auth_request_module --with-http_dav_module --with-http_flv_module --with-http_gunzip_module --with-http_gzip_static_module --with-http_mp4_module --with-http_random_index_module --with-http_realip_module --with-http_secure_link_module --with-http_slice_module --with-http_ssl_module --with-http_stub_status_module --with-http_sub_module --with-http_v2_module --with-mail --with-mail_ssl_module --with-stream --with-stream_realip_module --with-stream_ssl_module --with-stream_ssl_preread_module --add-module=/root/nginx_upstream_check_module-master --with-cc-opt='-O2 -g -pipe -Wall -Wp,-D_FORTIFY_SOURCE=2 -fexceptions -fstack-protector-strong --param=ssp-buffer-size=4 -grecord-gcc-switches -m64 -mtune=generic -fPIC' --with-ld-opt='-Wl,-z,relro -Wl,-z,now -pie'

# 编译
[root@lb01 nginx-1.14.2]# make

# 安装
[root@lb01 nginx-1.14.2]# make install

# 给安装后的目录 创建一个软链接
[root@lb01 ~]# ln -s /app/nginx-1.14.2 /app/nginx

# 添加环境变量
[root@lb01 ~]# echo 'export PATH="$PATH:/app/nginx/sbin/"' > /etc/profile.d/path.sh
[root@lb01 ~]# echo $PATH
/usr/local/sbin:/usr/local/bin:/usr/sbin:/usr/bin:/app/nginx/sbin/:/root/bin

# 修改 nginx.conf 主配置文件
[root@lb01 ~]# cat /app/nginx/conf/nginx.conf
user  www;
worker_processes  1;
error_log  logs/error.log;
#error_log  logs/error.log  notice;
#error_log  logs/error.log  info;
pid        logs/nginx.pid;
events {
    worker_connections  1024;
}
http {
    include       mime.types;
    default_type  application/octet-stream;
    log_format  main  '$remote_addr - $remote_user [$time_local] "$request" '
                      '$status $body_bytes_sent "$http_referer" '
                      '"$http_user_agent" "$http_x_forwarded_for"';
    access_log  logs/access.log  main;
    sendfile        on;
    #tcp_nopush     on;
    #keepalive_timeout  0;
    keepalive_timeout  65;
    #gzip  on;
    include conf.d/*.conf;
}

# 创建 conf.d 子配置文件目录
[root@lb01 ~]# mkdir /app/nginx/conf/conf.d

# 编辑子配置文件
[root@lb01 conf.d]# vi default.conf      <--------  # 方便在浏览器看 nginx 版本号
server {
	listen 80;
	server_name lb.com;
	root html;
	index index.html;
}

[root@lb01 ~]# vi /app/nginx/conf/conf.d/all.conf
upstream all {
	server 172.16.1.8;
	server 172.16.1.7;
	server 172.16.1.9;
	check interval=3000 rise=2 fall=3 timeout=1000 type=tcp;
}
server {
        listen  80;
        server_name wecenter.wqh.com blog.wqh.com phpmyadmin.com;
        location / {
                proxy_pass http://all;
                include proxy_params;
        }
	    location /check {
        	check_status;
    	}
}

# 编写 proxy_params 文件
[root@lb01 ~]# vi /app/nginx/conf/proxy_params
proxy_set_header HOST $host;
proxy_set_header X-Forwarded-For $proxy_add_x_forwarded_for;
proxy_connect_timeout 60s;
proxy_read_timeout 60s;
proxy_send_timeout 60s;
proxy_buffering on;
proxy_buffers 8 4k;
proxy_buffer_size 4k;

# 启动 nginx 或者 重新加载 nginx 配置文件
[root@lb01 ~]# nginx
[root@lb01 ~]# nginx -s reload


版本升级 nginx-1.16.1
# 下载 nginx-1.14.2 源码安装包
[root@lb01 ~]# wget http://nginx.org/download/nginx-1.16.1.tar.gz

# 解压源码包
[root@lb01 ~]# tar xf nginx-1.16.1.tar.gz

# 进入 nginx-1.16.1 目录,打补丁
[root@lb01 nginx-1.16.1]# patch -p1 <../nginx_upstream_check_module-master/check_1.16.1+.patch

#  生成,并将第三方模块加入
[root@lb01 nginx-1.16.1]# ./configure --prefix=/app/nginx-1.16.1  --user=www --group=www --with-compat --with-file-aio --with-threads --with-http_addition_module --with-http_auth_request_module --with-http_dav_module --with-http_flv_module --with-http_gunzip_module --with-http_gzip_static_module --with-http_mp4_module --with-http_random_index_module --with-http_realip_module --with-http_secure_link_module --with-http_slice_module --with-http_ssl_module --with-http_stub_status_module --with-http_sub_module --with-http_v2_module --with-mail --with-mail_ssl_module --with-stream --with-stream_realip_module --with-stream_ssl_module --with-stream_ssl_preread_module --add-module=/root/nginx_upstream_check_module-master --with-cc-opt='-O2 -g -pipe -Wall -Wp,-D_FORTIFY_SOURCE=2 -fexceptions -fstack-protector-strong --param=ssp-buffer-size=4 -grecord-gcc-switches -m64 -mtune=generic -fPIC' --with-ld-opt='-Wl,-z,relro -Wl,-z,now -pie'

# 编译
[root@lb01 nginx-1.16.1]# make

# 安装
[root@lb01 nginx-1.16.1]# make install

# 将 pid 文件 拷贝到新的安装目录
[root@lb01 ~]# cp /app/nginx/logs/nginx.pid /app/nginx-1.16.1/logs/

# 将 nginx.conf 主配置文件 拷贝到新的安装目录
[root@lb01 ~]# cp /app/nginx/conf/nginx.conf /app/nginx-1.16.1/conf/

# 将 nginx.conf 子配置文件目录 拷贝到新的安装目录
[root@lb01 ~]# cp -r /app/nginx/conf/conf.d /app/nginx-1.16.1/conf/

# 将 proxy_params 拷贝到新的安装目录
[root@lb01 ~]# cp  /app/nginx/conf/proxy_params /app/nginx-1.16.1/conf/

# 将 站点目录 拷贝到新的安装目录
[root@lb01 conf.d]# cp -r /app/nginx/html /app/nginx-1.16.1/

# 重置软链接文件
[root@lb01 ~]# cd /app/
[root@lb01 app]# ll
total 0
lrwxrwxrwx  1 root root  12 May 28 17:50 nginx -> nginx-1.14.2
drwxr-xr-x 11 root root 151 May 28 18:29 nginx-1.14.2
drwxr-xr-x  6 root root  54 May 28 20:07 nginx-1.16.1
[root@lb01 app]# rm -rf nginx && ln -s nginx-1.16.1/ nginx
[root@lb01 app]# ll
total 0
lrwxrwxrwx  1 root root  13 May 28 20:25 nginx -> nginx-1.16.1/
drwxr-xr-x 11 root root 151 May 28 18:29 nginx-1.14.2
drwxr-xr-x  6 root root  54 May 28 20:07 nginx-1.16.1

# 快速重启 nginx
[root@lb01 ~]# nginx -s stop && nginx


版本回滚
# 重置软链接文件
[root@lb01 ~]# cd /app/
[root@lb01 app]# rm -rf nginx && ln -s nginx-1.14.2/ nginx

# 快速重启 nginx
[root@lb01 ~]# nginx -s stop && nginx
