1.基本原理
spring security的核心是用户认证(Authentication)和用户授权(Authorization)。
用户认证指的是验证某个用户是否为系统中的合法主体,也就是说用户能否访问该系统。一般要求用户提供用户名和密码。
用户授权指的是验证某个用户是否有权限执行某个操作。在一个系统中,不同用户所具有的权限是不同的。
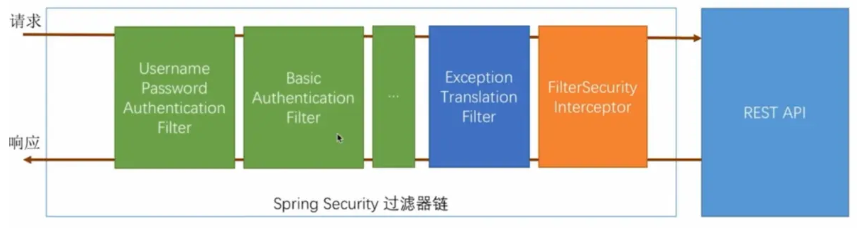
认证原理图
2.基本配置
这里使用Mybatis和SpringSecurity共同开发,除了Mybatis的配置,其他配置如下
第一步:导入依赖
  <dependency>
            <groupId>org.springframework.boot</groupId>
            <artifactId>spring-boot-starter-security</artifactId>
</dependency>
第二步:创建使用的页面
在资源目录的static目录下创建几个页面
***********add.html************
<!DOCTYPE html>
<html lang="en">
<head>
    <meta charset="UTF-8">
    <title>Title</title>
</head>
<body>
<h2>添加订单!!!!!!!</h2>
</body>
</html>

***********look.html************
<!DOCTYPE html>
<html lang="en">
<head>
    <meta charset="UTF-8">
    <title>Title</title>
</head>
<body>
<h2>查看订单!!!!!!!</h2>
</body>
</html>

***********delete.html************
<!DOCTYPE html>
<html lang="en">
<head>
    <meta charset="UTF-8">
    <title>Title</title>
</head>
<body>
<h2>删除订单!!!!!!!</h2>
</body>
</html>

***********update.html************
<!DOCTYPE html>
<html lang="en">
<head>
    <meta charset="UTF-8">
    <title>Title</title>
</head>
<body>
<h2>修改订单!!!!!!!</h2>
</body>
</html>

***********index.html************
<!DOCTYPE html>
<html lang="en">
<head>
    <meta charset="UTF-8">
    <title>首页</title>
</head>
<body>
    <p><a href="/look">查看订单</a></p>
    <p><a href="/add">添加订单</a></p>
    <p><a href="/delete">删除订单</a></p>
    <p><a href="/update">修改订单</a></p>
</body>
</html>
配置application.properties,其他配置在这里略,参考所讲配置
spring.mvc.view.prefix=/
spring.mvc.view.suffix=.html
spring.resources.static-locations=classpath:/static
第三步:创建UserController类
package com.example.springsecurity.controller;

import org.springframework.stereotype.Controller;
import org.springframework.web.bind.annotation.GetMapping;
import org.springframework.web.bind.annotation.RequestMapping;
import org.springframework.web.bind.annotation.RestController;

@Controller
public class UserController {
    @RequestMapping("/")
    public String index(){
        return "index";
    }

    @RequestMapping("/add")
    public String add(){
        return "add";
    }

    @RequestMapping("/look")
    public String look(){
        return "look";
    }

    @RequestMapping("/delete")
    public String delete(){
        return "delete";
    }

    @RequestMapping("/update")
    public String update(){
        return "update";
    }
}
3.httpBaisc的方式
1)在config包下创建SecurityConfig的配置类:
package com.example.springsecurity.config;

import org.springframework.context.annotation.Bean;
import org.springframework.security.config.annotation.authentication.builders.AuthenticationManagerBuilder;
import org.springframework.security.config.annotation.web.builders.HttpSecurity;
import org.springframework.security.config.annotation.web.configuration.EnableWebSecurity;
import org.springframework.security.config.annotation.web.configuration.WebSecurityConfigurerAdapter;
import org.springframework.security.crypto.password.NoOpPasswordEncoder;
import org.springframework.security.crypto.password.PasswordEncoder;
import org.springframework.stereotype.Component;

@Component
@EnableWebSecurity
public class SecurityConfig extends WebSecurityConfigurerAdapter {

    //配置加密的方式
    @Bean
    PasswordEncoder passwordEncoder(){
        //设置不加密
        return NoOpPasswordEncoder.getInstance();
    }

    //配置认证用户信息和授权
    @Override
    protected void configure(AuthenticationManagerBuilder auth) throws Exception {
        //基于内存的认证
       auth.inMemoryAuthentication().withUser("user").password("1234").authorities("addUser");
    }

    //配置拦截请求资源
    @Override
    protected void configure(HttpSecurity http) throws Exception {
       http
               //开启HttpSecurity配置
               .authorizeRequests()
               //指定路径
               .antMatchers("/**")
               //拦截所有
               .fullyAuthenticated()
               //配置认证模式
               .and().httpBasic();
    }
}
启动项目在浏览器输入localhost:8080,就会出现如下界面,需要进行登录。
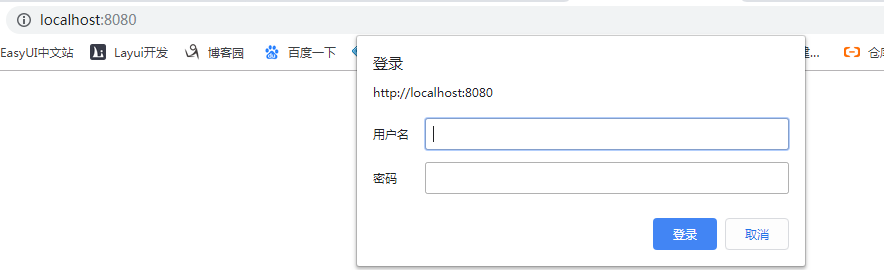
这里没有配置加密,登录成功后才能进行访问其他的资源。
4.使用FormLogin的方式
1)只需要在7.3的基础上把configure(HttpSecurity http)的.httpBasic()换成formLogin()即可,就会出现登录页面。
2)示例:admin用户可以访问所有的资源,user用户只能添加和查询订单的资源,SecurityConfig配置如下:
package com.example.springsecurity.config;

import org.springframework.context.annotation.Bean;
import org.springframework.security.config.annotation.authentication.builders.AuthenticationManagerBuilder;
import org.springframework.security.config.annotation.web.builders.HttpSecurity;
import org.springframework.security.config.annotation.web.configuration.EnableWebSecurity;
import org.springframework.security.config.annotation.web.configuration.WebSecurityConfigurerAdapter;
import org.springframework.security.crypto.password.NoOpPasswordEncoder;
import org.springframework.security.crypto.password.PasswordEncoder;
import org.springframework.stereotype.Component;

@Component
@EnableWebSecurity
public class SecurityConfig extends WebSecurityConfigurerAdapter {

    //配置加密的方式
    @Bean
    PasswordEncoder passwordEncoder(){
        //设置不加密
        return NoOpPasswordEncoder.getInstance();
    }

    //配置认证用户信息和授权
    @Override
    protected void configure(AuthenticationManagerBuilder auth) throws Exception {
        //基于内存的认证
        //配置user拥有权限
       auth.inMemoryAuthentication().
               withUser("user").password("1234").authorities("add","look");
       //配置admin拥有所有的权限
        auth.inMemoryAuthentication().
                withUser("admin").password("1234").authorities("add","look","delete","update");
    }

    //配置拦截请求资源
    @Override
    protected void configure(HttpSecurity http) throws Exception {
       http
               //开启HttpSecurity配置
               .authorizeRequests()
               //配置权限的授权
               .antMatchers("/add").hasAuthority("add")
               .antMatchers("/look").hasAuthority("look")
               .antMatchers("/delete").hasAuthority("delete")
               .antMatchers("/update").hasAuthority("update")
               .antMatchers("/**").fullyAuthenticated()
               //配置认证模式
               .and().formLogin();
    }
}
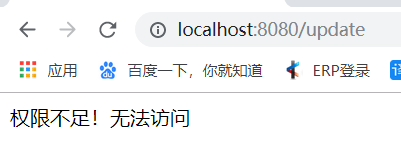
启动项目,使用admin登录可访问所有的资源,而user登录后访问look和add以外的资源时会出现403,这就是权限分配。
3)更改403权限不足页面
在static目录下新建error/403.html,内容如下
<!DOCTYPE html>
<html lang="en">
<head>
    <meta charset="UTF-8">
    <title>Title</title>
</head>
<body>
权限不足!无法访问
</body>
</html>
新建一个配置类WebServerAutoConfiguration
package com.example.springsecurity.config;


import org.springframework.boot.web.embedded.tomcat.TomcatServletWebServerFactory;
import org.springframework.boot.web.server.ErrorPage;
import org.springframework.boot.web.servlet.server.ConfigurableServletWebServerFactory;
import org.springframework.context.annotation.Bean;
import org.springframework.context.annotation.Configuration;
import org.springframework.http.HttpStatus;

/**
 * 配置发生错误的请求路径
 */

@Configuration
public class WebServerAutoConfiguration {

    @Bean
    public ConfigurableServletWebServerFactory webServerFactory(){
        TomcatServletWebServerFactory factory=new TomcatServletWebServerFactory();
        ErrorPage errorPage400=new ErrorPage(HttpStatus.BAD_REQUEST,"error/400");
        ErrorPage errorPage401=new ErrorPage(HttpStatus.UNAUTHORIZED,"error/401");
        ErrorPage errorPage403=new ErrorPage(HttpStatus.FORBIDDEN,"error/403");
        ErrorPage errorPage404=new ErrorPage(HttpStatus.NOT_FOUND,"error/404");
        ErrorPage errorPage415=new ErrorPage(HttpStatus.UNSUPPORTED_MEDIA_TYPE,"error/415");
        ErrorPage errorPage500=new ErrorPage(HttpStatus.INTERNAL_SERVER_ERROR,"error/500");
        factory.addErrorPages(errorPage400,errorPage401,errorPage403,errorPage404,errorPage415,errorPage500);
        return factory;
    }
}
新建错误的controller处理类ErrorController
package com.example.springsecurity.controller;

import org.springframework.stereotype.Controller;
import org.springframework.web.bind.annotation.RequestMapping;

/**
 * 错误的controller
 */
@Controller
public class ErrorController {

    @RequestMapping("/error/403")
    public String error(){
        return "error/403";
    }
}
这里是以403错误为例,自定义其他的错误页面雷同。启动项目,当使用user用户登录访问look和add以外的资源时会显示自定义的403页面的内容。
4)更换自定义登录页面
在资源目录下新建login.html
<!DOCTYPE html>
<html lang="en">
<head>
    <meta charset="UTF-8">
    <title>登录</title>
</head>
<body>
    <form method="post" action="/login">
        <p>
            <input type="text" id="username" name="username"  placeholder="用户名">
        </p>
        <p>
            <input type="password" id="password" name="password"  placeholder="密码">
        </p>
        <button  type="submit">登录</button>
    </form>
</body>
</html>
修改security的配置类,指定自定义的登录页面以及登录成功或失败的处理
package com.example.springsecurity.config;

import com.example.springsecurity.handler.MyAuthenticationFailureHandler;
import com.example.springsecurity.handler.MyAuthenticationSuccessHandler;
import org.springframework.beans.factory.annotation.Autowired;
import org.springframework.context.annotation.Bean;
import org.springframework.security.config.annotation.authentication.builders.AuthenticationManagerBuilder;
import org.springframework.security.config.annotation.web.builders.HttpSecurity;
import org.springframework.security.config.annotation.web.configuration.WebSecurityConfigurerAdapter;
import org.springframework.security.core.Authentication;
import org.springframework.security.core.AuthenticationException;
import org.springframework.security.crypto.password.NoOpPasswordEncoder;
import org.springframework.security.crypto.password.PasswordEncoder;
import org.springframework.security.web.authentication.AuthenticationFailureHandler;
import org.springframework.security.web.authentication.AuthenticationSuccessHandler;
import org.springframework.security.web.authentication.logout.LogoutHandler;
import org.springframework.security.web.authentication.logout.LogoutSuccessHandler;
import org.springframework.stereotype.Component;

import javax.servlet.ServletException;
import javax.servlet.http.HttpServletRequest;
import javax.servlet.http.HttpServletResponse;
import java.io.IOException;


@Component
public class SecurityConfig extends WebSecurityConfigurerAdapter {
    /**
     * 登录成功的处理
     */
    @Autowired
    private MyAuthenticationSuccessHandler successHandler;

    /**
     * 登录失败的处理
     */
    @Autowired
    private MyAuthenticationFailureHandler failureHandler;

    //配置加密的方式
    @Bean
    PasswordEncoder passwordEncoder() {
        //设置不加密
        return NoOpPasswordEncoder.getInstance();
    }

    //配置认证用户信息和授权
    @Override
    protected void configure(AuthenticationManagerBuilder auth) throws Exception {
        //配置user拥有权限
        auth.inMemoryAuthentication().
                withUser("user").password("1234").authorities("add","look");
        //配置admin拥有所有的权限
        auth.inMemoryAuthentication().
                withUser("admin").password("1234").authorities("add","look","delete","update");
    }

    //配置拦截请求资源
    @Override
    protected void configure(HttpSecurity http) throws Exception {
        http
                //开启HttpSecurity配置
                .authorizeRequests()
                //指定路径
                //配置权限的授权
                .antMatchers("/add").hasAuthority("add")
                .antMatchers("/look").hasAuthority("look")
                .antMatchers("/delete").hasAuthority("delete")
                .antMatchers("/update").hasAuthority("update")
                .antMatchers("/login.html").permitAll()
                .antMatchers("/**").fullyAuthenticated()
                //配置认证模式
                .and().formLogin()
                .loginPage("/login.html")
                .loginProcessingUrl("/login")
                //登录成功的操作
                .successHandler(successHandler)
                //登录失败的操作
                .failureHandler(failureHandler)
                .and()
                //关闭cors
                .csrf()
                .disable();
    }
}
创建登录成功的处理类MyAuthenticationSuccessHandler
package com.example.springsecurity.handler;

import com.fasterxml.jackson.databind.ObjectMapper;
import org.springframework.security.core.Authentication;
import org.springframework.security.web.authentication.AuthenticationSuccessHandler;
import org.springframework.stereotype.Component;

import javax.servlet.ServletException;
import javax.servlet.http.HttpServletRequest;
import javax.servlet.http.HttpServletResponse;
import java.io.IOException;


/**
 * @Author: yushizhong
 * @Date: 2020/1/7 10:11
 * @Title: 登录成功处理
 */
@Component
public class MyAuthenticationSuccessHandler implements AuthenticationSuccessHandler {
    @Override
    public void onAuthenticationSuccess(HttpServletRequest req, HttpServletResponse resp, Authentication authentication) throws IOException, ServletException {
        System.out.println("登录成功");
        resp.sendRedirect("/");
    }
}
创建登录失败的处理类MyAuthenticationFailureHandler
package com.example.springsecurity.handler;

import com.fasterxml.jackson.databind.ObjectMapper;
import org.springframework.security.authentication.*;
import org.springframework.security.core.AuthenticationException;
import org.springframework.security.web.authentication.AuthenticationFailureHandler;
import org.springframework.stereotype.Component;

import javax.servlet.ServletException;
import javax.servlet.http.HttpServletRequest;
import javax.servlet.http.HttpServletResponse;
import java.io.IOException;


/**
 * @Author: yushizhong
 * @Date: 2020/1/7 10:10
 * @Title: 验证失败处理
 */
@Component
public class MyAuthenticationFailureHandler implements AuthenticationFailureHandler {
    @Override
    public void onAuthenticationFailure(HttpServletRequest req, HttpServletResponse resp, AuthenticationException e) throws IOException, ServletException {
        System.out.println("登录失败");
        resp.sendRedirect("/login.html");
    }
}
启动项目,访问localhost:8080,当登录成功时控制台会打印登录成功,并跳转到首页;登录失败时会打印登录失败,回到登录页面。
5.使用数据库的方式验证
第一步:创建实体类
User类:
package com.example.springsecurity.domain;


import lombok.Data;
import org.springframework.security.core.GrantedAuthority;
import org.springframework.security.core.authority.SimpleGrantedAuthority;
import org.springframework.security.core.userdetails.UserDetails;

import java.util.ArrayList;
import java.util.Collection;
import java.util.List;
@Data
public class User implements UserDetails {
    private Integer id;
    private String username;
    private String name;
    private String password;
    private boolean enabled;
    private boolean locked;
    private String role;

    private List<SimpleGrantedAuthority> authorities = new ArrayList<>();
    //获取用户的角色信息
    @Override
    public Collection<? extends GrantedAuthority> getAuthorities() {
        return authorities;
    }

    //获取用户的密码
    @Override
    public String getPassword() {
        return password;
    }

    //获取用户的用户名
    @Override
    public String getUsername() {
        return username;
    }

    //当前账户是否未过期
    @Override
    public boolean isAccountNonExpired() {
        return true;
    }

    //当前账户是否锁定
    @Override
    public boolean isAccountNonLocked() {
        return !locked;
    }

    //当前账户密码是否未过期
    @Override
    public boolean isCredentialsNonExpired() {
        return true;
    }

    //当前账户是否可用
    @Override
    public boolean isEnabled() {
        return enabled;
    }

}
Role类
package com.example.springsecurity.domain;

import lombok.Data;

@Data
public class Role {
    private Integer id;
    private String role;
    private String explain;
}
Auth类:
package com.example.springsecurity.domain;

import lombok.Data;

@Data
public class Auth {
    private Integer id;
    private String auth;
    private String url;
    private String permission;
}
第二步:创建接口
UserMapper
package com.example.springsecurity.mapper;

import com.example.springsecurity.domain.Auth;
import com.example.springsecurity.domain.User;
import org.apache.ibatis.annotations.Mapper;

import java.util.List;

@Mapper
public interface UserMapper {
    User loadUserByUsername(String username);

    List<Auth> findAuthByUsername(String username);
}
RoleMapper
package com.example.springsecurity.mapper;

import org.apache.ibatis.annotations.Mapper;


@Mapper
public interface RoleMapper {

}
AuthMapper
package com.example.springsecurity.mapper;

import com.example.springsecurity.domain.Auth;
import org.apache.ibatis.annotations.Mapper;

import java.util.List;

@Mapper
public interface AuthMapper {
    List<Auth> findAll();
}
第三步:创建xml
UserMapper.xml
<?xml version="1.0" encoding="UTF-8" ?>
<!DOCTYPE mapper PUBLIC "-//mybatis.org//DTD Mapper 3.0//EN"
        "http://mybatis.org/dtd/mybatis-3-mapper.dtd">
<mapper namespace="com.example.springsecurity.mapper.UserMapper">
    <!--查询用户-->
    <select id="loadUserByUsername" resultType="com.example.springsecurity.domain.User">
        select * from user where username=#{username}
    </select>
    <!--查询用户的权限-->
    <select id="findAuthByUsername" resultType="com.example.springsecurity.domain.Auth">
        select auth.* from user u inner join user_role on user_role.user_id=u.id
            inner join role on role.id=user_role.user_id
            inner join role_auth on role_auth.role_id=role.id
            inner join auth on auth.id=role_auth.auth_id
            where u.username=#{username}
    </select>
</mapper>
RoleMapper.xml
<?xml version="1.0" encoding="UTF-8" ?>
<!DOCTYPE mapper PUBLIC "-//mybatis.org//DTD Mapper 3.0//EN"
        "http://mybatis.org/dtd/mybatis-3-mapper.dtd">
<mapper namespace="com.example.springsecurity.mapper.RoleMapper">

</mapper>
AuthMapper.xml
<?xml version="1.0" encoding="UTF-8" ?>
<!DOCTYPE mapper PUBLIC "-//mybatis.org//DTD Mapper 3.0//EN"
        "http://mybatis.org/dtd/mybatis-3-mapper.dtd">
<mapper namespace="com.example.springsecurity.mapper.AuthMapper">
    <!--查询所有的权限-->
    <select id="findAll" resultType="com.example.springsecurity.domain.Auth">
        select * from auth
    </select>
</mapper>
第三步:修改配置类SecurityConfig,md5加密的工具类在此略(可在工具类的博客中查看)
package com.example.springsecurity.config;

import com.example.springsecurity.domain.Auth;
import com.example.springsecurity.handler.MyAuthenticationFailureHandler;
import com.example.springsecurity.handler.MyAuthenticationSuccessHandler;
import com.example.springsecurity.mapper.AuthMapper;
import com.example.springsecurity.service.UserService;
import com.example.springsecurity.util.Md5Utils;
import org.springframework.beans.factory.annotation.Autowired;
import org.springframework.context.annotation.Bean;
import org.springframework.security.config.annotation.authentication.builders.AuthenticationManagerBuilder;
import org.springframework.security.config.annotation.web.builders.HttpSecurity;
import org.springframework.security.config.annotation.web.configuration.WebSecurityConfigurerAdapter;
import org.springframework.security.config.annotation.web.configurers.ExpressionUrlAuthorizationConfigurer;
import org.springframework.security.core.Authentication;
import org.springframework.security.core.AuthenticationException;
import org.springframework.security.crypto.bcrypt.BCryptPasswordEncoder;
import org.springframework.security.crypto.password.NoOpPasswordEncoder;
import org.springframework.security.crypto.password.PasswordEncoder;
import org.springframework.security.web.authentication.AuthenticationFailureHandler;
import org.springframework.security.web.authentication.AuthenticationSuccessHandler;
import org.springframework.security.web.authentication.logout.LogoutHandler;
import org.springframework.security.web.authentication.logout.LogoutSuccessHandler;
import org.springframework.stereotype.Component;

import javax.servlet.ServletException;
import javax.servlet.http.HttpServletRequest;
import javax.servlet.http.HttpServletResponse;
import java.io.IOException;
import java.util.List;


@Component
public class SecurityConfig extends WebSecurityConfigurerAdapter {
    /**
     * 登录成功的处理
     */
    @Autowired
    private MyAuthenticationSuccessHandler successHandler;

    /**
     * 登录失败的处理
     */
    @Autowired
    private MyAuthenticationFailureHandler failureHandler;

    /**
     * 数据库验证用户信息
     */
    @Autowired
    private UserService userService;

    /**
     * 查询权限
     */
    @Autowired
    private AuthMapper authMapper;

    //配置加密的方式
    @Bean
    PasswordEncoder passwordEncoder() {
        return NoOpPasswordEncoder.getInstance();
    }

    //配置认证用户信息和授权
    @Override
    protected void configure(AuthenticationManagerBuilder auth) throws Exception {
        auth.userDetailsService(userService).passwordEncoder(new PasswordEncoder() {
            //对输入的密码加密,这里暂时不用
            @Override
            public String encode(CharSequence charSequence) {
                return null;
            }

            //加密密码与传入的密码对比
            @Override
            public boolean matches(CharSequence charSequence, String encodePassword) {
                //encodePassword是数据库的密码,charSequence是输入的密码
                return Md5Utils.md5((String)charSequence).equals(encodePassword);
            }
        });
    }

    //配置拦截请求资源
    @Override
    protected void configure(HttpSecurity http) throws Exception {
        ExpressionUrlAuthorizationConfigurer<HttpSecurity>.ExpressionInterceptUrlRegistry authorizeRequests = http
                //开启HttpSecurity配置
                .authorizeRequests();
                //指定路径
                //动态配置权限的授权
        List<Auth> authList = authMapper.findAll();
        for (Auth auth : authList) {
            authorizeRequests.antMatchers(auth.getUrl()).hasAuthority(auth.getAuth());
        }
        authorizeRequests.antMatchers("/login.html").permitAll()
                .antMatchers("/**").fullyAuthenticated()
                //配置认证模式
                .and().formLogin()
                .loginPage("/login.html")
                .loginProcessingUrl("/login")
                //登录成功的操作
                .successHandler(successHandler)
                //登录失败的操作
                .failureHandler(failureHandler)
                .and()
                .logout()
                .logoutUrl("/logout")
                //清除身份认证信息
                .clearAuthentication(true)
                //设置session失效
                .invalidateHttpSession(true)
                .addLogoutHandler(new LogoutHandler() {
                    @Override
                    public void logout(HttpServletRequest req, HttpServletResponse resp, Authentication auth) {}
                })
                .logoutSuccessHandler(new LogoutSuccessHandler() {
                    @Override
                    public void onLogoutSuccess(HttpServletRequest req, HttpServletResponse resp, Authentication auth) throws IOException, ServletException {
                        //退出成功后跳转到登录
                        resp.sendRedirect("/login.html");
                    }
                })
                //配置和登录相关的接口不需要认证
                .permitAll()
                .and()
                //关闭cors
                .csrf()
                .disable();
    }
}
也可以使用默认的加密方式,与md5的配置对比,关键代码如下
 //配置加密的方式
    @Bean
    PasswordEncoder passwordEncoder() {
        return new BCryptPasswordEncoder();
    }

    //配置认证用户信息和授权
    @Override
    protected void configure(AuthenticationManagerBuilder auth) throws Exception {
        auth.userDetailsService(userService);
    }
第四步:创建UserService类
package com.example.springsecurity.service;

import com.example.springsecurity.domain.Auth;
import com.example.springsecurity.domain.User;
import com.example.springsecurity.mapper.UserMapper;
import org.springframework.beans.factory.annotation.Autowired;
import org.springframework.security.core.authority.SimpleGrantedAuthority;
import org.springframework.security.core.userdetails.UserDetails;
import org.springframework.security.core.userdetails.UserDetailsService;
import org.springframework.security.core.userdetails.UsernameNotFoundException;
import org.springframework.stereotype.Service;

import java.util.ArrayList;
import java.util.List;

@Service
public class UserService implements UserDetailsService {
    @Autowired
    private UserMapper mapper;
    @Override
    public UserDetails loadUserByUsername(String username) throws UsernameNotFoundException {
        //根据用户名查询用户的信息
        User user=mapper.loadUserByUsername(username);
        if(user==null){
            throw  new UsernameNotFoundException("用户不存在");
        }
        List<Auth> authList = mapper.findAuthByUsername(username);
        //赋予用户权限
        if(authList!=null&&authList.size()>0){
            List<SimpleGrantedAuthority> authorities = new ArrayList<>();
            for (Auth auth : authList) {
                authorities.add(new SimpleGrantedAuthority(auth.getAuth()));
            }
            user.setAuthorities(authorities);
        }
        //底层会根据数据库来查询用户信息,判断密码是否正确
        return user;
    }
}
第五步:这里使用了数据库验证,就可以对用户的登录信息进行细化,比如登录失败的原因。登录成功的处理和失败的处理配置修改如下:
登录成功处理
package com.example.springsecurity.handler;

import com.example.springsecurity.domain.User;
import com.fasterxml.jackson.databind.ObjectMapper;
import org.springframework.security.core.Authentication;
import org.springframework.security.web.authentication.AuthenticationSuccessHandler;
import org.springframework.stereotype.Component;

import javax.servlet.ServletException;
import javax.servlet.http.HttpServletRequest;
import javax.servlet.http.HttpServletResponse;
import java.io.IOException;
import java.io.PrintWriter;
import java.util.HashMap;
import java.util.Map;


/**
 * @Author: yushizhong
 * @Date: 2020/1/7 10:11
 * @Title: 登录成功处理
 */
@Component
public class MyAuthenticationSuccessHandler implements AuthenticationSuccessHandler {
    @Override
    public void onAuthenticationSuccess(HttpServletRequest req, HttpServletResponse resp, Authentication auth) throws IOException, ServletException {
        //这里可以进行页面的跳转或返回json数据给客户端浏览器
        User principal = (User) auth.getPrincipal();//获取登录用户的信息
        principal.setPassword(null);
        resp.setContentType("application/json;charset=utf-8");
        PrintWriter out=resp.getWriter();
        resp.setStatus(200);
        Map<String,Object> map=new HashMap<>();
        map.put("status",200);
        map.put("msg",principal);
        ObjectMapper objectMapper = new ObjectMapper();
        out.write(objectMapper.writeValueAsString(map));
        out.flush();;
        out.close();
//        resp.sendRedirect("/");
    }
}
登录失败处理
package com.example.springsecurity.handler;

import com.fasterxml.jackson.databind.ObjectMapper;
import org.springframework.security.authentication.*;
import org.springframework.security.core.AuthenticationException;
import org.springframework.security.web.authentication.AuthenticationFailureHandler;
import org.springframework.stereotype.Component;

import javax.servlet.ServletException;
import javax.servlet.http.HttpServletRequest;
import javax.servlet.http.HttpServletResponse;
import java.io.IOException;
import java.io.PrintWriter;
import java.util.HashMap;
import java.util.Map;


/**
 * @Author: yushizhong
 * @Date: 2020/1/7 10:10
 * @Title: 验证失败处理
 */
@Component
public class MyAuthenticationFailureHandler implements AuthenticationFailureHandler {
    @Override
    public void onAuthenticationFailure(HttpServletRequest req, HttpServletResponse resp, AuthenticationException e) throws IOException, ServletException {
        resp.setContentType("application/json;charset=utf-8");
        PrintWriter out=resp.getWriter();
        resp.setStatus(401);
        Map<String,Object> map=new HashMap<>();
        map.put("status",401);
        if(e instanceof LockedException){
            map.put("msg","账户被锁定,无法登录");
        }else if(e instanceof BadCredentialsException){
            map.put("msg","用户名或密码错误");
        }else if(e instanceof DisabledException){
            map.put("msg","账户被禁用,无法登录");
        }else if(e instanceof AccountExpiredException){
            map.put("msg","账户已过期,无法登录");
        }else if(e instanceof CredentialsExpiredException){
            map.put("msg","密码已过期,无法登录");
        }else{
            map.put("msg","登录异常,请联系管理员");
        }
        ObjectMapper objectMapper = new ObjectMapper();
        out.write(objectMapper.writeValueAsString(map));
        out.flush();;
        out.close();
//        resp.sendRedirect("/login.html");
    }
}
有了这些,不仅可以返回给用户具体的信息,也可以把这些信息记录到日志中。
第六步:由于这里对密码进行了加密,所有数据库中的密码也需要加密。启动项目进行测试,动态的配置和之前静态的配置的效果一样。
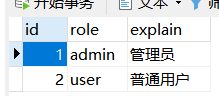
表数据如下,表结构可参考实体类:
*****************user表********************

*****************role表********************
*****************auth表********************
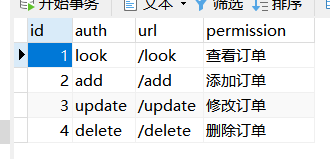
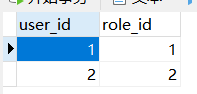
*****************user-role表********************
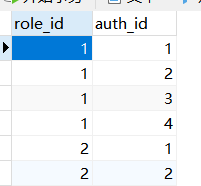
*****************role-auth表********************
6.获取表单额外的参数
首先,在7.5的基础上,往login.html中添加一个输入框,name是identity
<p>
         <input type="text"  name="identify"  placeholder="身份">
</p>
接着,创建类MyAuthenticationDetails来获取额外的参数
package com.example.springsecurity.filter;


import org.springframework.security.web.authentication.WebAuthenticationDetails;

import javax.servlet.http.HttpServletRequest;

/**
 * @Author: yushizhong
 * @Date: 2020/1/7 16:05
 * @Title: 在登录什获取表单的其他参数,存到session中,方便后面使用
 */
public class MyAuthenticationDetails extends WebAuthenticationDetails {
    private String identify;

    public MyAuthenticationDetails(HttpServletRequest request) {
        super(request);
        identify = request.getParameter("identify");
        request.getSession().setAttribute("identify", identify);
        System.out.println("identify:" + identify);
    }
}
然后,在SecurityConfig类的登录失败的操作后面添加一行
.authenticationDetailsSource(authenticationDetailsSource)
最后,启动项目,进行测试,输入的额外信息在控制台打印了,对于这个信息可以存入redis,在登录验证的时候使用。
7.自定义图片验证码验证
图片验证码的在页面显示需要调用生成图片验证码的工具类,验证码生成后会先存入redis,在此略,这里只介绍如何进行验证。
首先定义一个图片验证码验证的过滤器ImgCodeFilter
package com.example.springsecurity.filter;

import com.example.springsecurity.exception.ImgException;
import com.example.springsecurity.handler.MyAuthenticationFailureHandler;
import org.springframework.beans.factory.annotation.Autowired;
import org.springframework.stereotype.Component;
import org.springframework.web.filter.OncePerRequestFilter;

import javax.servlet.FilterChain;
import javax.servlet.ServletException;
import javax.servlet.http.HttpServletRequest;
import javax.servlet.http.HttpServletResponse;
import java.io.IOException;

/**
 * @Author: yushizhong
 * @Date: 2020/1/9 10:24
 * @Title: 数字验证过滤器,可用在图片验证码验证
 */
@Component
public class ImgCodeFilter extends OncePerRequestFilter {
    @Autowired
    MyAuthenticationFailureHandler authenticationFailureHandler;

    @Override
    protected void doFilterInternal(HttpServletRequest request, HttpServletResponse response, FilterChain filterChain) throws ServletException, IOException {
        //从请求中获取请求地址和方式进行判断是否是登录请求验证图片验证码
        if("/login".equals(request.getRequestURI())&&"post".equalsIgnoreCase(request.getMethod())){
            try{
                verityCode(request);
            }catch (ImgException e){
                authenticationFailureHandler.onAuthenticationFailure(request,response,e);
            }
        }
        doFilter(request,response,filterChain);
    }

    //验证图片验证码
    public void verityCode(HttpServletRequest request) throws ImgException {
        //图片验证码的在页面显示需要调用生成图片验证码的工具类,验证码生成后会先存入redis,在此略
        //这里的1234是自定义的,在实际开发中是从redis获取
        if(!"1234".equals(request.getParameter("code"))){
            throw new ImgException("验证码错误");
        }
    }
}
定义一个图片验证的异常类
package com.example.springsecurity.exception;

import org.springframework.security.core.AuthenticationException;

/**
 * @Author: yushizhong
 * @Date: 2020/1/9 10:59
 * @Title: 验证码异常类
 */
public class ImgException extends AuthenticationException {

    public ImgException(String explanation) {
        super(explanation);
    }
}
在SecurityConfig配置类中注入过滤器,并把过滤器加入security
*********注入图片验证的过滤器
@Autowired
    private ImgCodeFilter imgCodeFilter;

**********在configure(HttpSecurity http)方法中把过滤器加到security
 //验证用户名密码之前进行过滤验证
        http.addFilterBefore(imgCodeFilter, UsernamePasswordAuthenticationFilter.class);
修改登录失败处理类,添加一个异常的判断,异常判断的代码如下
if(e instanceof LockedException){
            map.put("msg","账户被锁定,无法登录");
        }else if(e instanceof BadCredentialsException){
            map.put("msg","用户名或密码错误");
        }else if(e instanceof DisabledException){
            map.put("msg","账户被禁用,无法登录");
        }else if(e instanceof AccountExpiredException){
            map.put("msg","账户已过期,无法登录");
        }else if(e instanceof CredentialsExpiredException){
            map.put("msg","密码已过期,无法登录");
        }else if(e instanceof ImgException){
            map.put("msg",e.getMessage());
        }else{
            map.put("msg","登录异常,请联系管理员");
        }
修改登录页面,表单中加入输入框,name是code
  <p>
        <input type="text" name="code"  placeholder="验证码">
    </p>
启动项目进行测试,当输入验证码不是1234时会显示验证码错误,验证码就验证成功了。在这里的过滤器中从请求中获取了请求的部分参数,对参数进行处理,这个方法可以借鉴,同上第六步。
8.短信登录开发
1)表单登录与短信登录的认证流程图比对

2)创建类SmsCodeAuthenticationToken,对应的是UsernamePasswordAuthenticationToken
package com.example.springsecurity.handler;

import org.springframework.security.authentication.AbstractAuthenticationToken;
import org.springframework.security.core.GrantedAuthority;

import java.util.Collection;

/**
 * @Author: yushizhong
 * @Date: 2020/1/9 14:38
 * @Title: 短信验证码token,对应UsernamePasswordAuthenticationToken
 */
public class SmsCodeAuthenticationToken extends AbstractAuthenticationToken {
    private static final long serialVersionUID = 500L;
    private final Object principal;

    public SmsCodeAuthenticationToken(Object mobile) {
        super((Collection)null);
        this.principal = mobile;
        this.setAuthenticated(false);
    }

    public SmsCodeAuthenticationToken(Object principal, Collection<? extends GrantedAuthority> authorities) {
        super(authorities);
        this.principal = principal;
        super.setAuthenticated(true);
    }

    public Object getCredentials() {
        return null;
    }

    public Object getPrincipal() {
        return this.principal;
    }

    public void setAuthenticated(boolean isAuthenticated) throws IllegalArgumentException {
        if (isAuthenticated) {
            throw new IllegalArgumentException("Cannot set this token to trusted - use constructor which takes a GrantedAuthority list instead");
        } else {
            super.setAuthenticated(false);
        }
    }

    public void eraseCredentials() {
        super.eraseCredentials();
    }

}
3)创建过滤器SmsCodeAuthenticationFilter,对应的是UsernamePasswordAuthenticationFilter
package com.example.springsecurity.filter;

import com.example.springsecurity.handler.SmsCodeAuthenticationToken;
import org.springframework.lang.Nullable;
import org.springframework.security.authentication.AuthenticationServiceException;
import org.springframework.security.core.Authentication;
import org.springframework.security.core.AuthenticationException;
import org.springframework.security.web.authentication.AbstractAuthenticationProcessingFilter;
import org.springframework.security.web.util.matcher.AntPathRequestMatcher;
import org.springframework.stereotype.Component;
import org.springframework.util.Assert;

import javax.servlet.http.HttpServletRequest;
import javax.servlet.http.HttpServletResponse;

/**
 * @Author: yushizhong
 * @Date: 2020/1/9 14:40
 * @Title: 短信验证码认证过滤器,对应UsernamePasswordAuthenticationFilter
 */
public class SmsCodeAuthenticationFilter extends AbstractAuthenticationProcessingFilter  {

    public static final String SPRING_SECURITY_FORM_MOBILE_KEY = "mobile";
    private String mobileParameter = "mobile";
    private boolean postOnly = true;

    public SmsCodeAuthenticationFilter() {
        super(new AntPathRequestMatcher("/mobile", "POST"));
    }

    public Authentication attemptAuthentication(HttpServletRequest request, HttpServletResponse response) throws AuthenticationException {
        if (this.postOnly && !request.getMethod().equals("POST")) {
            throw new AuthenticationServiceException("Authentication method not supported: " + request.getMethod());
        } else {
            String mobile = this.obtainMobile(request);
            if (mobile == null) {
                mobile = "";
            }
            mobile = mobile.trim();
            SmsCodeAuthenticationToken authRequest = new SmsCodeAuthenticationToken(mobile);
            this.setDetails(request, authRequest);
            return this.getAuthenticationManager().authenticate(authRequest);
        }
    }

    @Nullable
    protected String obtainMobile(HttpServletRequest request) {
        return request.getParameter(this.mobileParameter);
    }

    protected void setDetails(HttpServletRequest request, SmsCodeAuthenticationToken authRequest) {
        authRequest.setDetails(this.authenticationDetailsSource.buildDetails(request));
    }

    public void setMobileParameter(String mobileParameter) {
        Assert.hasText(mobileParameter, "Username parameter must not be empty or null");
        this.mobileParameter = mobileParameter;
    }

    public void setPostOnly(boolean postOnly) {
        this.postOnly = postOnly;
    }

    public final String getMobileParameter() {
        return this.mobileParameter;
    }


}
4)创建认证器SmsCodeAuthenticationProvider,对应的是DaoAuthenticationProvider
package com.example.springsecurity.handler;

import com.example.springsecurity.service.UserService;
import org.springframework.security.authentication.AuthenticationProvider;
import org.springframework.security.authentication.InternalAuthenticationServiceException;
import org.springframework.security.core.Authentication;
import org.springframework.security.core.AuthenticationException;
import org.springframework.security.core.userdetails.UserDetails;

/**
 * @Author: yushizhong
 * @Date: 2020/1/9 14:43
 * @Title: 短信验证码认证校验器,对应DaoAuthenticationProvider
 */
public class SmsCodeAuthenticationProvider implements AuthenticationProvider {


    private UserService userService;

    public UserService getUserService() {
        return userService;
    }

    public void setUserService(UserService userService) {
        this.userService = userService;
    }

    @Override
    public Authentication authenticate(Authentication authentication) throws AuthenticationException {
        SmsCodeAuthenticationToken smsCodeAuthenticationToken = (SmsCodeAuthenticationToken)authentication;
        UserDetails user = userService.loadUserByUsername((String)smsCodeAuthenticationToken.getPrincipal());
        if (user == null) {
            throw new InternalAuthenticationServiceException("无法获取用户信息");
        }
        //构造认证结果
        SmsCodeAuthenticationToken result = new SmsCodeAuthenticationToken(user, user.getAuthorities());
        result.setDetails(smsCodeAuthenticationToken.getDetails());
        return result;
    }

    @Override
    public boolean supports(Class<?> authentication) {
        return SmsCodeAuthenticationToken.class.isAssignableFrom(authentication);
    }


}
5)创建短信验证码过滤器SmsCodeFilter,用于验证短信验证码是否正确
package com.example.springsecurity.filter;

import com.example.springsecurity.exception.SmsCodeException;
import org.springframework.beans.factory.InitializingBean;
import org.springframework.beans.factory.annotation.Autowired;
import org.springframework.security.web.authentication.AuthenticationFailureHandler;
import org.springframework.stereotype.Component;
import org.springframework.util.AntPathMatcher;
import org.springframework.web.filter.OncePerRequestFilter;

import javax.servlet.FilterChain;
import javax.servlet.ServletException;
import javax.servlet.http.HttpServletRequest;
import javax.servlet.http.HttpServletResponse;
import java.io.IOException;
import java.util.HashSet;
import java.util.Set;

/**
 * @Author: yushizhong
 * @Date: 2020/1/9 15:00
 * @Title: 用于验证短信验证码是否正确
 */
@Component
public class SmsCodeFilter extends OncePerRequestFilter implements InitializingBean {

    @Autowired
    private AuthenticationFailureHandler authenticationFailureHandler;

    private Set<String> urls = new HashSet<>();

    private AntPathMatcher antPathMatcher = new AntPathMatcher();

    @Override
    public void afterPropertiesSet() throws ServletException {
        super.afterPropertiesSet();
        // 这里配置需要拦截的地址
        urls.add("/mobile");

    }

    @Override
    protected void doFilterInternal(HttpServletRequest httpServletRequest, HttpServletResponse httpServletResponse, FilterChain filterChain)
throws ServletException, IOException {
        boolean action = false;
        //判断请求地址
        for (String url : urls) {
            if (antPathMatcher.match(url, httpServletRequest.getRequestURI())) {
                action = true;
                break;
            }
        }
        if (action) {
            try {
                validate(httpServletRequest);
            } catch (SmsCodeException e) {
                authenticationFailureHandler.onAuthenticationFailure(httpServletRequest, httpServletResponse, e);
                return;
            }
        }
        filterChain.doFilter(httpServletRequest, httpServletResponse);
    }

    private void validate(HttpServletRequest request) {
       String code= (String) request.getSession().getAttribute("code");
        String smsCodeRequest = request.getParameter("smsCode");
        if (code == null) {
            throw new SmsCodeException("短信验证码不存在");
        }
        if(!smsCodeRequest.equalsIgnoreCase(code)) {
            throw new SmsCodeException("短信验证码错误");
        }
        //清除session
//        request.getSession().removeAttribute("code");
    }

}
6)创建配置类SmsCodeAuthenticationSecurityConfig,将短信验证码认证的各个组件组合起来
package com.example.springsecurity.config;

import com.example.springsecurity.filter.SmsCodeAuthenticationFilter;
import com.example.springsecurity.handler.MyAuthenticationFailureHandler;
import com.example.springsecurity.handler.MyAuthenticationSuccessHandler;
import com.example.springsecurity.handler.SmsCodeAuthenticationProvider;
import com.example.springsecurity.service.UserService;
import org.springframework.beans.factory.annotation.Autowired;
import org.springframework.security.authentication.AuthenticationManager;
import org.springframework.security.config.annotation.SecurityConfigurerAdapter;
import org.springframework.security.config.annotation.web.builders.HttpSecurity;
import org.springframework.security.core.userdetails.UserDetailsService;
import org.springframework.security.web.DefaultSecurityFilterChain;
import org.springframework.security.web.authentication.UsernamePasswordAuthenticationFilter;
import org.springframework.stereotype.Component;

/**
 * @Author: yushizhong
 * @Date: 2020/1/9 14:57
 * @Title: 短信验证码认证安全设置,重写configure方法
 */
@Component
public class SmsCodeAuthenticationSecurityConfig extends SecurityConfigurerAdapter<DefaultSecurityFilterChain, HttpSecurity> {
    @Autowired
    private MyAuthenticationFailureHandler myAuthenticationFailHandler;

    @Autowired
    private MyAuthenticationSuccessHandler myAuthenticationSuccessHandler;

    @Autowired
    private UserService userService;

    @Override
    public void configure(HttpSecurity http) throws Exception {

        SmsCodeAuthenticationFilter smsCodeAuthenticationFilter = new SmsCodeAuthenticationFilter();
        smsCodeAuthenticationFilter.setAuthenticationManager(http.getSharedObject(AuthenticationManager.class));
        smsCodeAuthenticationFilter.setAuthenticationSuccessHandler(myAuthenticationSuccessHandler);
        smsCodeAuthenticationFilter.setAuthenticationFailureHandler(myAuthenticationFailHandler);

        SmsCodeAuthenticationProvider smsCodeAuthenticationProvider = new SmsCodeAuthenticationProvider();
        smsCodeAuthenticationProvider.setUserService(userService);

        http.authenticationProvider(smsCodeAuthenticationProvider)
               .addFilterBefore(smsCodeAuthenticationFilter, UsernamePasswordAuthenticationFilter.class);
    }

}
7)创建配置类 SecurityConfig
package com.example.springsecurity.config;

import com.example.springsecurity.domain.Auth;
import com.example.springsecurity.filter.ImgCodeFilter;
import com.example.springsecurity.filter.SmsCodeFilter;
import com.example.springsecurity.handler.MyAuthenticationFailureHandler;
import com.example.springsecurity.handler.MyAuthenticationSuccessHandler;
import com.example.springsecurity.mapper.AuthMapper;
import com.example.springsecurity.service.UserService;
import org.springframework.beans.factory.annotation.Autowired;
import org.springframework.context.annotation.Bean;
import org.springframework.context.annotation.Configuration;
import org.springframework.security.config.annotation.authentication.builders.AuthenticationManagerBuilder;
import org.springframework.security.config.annotation.web.builders.HttpSecurity;
import org.springframework.security.config.annotation.web.configuration.WebSecurityConfigurerAdapter;
import org.springframework.security.config.annotation.web.configurers.ExpressionUrlAuthorizationConfigurer;
import org.springframework.security.core.Authentication;
import org.springframework.security.crypto.password.NoOpPasswordEncoder;
import org.springframework.security.crypto.password.PasswordEncoder;
import org.springframework.security.web.authentication.UsernamePasswordAuthenticationFilter;
import org.springframework.security.web.authentication.logout.LogoutHandler;
import org.springframework.security.web.authentication.logout.LogoutSuccessHandler;
import org.springframework.stereotype.Component;

import javax.servlet.ServletException;
import javax.servlet.http.HttpServletRequest;
import javax.servlet.http.HttpServletResponse;
import java.io.IOException;
import java.util.List;


@Configuration
public class SecurityConfig extends WebSecurityConfigurerAdapter {
    /**
     * 登录成功的处理
     */
    @Autowired
    private MyAuthenticationSuccessHandler successHandler;

    /**
     * 登录失败的处理
     */
    @Autowired
    private MyAuthenticationFailureHandler failureHandler;

    /**
     * 数据库验证用户信息
     */
    @Autowired
    private UserService userService;

    @Autowired
    private SmsCodeFilter smsCodeFilter;

    @Autowired
    private SmsCodeAuthenticationSecurityConfig codeAuthenticationSecurityConfig;

    //配置加密的方式
    @Bean
    PasswordEncoder passwordEncoder() {
        return NoOpPasswordEncoder.getInstance();
    }

    //配置认证用户信息和授权
    @Override
    protected void configure(AuthenticationManagerBuilder auth) throws Exception {
        auth.userDetailsService(userService);
    }

    //配置拦截请求资源
    @Override
    protected void configure(HttpSecurity http) throws Exception {
        http
                //开启HttpSecurity配置
                .authorizeRequests()
                //指定路径
                .antMatchers("/login.html").permitAll()
                .antMatchers("/sendCode").permitAll()
                .antMatchers("/mobile").permitAll()
                .antMatchers("/**").fullyAuthenticated()
                //配置认证模式
                .and().formLogin()
                .loginPage("/login.html")
                .loginProcessingUrl("/mobile")
                //登录成功的操作
                .successHandler(successHandler)
                //登录失败的操作
                .failureHandler(failureHandler)
                .and()
                .logout()
                .logoutUrl("/logout")
                //清除身份认证信息
                .clearAuthentication(true)
                //设置session失效
                .invalidateHttpSession(true)
                .addLogoutHandler(new LogoutHandler() {
                    @Override
                    public void logout(HttpServletRequest req, HttpServletResponse resp, Authentication auth) {
                    }
                })
                .logoutSuccessHandler(new LogoutSuccessHandler() {
                    @Override
                    public void onLogoutSuccess(HttpServletRequest req, HttpServletResponse resp, Authentication auth) throws IOException, ServletException {
                        //退出成功后跳转到登录
                        resp.sendRedirect("/login.html");
                    }
                })
                //配置和登录相关的接口不需要认证
                .permitAll()
                .and()
                //关闭cors
                .csrf()
                .disable();
                //加载自己的配置
        http.apply(codeAuthenticationSecurityConfig);
        http.addFilterBefore(smsCodeFilter, UsernamePasswordAuthenticationFilter.class);


    }
}
8)创建登录成功和失败的处理类、异常类
登录成功
package com.example.springsecurity.handler;

import com.example.springsecurity.domain.User;
import com.fasterxml.jackson.databind.ObjectMapper;
import org.springframework.security.core.Authentication;
import org.springframework.security.web.authentication.AuthenticationSuccessHandler;
import org.springframework.stereotype.Component;

import javax.servlet.ServletException;
import javax.servlet.http.HttpServletRequest;
import javax.servlet.http.HttpServletResponse;
import java.io.IOException;
import java.io.PrintWriter;
import java.util.HashMap;
import java.util.Map;


/**
 * @Author: yushizhong
 * @Date: 2020/1/7 10:11
 * @Title: 登录成功处理
 */
@Component
public class MyAuthenticationSuccessHandler implements AuthenticationSuccessHandler {
    @Override
    public void onAuthenticationSuccess(HttpServletRequest req, HttpServletResponse resp, Authentication auth) throws IOException, ServletException {
        //这里可以进行页面的跳转或返回json数据给客户端浏览器
        User principal = (User) auth.getPrincipal();//获取登录用户的信息
        principal.setPassword(null);
        resp.setContentType("application/json;charset=utf-8");
        PrintWriter out=resp.getWriter();
        resp.setStatus(200);
        Map<String,Object> map=new HashMap<>();
        map.put("status",200);
        map.put("msg",principal);
        ObjectMapper objectMapper = new ObjectMapper();
        out.write(objectMapper.writeValueAsString(map));
        out.flush();;
        out.close();
//        resp.sendRedirect("/");
    }
}
失败的处理
package com.example.springsecurity.handler;

import com.example.springsecurity.exception.ImgException;
import com.example.springsecurity.exception.SmsCodeException;
import com.fasterxml.jackson.databind.ObjectMapper;
import org.springframework.security.authentication.*;
import org.springframework.security.core.AuthenticationException;
import org.springframework.security.web.authentication.AuthenticationFailureHandler;
import org.springframework.stereotype.Component;

import javax.servlet.ServletException;
import javax.servlet.http.HttpServletRequest;
import javax.servlet.http.HttpServletResponse;
import java.io.IOException;
import java.io.PrintWriter;
import java.util.HashMap;
import java.util.Map;


/**
 * @Author: yushizhong
 * @Date: 2020/1/7 10:10
 * @Title: 验证失败处理
 */
@Component
public class MyAuthenticationFailureHandler implements AuthenticationFailureHandler {
    @Override
    public void onAuthenticationFailure(HttpServletRequest req, HttpServletResponse resp, AuthenticationException e) throws IOException, ServletException {
        resp.setContentType("application/json;charset=utf-8");
        PrintWriter out=resp.getWriter();
        resp.setStatus(401);
        Map<String,Object> map=new HashMap<>();
        map.put("status",401);
        if(e instanceof LockedException){
            map.put("msg","账户被锁定,无法登录");
        }else if(e instanceof BadCredentialsException){
            map.put("msg","用户名或密码错误");
        }else if(e instanceof DisabledException){
            map.put("msg","账户被禁用,无法登录");
        }else if(e instanceof AccountExpiredException){
            map.put("msg","账户已过期,无法登录");
        }else if(e instanceof CredentialsExpiredException){
            map.put("msg","密码已过期,无法登录");
        }else if(e instanceof SmsCodeException){
            map.put("msg",e.getMessage());
        }else{
            map.put("msg","登录异常,请联系管理员");
        }
        ObjectMapper objectMapper = new ObjectMapper();
        out.write(objectMapper.writeValueAsString(map));
        out.flush();;
        out.close();
//        resp.sendRedirect("/login.html");
    }
}
异常
package com.example.springsecurity.exception;

import org.springframework.security.core.AuthenticationException;
import org.springframework.stereotype.Component;

/**
 * @Author: yushizhong
 * @Date: 2020/1/9 15:03
 * @Title: 短信验证码异常类
 */
public class SmsCodeException  extends AuthenticationException {
    public SmsCodeException(String msg) {
        super(msg);
    }
}
9)创建登录页面login.html
<!DOCTYPE html>
<html lang="en">
<head>
    <meta charset="UTF-8">
    <title>登录</title>
</head>
<body>
<h3>手机号登录</h3>
<form method="post" action="/mobile">
    <p>
        <input type="text" name="mobile"  placeholder="手机号" value="15623637827">
    </p>
    <a href="/sendCode?mobile=15623637827">发送</a>
    <p>
        <input type="text" name="smsCode"  placeholder="短信验证码" >
    </p>
    <button  type="submit">登录</button>
</form>
</body>
</html>
10)创建短信发送的接口,这里的短信发送是模拟是,实际开发中改为短信发送即可。
package com.example.springsecurity.controller;

import com.example.springsecurity.util.CodeUtil;
import com.example.springsecurity.util.SendSms;
import org.springframework.stereotype.Controller;
import org.springframework.web.bind.annotation.RequestMapping;

import javax.servlet.http.HttpServletRequest;

@Controller
public class UserController {
    @RequestMapping("/sendCode")
    public void sendCode(HttpServletRequest request,String mobile){
        String code = CodeUtil.getCode(6);
        System.out.println("验证码:"+code);
//        SendSms.sendMsg(mobile,code);
       request.getSession().setAttribute("code",code);
    }


}
11)创建User类
package com.example.springsecurity.domain;


import lombok.Data;
import org.springframework.security.core.GrantedAuthority;
import org.springframework.security.core.authority.SimpleGrantedAuthority;
import org.springframework.security.core.userdetails.UserDetails;

import java.util.ArrayList;
import java.util.Collection;
import java.util.List;
@Data
public class User implements UserDetails {
    private Integer id;
    private String username;
    private String name;
    private String password;
    private boolean enabled;
    private boolean locked;
    private String role;
    private String mobile;

    private List<SimpleGrantedAuthority> authorities = new ArrayList<>();
    //获取用户的角色信息
    @Override
    public Collection<? extends GrantedAuthority> getAuthorities() {
        return authorities;
    }

    //获取用户的密码
    @Override
    public String getPassword() {
        return password;
    }

    //获取用户的用户名
    @Override
    public String getUsername() {
        return username;
    }

    //当前账户是否未过期
    @Override
    public boolean isAccountNonExpired() {
        return true;
    }

    //当前账户是否锁定
    @Override
    public boolean isAccountNonLocked() {
        return !locked;
    }

    //当前账户密码是否未过期
    @Override
    public boolean isCredentialsNonExpired() {
        return true;
    }

    //当前账户是否可用
    @Override
    public boolean isEnabled() {
        return enabled;
    }

}
12)创建UserService类,重写验证的方法loadUserByUsername。
package com.example.springsecurity.service;

import com.example.springsecurity.domain.Auth;
import com.example.springsecurity.domain.User;
import com.example.springsecurity.mapper.UserMapper;
import org.springframework.beans.factory.annotation.Autowired;
import org.springframework.security.core.authority.SimpleGrantedAuthority;
import org.springframework.security.core.userdetails.UserDetails;
import org.springframework.security.core.userdetails.UserDetailsService;
import org.springframework.security.core.userdetails.UsernameNotFoundException;
import org.springframework.stereotype.Service;

import java.util.ArrayList;
import java.util.List;


@Service
public class UserService implements UserDetailsService {
    @Autowired
    private UserMapper mapper;

    @Override
    public UserDetails loadUserByUsername(String mobile) throws UsernameNotFoundException {
        User user=mapper.loadUserByMobile(mobile);
        if(user==null){
            throw  new UsernameNotFoundException("用户不存在");
        }
        return user;
    }


}
Usermapper
package com.example.springsecurity.mapper;

import com.example.springsecurity.domain.Auth;
import com.example.springsecurity.domain.User;
import org.apache.ibatis.annotations.Mapper;

import java.util.List;

@Mapper
public interface UserMapper {
    User loadUserByMobile(String mobile);
}
UserMapper.xml
<?xml version="1.0" encoding="UTF-8" ?>
<!DOCTYPE mapper PUBLIC "-//mybatis.org//DTD Mapper 3.0//EN"
        "http://mybatis.org/dtd/mybatis-3-mapper.dtd">
<mapper namespace="com.example.springsecurity.mapper.UserMapper">

    <select id="loadUserByMobile" resultType="com.example.springsecurity.domain.User">
         select * from user where mobile=#{mobile}
    </select>

</mapper>
数据库中的表和数据参考User类填写即可。启动项目,点击发送按钮,在控制台复制验证码,进行登录测试。