之前我们介绍过keil的安装,但是并没有使用keil去调试程序,主要原因是因为我们编写的makefile文件无法在keil中使用。而且,我们编写的start.S在keil中也会报个各种错误。但是作为一个程序员,调试程序是并不可少的。这节将带领大家学习如何在Linux上使用jlink调试Mini2440开发板。
Mini2440调试方案有多种:
- 硬件使用jlink,在ubuntu下使用JLINKGDBserver和arm-linux-gdb (我们使用这种);
- 硬件使用openJTAG, 在ubuntu下使用openOCD和arm-linux-gdb;
- 硬件使用jlink,在ubuntu下使用openOCD和arm-linux-gdb;
其实这三种整体调试流程都差不多,有兴趣可以自行研究。
针对第二种调试方案,可以查看这边文章Eclipse,OpenOCD,OpenJTAGv3.1嵌入式开发教程。下载地址:https://files.cnblogs.com/files/zyly/Eclipse,OpenOCD,OpenJTAGv3.1%E5%B5%8C%E5%85%A5%E5%BC%8F%E5%BC%80%E5%8F%91%E6%95%99%E7%A8%8B%E7%89%88%E6%9C%AC5.rar。
我们本文以第一种为例,在安装eclipse之前,需要先安装arm-linux-gcc、arm-linux-gbd、jlink,具体参考博客嵌入式Linux开发环境搭建。
一、安装Eclipse IDE
1.1 安装jdk
JDK的安装我就不介绍了,相信大家都很熟了。
下载地址http://www.java.com/en/download/linux_manual.jsp?locale=en,下载版本jdk-7u4-linux-x64.tar.gz。
Orcale登录账号:2696671285@qq.com 登录密码:Oracle123。
解压:
mv /work/sambashare/jdk-7u4-linux-x64.tar.gz /opt/tools
cd /opt/tools
tar -zvxf jdk-7u4-linux-x64.tar.gz  -C /usr/java
配置/ /etc/profile:
export JAVA_HOME=/usr/java/jdk1.7.0_04
export PATH=$JAVA_HOME/bin:$JAVA_HOME/jre/bin:$PATH
export CLASSPATH=$CLASSPATH:.:$JAVA_HOME/lib:$JAVA_HOME/jre/lib
执行source /etc/profile ,使立即生效即可

1.2 安装eclipse
到官网下载eclipse,注意需要下载下面这个版本http://archive.eclipse.org/technology/epp/downloads/release/indigo/SR2/eclipse-linuxtools-indigo-SR2-incubation-linux-gtk-x86_64.tar.gz,如果谷歌浏览器下载不了,尝试IE浏览器。


解压就好了:
mv /work/sambashare/eclipse-linuxtools-indigo-SR2-incubation-linux-gtk-x86_64.tar.gz  /opt/tools
cd /opt/tools
tar -zvxf eclipse-linuxtools-indigo-SR2-incubation-linux-gtk-x86_64.tar.gz -C /usr/local

创建软连接:
mkdir jre
cd jre
ln -s /usr/java/jdk1.7.0_04/jre/bin bin
1.3 运行eclipse
登录ubuntu,通过可视化页面通过终端以管理员身份运行:
cd /usr/local/eclipse
sudo ./eclipse
设置工作目录为/work/sambashare/project/eclipse_workspace。
1.4 eclipse安装C/C++ Embedded CDT
打开eclipse,Help -> Install New Software

点击Add输入http://opensource.zylin.com/zylincdt:

一直Next直至安装完成。
二、使用Eclipse调试
2.1 配置编译器
新建一个项目,file -> new ->C/C++ project ,这里项目名称我叫led:

然后一直Next直至安装完成。如果led目录下已经有源文件,则这些文件会 被自动加入工程中。
右键项目led -> properties -> C/C++ Build -> Settings -> Tool Setting将下面三处gcc、as改为arm-linux-gcc、arm-linux-as:
2.2 添加项目代码
如果想导入已经存在的文件,选择菜单项File -> Import…,然后选择File System作为文件来源。
这里我们新建的项目代码文件:
start.S

/*  初始化系统时钟 FCLK = 400MHz,HCLK = 100MHz, PCLK = 50MHz, UPLL=48MHz  */
.EQU     LOCKTIME,     0x4c000000
.EQU     MPLLCON,      0x4c000004
.EQU     UPLLCON,      0x4c000008
.EQU     CLKDIVN,      0x4c000014
.EQU     M_MDIV,       92       /* @Fin=12M  UPLL=400M  */
.EQU     M_PDIV,       1
.EQU     M_SDIV,       1
.EQU     U_MDIV,       56        /* @Fin=12M  UPLL=48M  */
.EQU     U_PDIV,       2
.EQU     U_SDIV,       2
.EQU     DIVN_UPLL,    0         /* FCLK:HCLK:PCLK=1:4:8 */
.EQU      HDIVN,        2
.EQU     PDIVN,        1
.EQU     CLKDIVN_VAL, ((DIVN_UPLL<<3) | HDIVN <<1 | PDIVN)
.EQU     UPLLCON_VAL, ((U_MDIV<<12) | (U_PDIV<<4) | U_SDIV)
.EQU     MPLLCON_VAL, ((M_MDIV << 12) | (M_PDIV << 4) | M_SDIV)

/* 关闭开门狗(关闭门狗中断,以及看门狗计数器,禁止复位信号输出)    */
.EQU   WTCON,    0x53000000    /* 看门狗控制寄存器地址 #define等价于标准汇编里的EQU 用来定义常量 */

.text
.global _start
_start:
    /*  关闭看门狗 */
    bl  disable_watchdog

    /*  设置系统时钟 */
    bl system_clock_init

    /* 初始化栈 */
    bl stack_init

    /* 跳到main函数执行 */
    bl main

loop:
    b loop

disable_watchdog:
        ldr  r0,=WTCON             /*  伪指令加载WTCON值到r0  */
        mov  r1,#0x00
        str  r1,[r0]               /*  把[WTCON]内存单元清零  */
        mov  pc,lr

system_clock_init:
    /* 设置Lock Time  */
    ldr r0,=LOCKTIME
    ldr r1,=0xffffffff
    str r1,[r0]

    /* 设置分频系数 */
    ldr r0,=CLKDIVN
    ldr r1,=CLKDIVN_VAL
    str r1,[r0]


    /* 设置UPLL */
    ldr r0,=UPLLCON
    ldr r1,=UPLLCON_VAL
    str r1, [r0]

    nop
    nop
    nop
    nop
    nop
    nop
    nop

    /* 设置MPLL */
    ldr r0,=MPLLCON
    ldr r1,=MPLLCON_VAL
    str r1,[r0]

        /* CPU改为异步总线模式 */
    mrc p15,0,r1,c1,c0,0
    orr r1,r1,#0xC0000000
    mcr p15,0,r1,c1,c0,0

    mov pc,lr

/* 设置栈 自动分辨是nor flash 启动还是nand flash启动 */
/* 先将一个数写道0地址,然后读出来判断跟写入的值是否一样;跟写入的一样则是nand flash启动,跟写入的值不一样则是nor flash 启动 */
stack_init:
    mov r1, #0
    ldr r0, [r1]                /* 读出原来的值备份 */
    str r1, [r1]                /* 0->[0] */
    ldr r2, [r1]                /* r2=[0] */
    cmp r1, r2                  /* r1==r2? 如果相等表示是NAND启动 */
    ldr sp, =0x40000000+0x1000         /* 先假设是nor启动 */
    moveq sp, #0x1000              /* nand启动, 将栈设置在4k处 */
    streq r0, [r1]              /* 恢复原来的值 */
    mov pc,lr
main.c

/*GPIO registers*/
#define GPBCON              (*(volatile unsigned long *)0x56000010)
#define GPBDAT              (*(volatile unsigned long *)0x56000014)


void delay(int tim){
    while(tim--);
}

int main(){
    /* 清零 */
    GPBCON &= ~(0x03 << 10);
    /* 设置为output */
    GPBCON |= (0x01 << 10);

    while(1){
        /* 将 GPB5 输出低电平 */
        GPBDAT &= ~(1<<5);
        delay(0x100000);
        /* 将 GPB5 输出高电平 */
        GPBDAT |= (1<<5);
        delay(0x100000);
    }
    return 0;
}
Makefile

all:start.o main.o
    # 链接
    arm-linux-ld -Ttext 0x00000000  -o main.elf $^
    # 转为bin  -S 不从源文件中复制重定位信息和符号信息到目标文件中
    arm-linux-objcopy -O binary -S main.elf main.bin
    # 反汇编 -D反汇编所有段
    arm-linux-objdump -D main.elf > main.dis

%.o : %.S
    arm-linux-gcc -g -c $^

%.o : %.c
    arm-linux-gcc -g -c $^

.PHONY: clean
clean:
    rm *.o *.elf *.bin *.dis
需要注意代码链接地址是0x30000000,0x30000000~0x34000000为SDRAM的内存地址。调试的时候GDB初始化脚本加入初始化SDRAM控制器的话,这样就可以将代码下载到到SDRAM起始地址0x30000000上调试运行了。
当采用NOR FLASH启动时,0x40000000~0x40001000为片内SRAM 4KB的地址空间。
当采用NANDFLASH启动时,0x00000000~0x00001000为片内SRAM 4KB的地址空间。
调试时,如果代码小于4KB,我们可以将代码下载到片内SRAM中运行。如果大于4KB,我们可以先初始化SDRAM,然后将代码下载到SDRAM中运行。
2.3 配置调试器
在终端编译make命令生成main.elf。

选择Eclipse菜单栏上的小蜘蛛 ->Debug configurations:

需要注意这里一定要选择elf文件。

针对Mini2440开发板的初始化代码填入下面的Commands中,由GDB命令脚本组成,用于Mini2440初始化:包括运行模式、关门狗、MMU、系统时钟、SDRAM等配置:
# connect to the J-Link gdb server
target remote localhost:2331
# Set JTAG speed to 30 kHz
monitor endian little
monitor speed 30
# Reset the target
monitor reset
monitor sleep 10
#
# CPU core initialization (to be done by user)
#
# Set the processor mode
monitor reg cpsr = 0xd3
#config MMU 配置MMU
#flush v3/v4 cache
monitor cp15 7, 7, 0, 0 = 0x0
#/* flush v4 TLB  协处理器*/
monitor cp15 8, 7, 0, 0 = 0x0
#disable MMU stuff and caches
monitor cp15 1, 0, 0, 0 =0x1002
#Peri port setup
monitor cp15 15, 2, 0, 4 = 0x70000013
#disable watchdog kangear 关闭看门狗
monitor MemU32 0x53000000  =  0x00000000
monitor sleep 10
#disable interrupt kangear 关闭中断
monitor MemU32 0x4A000008  =  0xffffffff
monitor MemU32 0x4A00001C  =  0x7fff

#set clock

#initialize system clocks --- locktime register
monitor MemU32 0x4C000000 = 0xFF000000

#initialize system clocks --- clock-divn register
monitor MemU32 0x4C000014 = 0x5            #CLKDVIN_400_148

#initialize system clocks --- mpll register
monitor MemU32 0x4C000004 = 0x7f021    #default clock


#config sdram
monitor MemU32 0x53000000 0x00000000
monitor MemU32 0x4A000008 0xFFFFFFFF
monitor MemU32 0x4A00001C 0x000007FF
monitor MemU32 0x53000000 0x00000000
monitor MemU32 0x56000050 0x000055AA
monitor MemU32 0x4C000014 0x00000007
monitor MemU32 0x4C000000 0x00FFFFFF
monitor MemU32 0x4C000004 0x00061012
monitor MemU32 0x4C000008 0x00040042
monitor MemU32 0x48000000 0x22111120
monitor MemU32 0x48000004 0x00002F50
monitor MemU32 0x48000008 0x00000700
monitor MemU32 0x4800000C 0x00000700
monitor MemU32 0x48000010 0x00000700
monitor MemU32 0x48000014 0x00000700
monitor MemU32 0x48000018 0x0007FFFC
monitor MemU32 0x4800001C 0x00018005
monitor MemU32 0x48000020 0x00018005
monitor MemU32 0x48000024 0x008E0459
monitor MemU32 0x48000028 0x00000032
monitor MemU32 0x4800002C 0x00000030
monitor MemU32 0x48000030 0x00000030

# Setup GDB for faster downloads
#set remote memory-write-packet-size 1024
monitor speed auto
break _start
load
执行load命令,它会根据led.elf里面的信息将可执行代码加载到地址为0x30000000的内存处。
2.4 eclipse使用Makefile编译
右击项目Make Targets->Create->名称填上Makefile中的target:

再次执行Make targets->Build进行编译。
2.5 启动JLinkGDBServer
调试前需要进行以下准备工作:
PC级串口通过Jlink连接到Mini2440开发板,并且Mini2440调到NOR FLASH启动;

要先运行 ./JLinkGDBServer,就是要先运行jlink服务;
cd /usr/local/JLink_Linux_V434a/
./JLinkGDBServer

如果我们不想每次都通过命令行启动JLinkGDBServer,我们可以配置Eclipse的外部工具,点击图标 ,选择External Tools Configurations:


然后点击Run即可运行。
2.6 Mini2440开发板联调
点击Project -> Build All,编译效果和在命令行运行make all命令一样。注意:取消掉Project里面的自动编译Build Automatically。

然后eclipse对项目进行调试,这里以led代码为例:

调试器启动后,eclipse 会启动arm-linux-gdb,并执行Commands中命令进行Mini2440初始化,并将代码下载到开发板上,JLinkGDBServer和arm-linux-gdb控制台会输出调试信息如下,分别如下:
SEGGER J-Link GDB Server V4.34a

JLinkARM.dll V4.34a (DLL compiled Aug 31 2011 11:51:40)

Listening on TCP/IP port 2331

J-Link connected
Firmware: J-Link ARM V8 compiled Nov 28 2014 13:44:46
Hardware: V8.00
Feature(s): RDI,FlashDL,FlashBP,JFlash,GDB

J-Link found 1 JTAG device, Total IRLen = 4
JTAG ID: 0x0032409D (ARM9)

Connected to 127.0.0.1
Reading all registers
Read 4 bytes @ address 0x00000000 (Data = 0xEA000014)
Read 4 bytes @ address 0xFFFFFFFC (Data = 0x00000000)
Read 4 bytes @ address 0x00000000 (Data = 0xEA000014)
Read 4 bytes @ address 0xFFFFFFFC (Data = 0x00000000)
Read 4 bytes @ address 0x00000000 (Data = 0xEA000014)
Read 4 bytes @ address 0xFFFFFFFC (Data = 0x00000000)
Read 4 bytes @ address 0x00000000 (Data = 0xEA000014)
Read 4 bytes @ address 0xFFFFFFFC (Data = 0x00000000)
Read 4 bytes @ address 0x00000000 (Data = 0xEA000014)
Read 4 bytes @ address 0x00000000 (Data = 0xEA000014)
Read 4 bytes @ address 0x00000000 (Data = 0xEA000014)
Target endianess set to "little endian"
JTAG speed set to 30 kHz
Resetting target
Sleep 10ms
Writing register (CPSR = 0x000000D3)
Writing CP15 register (7,7,0,0 = 0x00000000)
Writing CP15 register (8,7,0,0 = 0x00000000)
Writing CP15 register (1,0,0,0 = 0x00001002)
Writing CP15 register (15,2,0,4 = 0x70000013)
Writing 0x00000000 @ address 0x53000000
Sleep 10ms
Writing 0xFFFFFFFF @ address 0x4A000008
Writing 0x00007FFF @ address 0x4A00001C
Writing 0xFF000000 @ address 0x4C000000
Writing 0x00000005 @ address 0x4C000014
Writing 0x0007F021 @ address 0x4C000004
Writing 0x00000000 @ address 0x53000000
Writing 0xFFFFFFFF @ address 0x4A000008
Writing 0x000007FF @ address 0x4A00001C
Writing 0x00000000 @ address 0x53000000
Writing 0x000055AA @ address 0x56000050
Writing 0x00000007 @ address 0x4C000014
Writing 0x00FFFFFF @ address 0x4C000000
Writing 0x00061012 @ address 0x4C000004
Writing 0x00040042 @ address 0x4C000008
Writing 0x22111120 @ address 0x48000000
Writing 0x00002F50 @ address 0x48000004
Writing 0x00000700 @ address 0x48000008
Writing 0x00000700 @ address 0x4800000C
Writing 0x00000700 @ address 0x48000010
Writing 0x00000700 @ address 0x48000014
Writing 0x0007FFFC @ address 0x48000018
Writing 0x00018005 @ address 0x4800001C
Writing 0x00018005 @ address 0x48000020
Writing 0x008E0459 @ address 0x48000024
Writing 0x00000032 @ address 0x48000028
Writing 0x00000030 @ address 0x4800002C
Writing 0x00000030 @ address 0x48000030
Select auto JTAG speed (8000 kHz)
Read 4 bytes @ address 0x00000000 (Data = 0xEA000014)
Read 4 bytes @ address 0x30000004 (Data = 0xA00A0425)
Read 4 bytes @ address 0x30000004 (Data = 0xA00A0425)
Downloading 396 bytes @ address 0x30000000
Writing register (PC = 0x30000000)
Remote debugging using localhost:2331
target remote localhost:2331
0x00000000 in ?? ()
Target endianess set to "little endian"
monitor endian little
monitor speed 30
JTAG speed set to 30 kHz
monitor reset
Resetting target
monitor sleep 10
Sleep 10ms
monitor reg cpsr = 0xd3
Writing register (CPSR = 0x000000D3)
monitor cp15 7, 7, 0, 0 = 0x0
Writing CP15 register (7,7,0,0 = 0x00000000)
monitor cp15 8, 7, 0, 0 = 0x0
Writing CP15 register (8,7,0,0 = 0x00000000)
monitor cp15 1, 0, 0, 0 =0x1002
Writing CP15 register (1,0,0,0 = 0x00001002)
monitor cp15 15, 2, 0, 4 = 0x70000013
Writing CP15 register (15,2,0,4 = 0x70000013)
monitor MemU32 0x53000000  =  0x00000000
Writing 0x00000000 @ address 0x53000000
monitor sleep 10
Sleep 10ms
monitor MemU32 0x4A000008  =  0xffffffff
Writing 0xFFFFFFFF @ address 0x4A000008
monitor MemU32 0x4A00001C  =  0x7fff
Writing 0x00007FFF @ address 0x4A00001C


monitor MemU32 0x4C000000 = 0xFF000000
Writing 0xFF000000 @ address 0x4C000000

monitor MemU32 0x4C000014 = 0x5            #CLKDVIN_400_148
Writing 0x00000005 @ address 0x4C000014

monitor MemU32 0x4C000004 = 0x7f021    #default clock
Writing 0x0007F021 @ address 0x4C000004


monitor MemU32 0x53000000 0x00000000
Writing 0x00000000 @ address 0x53000000
monitor MemU32 0x4A000008 0xFFFFFFFF
Writing 0xFFFFFFFF @ address 0x4A000008
monitor MemU32 0x4A00001C 0x000007FF
Writing 0x000007FF @ address 0x4A00001C
monitor MemU32 0x53000000 0x00000000
Writing 0x00000000 @ address 0x53000000
monitor MemU32 0x56000050 0x000055AA
Writing 0x000055AA @ address 0x56000050
monitor MemU32 0x4C000014 0x00000007
Writing 0x00000007 @ address 0x4C000014
monitor MemU32 0x4C000000 0x00FFFFFF
Writing 0x00FFFFFF @ address 0x4C000000
monitor MemU32 0x4C000004 0x00061012
Writing 0x00061012 @ address 0x4C000004
monitor MemU32 0x4C000008 0x00040042
Writing 0x00040042 @ address 0x4C000008
monitor MemU32 0x48000000 0x22111120
Writing 0x22111120 @ address 0x48000000
monitor MemU32 0x48000004 0x00002F50
Writing 0x00002F50 @ address 0x48000004
monitor MemU32 0x48000008 0x00000700
Writing 0x00000700 @ address 0x48000008
monitor MemU32 0x4800000C 0x00000700
Writing 0x00000700 @ address 0x4800000C
monitor MemU32 0x48000010 0x00000700
Writing 0x00000700 @ address 0x48000010
monitor MemU32 0x48000014 0x00000700
Writing 0x00000700 @ address 0x48000014
monitor MemU32 0x48000018 0x0007FFFC
Writing 0x0007FFFC @ address 0x48000018
monitor MemU32 0x4800001C 0x00018005
Writing 0x00018005 @ address 0x4800001C
monitor MemU32 0x48000020 0x00018005
Writing 0x00018005 @ address 0x48000020
monitor MemU32 0x48000024 0x008E0459
Writing 0x008E0459 @ address 0x48000024
monitor MemU32 0x48000028 0x00000032
Writing 0x00000032 @ address 0x48000028
monitor MemU32 0x4800002C 0x00000030
Writing 0x00000030 @ address 0x4800002C
monitor MemU32 0x48000030 0x00000030
Writing 0x00000030 @ address 0x48000030

monitor speed auto
Select auto JTAG speed (8000 kHz)
break _start
Breakpoint 1 at 0x30000004: file start.S, line 29.
Loading section .text, size 0x18c lma 0x30000000
load
Start address 0x30000000, load size 396
Transfer rate: 77 KB/sec, 396 bytes/write.
初始化SDRAM之后,可以看到代码是下载到0x30000000处,也就是我们的链接地址,然后PC赋值为0x30000000,即运行我们编写的代码。
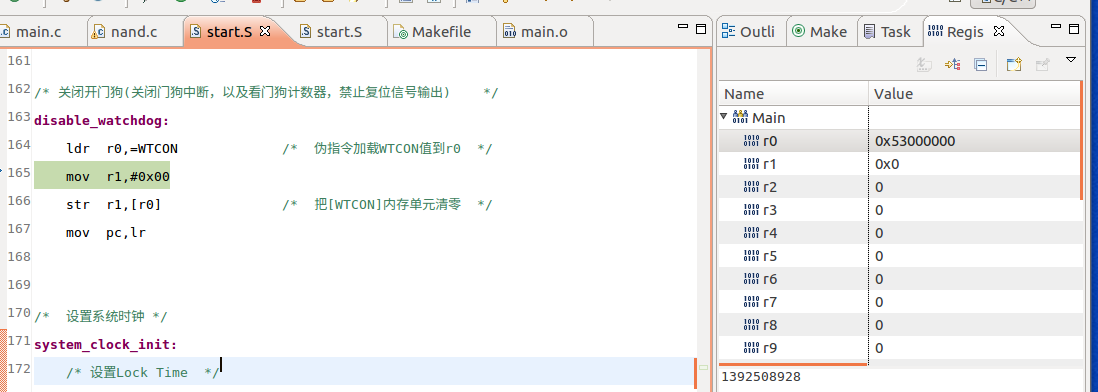
此时,我们就可以使用Eclipse继续调试代码了,点击【F5】是"Step Into" ,【F6】是"Step Over"。

如果想查看内存和寄存器信息,点击window -> Show View:


2.7 arm-linux-gdb调试
在./JLinkGDBServer启动后,如果不想通过可视化界面eclipse调试程序,而想使用arm-linux-gdb进行调试,可以参考Eclipse,OpenOCD,OpenJTAGv3.1嵌入式开发教程p91。

三、导入存在的项目
3.1 导入项目
新建工程,选择新建一个已存在源文件的工程File -> New Project -> Makefile project with Existing Code

注意:这里的源文件目录必须是在工作目录下的另外一个目录,比如工作目录是"/work/sambashare/project/eclipse_workspace",那么Existing Code Location的目录为不能和工作目录相同,必须是别的目录,或者是工作目录下的一个子目录,比如"/work/sambashare/project/eclipse_workspace/led/"或者是"//work/sambashare/project/4.uart/"

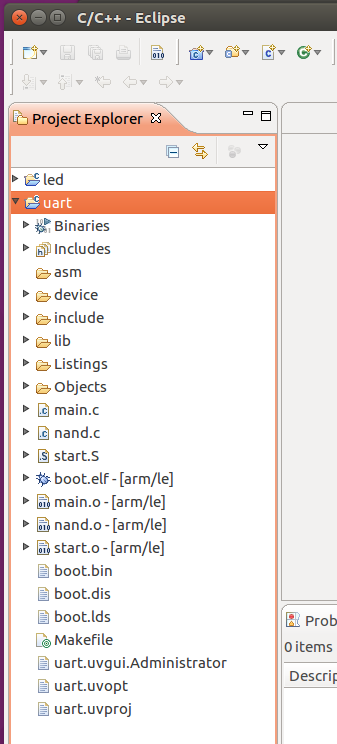
最后项目窗口如下:

linux上文件结构如下:

3.2 中文乱码
如果项目中文乱码。右键项目 -> Properties -> Resource -> Text file encoding,输入GBK:

3.3 led代码下载
参考文章:
[4]基于Deepin 搭建嵌入式开发环境 eclipse+arm-linux-gcc-4.3.2
[5]ubuntu上 eclipse+arm-linux-gcc+jlink+s3c2440a开发环境搭建
[6]arm+linux裸机环境搭建之jlink+eclipse+arm-linux-gdb在线裸调(完结篇)
[7]【转载】eclipse调试arm裸机程序(推荐)
